


一,关于证书的安装:
1. 如果已有通用证书,则直接导入即可,步骤是:IIS根目录->Server Certificates->Import
2. 如果要申请创建新的通用证书,可以网上搜索申请步骤,这里不讨论。
3. 如果是本地环境,则可以创建自签名证书,方法很简单:IIS根目录->Server Certificates->Create Self-Signed Certificate。
二,应用证书开启https连接
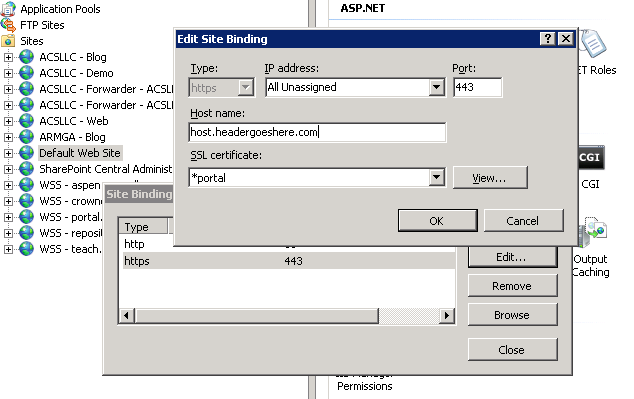
在需要开启https连接的站点里进入Bindings选项设置即可,如果一台Server有多个站点需要https的话,必须要绑定Host Name,否则会有端口冲突。但这里有个问题就是,如果你用的是自签名证书的话,在Bindings里设置https选项时,发现Host Name一项是冻结的,怎么办呢?这里有个简单的方法:
摘自:http://blog.armgasys.com/?p=80
Instructions
- Open Internet Information Services (IIS) Manager
- Edit the Site Bindings for the website you which to assign an SSL certificate to
(right click, select Edit Bindings - Select the HTTPS port and select Edit
- Note that the Host Name (Host Header) field is unavailable for editing

- Launch the Microsoft Management Console (MMC)
- Select Start –> Run
- Type in “MMC” and hit enter
- From the console, select File –> Add / Remove Snap-in
- Select Certificates from the Add / Remove dialog
- Select Computer Account when prompt for which certificates the snap-in will manager.
- Select Local Computer when prompted
- Click OK to add the Snap-in to the MMC
- Locate your SSL certificate
- For self-signed (SELFSSL), look in Personal
- For installed / purchased, look in the appropriate folder the certificate was originally installed in
- Right click on the certificate and select properties
- Edit the Friendly Name field so the name starts with an *

- Repeat steps #1 – 3 above
Note that the Host Name (Host Header) field is now available for editing


有关MMC的更多知识,参考:http://baike.baidu.com/view/115504.htm


 761
761

 被折叠的 条评论
为什么被折叠?
被折叠的 条评论
为什么被折叠?
 到【灌水乐园】发言


