原文网址:http://blog.csdn.net/m_changgong/article/details/8115137 作者:张燕广
1、创建一个Single View Application工程,命名为:TableViewDemo,如下图

2、修改ViewController.xib,添加一个Table View控件,连接操作,如下

3、视图控制器ViewController,需要实现协议UITableViewDataSource、UITableViewDelegate中的必须实现的方法,
在工程目录依次展开Frameworks->UIKit.framework->Headers,然后打开UITableView.h,搜索找到协议UITableViewDataSource、UITableViewDelegate的定义,如下

4、修改ViewController.h,如下
<span style="font-family:Microsoft YaHei;font-size:18px;">//
//  ViewController.h
//  TableViewDemo
//
//  Created by Zhang Yanguang on 12-10-25.
//  Copyright (c) 2012年 MyCompanyName. All rights reserved.
//

#import <UIKit/UIKit.h>

@interface ViewController : UIViewController

@property(nonatomic,retain)NSMutableArray *apps;

@end
</span>
5、修改ViewController.m,如下
<span style="font-family:Microsoft YaHei;font-size:18px;">//
//  ViewController.m
//  TableViewDemo
//
//  Created by Zhang Yanguang on 12-10-25.
//  Copyright (c) 2012年 MyCompanyName. All rights reserved.
//

#import "ViewController.h"

@interface ViewController ()

@end

@implementation ViewController
@synthesize apps;

- (void)viewDidLoad
{
    [super viewDidLoad];
    // Do any additional setup after loading the view, typically from a nib.
    //加载数据
    [self loadData];
}

//模拟加载数据
-(void)loadData{
    apps = [[NSMutableArray alloc]init];
    for(int i=0;i<8;i++){
        [apps insertObject:[NSString stringWithFormat:@"App-%d",(i+1)] atIndex:i];
    }
}

- (void)viewDidUnload
{
    [super viewDidUnload];
    apps = nil;
    // Release any retained subviews of the main view.
}

-(void)dealloc{
    [super dealloc];
    [apps release];
}

- (BOOL)shouldAutorotateToInterfaceOrientation:(UIInterfaceOrientation)interfaceOrientation
{
    return (interfaceOrientation != UIInterfaceOrientationPortraitUpsideDown);
}

#pragma mark table view datasource methods
//可选实现的方法,默认为1
- (NSInteger)numberOfSectionsInTableView:(UITableView *)tableView;{
    return 1;
}

//必须实现的方法
- (NSInteger)tableView:(UITableView *)tableView numberOfRowsInSection:(NSInteger)section{
    return [apps count];
}

//必须实现的方法
- (UITableViewCell *)tableView:(UITableView *)tableView cellForRowAtIndexPath:(NSIndexPath *)indexPath{
    //
    NSString *myTableViewCellIdentifier = @"myTableViewCellIdentifier";
    UITableViewCell *cell = [[UITableView alloc]dequeueReusableCellWithIdentifier:myTableViewCellIdentifier];//备注1
    if(cell==nil){
        cell = [[UITableViewCell alloc]initWithStyle:UITableViewCellStyleDefault reuseIdentifier:myTableViewCellIdentifier]; //备注2
    }
    NSString *imageName = [NSString stringWithFormat:@"%d",[indexPath row]+1];
    //cell.image = [UIImage imageNamed:imageName]; //这种用法已经废弃
    cell.imageView.image = [UIImage imageNamed:imageName];
    cell.textLabel.text = [apps objectAtIndex:[indexPath row]];
    cell.textLabel.textAlignment = UITextAlignmentLeft;
    cell.textLabel.font = [cell.textLabel.font fontWithSize:30];

    tableView.separatorColor = [UIColor clearColor];  //将分割线去掉
    cell.accessoryType = UITableViewCellAccessoryDisclosureIndicator;   //显示内容后面的箭头
    return cell;
}

//可选实现的方法
- (NSString *)tableView:(UITableView *)tableView titleForHeaderInSection:(NSInteger)section{
    return @"Header";
}

//可选实现的方法
- (NSString *)tableView:(UITableView *)tableView titleForFooterInSection:(NSInteger)section{
    return @"Footer";
}

#pragma mark table view data delegate methods
- (CGFloat)tableView:(UITableView *)tableView heightForRowAtIndexPath:(NSIndexPath *)indexPath{
    return 50;
}
@end</span>
备注1、备注2,代码解释:
1)表中的每一行都拥有一个子视图,即一个UITableViewCell类的实例
2)对于一个拥有大量数据的表,如果UITableView为表中的每一行都分配一个UITableViewCell的实例,而不管该行是否正在显示,这无疑将带来大量内容开销。当然,UITableView并不是这样设计的。
3)只有当前显示的行才被分配UITableViewCell的实例,因滚动操作已离开屏幕的表视图单元(UITableViewCell的实例)将被放置在一个可以被重用的单元序列中。
如果系统运行比较缓慢,表视图就从该序列中删除这些单元,以释放存储空间;
只要有可用的存储空间,表视图就会重新获取这些单元,以便以后再次使用。
4)//当一个表单视图滚出屏幕时,另一个表单视图就会从另一边滚动到屏幕上,如果滚动到屏幕上的新行重新使用从屏幕上滚动下来的那些单元格中的某一个单元格,系统就会避免与不断创建和释放那些视图相关的开销。
5)为了使用此机制,需要一个标识符(identifier)来标示可重用的单元格
6)表第一次初始化时肯定没有可重用的表单元,所以需要初始分配:
cell = [[UITableViewCell alloc]initWithStyle:UITableViewCellStyleDefault reuseIdentifier:myTableViewCellIdentifier];
reuseIdentifier参数即标示该表单元可重用的标示符
6、编译、运行,效果如下

如何用图片自定义Table Separeator分割线
一般地,利用类似[tableView setSeparatorColor:[UIColor redColor]];语句即可修改cell中间分割线的颜色。那又如何用一个图片作为分割线背景呢?可以尝试如下:
方法一:
先设置cell separatorColor为clear,然后把图片做的分割线添加到自定义的custom cell上。
tableView.separatorColor = [UIColor clearColor];
方法二:
在cell里添加一个像素的imageView后将图片载入进,之后设置tableView.separatorStyle = UITableViewCellSeparatorStyleNone
自定义首行Cell与其上面导航栏间距
tableView.tableHeaderView = [[[UIView alloc] initWithFrame:CGRectMake(0,0,5,20)] autorelease];
自定义表格视图单元格
应用程序是否可以更好看?我们将通过自定义表格单元格使其更好看。到目前为止,我们使用的默认样式显示表单元格,而且缩略图的位置和大小是固定的。如果你想就像下面的屏幕显示的那样使缩略图更大并附上每个菜的准备时间,怎么办?
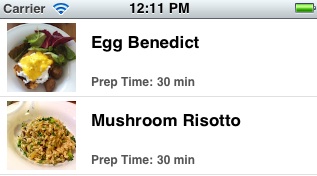
不同风格的自定义表格视图单元格
设计单元格
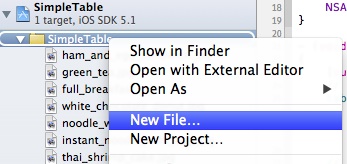
在这种情况下,你必须创建和设计自己的表格单元格。返回到Xcode。在项目浏览器中,右键单击“SimpleTable”文件夹并选择“New File ...”。
为了设计我们自己的表格单元格,我们要创建一个新的表格单元格界面生成器。在这种情况下,我们只需要启动一个“空”的用户界面。点击“下一步”继续。
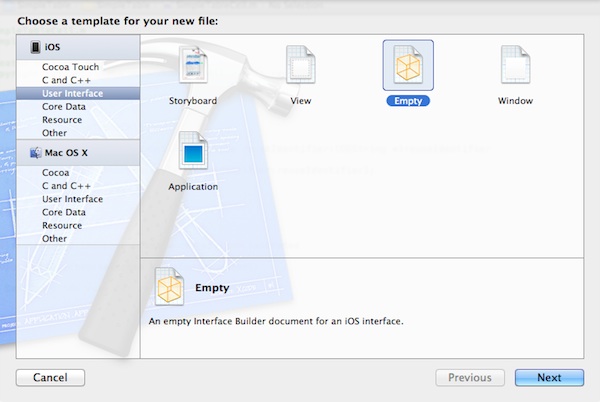
选择一个空的Interface Builder文档
当提示选择设备系列时,选择“iPhone”,然后单击“下一步”继续。保存的文件为“SimpleTableCell”。
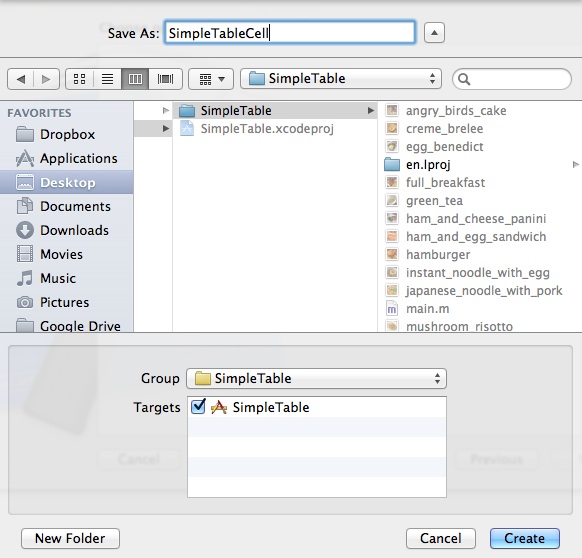
一旦该文件被创建时,你就能在Project Navigator中找到它。选择“SimpleTableCell.xib”切换到界面生成器。我们要设计的自定义表格单元格的外观。
在对象库中,选择“Table View Cell(表格视图单元格)”,将其拖动到界面生成器的设计区域。
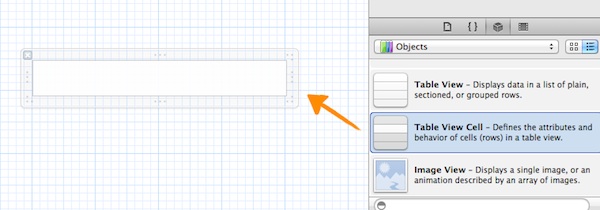
为了容纳更大的缩略图,我们要改变单元格的高度。只要按住下/上侧的单元格边缘并缩放到高度78。
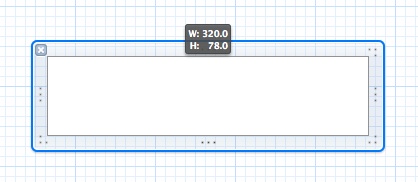
或者,您也可以使用“Size Inspector”改变高度。
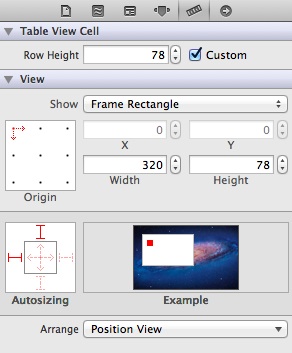
表查看单元格的尺寸督察
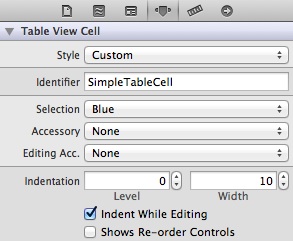
下一步,选择“Attributes Inspector(属性检查器)“的上半部分的通用区域来为自定义单元格“SimpleTableCell”设置“Identifier(标识符)”。这个标识符将在后面的代码中使用。
表格单元格视图配置好之后,我们将往他里面放其他元素。选择“Image View”,并把它拖到表视图单元格。
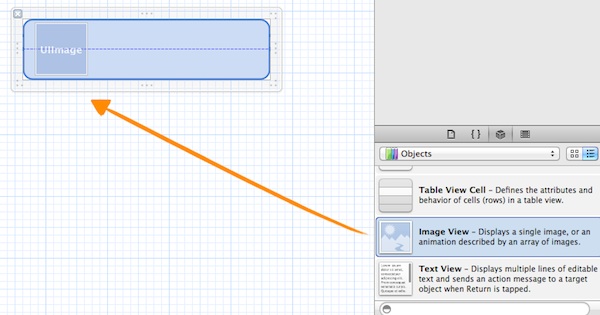
image view用于显示缩略图。您可以调整其大小,使其适合单元格。参考数值,我设置的高度和宽度为69像素。
接下来,我们将添加三个标签:Name(姓名),Prep Time(准备时间)和Time(时间)。“Name”标签将用于显示配方的名称。“Prep Time”是一个静态的标签,只显示“准备时间”。最后,“Time”的标签是一个动态的标签被用于显示实际的具体菜肴的准备时间。
要添加一个标签,在Object library(对象库)中选择“标签”,将其拖动到单元格中。您可以双击标签以更改其名称。

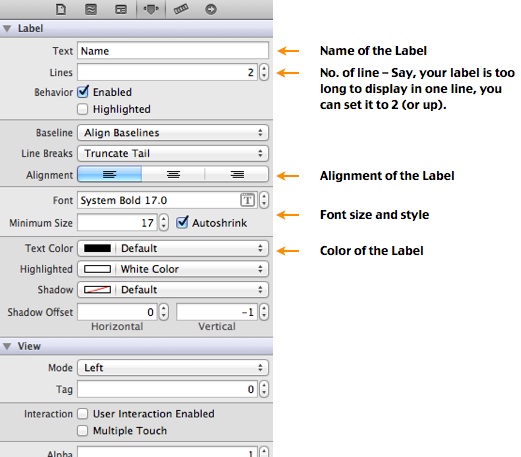
和上面所显示的做比较,您可能会发现您的字体大小和样式是不同的。要更改字体样式,只需选择标签并选择“Attribute Inspector(属性检查器)”。从这里,你可以改变“字体”和最小字体大小的设置。您也可以通过检查更改文本颜色和对齐方式。
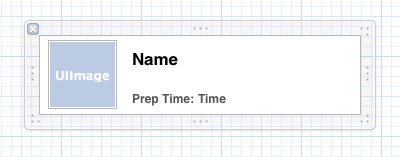
您的最终设计应该类似于这样:
创建一个类的自定义单元格
到目前为止,我们已经设计了表格单元格。但如何才能改变自定义单元格的标签值吗?我们要为自定义表视图单元格创建一个新的类。这个类代表了自定义单元格的底层数据模型。
就像以前一样,右键单击“SimpleTable的项目浏览器”文件夹中,然后选择“新建文件”。
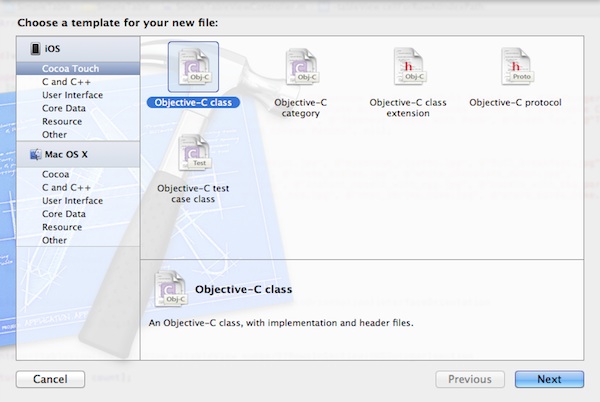
选择一个新的文件模板
选择该选项后,Xcode会提示你选择一个模板。我们要创建一个新的自定义表格视图单元格类,选择“Objective-C类”下的“Cocoa Touch”,然后单击“下一步”。
为您的项目创建新的文件
类名填写“SimpleTableCell”,选中"Subclass of "里的“UITableViewCell”。
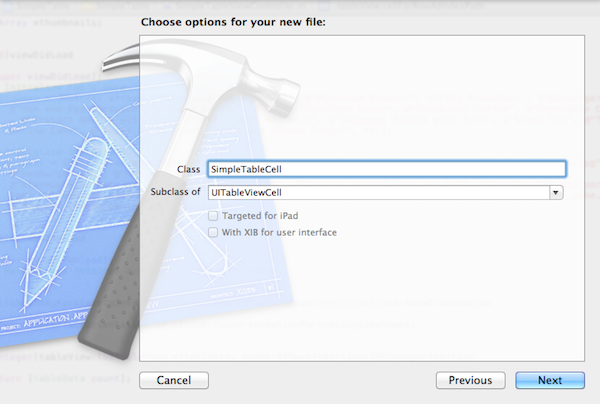
单击“下一步”,保存的文件在SimpleTable项目文件夹,并单击“创建”继续。Xcode将在Project Navigator中创建两个名为“SimpleTableCell.h”文件和“SimpleTableCell.m”。
正如前面提到的中,SimpleTableCell类作为自定义单元格的数据模型。在单元格中,我们有三个值是可变的:thumbnail image view(缩略图图像视图),name label(名称标签)和time label(时间标签)。在这个类里,我们将添加三个属性来表示这些动态值。
打开“SimpleTableCell.h”中添加以下属性:
@property (nonatomic, weak) IBOutlet UILabel *nameLabel;
@property (nonatomic, weak) IBOutlet UILabel *prepTimeLabel
@property (nonatomic, weak) IBOutlet UIImageView *thumbnailImageView;
现在,打开“SimpleTableCell.m”,以下“@implementation SimpleTableCell”下面添加以下代码:
@synthesize nameLabel = _nameLabel;
@synthesize prepTimeLabel = _prepTimeLabel;
@synthesize thumbnailImageView = _thumbnailImageView;
建立连接
保存更改并选择“SimpleTableCell.xib”回到Interface Builder中。现在我们可以在类的属性和Label/ ImageView之间创建连接。
首先,选择单元格,在“Identity Inspector”中把类改为“SimpleTableCell”,这样就可以在单元格视图和我们之前创建的类之间建立联系。
现在,我们要建立的连接的属性。右键单击"Objects"下的“SimpleTableCell”,以显示“Outlets”查询器。单击并按住“nameLabel”旁边的圆圈,并将其拖动到Label – Name”对象。Xcode会自动建立连接。
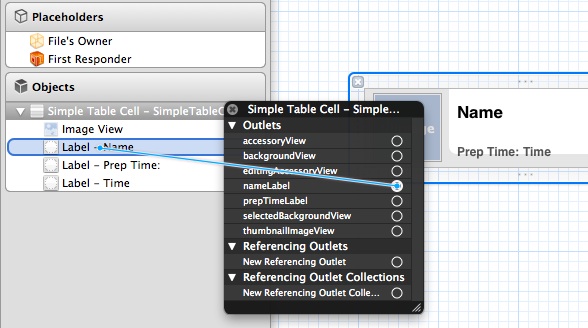
为“prepTimeLabel”和“thumbnailImageView”重复上述操作:
View”:
-
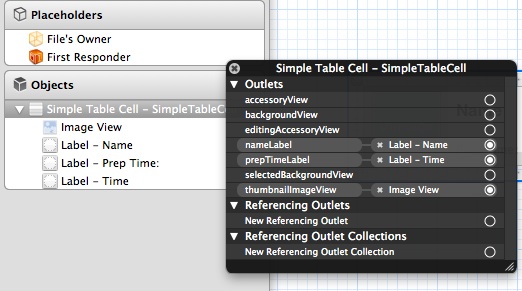
- 连接“prepTimeLabel” 和“Label – Time”
- 连接“thumbnailImageView” 和“ImageView”
当你建立所有的连接后,它看起来应该是这样的:
更新SimpleTableViewController
我们已经完成了自定义表格单元格的设计和编码。最后,我们来到最后修改的部分 - 确认自定义单元格放在SimpleTableViewController中。
让我们重温在“SimpleTableView.m”的代码:
- (UITableViewCell *)tableView:(UITableView *)tableView cellForRowAtIndexPath:(NSIndexPath *)indexPath
{
    static NSString *simpleTableIdentifier = @"SimpleTableItem";

    UITableViewCell *cell = [tableView dequeueReusableCellWithIdentifier:simpleTableIdentifier];

    if (cell == nil) {
        cell = [[UITableViewCell alloc] initWithStyle:UITableViewCellStyleDefault reuseIdentifier:simpleTableIdentifier];
    }

    cell.textLabel.text = [tableData objectAtIndex:indexPath.row];
    cell.imageView.image = [UIImage imageNamed:[thumbnails objectAtIndex:indexPath.row]];

    return cell;
}
我们先前使用默认的表视图单元格(即UITableViewCell)显示的表项。为了使用我们的自定义表格单元格,我们必须改变在“SimpleTableView.m”代码:
- (UITableViewCell *)tableView:(UITableView *)tableView cellForRowAtIndexPath:(NSIndexPath *)indexPath
{
    static NSString *simpleTableIdentifier = @"SimpleTableCell";

    SimpleTableCell *cell = (SimpleTableCell *)[tableView dequeueReusableCellWithIdentifier:simpleTableIdentifier];
    if (cell == nil)
    {
        NSArray *nib = [[NSBundle mainBundle] loadNibNamed:@"SimpleTableCell" owner:self options:nil];
        cell = [nib objectAtIndex:0];
    }

    cell.nameLabel.text = [tableData objectAtIndex:indexPath.row];
    cell.thumbnailImageView.image = [UIImage imageNamed:[thumbnails objectAtIndex:indexPath.row]];
    cell.prepTimeLabel.text = [prepTime objectAtIndex:indexPath.row];

    return cell;
}
通过导入#import“SimpleTableCell.h”,“SimpleTableViewController”知道"SimpleTableCell是什么并可以利用它。
最后,由于表格单元格的高度改为78,在“@end”前面添加下面的代码。
- (CGFloat)tableView:(UITableView *)tableView heightForRowAtIndexPath:(NSIndexPath *)indexPath
{
    return 78;
}
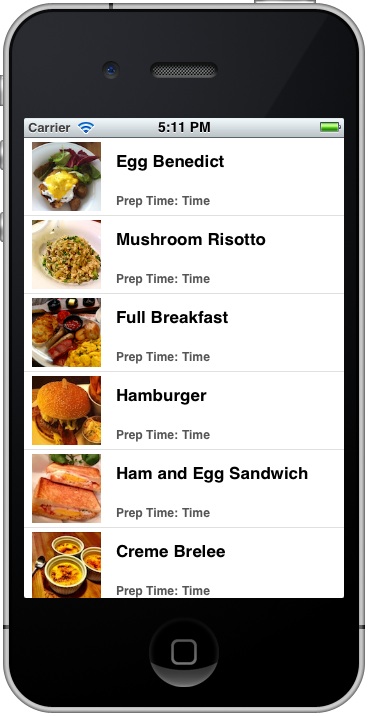
现在,点击“Run”按钮和您的SimpleTable的应用程序看起来应该象下面这样:
自定义表格视图单元格(不使用xib)
- (id)initWithStyle:(UITableViewCellStyle)style reuseIdentifier:(NSString *)reuseIdentifier {
    if ((self = [super initWithStyle:style reuseIdentifier:reuseIdentifier])) {
        UIImage *defaultImage = [UIImage imageNamed:@"hotelImageDefault.png"];
        hotelImage = [[UIImageView alloc] initWithFrame:CGRectMake(7, 7, 56, 56)];
        hotelImage.image = defaultImage;
        hotelImage.layer.masksToBounds = YES;
        hotelImage.layer.cornerRadius = 6.0;

        titleText = [[UILabel alloc] initWithFrame:CGRectMake(71, 5, 209, 25)];
        titleText.font = [UIFont fontWithName:@"Arial" size:17.0f];
        titleText.backgroundColor = [UIColor clearColor];
        addressText = [[UILabel alloc] initWithFrame:CGRectMake(71, 30, 209, 30)];
        addressText.font = [UIFont fontWithName:@"Arial" size:14.0f];
        addressText.numberOfLines = 2;
        addressText.textColor = [UIColor darkGrayColor];
        addressText.backgroundColor = [UIColor clearColor];
        [self.contentView addSubview:hotelImage];
        [self.contentView addSubview:titleText];
        [self.contentView addSubview:addressText];
    }
    return self;
}


 751
751

 被折叠的 条评论
为什么被折叠?


