


本文是Scheduler模块源码分析的第二篇,第一篇Spark Scheduler模块源码分析之DAGScheduler主要分析了DAGScheduler。本文接下来结合Spark-1.6.0的源码继续分析TaskScheduler和SchedulerBackend。
一、TaskScheduler和SchedulerBackend类结构和继承关系
之所以把这部分放在最前面,是想让大家在阅读后续文章时对TaskScheduler和SchedulerBackend是什么有一个概念。因为有些方法是从父类继承的,如果不先把类结构梳理清楚,到后面遇到多个XXXScheduler或者XXXBackend时迷失方向。
1、TaskScheduler
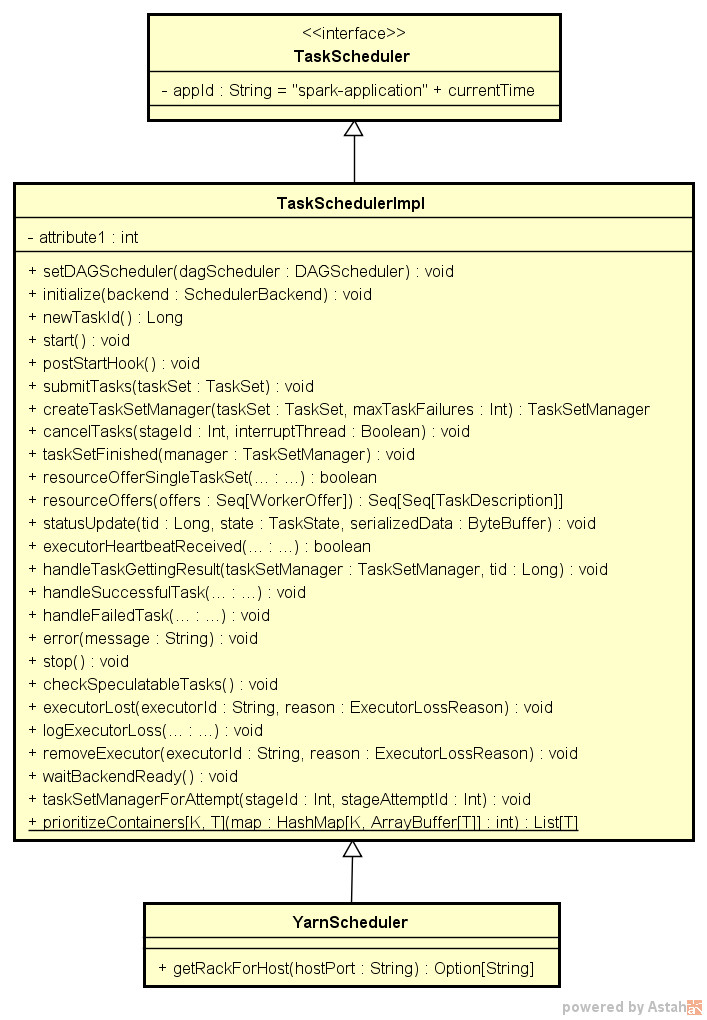
其实,严格来说TaskScheduler是一个trait,打开org.apache.spark.scheduler.TaskScheduler就可以看到。在源码中真正使用的还是TaskScheduler的实现类。至于使用的是哪个实现类,和Spark的部署模式有关,本文中使用的是yarn-client模式,对应YarnScheduler类,第二部分创建TaskScheduler时会有分析。
TaskScheduler及其子类的类结构和继承关系,以及重要的变量和方法都列举在下面的UML图中,下图中只列出有具体实现的方法。
2、SchedulerBackend
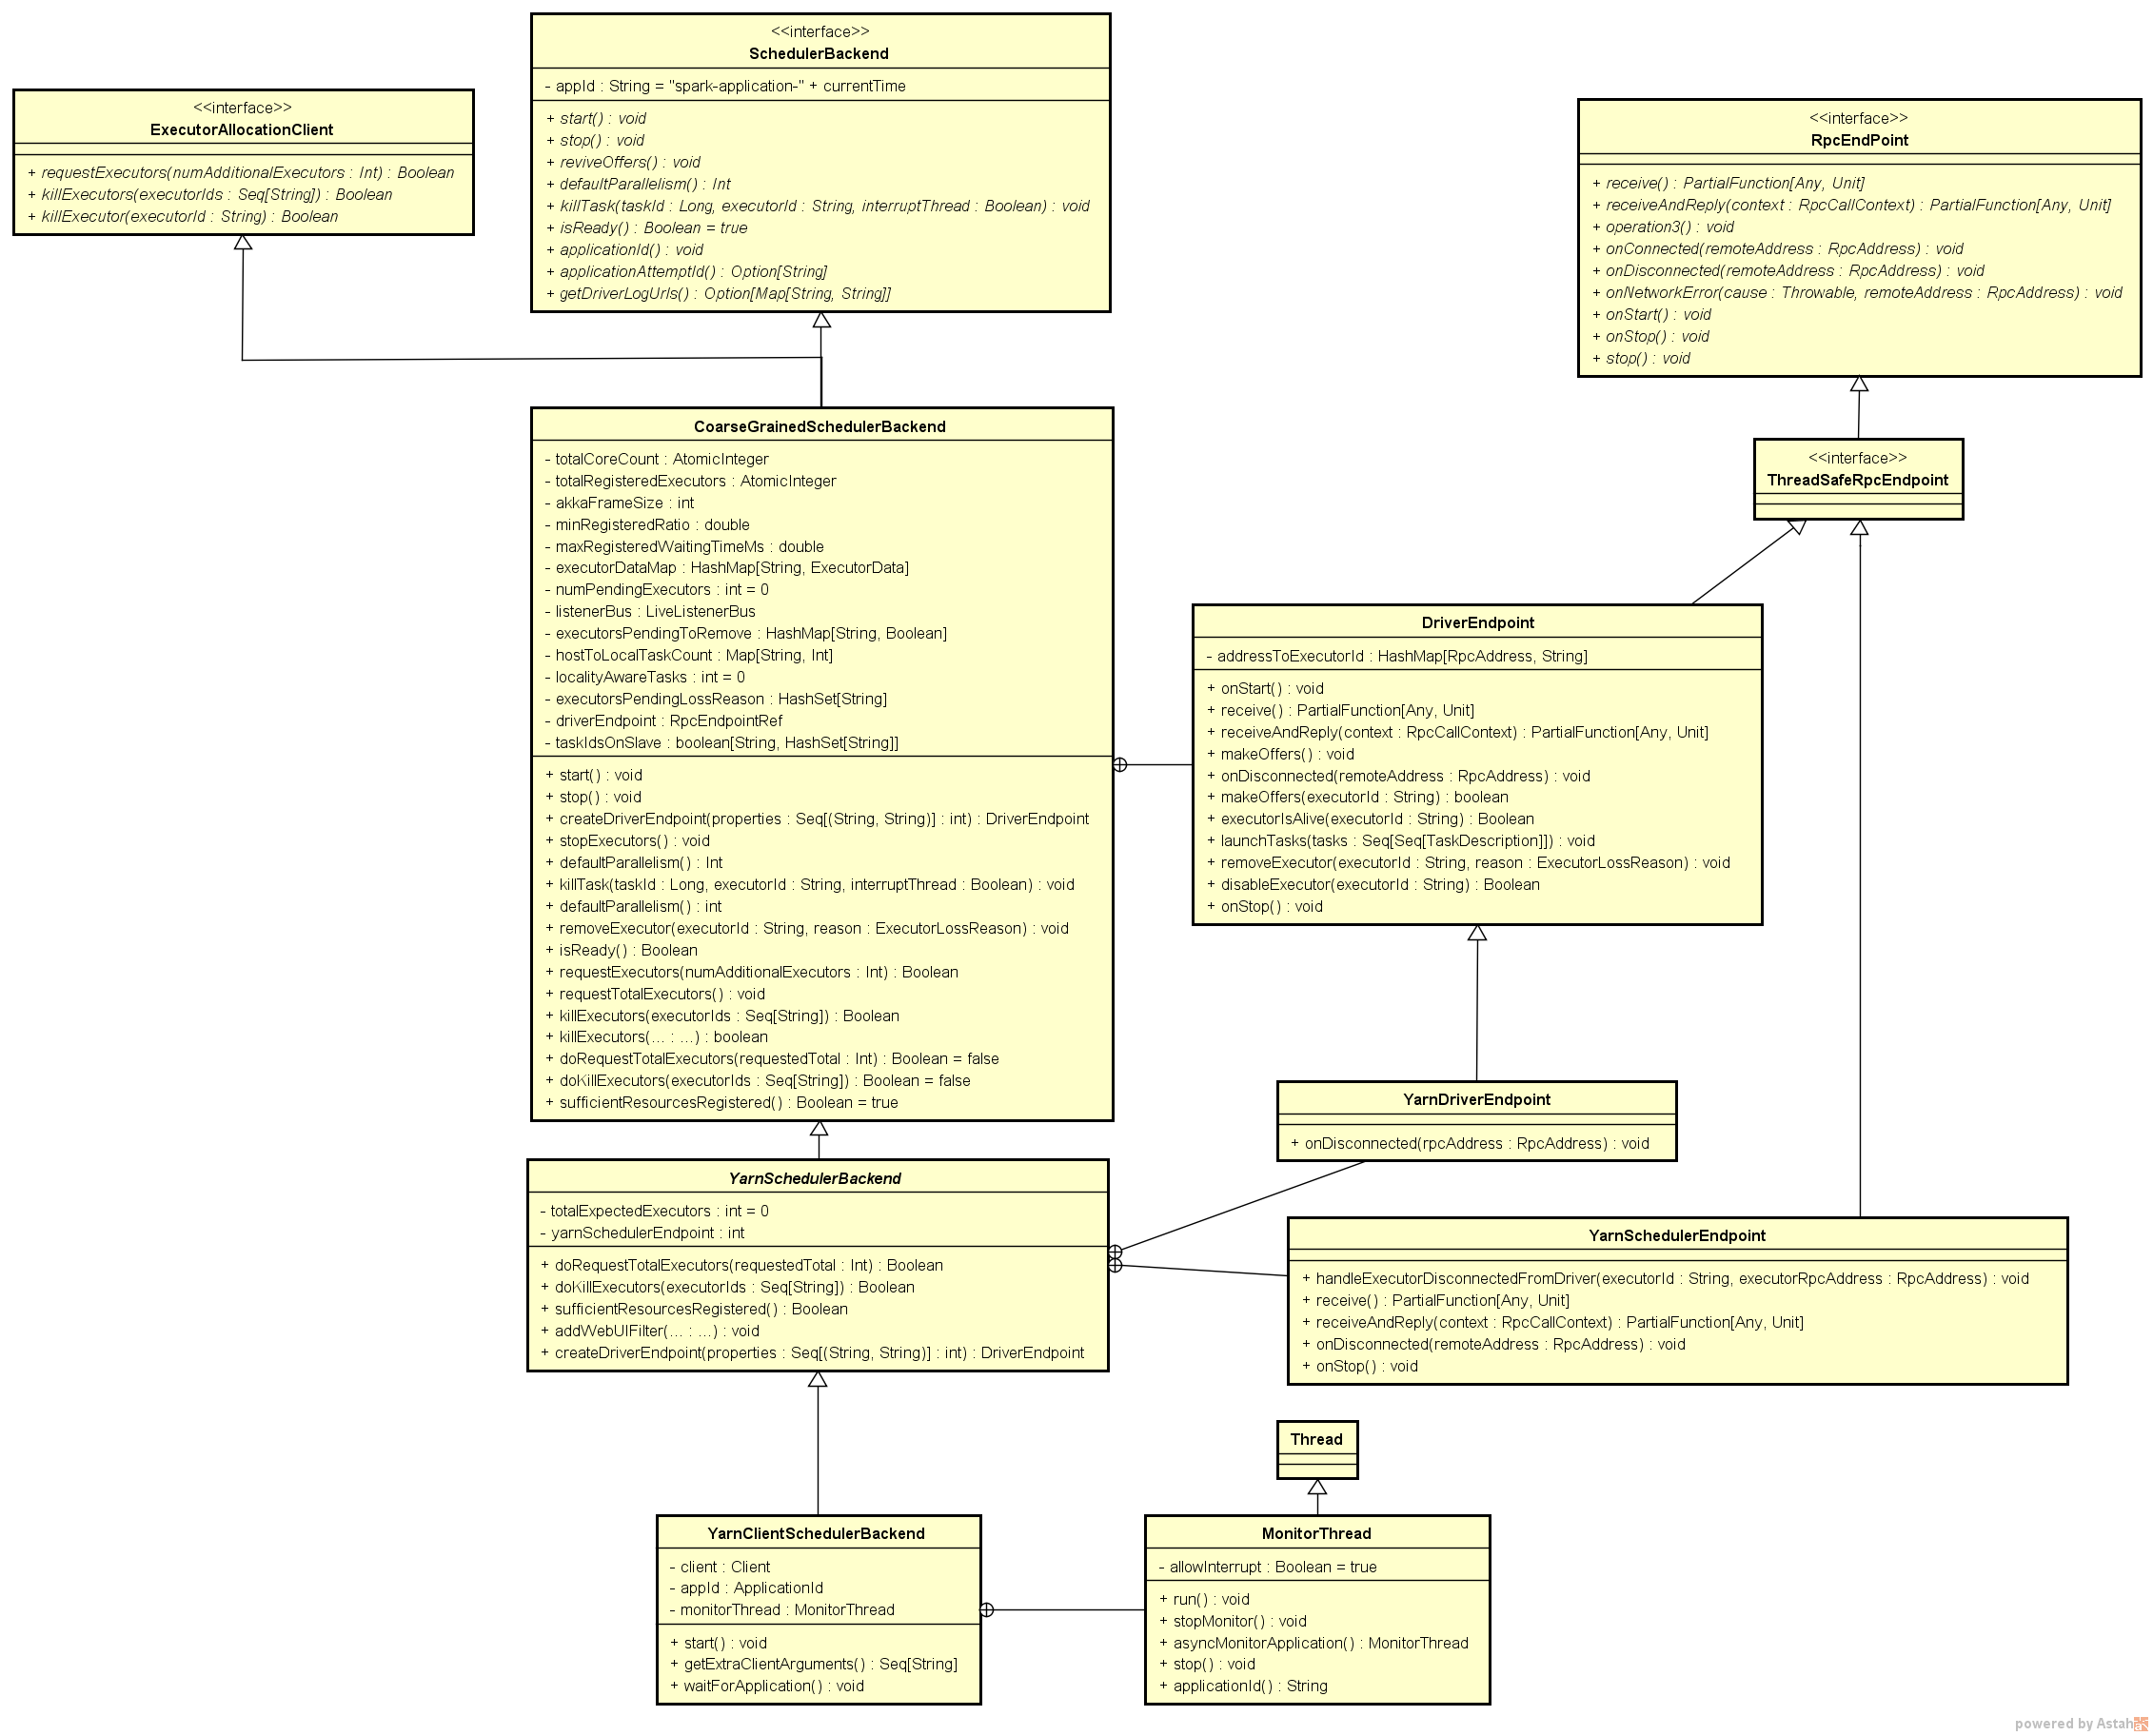
这里说到的org.apache.spark.scheduler.SchedulerBackend也是一个trait,根据第二节SchedulerBackend类创建过程中的分析,从yarn-client模式下使用的YarnClientSchedulerBackend往上分析,类结构图如下
从上图中可以看出yarn-client模式下使用的YarnClientSchedulerBackend类继承自一个ExecutorAllocationClient的trait,所以YarnClientSchedulerBackend可以与cluster manager联系,用于请求和kill Executor。同时也继承自SchedulerBackend trait,所以YarnClientSchedulerBackend也可以用于请求资源。
其实每一个SchedulerBackend的具体实现起到的作用基本相同,就是向当前等待分配计算资源的Task分配计算资源(即Executors),并且在分配的Executor上启动Task,完成计算的资源调度过程。
二、TaskScheduler和SchedulerBackend的创建
1、SparkContext#createTaskScheduler创建实例
在DAGScheduler中已经提到TaskScheduler和SchedulerBackend都是在SparkContext中同时生成的。
val (sched , ts) = SparkContext.createTaskScheduler(this, master) // 这里的master是"spark.master"参数的值,String类型
_schedulerBackend = sched//生成 schedulerBackend
_taskScheduler = ts//生成 taskScheduler
_taskScheduler .start() 进入到SparkContext.createTaskScheduler方法中,该方法中根据master类型,生成不同的TaskScheduler和SchedulerBackend实例,下面仍然以“yarn-client”模式进行分析,其他模式请进入该方法中查看。
master match { // 获取master的类型
case "yarn-client" =>
  val scheduler = try {
    val clazz = Utils.classForName( "org.apache.spark.scheduler.cluster.YarnScheduler" )
    val cons = clazz.getConstructor( classOf[SparkContext])
    // yarn-client模式,生成一个YarnScheduler类型的scheduler实例
    cons.newInstance(sc).asInstanceOf[TaskSchedulerImpl]
  } catch {
    case e: Exception => {
      throw new SparkException( "YARN mode not available ?" , e)
    }
  }

  val backend = try {
    val clazz =
      Utils.classForName( "org.apache.spark.scheduler.cluster.YarnClientSchedulerBackend" )
      // yarn-client模式,生成一个YarnClientSchedulerBackend实例
    val cons = clazz.getConstructor( classOf[TaskSchedulerImpl] , classOf [SparkContext])
    cons.newInstance(scheduler, sc).asInstanceOf[CoarseGrainedSchedulerBackend]
  } catch {
    case e: Exception => {
      throw new SparkException( "YARN mode not available ?" , e)
    }
  }
  scheduler.initialize(backend)
  (backend, scheduler)
} 从上面代码中可以看到“yarn-client”模式下,scheduler的类型是org.apache.spark.scheduler.cluster.YarnScheduler,backend的类型是org.apache.spark.scheduler.cluster.YarnClientSchedulerBackend。
2、构建调度池
从上面代码中可以看到,在生成这两个对象后,接下来将backend传入scheduler的初始化方法中进行初始化,TaskSchedulerImpl.initialize方法中主要是根据调度模式初始化调度池,关于Spark调度模式,已经在Spark调度模式-FIFO和FAIR中有详细的分析。
3、Application的提交
回到SparkContext,在TaskScheduler和SchedulerBackend的具体实例构建后,调用TaskSchedulerImpl.start方法,启动taskScheduler。如果启动了speculative功能(即设置spark.speculation=true)的话,会后台启动一个线程检查符合speculation条件的task。在TaskSchedulerImpl.start方法中,调用backend.start方法,启动schedulerBackend。在YarnClientSchedulerBackend.start方法中,根据配置参数生成一个Client类型的对象,然后调用Client.submitApplication方法,提交该Application.
YarnClientSchedulerBackend#start方法
  override def start() {
    val driverHost = conf.get("spark.driver.host") // 获取driver的IP地址
    val driverPort = conf.get("spark.driver.port") // 获取driver的端口号
    val hostport = driverHost + ":" + driverPort
    sc.ui.foreach { ui => conf.set("spark.driver.appUIAddress", ui.appUIAddress) } // 为对应UI地址绑定ui对象

    val argsArrayBuf = new ArrayBuffer[String]() // 获取启动参数
    argsArrayBuf += ("--arg", hostport)
    argsArrayBuf ++= getExtraClientArguments

    logDebug("ClientArguments called with: " + argsArrayBuf.mkString(" "))
    val args = new ClientArguments(argsArrayBuf.toArray, conf)
    totalExpectedExecutors = args.numExecutors // 获取启动时指定的Executor个数
    client = new Client(args, conf) // 生成driver端的client
    appId = client.submitApplication() // 通过client提交application

    super.start() // 最终调用了CoarseGrainedSchedulerBackend中的start方法

    waitForApplication() // 等待Application开始运行

    if (conf.contains("spark.yarn.credentials.file")) {
      YarnSparkHadoopUtil.get.startExecutorDelegationTokenRenewer(conf)
    }
    // 启动一个监控线程,当SparkContext结束或者该Application在Yarn上运行结束,这个线程才会结束
    monitorThread = asyncMonitorApplication()
    monitorThread.start()
} 有关Application的提交与监控,有兴趣的话,可以从YarnClientSchedulerBackend#start方法开始进一步的分析。
三、Task的提交
在Spark Scheduler模块源码分析之DAGScheduler中提到,DAGScheduler完成对Stage的划分后,会提交Stage。从这里开始,继续从上一篇文章最后的四.3 DAGScheduler.submitMissingTasks方法开始进行分析。
1、DAGScheduler#submitMissingTasks
这个方法比较长,这里只列举出源代码中的主要逻辑,搞清楚DAGScheduler提交Stage时如何开始对Task的提交的。
  private def submitMissingTasks(stage: Stage, jobId: Int) {
    //取得当前Stage需要计算的partition
    val partitionsToCompute: Seq[Int] = stage.findMissingPartitions()
    ...
    // 将当前stage存入running状态的stage列表中
    runningStages += stage
    // 判断当前stage是ShuffleMapStage还是ResultStage
    stage match {
      case s: ShuffleMapStage =>
        outputCommitCoordinator.stageStart(stage = s.id, maxPartitionId = s.numPartitions - 1)
      case s: ResultStage =>
        outputCommitCoordinator.stageStart(
          stage = s.id, maxPartitionId = s.rdd.partitions.length - 1)
    }
    ...
    // 向listenerBus提交StageSubmitted事件
    listenerBus.post(SparkListenerStageSubmitted(stage.latestInfo, properties))
    ...
    // 根据stage的类型获取其中包含的task
    val tasks: Seq[Task[_]] = try {
      stage match {
        // ShuffleMapStage中对应的是ShuffleMapTask
        case stage: ShuffleMapStage =>
          partitionsToCompute.map { id =>
            val locs = taskIdToLocations(id)
            val part = stage.rdd.partitions(id)
            new ShuffleMapTask(stage.id, stage.latestInfo.attemptId,
              taskBinary, part, locs, stage.internalAccumulators)
          }
        // ResultStage中对应的是ResultTask
        case stage: ResultStage =>
          val job = stage.activeJob.get
          partitionsToCompute.map { id =>
            val p: Int = stage.partitions(id)
            val part = stage.rdd.partitions(p)
            val locs = taskIdToLocations(id)
            new ResultTask(stage.id, stage.latestInfo.attemptId,
              taskBinary, part, locs, id, stage.internalAccumulators)
          }
      }
    }
    ...
  if (tasks.size > 0) { // 如果当前Stege中有task
      logInfo("Submitting " + tasks.size + " missing tasks from " + stage + " (" + stage.rdd + ")")
      stage.pendingPartitions ++= tasks.map(_.partitionId)
      logDebug("New pending partitions: " + stage.pendingPartitions)
      // 根据tasks生成TaskSet,然后通过TaskScheduler.submitTasks方法提交TaskSet
      taskScheduler.submitTasks(new TaskSet(
        tasks.toArray, stage.id, stage.latestInfo.attemptId, jobId, properties))
      stage.latestInfo.submissionTime = Some(clock.getTimeMillis())
    } else { // 如果当前Stege中不包含task
      // 由于前面已经向listenerBus中提交了StageSubmitted事件,现在这个Stege中没有task运行
      // 则正常流程时,该stage不会被标记为结束。那么需要手动指定该stege为finish状态。
      markStageAsFinished(stage, None)
      // log中的显示信息
      val debugString = stage match {
        case stage: ShuffleMapStage =>
          s"Stage ${stage} is actually done; " +
            s"(available: ${stage.isAvailable}," +
            s"available outputs: ${stage.numAvailableOutputs}," +
            s"partitions: ${stage.numPartitions})"
        case stage : ResultStage =>
          s"Stage ${stage} is actually done; (partitions: ${stage.numPartitions})"
      }
      logDebug(debugString)
    }
  }
这个方法的主要过程和逻辑都已经在源码注释中进行了分析,在提交Stage时,对于不同的ShuffleMapStage和ResultStage,有不同的处理逻辑。最终根据Stage对于的rdd partition生成tasks组,然后通过TaskScheduler.submitTasks方法,将tasks生成的TaseSet进行提交。
这里面有一点需要注意的是,在Stage提交时,会向LiveListenerBus发送一个SparkListenerStageSubmitted事件,正常情况下,随着Stage中的task运行结束,会最终将Stage设置成完成状态。但是,对于空的Stage,不会有task运行,所以该Stage也就不会结束,需要在提交时手动将Stage的运行状态设置成Finished。
2、TaskSchedulerImpl#submitTasks
上一步中生成的TaskSet对象传入该方法中,那么首先看一下TaskSet的结构。在TaskSet中,有一个Task类型的数组包含当前Stage对应的Task,然后就是一些stageId,stageAttemptId,以及priority等信息。从前面代码中可以看到,这里传入的优先级是jobId,越早提交的job越优先运行。
private[spark] class TaskSet(
    val tasks: Array[Task[_]],
    val stageId: Int,
    val stageAttemptId: Int,
    val priority: Int,
    val properties: Properties) {
  val id: String = stageId + "." + stageAttemptId

  override def toString: String = "TaskSet " + id
} 接下来进入TaskScheduler.submitTasks方法,主要的过程都在注释中。这里需要再分析一些TaskSetManager的zombie状态。isZombie的默认值为false,进入true状态有两种情况:TaskSetManager中的tasks都执行成功了,或者这些tasks不再需要执行(比如当前stage被cancel)。之所以在tasks都执行成功后将该TaskSetManager设置为zombie状态而不是直接清除该对象,是为了从TaseSetManager中获取task的运行状况信息。
那么对于isZombie为false的TaseSetManager,即表示其中的tasks仍然需要执行,如果对于当前stage,有一个taskSet正在执行,并且此次提交的taskSet和正在执行的那个不是同一个,那么就会出现同一个Stage执行两个不同的TaskSet的状况,这是不允许的。
  override def submitTasks(taskSet: TaskSet) {
    val tasks = taskSet.tasks
    logInfo("Adding task set " + taskSet.id + " with " + tasks.length + " tasks")
    this.synchronized {
      // 生成一个TaskSetManager类型对象,
      // task最大重试次数,由参数spark.task.maxFailures设置,默认为4
      val manager = createTaskSetManager(taskSet, maxTaskFailures)
      val stage = taskSet.stageId
      // key为stageId,value为一个HashMap,这个HashMap中的key为stageAttemptId,value为TaskSetManager对象
      val stageTaskSets =
        taskSetsByStageIdAndAttempt.getOrElseUpdate(stage, new HashMap[Int, TaskSetManager])
      stageTaskSets(taskSet.stageAttemptId) = manager
      // 如果当前这个stageId对应的HashMap[Int, TaskSetManager]中存在某个taskSet
      // 使得当前的taskSet和这个taskSet不是同一个,并且当前这个TaskSetManager不是zombie进程
      // 即对于同一个stageId,如果当前这个TaskSetManager不是zombie进程,即其中的tasks需要运行,
      // 并且对当前stageId,有两个不同的taskSet在运行
      // 那么就应该抛出异常,确保同一个Stage在正常运行情况下不能有两个taskSet在运行
      val conflictingTaskSet = stageTaskSets.exists { case (_, ts) =>
        ts.taskSet != taskSet && !ts.isZombie
      }
      if (conflictingTaskSet) {
        throw new IllegalStateException(s"more than one active taskSet for stage $stage:" +
          s" ${stageTaskSets.toSeq.map{_._2.taskSet.id}.mkString(",")}")
      }
      // 根据调度模式生成FIFOSchedulableBuilder或者FairSchedulableBuilder,将当前的TaskSetManager提交到调度池中
      schedulableBuilder.addTaskSetManager(manager, manager.taskSet.properties)

      if (!isLocal && !hasReceivedTask) {
        starvationTimer.scheduleAtFixedRate(new TimerTask() {
          override def run() {
            if (!hasLaunchedTask) {
              logWarning("Initial job has not accepted any resources; " +
                "check your cluster UI to ensure that workers are registered " +
                "and have sufficient resources")
            } else {
              this.cancel()
            }
          }
        }, STARVATION_TIMEOUT_MS, STARVATION_TIMEOUT_MS)
      }
      hasReceivedTask = true
    }
    // 向schedulerBackend申请资源
    backend.reviveOffers()
} schedulableBuilder.addTaskSetManager这部分是向调度池提交任务的,可以参考Spark调度模式-FIFO和FAIR。
3、CoarseGrainedSchedulerBackend#reviveOffers
这个方法比较简单,只有一行代码
  override def reviveOffers() {
    driverEndpoint.send(ReviveOffers)
  }
4、NettyRpcEnv#send
在NettyRpcEnv中有几个重载的send方法,最终进入的下面这个。由于该方法的逻辑比较简单,下面直接列出debug时该方法中各变量的内容。其中192.168.1.88是spark客户端,即提交Spark应用的机器,通过192.168.1.88:42060端口发送一个ReviveOffers的message。
接下来代码会进入下一节中,执行CoarseGrainedSchedulerBackend.receive方法。
这一段主要会在第四节Task的运行和运行结果的处理中用到。在NettyRpcEnv中有一个重要的变量dispatcher,其类型为org.apache.spark.rpc.netty.Dispatcher,在Dispatcher中会生成一个ThreadPoolExecutor类型的threadpool变量。这个threadpool变量会在后续的Executor模块中进一步分析。

5、CoarseGrainedSchedulerBackend#receive
通过netty发送一个请求资源的消息后,CoarseGrainedSchedulerBackend的receive方法则会接收分配到的资源。
在该方法中,由于接收到的是ReviveOffers,会调用makeOffers方法开始生成资源。
override def receive: PartialFunction[Any, Unit] = {
case StatusUpdate(executorId, taskId, state, data) =>
...
case ReviveOffers =>
makeOffers()
case KillTask(taskId, executorId, interruptThread) =>
...
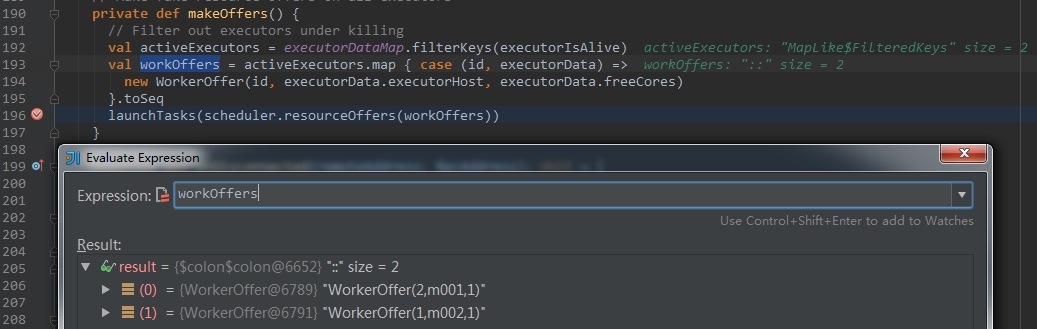
}6、CoarseGrainedSchedulerBackend#makeOffers
在本次debug过程中,只启动了两个Executor,分别在m001和m002机器上。从下图中可以看出,workOffers中获取到了两个Executor,executorId分别为1和2。
接下来会执行launchTasks方法,该方法接收的参数是schedulerBackend分配的计算资源,有关计算资源的分配,在后续的7-8-9-10小节中深入分析,关于launchTasks方法,会在第四节-Task的运行和运行结果的处理进一步分析。
7、TaskSchedulerImpl#resourceOffers
资源生成好封装成WorkerOffer类型的队列后,就开始进入SchedulerBackend中,由SchedulerBackend分配这些资源。
  /**
   * 由cluster manager来调用,为task分配节点上的资源。
   * 根据优先级为task分配资源,
   * 采用round-robin方式使task均匀分布到集群的各个节点上。
   */
  def resourceOffers(offers: Seq[WorkerOffer]): Seq[Seq[TaskDescription]] = synchronized {
    var newExecAvail = false
    ...
    // 为避免多个Task集中分配到某些机器上,对这些Task进行随机打散.
    val shuffledOffers = Random.shuffle(offers)
    // .
    val tasks = shuffledOffers.map(o => new ArrayBuffer[TaskDescription](o.cores))  //存储分配好资源的task
    val availableCpus = shuffledOffers.map(o => o.cores).toArray
    // 从调度池中获取排好序的TaskSetManager,由调度池确定TaskSet的执行顺序
    val sortedTaskSets = rootPool.getSortedTaskSetQueue
    for (taskSet <- sortedTaskSets) { // 按顺序取出各taskSet
      logDebug("parentName: %s, name: %s, runningTasks: %s".format(
        taskSet.parent.name, taskSet.name, taskSet.runningTasks))
      if (newExecAvail) { // 如果该executor是新分配来的
        taskSet.executorAdded() // 重新计算TaskSetManager的就近原则
      }
    }

    // 为从rootPool中获得的TaskSetManager列表分配资源。就近顺序是:
    // PROCESS_LOCAL, NODE_LOCAL, NO_PREF, RACK_LOCAL, ANY
    var launchedTask = false
    // 对每一个taskSet,按照就近顺序分配最近的executor来执行task
    for (taskSet <- sortedTaskSets; maxLocality <- taskSet.myLocalityLevels) {
      do {
        // 将前面随机打散的WorkOffers计算资源按照就近原则分配给taskSet,用于执行其中的task
        launchedTask = resourceOfferSingleTaskSet(
            taskSet, maxLocality, shuffledOffers, availableCpus, tasks)
      } while (launchedTask)
    }

    if (tasks.size > 0) {
      hasLaunchedTask = true
    }
    return tasks
  }
8、TaskSchedulerImpl#resourceOfferSingleTaskSet
这个方法主要是在分配的executor资源上,执行taskSet中包含的所有task。首先遍历分配到的executor,如果当前executor中的cores个数满足配置的单个task需要的core数要求(该core数由参数spark.task.cpus确定,默认值为1),才能在该executor上启动task。
  private def resourceOfferSingleTaskSet(
      taskSet: TaskSetManager,
      maxLocality: TaskLocality,
      shuffledOffers: Seq[WorkerOffer],
      availableCpus: Array[Int],
      tasks: Seq[ArrayBuffer[TaskDescription]]) : Boolean = {
    var launchedTask = false
    for (i <- 0 until shuffledOffers.size) {  // 顺序遍历当前存在的Executor
      val execId = shuffledOffers(i).executorId // Executor ID
      val host = shuffledOffers(i).host   // Executor所在的host
      if (availableCpus(i) >= CPUS_PER_TASK) {  // 如果当前executor上的core数满足配置的单个task的core数要求
        try {
          for (task <- taskSet.resourceOffer(execId, host, maxLocality)) { // 为当前stage分配一个executor
            tasks(i) += task
            val tid = task.taskId
            taskIdToTaskSetManager(tid) = taskSet // 存储该task->taskSet的映射关系
            taskIdToExecutorId(tid) = execId // 存储该task分配到的executorId
            executorIdToTaskCount(execId) += 1 // 该executor上执行的task个数加一
            executorsByHost(host) += execId // 存储host->executorId的映射关系
            availableCpus(i) -= CPUS_PER_TASK // 该Executor可用core数减一
            assert(availableCpus(i) >= 0) // 如果启动task后,该executor上的core数大于等于0,才算正常启动。
            launchedTask = true
          }
        } catch {
          ...
        }
      }
    }
    return launchedTask
  }
9、TaskSetManager#resourceOffer
上面方法中,将executor分配给taskSet之后在这个方法中,最终启动一个个task,并未启动的task生成task描述对象TaskDescription。isZombie的值在上面已经讲过了,如果为false,则表示当前TaskSetManager中的task没有全部执行成功,可以继续执行剩余task。
每次分配一个executor给TaskSetManager,然后TaskSetManager从未执行的task队列中取出一个task分配到该executor上执行。
  def resourceOffer(
      execId: String,
      host: String,
      maxLocality: TaskLocality.TaskLocality)
    : Option[TaskDescription] =
  {
    if (!isZombie) {
      ...
      // 顺序取出TaskSetManager中未执行的task
      dequeueTask(execId, host, allowedLocality) match {
        case Some((index, taskLocality, speculative)) => {
          val task = tasks(index) // 取出一个task
          val taskId = sched.newTaskId() // 分配一个新的taskId
          copiesRunning(index) += 1
          val attemptNum = taskAttempts(index).size
          // 生成taskInfo对象存储当前task的相关信息
          val info = new TaskInfo(taskId, index, attemptNum, curTime,
            execId, host, taskLocality, speculative)
          taskInfos(taskId) = info // 记录taskId->taskInfo映射关系
          taskAttempts(index) = info :: taskAttempts(index)
          ...
          // 序列化并返回task
          val startTime = clock.getTimeMillis()
          val serializedTask: ByteBuffer = try {
            Task.serializeWithDependencies(task, sched.sc.addedFiles, sched.sc.addedJars, ser)
          } catch {
            ...
          }
          // 如果序列化后的task大小超过100KB时,直接抛出异常
          if (serializedTask.limit > TaskSetManager.TASK_SIZE_TO_WARN_KB * 1024 &&
              !emittedTaskSizeWarning) {
            emittedTaskSizeWarning = true
            logWarning(s"Stage ${task.stageId} contains a task of very large size " +
              s"(${serializedTask.limit / 1024} KB). The maximum recommended task size is " +
              s"${TaskSetManager.TASK_SIZE_TO_WARN_KB} KB.")
          }
          addRunningTask(taskId)

          // We used to log the time it takes to serialize the task, but task size is already
          // a good proxy to task serialization time.
          // val timeTaken = clock.getTime() - startTime
          val taskName = s"task ${info.id} in stage ${taskSet.id}"
          logInfo(s"Starting $taskName (TID $taskId, $host, partition ${task.partitionId}," +
            s"$taskLocality, ${serializedTask.limit} bytes)")
          // 为该task准备好执行环境后,开始执行task
          sched.dagScheduler.taskStarted(task, info)
          // 返回一个TaskDescription信息
          return Some(new TaskDescription(taskId = taskId, attemptNumber = attemptNum, execId,
            taskName, index, serializedTask))
        }
        case _ =>
      }
    }
    None
  }
10、DAGScheduler#taskStarted
为task准备好执行环境和资源后,在TaskScheduler和SchedulerBackend中绕了一大圈后又再次回到了DAGScheduler中,调用taskStarted方法,最终将该task运行起来。
  def taskStarted(task: Task[_], taskInfo: TaskInfo) {
    eventProcessLoop.post(BeginEvent(task, taskInfo))
}在这个方法中通过eventProcessLoop的post方法提交一个BeginEvent事件到DAGSchedulerEventProcessLoop中。有关DAGSchedulerEventProcessLoop,在Spark Scheduler模块源码分析之DAGScheduler中已经分析过了。
四、Task的运行和运行结果的处理
这一部分主要分析Task运行起来后的过程,以及运行结束后的结果如何处理。第三节中讲到,一个Stage中包含一组Tasks,这些Task在分配的Executor上执行。
在三、6-CoarseGrainedSchedulerBackend#makeOffers的最后,调用了CoarseGrainedSchedulerBackend#launchTasks方法。
1、CoarseGrainedSchedulerBackend#launchTasks
在该方法中,会将当前task在driver上序列化后发送到executor上运行。序列化后的task大小,如果超过128MB-200KB,当前task不能执行,并且把task对应的taskSetManager设置成zombie模式,因此其中剩余的task都不再执行。如果不超过该限制,则会把task分发到executor上。
序列化后的Task发送到Executor上执行,是通过Akka来进行的。其实上面那个限制大小也是Akka决定的。在AkkaUtils类中可以看到,这个限制由两个参数来确定spark.akka.frameSize,默认值为128,经过处理后,最终计算成128MB,表示Akka最大能传递的消息大小。除了用于发送序列化后的task数据之外,Akka本身会使用到一部分空间存储一些额外的数据,这一部分的大小为200KB。所以在默认情况下,对Akka来说,一个消息最大能传递的数据大小为128MB - 200KB。这两个参数在后面Executor中也会用到。
    private def launchTasks(tasks: Seq[Seq[TaskDescription]]) {
      for (task <- tasks.flatten) {
        // 序列化当前task
        val serializedTask = ser.serialize(task)
        // 如果当前task序列化后的大小超过了128MB-200KB,跳过当前task,并把对应的taskSetManager置为zombie模式
        if (serializedTask.limit >= akkaFrameSize - AkkaUtils.reservedSizeBytes) {
          scheduler.taskIdToTaskSetManager.get(task.taskId).foreach { taskSetMgr =>
            try {
              var msg = "Serialized task %s:%d was %d bytes, which exceeds max allowed: " +
                "spark.akka.frameSize (%d bytes) - reserved (%d bytes). Consider increasing " +
                "spark.akka.frameSize or using broadcast variables for large values."
              msg = msg.format(task.taskId, task.index, serializedTask.limit, akkaFrameSize,
                AkkaUtils.reservedSizeBytes)
              taskSetMgr.abort(msg)
            } catch {
              case e: Exception => logError("Exception in error callback", e)
            }
          }
        }
        else { // 序列化后的task大小不超过限制时,将当前task发送到Executor上执行。
          // 获取当前task分配到的executor相关信息
          val executorData = executorDataMap(task.executorId)
          executorData.freeCores -= scheduler.CPUS_PER_TASK
          executorData.executorEndpoint.send(LaunchTask(new SerializableBuffer(serializedTask)))  //将tasks发送到Executor
        }
      }
    }
根据当前task所分配的executor信息,将该executor可用core减去配置的CPUS_PER_TASK,然后调用send方法发送一个LaunchTask消息。
2、CoarseGrainedExecutorBackend#receive
Driver和Executor之间仍然使用Netty进行通信,在Driver端send一个LaunchTask的消息后,在Executor端会对应有一个receive方法接收消息。在下面代码中,可以看到Executor除了响应LaunchTask之外还能处理的其他事件。这些事件都继承自CoarseGrainedClusterMessage类。
  override def receive: PartialFunction[Any, Unit] = {
    // 注册Executor消息
    case RegisteredExecutor(hostname) =>
      logInfo("Successfully registered with driver")
      executor = new Executor(executorId, hostname, env, userClassPath, isLocal = false)

    case RegisterExecutorFailed(message) =>
      logError("Slave registration failed: " + message)
      System.exit(1)
    // 启动Task事件
    case LaunchTask(data) =>
      // 如果分配的executor为空,即当前task无分配的executor,则直接退出
      if (executor == null) {
        logError("Received LaunchTask command but executor was null")
        System.exit(1)
      } else {
        // 否则,反序列化Akka从driver端传输过来的task数据
        val taskDesc = ser.deserialize[TaskDescription](data.value)
        logInfo("Got assigned task " + taskDesc.taskId)
        // executor上启动task
        executor.launchTask(this, taskId = taskDesc.taskId, attemptNumber = taskDesc.attemptNumber,
          taskDesc.name, taskDesc.serializedTask)
      }
    // 杀死Task事件
    case KillTask(taskId, _, interruptThread) =>
      if (executor == null) {
        logError("Received KillTask command but executor was null")
        System.exit(1)
      } else {
        executor.killTask(taskId, interruptThread)
      }
    // 停止Executor事件
    case StopExecutor =>
      logInfo("Driver commanded a shutdown")
      // Cannot shutdown here because an ack may need to be sent back to the caller. So send
      // a message to self to actually do the shutdown.
      self.send(Shutdown)
    // 终止事件
    case Shutdown =>
      executor.stop()
      stop()
      rpcEnv.shutdown()
  }
3、Executor#launchTask
略。。
  def launchTask(
      context: ExecutorBackend,
      taskId: Long,
      attemptNumber: Int,
      taskName: String,
      serializedTask: ByteBuffer): Unit = {
    val tr = new TaskRunner(context, taskId = taskId, attemptNumber = attemptNumber, taskName,
      serializedTask)
    runningTasks.put(taskId, tr)
    threadPool.execute(tr)
  }
4、Executor#run
这个方法是Executor执行task的主要方法。Task在Executor中执行完成后,会通过向Driver发送StatusUpdate的消息来通知Driver任务的状态更新为TaskState.FINISHED。
在Executor运行Task时,得到计算结果会存入org.apache.spark.scheduler.DirectTaskResult。在将结果传回Driver时,会根据结果的大小有不同的策略:对于较大的结果,将其以taskId为key存入org.apache.storage.BlockManager,如果结果不大,则直接回传给Driver。回传是通过AKKA来实现的,所以能够回传的值会有一个由AKKA限制的大小,这里涉及到一个参数spark.akka.frameSize,默认为128,单位为Byte,在源码中最终转换成了128MB。表示AKKA最大能传递的消息大小为128MB,但是同时AKKA会保留一部分空间用于存储其他数据,这部分的大小为200KB,那么结果如果小于128MB - 200KB的话就可以直接返回该值,否则的话,在不大于1G的情况下(可以通过参数spark.driver.maxResultSize来修改,默认为1g),会通过BlockManager来传递。详细信息会在Executor模块中描述。完整情况如下:
(1)如果结果大于1G,直接丢弃
(2)如果结果小于等于1G,大于128MB - 200KB,通过BlockManager记录结果的tid和其他信息
(3)如果结果小于128MB - 200 KB,直接返回该值
    override def run(): Unit = {
      ...
      logInfo(s"Running $taskName (TID $taskId)")
      // 开始执行Task,
      // yarn-client模式下,调用CoarseGrainedExecutorBackend的statusUpdate方法
      // 将该Task的运行状态置为RUNNING
      execBackend.statusUpdate(taskId, TaskState.RUNNING, EMPTY_BYTE_BUFFER)
      ...
      try {
        // 反序列化task,获取该Task需要使用到的file和jar文件
        val (taskFiles, taskJars, taskBytes) = Task.deserializeWithDependencies(serializedTask)
        updateDependencies(taskFiles, taskJars)
        task = ser.deserialize[Task[Any]](taskBytes, Thread.currentThread.getContextClassLoader)
        task.setTaskMemoryManager(taskMemoryManager)

        // 判断如果该task被kill了,直接抛出异常
        if (killed) {
          throw new TaskKilledException
        }
        ...
        var threwException = true
        val (value, accumUpdates) = try {
          // 调用Task.run方法,开始运行task
          val res = task.run(
            taskAttemptId = taskId,
            attemptNumber = attemptNumber,
            metricsSystem = env.metricsSystem)
          threwException = false
          res
        } finally {
          ...
        }
        ...
        // 生成DirectTaskResult对象,并序列化Task的运行结果
        val directResult = new DirectTaskResult(valueBytes, accumUpdates, task.metrics.orNull)
        val serializedDirectResult = ser.serialize(directResult)
        val resultSize = serializedDirectResult.limit

        val serializedResult: ByteBuffer = {
          // 如果序列化后的结果比spark.driver.maxResultSize配置的还大,直接丢弃该结果
          if (maxResultSize > 0 && resultSize > maxResultSize) {
            logWarning(s"Finished $taskName (TID $taskId). Result is larger than maxResultSize " +
              s"(${Utils.bytesToString(resultSize)} > ${Utils.bytesToString(maxResultSize)}), " +
              s"dropping it.")
            ser.serialize(new IndirectTaskResult[Any](TaskResultBlockId(taskId), resultSize))
          }
          // 如果序列化后的结果小于上面的配置,而大于spark.akka.frameSize - 200KB
          // 结果通过BlockManager回传
          else if (resultSize >= akkaFrameSize - AkkaUtils.reservedSizeBytes) {
            val blockId = TaskResultBlockId(taskId)
            env.blockManager.putBytes(
              blockId, serializedDirectResult, StorageLevel.MEMORY_AND_DISK_SER)
            logInfo(
              s"Finished $taskName (TID $taskId). $resultSize bytes result sent via BlockManager)")
            ser.serialize(new IndirectTaskResult[Any](blockId, resultSize))
          }
          // 如果结果小于spark.akka.frameSize - 200KB,则可通过AKKA直接返回Task的该执行结果
          else {
            logInfo(s"Finished $taskName (TID $taskId). $resultSize bytes result sent to driver")
            serializedDirectResult
          }
        }
        // 更新当前Task的状态为finished
        execBackend.statusUpdate(taskId, TaskState.FINISHED, serializedResult)

      } catch {
        case ffe: FetchFailedException =>
          ...
        case _: TaskKilledException | _: InterruptedException if task.killed =>
          ...
        case cDE: CommitDeniedException =>
          ...
        case t: Throwable =>
          ...
      } finally {
        // 总runnint状态的task列表中将该task移除
        runningTasks.remove(taskId)
      }
    }
  }
5、CoarseGrainedExecutorBackend#statusUpdate
上面代码中,在Task开始时以及Task处理完毕后都会通过本方法更新Task的状态。这里的msg是StatusUpdate类型,通过调用driver的send方法将该msg发出。
  override def statusUpdate(taskId: Long, state: TaskState, data: ByteBuffer) {
    val msg = StatusUpdate(executorId, taskId, state, data)
    driver match {
      case Some(driverRef) => driverRef.send(msg)
      case None => logWarning(s"Drop $msg because has not yet connected to driver")
    }
6、CoarseGrainedSchedulerBackend#receive
这个方法最终获取到上面发出的msg,这个方法在三-5、CoarseGrainedSchedulerBackend#receive中已经分析过,当时是接收请求资源的消息。这里继续分析接收到StatusUpdate后的逻辑。
    override def receive: PartialFunction[Any, Unit] = {
      case StatusUpdate(executorId, taskId, state, data) =>
        // 调用TaskSchedulerImpl.statusUpdate方法处理task状态变更消息
        scheduler.statusUpdate(taskId, state, data.value)
        ...

      case ReviveOffers =>
        makeOffers()

      case KillTask(taskId, executorId, interruptThread) =>
        ...
    }
7、TaskSchedulerImpl#statusUpdate
在这个方法中,主要分析完成状态和失败状态的Task后续处理流程的入口。
  def statusUpdate(tid: Long, state: TaskState, serializedData: ByteBuffer) {
    var failedExecutor: Option[String] = None
    synchronized {
      try {
        ...
        taskIdToTaskSetManager.get(tid) match {
          case Some(taskSet) =>
            // 如果Task的状态为FINISHED或FAILED或KILLED或LOST,该task就被认为执行结束
            // 将运行完成的Task从相关记录器中移除
            if (TaskState.isFinished(state)) {
              taskIdToTaskSetManager.remove(tid)
              taskIdToExecutorId.remove(tid).foreach { execId =>
                if (executorIdToTaskCount.contains(execId)) {
                  executorIdToTaskCount(execId) -= 1
                }
              }
            }
            // 任务成功完成
            if (state == TaskState.FINISHED) {
              taskSet.removeRunningTask(tid)    // TaskSetManager标记该任务已经结束
              // 成功Task后续处理逻辑入口
              taskResultGetter.enqueueSuccessfulTask(taskSet, tid, serializedData)
            }
            // 如果TASK状态为FAILED或KILLED或LOST
            else if (Set(TaskState.FAILED, TaskState.KILLED, TaskState.LOST).contains(state)) {
              taskSet.removeRunningTask(tid)
              // 处理失败任务,加入到失败任务处理队列中
              taskResultGetter.enqueueFailedTask(taskSet, tid, state, serializedData)
            }
          case None =>
            ...
        }
      } catch {
        case e: Exception => logError("Exception in statusUpdate", e)
      }
    }
    // 如果当前Executor lost,则通知DAGScheduler该Executor已经lost。
    // SchedulerBackend申请新的Executor
    if (failedExecutor.isDefined) {
      dagScheduler.executorLost(failedExecutor.get)
      backend.reviveOffers()
    }
  }
7.1、成功执行的Task
7.2、执行失败的Task


 4970
4970


 被折叠的 条评论
为什么被折叠?
被折叠的 条评论
为什么被折叠?
 到【灌水乐园】发言


