


在上一篇 中,定义了一个最简单的SkinnableComponent并为其定义了两个Skin。
对于TransitionSkin,需要在enable时有不同的展现方式,这可以通过Skin State实现。
对自定义的SkinnableComponent的修改
首先在组件中定义isEnabled属性:
private var _isEnabled:Boolean = false; public function get isEnabled():Boolean { return _isEnabled; } public function set isEnabled(value:Boolean):void { _isEnabled = value; }
然后定义SkinState元标签:
[SkinState("normal")] [SkinState("enable")]
最后需要将属性值和组件状态关联起来,这是通过覆盖SkinnableComponent的getCurrentSkinState方法实现的。
该方法的最初定义如下:
/** * Returns the name of the state to be applied to the skin. For example, a * Button component could return the String "up", "down", "over", or "disabled" * to specify the state. * * <p>A subclass of SkinnableComponent must override this method to return a value.</p> * * @return A string specifying the name of the state to apply to the skin. * * @langversion 3.0 * @playerversion Flash 10 * @playerversion AIR 1.5 * @productversion Flex 4 */ protected function getCurrentSkinState():String { return null; }
在Node中需要覆盖该方法:
override protected function getCurrentSkinState():String { if(isEnabled) return "enable"; return "normal"; }
完整的Node代码如下:
Node.as
package skinsample { [SkinState("normal")] [SkinState("enable")] import spark.components.supportClasses.SkinnableComponent; public class Node extends SkinnableComponent { public function Node() { super(); } private var _isEnabled:Boolean = false; public function get isEnabled():Boolean { return _isEnabled; } public function set isEnabled(value:Boolean):void { _isEnabled = value; } override protected function getCurrentSkinState():String { if(isEnabled) return "enable"; return "normal"; } } }
对Skin的修改
Skin中首先需要增加状态的声明:
<s:states> <s:State name="normal" /> <s:State name="enable" /> </s:states>
接下来可以指定Skin元素在哪个状态中出现,默认是在所有状态中出现。XML节点和属性都可以进行指定。
对于XML节点,增加includeIn属性,如:
<s:Button top="0" right="0" bottom="0" left="0" alpha="0" includeIn="enable,normal" />
对于XML属性,增加 属性名称.状态名称 指定特定状态下的属性值,如:
<s:SolidColor color="0x131313" color.enable="0xff0000" />
完整的Skin代码如下:
TransitionSkin.mxml
<?xml version="1.0" encoding="utf-8"?> <s:Skin xmlns:fx="http://ns.adobe.com/mxml/2009" xmlns:s="library://ns.adobe.com/flex/spark" xmlns:mx="library://ns.adobe.com/flex/halo" width="400" height="300"> <s:states> <s:State name="normal" /> <s:State name="enable" /> </s:states> <s:Rect id="rect" radiusX="4" radiusY="4" top="0" right="0" bottom="0" left="0"> <s:fill> <s:SolidColor color="0x131313" color.enable="0xff0000" /> </s:fill> <s:stroke> <s:SolidColorStroke color="0x131313" weight="2"/> </s:stroke> </s:Rect> <s:Button top="0" right="0" bottom="0" left="0" alpha="0" includeIn="enable,normal"/> </s:Skin>
PlaceSkin.mxml
<?xml version="1.0" encoding="utf-8"?> <s:Skin xmlns:fx="http://ns.adobe.com/mxml/2009" xmlns:s="library://ns.adobe.com/flex/spark" xmlns:mx="library://ns.adobe.com/flex/halo" width="400" height="300"> <s:states> <s:State name="normal" /> <s:State name="enable" /> </s:states> <s:Ellipse id="ellipse" top="0" right="0" bottom="0" left="0"> <s:fill> <s:SolidColor color="0x77CC22" /> </s:fill> <s:stroke> <s:SolidColorStroke color="0x131313" weight="2"/> </s:stroke> </s:Ellipse> </s:Skin>
使用具有状态的组件和Skin
定义好组件和Skin后,就可以使用了:
NodeSample.mxml
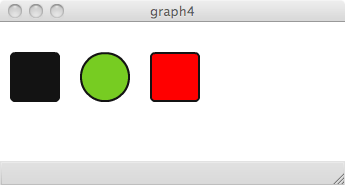
<?xml version="1.0" encoding="utf-8"?> <s:WindowedApplication xmlns:fx="http://ns.adobe.com/mxml/2009" xmlns:s="library://ns.adobe.com/flex/spark" xmlns:mx="library://ns.adobe.com/flex/halo" xmlns:skinsample="skinsample.*"> <fx:Script> <!--[CDATA[ import skinsample.TransitionSkin; ]]--> </fx:Script> <skinsample:Node skinClass="skinsample.TransitionSkin" x="10" y="30" width="50" height="50"/> <skinsample:Node skinClass="skinsample.PlaceSkin" x="80" y="30" width="50" height="50"/> <skinsample:Node skinClass="skinsample.TransitionSkin" x="150" y="30" width="50" height="50" isEnabled="true"/> </s:WindowedApplication>
运行效果:


 2738
2738

 被折叠的 条评论
为什么被折叠?
被折叠的 条评论
为什么被折叠?
 到【灌水乐园】发言


