


Nexus是一个强大的Maven仓库管理器,它极大地简化了自己内部仓库的维护和外部仓库的访问。利用Nexus你可以只在一个地方就能够完全控制访问和部署在你所维护仓库中的每个Artifact。Nexus是一套“开箱即用”的系统不需要数据库,它使用文件系统加Lucene来组织数据。Nexus 使用ExtJS来开发界面,利用Restlet来提供完整的REST APIs,通过m2eclipse与Eclipse集成使用。Nexus支持WebDAV与LDAP安全身份认证。
来自<http://www.oschina.net/p/nexus>
安装Nexus
下载
Nexus有两种安装包,一种是包含Jetty容器的Bundle包,另一种是不包含Web容器的war包。我们可以从http://www.sonatype.org/downloads/nexus-latest-bundle.zip下载最新版本的Nexus的Bundle包。
解压nexus-latest-bundle.zip,会发现有两个文件夹。如图1:
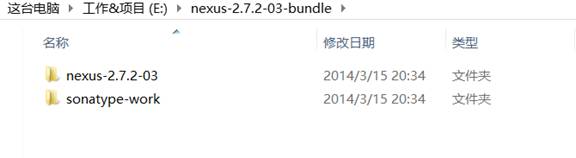
图1
nexus-2.7.2-03目录包含了Nexus运行所需要的文件。是Nexus运行必须的。
sonatype-work目录包含Nexus生成的配置文件、日志文件、仓库文件等。当我们需要备份Nexus的时候默认备份此目录即可。
安装
进入目录nexus-2.7.2-03\bin\jsw,你会发现有很多的安装环境。我的操作系统是64位的Windows 8,那么进入windows-x86-64目录。有以下文件,如图2:
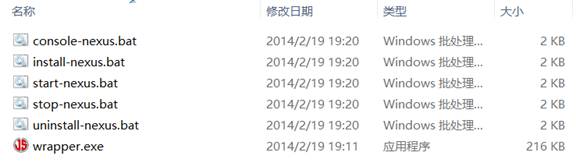
图2
install-nexus.bat:将Nexus服务安装到Windows系统。
start-nexus.bat:启动Nexus服务。
stop-nexus.bat:停止Nexus服务。
uninstall-nexus.bat:卸载Nexus服务。
右击install-nexus.bat“以管理员身份运行”运行文件,右击start-nexus.bat“以管理员身份运行”运行文件。在“服务”中,我们可以看到Nexus已经安装并且运行起来了,图3:

图3
安装之前要先安装JDK,并在环境变量中配置JAVA_HOME和PATH。
登录
在浏览器中输入:http://localhost:8081/nexus/得到以下界面,见图4:

图4
单击右上角的“Log In”按钮进行登录,Nexus的默认管理员账户密码为admin/admin123。
配置Nexus
Nexus仓库分类
Nexus包含了各种类型的仓库类型。在登录后的Nexus界面,单击左边的“Repositories”链接,可以看到图5所示:
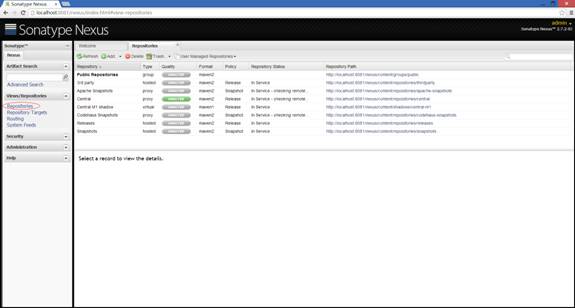
图5
我们可以从上图中看到四种仓库类型:group(仓库组)、hosted(宿主)、proxy(代理)和virtual(虚拟)。其中每种类型的Format有Maven1或者Maven2,这里我们不看Maven1的。仓库的Policy(策略)表示该仓库为发布(Release)版本还是快照(Snapshot)版本仓库。
在图5中,Nexus列出了默认的几个仓库:
Public Repositories:仓库组,将所有策略为Release的仓库聚合并通过一致的地址提供服务。
3rd party:一个策略为Release的宿主类型仓库,用来部署无法从公共仓库获得的第三方发布版本构件。
Apache Snapshots:策略为Snapshots的代理仓库,用来代理Apache Maven仓库的快照版本构件。
Central:该仓库代理Maven的中央仓库,策略为Release,只会下载和缓存中央仓库中的发布版本构件。
Central M1 shadow:maven1格式的虚拟类型仓库。
Codehaus Snapshots:代理Codehaus Maven仓库快照版本的代理仓库。
Release:策略为Release的宿主类型仓库,用来部署组织内部的发布版本构件。
Snapshots:策略为Snapshots的宿主类型仓库,用来部署组织内部的快照版本构件。
用《Maven实战》中一张图来解释下仓库的分类:
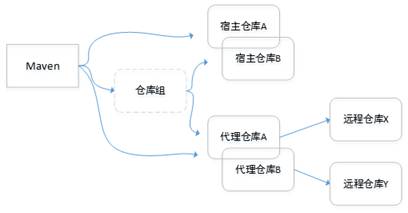
图6
私有仓库配置
Nexus的索引与构件搜索
点击图5中列表上的“Public Repositories”行,在下方的“Configuration”中我们可以看到,在“Ordered Group Repositories”中包含了Release、Snapshots、3rd party、Central等仓库。
为了构建Nexus的Maven中央库索引,首先需要设置Nexus中Maven Cencal代理仓库下载远程索引,将“Download Remote Indexes”的值从默认值false改为true。如图7:

图7
点击“Save”后,点击左边的“Scheduled Tasks”链接,会出现图8界面,说明Nexus后台在下载Maven中央仓库的索引。

图8
如果没有出现图8界面,那么要在“Public Repositories”行右击,点击“Update Index”。
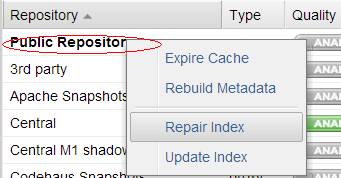
图9
在“Repositories”界面中,选择Browse Index选项卡,可以看到Maven中央仓库内容的树形结构,如图10。

图10
如果还是构建不成功,参考:http://blog.csdn.net/mtkong/article/details/9377605
http://397013586.iteye.com/blog/1558492
在左边的搜索框中输入“spring”关键字,会出现一大堆与spring相关的结果。
如果要对宿主仓库和代理仓库建立索引。只需要在对应的仓库上右击,从弹出的快捷菜单中选择“ReIndex”即可。
配置Maven从Nexus下载构件
在上面的基础上,我们可以用Nexus私服了。有2种方式:
1、在项目的POM中配置。
|
1
2
3
4
5
6
7
8
9
10
11
12
13
14
15
16
17
18
19
20
21
22
23
24
25
26
|
<
code
><
repositories
>
<
repository
>
<
id
>local_nexus</
id
>
<
name
>local_nexus</
name
>
<
url
>http://localhost:8081/nexus/content/groups/public/</
url
>
<
releases
>
<
enabled
>true</
enabled
>
</
releases
>
<
snapshots
>
<
enabled
>true</
enabled
>
</
snapshots
>
</
repository
>
</
repositories
>
<
pluginRepositories
>
<
pluginRepository
>
<
id
>local_nexus</
id
>
<
name
>local_nexus</
name
>
<
url
>http://localhost:8081/nexus/content/groups/public/</
url
>
<
releases
>
<
enabled
>true</
enabled
>
</
releases
>
<
snapshots
>
<
enabled
>true</
enabled
>
</
snapshots
>
</
pluginRepository
>
</
pluginRepositories
></
code
>
|
这样的配置只对当前的Maven项目有效。但是,实际的项目开发中,我们都想着一次配置就能让本机的所有Maven项目都使用Maven私服,那么我们就要用到下面的方法。
2、在settings.xml中配置远程仓库。
Maven提供的profile是一组可选的配置,可以用来设置或者覆盖配置默认值。有了profile,你就可以为不同的环境定制构建。那么在settings.xml中加入以下代码:
|
1
2
3
4
5
6
7
8
9
10
11
12
13
14
15
16
17
18
19
20
21
22
23
24
25
26
27
28
29
30
31
32
33
34
35
36
37
38
|
<
code
><
settings
>
...
<
profiles
>
<
profile
>
<
id
>local_nexus</
id
>
<
repositories
>
<
repository
>
<
id
>local_nexus</
id
>
<
name
>local_nexus</
name
>
<
url
>http://localhost:8081/nexus/content/groups/public/</
url
>
<
releases
>
<
enabled
>true</
enabled
>
</
releases
>
<
snapshots
>
<
enabled
>true</
enabled
>
</
snapshots
>
</
repository
>
</
repositories
>
<
pluginRepositories
>
<
pluginRepository
>
<
id
>local_nexus</
id
>
<
name
>local_nexus</
name
>
<
url
>http://localhost:8081/nexus/content/groups/public/</
url
>
<
releases
>
<
enabled
>true</
enabled
>
</
releases
>
<
snapshots
>
<
enabled
>true</
enabled
>
</
snapshots
>
</
pluginRepository
>
</
pluginRepositories
>
</
profile
>
</
profiles
>
<
activeProfiles
>
<
activeProfile
>local_nexus</
activeProfile
>
</
activeProfiles
>
...
</
settings
></
code
>
|
上面的配置中,使用了一个id为local_nexus的profile,这个profile包含了相关的仓库配置,同时配置中又使用了activeProfiles元素将nexus这个profile激活,这样当执行Maven构建的时候,激活的profile会将仓库配置应用到项目中去。
通过上面的配置,我们会发现Maven除了从Nexus下载构件外还会从中央仓库下载构件构件。既然是私服,那么我们就只希望Maven下载请求都仅仅通过Nexus。我们可以通过镜像实现这一需求。可以创建一个匹配任何仓库的镜像,镜像的地址是私服,这样Maven对任何仓库的构件下载请求都会转到私服中。把上面的配置修改为如下配置:
|
1
2
3
4
5
6
7
8
9
10
11
12
13
14
15
16
17
18
19
20
21
22
23
24
25
26
27
28
29
30
31
32
33
34
35
36
37
38
39
40
41
42
43
44
45
46
47
48
49
50
51
52
53
54
55
56
57
58
59
60
61
62
63
64
65
66
67
68
|
<
code
><
settings
>
...
<
mirrors
>
<
mirror
>
<
id
>local_mirror</
id
>
<
mirrorOf
>*</
mirrorOf
>
<
name
>local_mirror</
name
>
<
url
>http://localhost:8081/nexus/content/groups/public/</
url
>
</
mirror
>
</
mirrors
>
<
profiles
>
<
profile
>
<
id
>local_nexus</
id
>
<
repositories
>
<
repository
>
<
id
>local_nexus</
id
>
<
name
>local_nexus</
name
>
<
url
>http://localhost:8081/nexus/content/groups/public/</
url
>
<
releases
>
<
enabled
>true</
enabled
>
</
releases
>
<
snapshots
>
<
enabled
>true</
enabled
>
</
snapshots
>
</
repository
>
<
repository
>
<
id
>central</
id
>
<!--由于配置过镜像,这个url不起作用-->
<
url
>http://repo.maven.apache.org/maven2</
url
>
<
releases
>
<
enabled
>true</
enabled
>
</
releases
>
<
snapshots
>
<
enabled
>true</
enabled
>
</
snapshots
>
</
repository
>
</
repositories
>
<
pluginRepositories
>
<
pluginRepository
>
<
id
>local_nexus</
id
>
<
name
>local_nexus</
name
>
<
url
>http://localhost:8081/nexus/content/groups/public/</
url
>
<
releases
>
<
enabled
>true</
enabled
>
</
releases
>
<
snapshots
>
<
enabled
>true</
enabled
>
</
snapshots
>
</
pluginRepository
>
<
pluginRepository
>
<
id
>central</
id
>
<
url
>http://repo.maven.apache.org/maven2</
url
>
<
releases
>
<
enabled
>true</
enabled
>
</
releases
>
<
snapshots
>
<
enabled
>true</
enabled
>
</
snapshots
>
</
pluginRepository
>
</
pluginRepositories
>
</
profile
>
</
profiles
>
<
activeProfiles
>
<
activeProfile
>local_nexus</
activeProfile
>
</
activeProfiles
>
...
</
settings
></
code
>
|
部署构件到私服
我们在实际开发过程是多个人的,那么总有一些公共模块或者说第三方构件是无法从Maven中央库下载的。我们需要将这些构件部署到私服上,供其他开发人员下载。用户可以配置Maven自动部署构件至Nexus的宿主仓库,也可以通过界面手动上传构件。
使用Maven部署构件到Nexus私服上
日常开发的快照版本部署到Nexus中策略为Snapshot的宿主仓库中,正式项目部署到策略为Release的宿主仓库中,POM的配置方式如下:
|
1
2
3
4
5
6
7
8
9
10
11
12
13
14
|
<
code
>...
<
distributionManagement
>
<
repository
>
<
id
>local_nexus_releases</
id
>
<
name
>core Release Repository</
name
>
<
url
>http://localhost:8081/nexus/content/repositories/releases/</
url
>
</
repository
>
<
snapshotRepository
>
<
id
>local_nexus_snapshots</
id
>
<
name
>core Snapshots Repository</
name
>
<
url
>http://localhost:8081/nexus/content/repositories/snapshots/</
url
>
</
snapshotRepository
>
</
distributionManagement
>
...</
code
>
|
Nexus的仓库对于匿名用户只是只读的。为了能够部署构件,我们还需要再settings.xml中配置验证信息:
|
1
2
3
4
5
6
7
8
9
10
11
12
13
14
|
<
code
>...
<
servers
>
<
server
>
<
id
>local_nexus_releases</
id
>
<
username
>admin</
username
>
<
password
>admin123</
password
>
</
server
>
<
server
>
<
id
>local_nexus_snapshots</
id
>
<
username
>admin</
username
>
<
password
>admin123</
password
>
</
server
>
</
servers
>
...</
code
>
|
其中,验证信息中service的id应该与POM中repository的id一致。
在Nexus界面上手动部署第三方构件至私服
我们除了自己的构件要部署到Nexus私服上外,我们有可能还要将第三方构件(如:SQLService的JDBC)部署到Nexus上。这个时候,在Nexus界面上选择一个宿主仓库(如3rd party),再在页面下方选择Artifact Upload选项卡。填写对应的Maven坐标。然后点击“Select Artifact(s) for Upload”按钮从本机选择要上传的构件,然后点击“Add Artifact”按钮将其加入到上传列表中。最后,单击页面底部的“Upload Artifact(s)”按钮将构件上传到仓库中。


 3151
3151


 被折叠的 条评论
为什么被折叠?
被折叠的 条评论
为什么被折叠?
 到【灌水乐园】发言


