软件中永远绕不开的一个问题就是数据存储的问题,PC的时候一般都是选择在数据库中存储,iOS如果是和后端配合的话,那么不需要考虑数据存储的这个问题,上次写了一下plist的存储,不过数据都是存储一些简单的键值对对象。本次需要将一些自己定义的类型存储在plist比如说图片,这个时候可以利用NSCoding协议,将数据地以类似档案的形式存储到plist文件中,然后从plist的文件中读取数据,使用协议的时候这个时候就会用到了NSCoder,如果对存档和解压没有概念的话,可以简单的理解为数据的序列化与反序列化。
基础概念
NSCoding是一个protocol. 如果实现了NSCoding,需要实现其中的两个方法:
|
1
2
|
- (
void
)encodeWithCoder:(
NSCoder
*)aCoder;
- (
id
)initWithCoder:(
NSCoder
*)aDecoder;
// NS_DESIGNATED_INITIALIZER
|
方法中的主要的参数就是NSCoder,它是archivie字节流的抽象类.可以将数据写入一个coder,也可以从coder中读取我们写入的数据. NSCoder是一个抽象类,不能直接使用它来创建对象. 但是可以通过其子类NSKeyedUnarchiver从字节流中读取数据,NSKeyedArchiver将对象写入到字节流。本文以书籍为例:
新建一个Book类,Book.h中的代码:
|
1
2
3
4
5
6
7
8
9
10
11
12
13
14
|
#import <Foundation/Foundation.h>
#import <UIKit/UIKit.h>
@interface
Book :
NSObject
<
NSCoding
>
@property
(strong,
nonatomic
) UIImage *ConverPicture;
@property
(strong,
nonatomic
)
NSString
*BookName;
@property
(strong,
nonatomic
)
NSString
*Author;
@property
(strong,
nonatomic
)
NSNumber
*Price;
@end
|
Book.m中实现NSCoding的两个方法,注意中UIImage的写法与其他有所不同:
|
1
2
3
4
5
6
7
8
9
10
11
12
13
14
15
16
17
18
19
20
21
22
|
@implementation
Book
- (
void
)encodeWithCoder:(
NSCoder
*)aCoder{
//注意这里是存储的是JPG图片的调用
[aCoder encodeObject:UIImageJPEGRepresentation(
self
.ConverPicture,1.0)forKey:@
"ConverPicture"
];
[aCoder encodeObject:_BookName forKey:@
"BookName"
];
[aCoder encodeObject:_Author forKey:@
"Author"
];
[aCoder encodeObject:_Price forKey:@
"Price"
];
}
- (
id
)initWithCoder:(
NSCoder
*)aDecoder{
self
.ConverPicture=[UIImage imageWithData:[aDecoder decodeObjectForKey:@
"ConverPicture"
]];
self
.BookName=[aDecoder decodeObjectForKey:@
"BookName"
];
self
.Author=[aDecoder decodeObjectForKey:@
"Author"
];
self
.Price=[aDecoder decodeObjectForKey:@
"Price"
];
return
self
;
}
@end
|
Demo实现
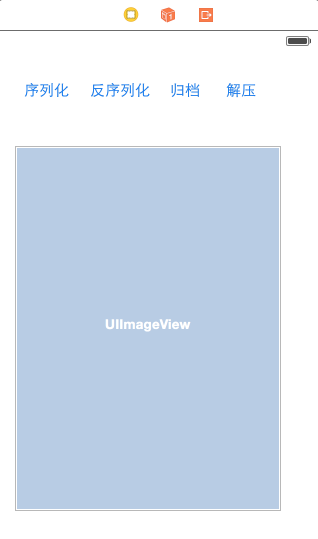
正常的情况的不需要新建页面的,不过需要演示一下UIImage的效果,Main.storyboard中的布局:

稍微解释一下,前两个是存的单文件,后两个存的是多文件,UIImage展示存储的图片:
ViewController定义字段:
|
1
2
3
4
5
|
@property
(strong,
nonatomic
)
NSString
*storagePath;
@property
(strong,
nonatomic
)
NSString
*storageListPath;
@property
(strong,
nonatomic
)
NSMutableArray
*bookList;
|
设置路径,如果不是很清晰,可参考本文之前的博客:
|
1
2
3
4
|
NSArray
*codepath=
NSSearchPathForDirectoriesInDomains
(
NSDocumentDirectory
,
NSUserDomainMask
,
YES
);
_storagePath = [codepath[0] stringByAppendingPathComponent:@
"book.plist"
];
NSLog
(@
"%@"
,
NSHomeDirectory
());
_storageListPath = [codepath[0] stringByAppendingPathComponent:@
"booklist.plist"
];
|
单个存档:
|
1
2
3
4
5
6
7
8
9
|
Book *book=[[Book alloc]init];
UIImage *image=[UIImage imageNamed:@
"Code1.jpg"
];
book.ConverPicture=image;
book.BookName=@
"百年孤独"
;
book.Author=@
"加西亚.马尔克斯"
;
book.Price=[[
NSNumber
alloc] initWithInteger:45];
if
([
NSKeyedArchiver
archiveRootObject:book toFile:_storagePath]) {
NSLog
(@
"数据存档成功"
);
}
|
单个解压:
|
1
2
3
4
5
|
Book *decodeBook=[
NSKeyedUnarchiver
unarchiveObjectWithFile:_storagePath];
self
.myImageView.image=decodeBook.ConverPicture;
NSLog
(@
"%@"
,decodeBook.ConverPicture);
NSLog
(@
"%@"
,decodeBook.BookName);
NSLog
(@
"解档成功"
);
|
多个存档:
|
1
2
3
4
5
6
7
8
9
10
11
12
13
14
15
|
self
.bookList=[
NSMutableArray
array];
for
(
NSInteger
i=1; i<3; i++) {
Book *book=[[Book alloc]init];
NSString
*imageName=[
NSString
stringWithFormat:@
"Code%ld.jpg"
,(
long
)i];
UIImage *image=[UIImage imageNamed:imageName];
book.ConverPicture=image;
book.BookName=[
NSString
stringWithFormat:@
"百年孤独%ld"
,(
long
)i];
book.Author=[
NSString
stringWithFormat:@
"加西亚.马尔克斯%ld"
,(
long
)i];
book.Price=[[
NSNumber
alloc] initWithInteger:45];
[
self
.bookList addObject:book];
}
if
([
NSKeyedArchiver
archiveRootObject:
self
.bookList toFile:_storageListPath]) {
NSLog
(@
"数据存档成功"
);
}
|
多个解档:
|
1
2
3
4
|
self
.bookList=[
NSKeyedUnarchiver
unarchiveObjectWithFile:_storageListPath];
Book *nextBook=
self
.bookList[1];
self
.myImageView.image=nextBook.ConverPicture;
NSLog
(@
"解档成功"
);
|
通过代码基本上发现其实存档和解压是非常简单的一个事情,不过事实这种方式缺点还是很明显的,以这种方式保存数据只能一次性归档保存以及一次性解压。数据较少的时候如果使用感觉比较方便,数据量过多的时候如果想修改其中的某一条,解压整个数据然后归档整个数据还是比较耗时的。最终演示效果如下:

出处: http://www.cnblogs.com/xiaofeixiang
说明:博客经个人辛苦努力所得,如有转载会特别申明,博客不求技惊四座,但求与有缘人分享个人学习知识,生活学习提高之用,博客所有权归本人和博客园所有,如有转载请在显著位置给出博文链接和作者姓名,否则本人将付诸法律。


 75
75


 被折叠的 条评论
为什么被折叠?


