


Spring MVC
Spring MVC 说是框架,对Tomcat来说其实就是一个Servlet,关于如何从上古时期的Servlet演化到如今的SpringMVC的,可以看看这篇博文:Spring MVC是如何逐步简化Servlet的编程的
业务分层之后既方便解耦,条例也更清晰。因此对于后台web层中又分了MVC三层:
- 模型(Model):负责封装应用的状态,并实现应用的功能。通常分为数据模型和业务逻辑模型,数据模型用来存放业务数据,比如订单信息、用户信息等;而业务逻辑模型包含应用的业务操作,比如订单的添加或者修改等。通常由java开发人员编写程序完成,代码量最多
- 视图(View):视图通过控制器从模型获得要展示的数据,然后用自己的方式展现给用户,相当于提供界面来与用户进行人机交互。通常由前端和java开发人员完成,代码量较多。
- 控制器(Controller):用来控制应用程序的流程和处理用户所发出的请求。当控制器接收到用户的请求后,会将用户的数据和模型的更新相映射,也就是调用模型来实现用户请求的功能;然后控制器会选择用于响应的视图,把模型更新后的数据展示给用户。起到总调度的作用,Controller通常由框架实现,使用时基本不需要编写代码
然而现在前端都在使用MVVM模型 ?
环境铺垫:
依赖及配置文件
创建maven工程并设置打包方式为war
<properties>
    <project.build.sourceEncoding>UTF-8</project.build.sourceEncoding>
    <maven.compiler.source>1.8</maven.compiler.source>
    <maven.compiler.target>1.8</maven.compiler.target>
</properties>

<packaging>war</packaging>
然后是添加依赖:
<dependencies>
    <!--springmmvc-->
    <dependency>
        <groupId>org.springframework</groupId>
        <artifactId>spring-webmvc</artifactId>
        <version>5.1.9.RELEASE</version>
    </dependency>
    <!--日志-->
    <dependency>
        <groupId>org.slf4j</groupId>
        <artifactId>slf4j-log4j12</artifactId>
        <version>1.7.28</version>
        <scope>test</scope>
    </dependency>
    <!--jsp相关-->
    <dependency>
        <groupId>javax.servlet</groupId>
        <artifactId>javax.servlet-api</artifactId>
        <version>4.0.1</version>
        <scope>provided</scope>
    </dependency>
    <dependency>
        <groupId>jstl</groupId>
        <artifactId>jstl</artifactId>
        <version>1.2</version>
    </dependency>
    <dependency>
        <groupId>javax.servlet.jsp</groupId>
        <artifactId>jsp-api</artifactId>
        <scope>provided</scope>
        <version>2.2</version>
    </dependency>
</dependencies>还用个吊毛的JSP啊?
日志配置文件log4j.properties:
### direct log messages to stdout ###
### 输出源的配置 语法  log4j.appender.输出源的名字=输出源的实现类 ###
### log4j.appender.输出源的名字.属性=属性值   ###
log4j.appender.a=org.apache.log4j.ConsoleAppender
log4j.appender.a.Target=System.out
log4j.appender.a.layout=org.apache.log4j.PatternLayout
log4j.appender.a.layout.ConversionPattern=%-d{yyyy-MM-dd HH:mm:ss,SSS} [%t] [%c]-[%p] %m%n
### set log levels - for more verbose logging change 'info' to 'debug' ###
### 日志记录器的配置,固定语法  log4j.rootLogger=输出级别, 输出源,输出源...  ###
log4j.rootLogger=debug, a
springMVC主配置文件springMVC.xml:
<?xml version="1.0" encoding="UTF-8"?>
<beans xmlns="http://www.springframework.org/schema/beans"
       xmlns:xsi="http://www.w3.org/2001/XMLSchema-instance" xmlns:p="http://www.springframework.org/schema/p"
       xmlns:context="http://www.springframework.org/schema/context"
       xmlns:mvc="http://www.springframework.org/schema/mvc"
       xsi:schemaLocation="http://www.springframework.org/schema/beans
   http://www.springframework.org/schema/beans/spring-beans.xsd
        http://www.springframework.org/schema/mvc
        http://www.springframework.org/schema/mvc/spring-mvc.xsd
        http://www.springframework.org/schema/context
        http://www.springframework.org/schema/context/spring-context.xsd">

<!-- 开启注解扫描 -->
<context:component-scan base-package="com.bilibili"></context:component-scan>
</beans>jsp页面:本文使用的是老旧的方式进行展示,新方式前后端分离,文章末尾有介绍JSP方式与前后端分离方式的不同
<%@ page contentType="text/html;charset=UTF-8" language="java" %>
<html>
<head>
    <title>Title</title>
</head>
<body>
    <h1>hello world!!!</h1>
</body>
</html>
在web.xml中配置映射:
<?xml version="1.0" encoding="UTF-8"?>
<web-app xmlns="http://java.sun.com/xml/ns/javaee"
           xmlns:xsi="http://www.w3.org/2001/XMLSchema-instance"
           xsi:schemaLocation="http://java.sun.com/xml/ns/javaee
        http://java.sun.com/xml/ns/javaee/web-app_3_0.xsd"
           version="3.0">

    <servlet>
        <servlet-name>DispatcherServlet</servlet-name>
        <!--配置springmvc的核心控制器 -->
        <servlet-class>org.springframework.web.servlet.DispatcherServlet</servlet-class>
        <init-param>
            <!-- 配置springmvc的核心配置文件的位置,Key是固定的 -->
            <param-name>contextConfigLocation</param-name>
            <param-value>classpath:springMVC.xml</param-value>
        </init-param>
    </servlet>
    <servlet-mapping>
        <servlet-name>DispatcherServlet</servlet-name>
        <!-- 配置springmvc的核心控制器拦截的请求,我们拦截所有已 do为后缀的所有请求 -->
        <url-pattern>*.do</url-pattern>
    </servlet-mapping>
</web-app>
创建自定义处理器:
/**
 *  @Controller:声明当前类是一个控制器
 */
@Controller
public class MyController {
    /**
     * @RequestMapping: 配置指定的请求由指定的方法来处理
     * @return
     */
    @RequestMapping("/show1.do")
    public ModelAndView test1(){
        ModelAndView mv = new ModelAndView();
        mv.setViewName("/WEB-INF/views/hello.jsp");
        mv.addObject("msg","springMVC入门");
        return mv;
    }
}
Spring MVC中的组件执行流程:
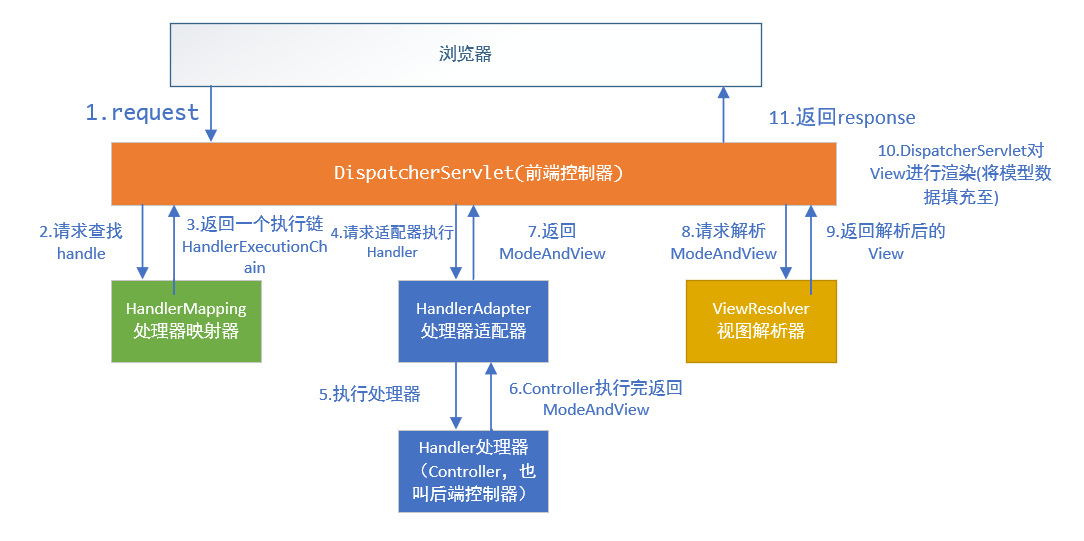
组件说明:
- DispatcherServlet:用户请求到达前端控制器,它就相当于mvc模式中的c,dispatcherServlet是整个流程控制的中心,由它调用其它组件处理用户的请求,dispatcherServlet的存在降低了组件之间的耦合性。
- HandlerMapping:HandlerMapping负责根据用户请求找到Handler即处理器,SpringMVC提供了不同的映射器实现不同的映射方式,例如:配置文件方式,实现接口方式,注解方式等。
- HandlAdapter:通过HandlerAdapter对处理器进行执行,通过扩展适配器可以对更多类型的处理器进行执行。
- Handler:具体业务处理器,由DispatcherServlet把用户请求转发到Handler。由Handler对具体的用户请求进行处理。
- View Resolver:View Resolver负责将处理结果生成View视图,View Resolver首先根据逻辑视图名解析成物理视图名即具体的页面地址,再生成View视图对象,最后对View进行渲染将处理结果通过页面展示给用户。
- View:通过页面标签将模型数据通过页面展示给用户。
其中大部分组件框架都已经提供并且已经配置完成,比如映射器和适配器,我么需要配置的是视图解析器:
<context:component-scan base-package="com.bilibili"></context:component-scan>

<bean class="org.springframework.web.servlet.view.InternalResourceViewResolver">
    <!-- 配置视图解析器的后缀,去找以 .jsp结尾的视图 -->
    <property name="suffix" value=".jsp"></property>
    <!-- 配置视图解析器的 ,也就是去哪里找视图-->
    <property name="prefix" value="/WEB-INF/views/"></property>
</bean>
<!-- 低版本需要主动配置注解驱动 -->
<!-- <mvc:annotation-driven></mvc:annotation-driven> -->
RequestMapping(映射请求)
@Controller:代表这是一个Handler,也就是执行器。@RequestMapping():规定映射规则
- 定义在方法上:请求路径就是方法上的@RequestMapping的value值
- 定义在类上:相当于给url多加了一个一级路径。
Ant映射风格:
?:匹配一个字符*:匹配任意个字符**:匹配任意路径
Rest映射风格:
路径中使用{key}来传参
举例说明:
/**
 * Rest风格的映射
 * {key}表示占位符,key为URL中允许的字符
 * 但是注意,我们可以通过@PathVariable(key) 获取地址中的参数。
 * @PathVariable 注解中的key必须和{key}占位符中的key一致,才能获取。形参名称可以是任意名
 * @return
 */
@RequestMapping("show5/{name}/{id}")
public ModelAndView test5(@PathVariable("name")String name,@PathVariable("id") int id){
    ModelAndView mv = new ModelAndView();
    mv.setViewName("hello");
    mv.addObject("msg","Rest风格的使用:name="+name+"  id="+id);
    return mv;
}@RequestMapping()注解的属性:
value:映射路径method:请求方法
值:RequestMethod.GET、RequestMethod.POST等,可以为多个params:参数为字符串数组
值:"id"必须携带参数(id)
值:"!id"不能携带参数(id)
值:"id=2"参数id必须为2(必须有参数id)
值:"id!=2"参数id不能为2(可以没有)
组合注解:
@GetMapping:相当于@RequestMapping(method = RequestMethod.GET)@PostMapping:相当于@RequestMapping(method = RequestMethod.POST)@PutMapping:相当于@RequestMapping(method = RequestMethod.PUT)@DeleteMapping:相当于@RequestMapping(method = RequestMethod.DELETE)
@RequestMapping注解的方法返回值是String:
@RequestMapping("show17")
//springMVC自动传递model
public String test17(Model model){

    model.addAttribute("msg","控制器优化后的代码");
    return "hello";//springMVC默认将返回的字符串直接作为视图名
}
@RequestMapping注解的方法返回值是void:
@ResponseStatus(HttpStatus.OK)//如果不响应页面,需要设置响应的状态为ok
@RequestMapping("show18")
public void test18(Model model){
    System.out.println("返回值是void类型");
}
接收servlet常用对象:
@ResponseStatus(HttpStatus.OK)
@RequestMapping("show19")
//直接写参数类型即可,springMVC自动传递参数,不考虑参数顺序
public void test19(Model model, HttpServletRequest request, HttpServletResponse response, HttpSession session){
    System.out.println(request);
    System.out.println(response);
    System.out.println(session);
}接收普通参数:@RequestParam(value="", required=true/false, defaultValue="")
- value:参数名
- required:是否必须,默认为true,标示请求参数中必须包含该参数,如果不包含则抛出异常
- defaultValue:默认参数值,如果设置了该值,required=true将失效(即使手动设置了也会失效),自动为false,如果请求中不包含该参数则使用默认值。
@RequestMapping("show20")
public String test20(Model model,@RequestParam(value = "username",required = true,defaultValue = "lisi") String username){
    model.addAttribute("msg",username);
    return "index";
}
获取Cookie:
- 在参数中添加
HttpServletRequest request,使用request.getCookies()方法 - 使用
@CookieValue注解
//@CookieValue : 使用方式和@RequestParam一致,需要注意,value值就是cookie中的名字,区分大小写。
@RequestMapping("show22")
public String test22(Model model,@CookieValue("JSESSIONID")String sessionId){
    model.addAttribute("msg",sessionId);
    return "index";
}
直接在参数中添加POJO类型可以实现前端数据直接绑定为POJO对象。
集合绑定:
集合属性为简单类型:
当前端同一个name有多个值时可以直接使用List来接收:@RequestParam("chenkBoxName") List<String> box
集合属性为POJO类型:
表单的name值需要是集合属性名[索引].Pojo属性名,比如users[0].age,代表第一个表单的age属性。
后端这么获取:
沙雕方法
public class Users {
    private List<User> userList;

    public List<User> getUserList() {
        return userList;
    }

    public void setUserList(List<User> userList) {
        this.userList = userList;
    }
}

@RequestMapping("show26")
    public String test26(Model model, Users users){
        model.addAttribute("msg",userVo);
        return "hello";
}
哦,上帝,这种前后端交互这太蠢了。
响应JSON
Json才是王道
首先引入依赖:
<dependency>
    <groupId>com.fasterxml.jackson.core</groupId>
    <artifactId>jackson-databind</artifactId>
    <version>2.9.9</version>
</dependency>
注意需要在SpringMVC.xml文件中添加注解驱动(为什么???):
<mvc:annotation-driven></mvc:annotation-driven>这样就可以返回Json类型数据:
Controller返回JSON
@ResponseBody//响应json数据
@RequestMapping("show28")
public List<User> test28(){
    List<User> userList = new ArrayList<>();
    User u1 = new User();
    u1.setName("张三1");
    u1.setAge(23);
    u1.setIncome(10000);
    u1.setIsMarry(true);
    User u2 = new User();
    u2.setName("张三2");
    u2.setAge(24);
    u2.setIncome(10002);
    u2.setIsMarry(false);

    userList.add(u1);
    userList.add(u2);
    return userList;
}
接收JSON为POJO对象:
直接在参数里添加@RequestBody修饰的POJO对象即可:
@RequestMapping("show29")
public String test29(Model model,@RequestBody User user){

}
如果出现乱码现象:
- filter全局乱码过滤器
- SpringMVC中配置字符串消息处理器编码格式(StringHttpMessageConverter这个类提供了编码的有参构造)
即springMVC.xml中配置:
<mvc:annotation-driven>
    <mvc:message-converters>
        <bean class="org.springframework.http.converter.StringHttpMessageConverter">
            <constructor-arg value="utf-8"></constructor-arg>
        </bean>
    </mvc:message-converters>
</mvc:annotation-driven>
@RestController
有时如果在一个Contoller中所有的方法都是用来响应json格式数据的,那么如果有多个方法,就需要在多个方法上使用@ResponseBody,这样太麻烦,springmvc提供了一个@RestController,将该注解使用在Controller类上,那么该controller中的所有方法都默认是响应json格式的数据了
文件上传
Spring有两个web相关的包,spring-webmvc :这个里面存放的是springmvc的核心功能。spring-web:这里面存放的是web相关的功能,例如监听器,文件上传等,而文件上传依赖apache的commons-fileupload依赖。
首先导入依赖:
<!-- 文件上传依赖的包,apache的 -->
<dependency>
    <groupId>commons-fileupload</groupId>
    <artifactId>commons-fileupload</artifactId>
    <version>1.4</version>
</dependency>
创建控制器:
/**
 *  @RequestParam: 注意此注解的值,需要和表单提交的名字一致
 * @param model
 * @param file  接受上传的文件
 * @return
 * @throws Exception
 */
@RequestMapping("show34")
public String test34(Model model, @RequestParam("file") MultipartFile file) throws Exception{

    if(file!=null){
        file.transferTo(new File("f://download/"+file.getOriginalFilename()));
    }
    model.addAttribute("msg","上传成功");

    return "hello";
}
前端HTML中创建表单:
<!-- 这里提交方式必须是post,并且需要有 enctype="multipart/form-data" 这一属性 -->
<form action="http://localhost:8080/hello/show34.do" method="post" enctype="multipart/form-data">
    <input type="file" name="files">
    <input type="submit"  value="上传">
</form>
在spring配置文件中添加文件解析器:
<!-- 配置文件上传解析器,注意,此处id必须为 multipartResolver -->
<bean id="multipartResolver" class="org.springframework.web.multipart.commons.CommonsMultipartResolver">
    <!-- 配置文件上传的最大值,这里是5M -->
    <property name="maxUploadSize" value="5242880"></property>
    <!-- 配置上传文件的名字编码格式 -->
    <property name="defaultEncoding" value="utf-8"></property>
</bean>
上传多个文件:
首先在前端HTML的input标签中添加multiple属性:
<!-- 添加multiple属性以支持多个文件 -->
<input type="file" multiple name="files">
后端控制器需要修改MultipartFile参数为数组:
@RequestMapping("show35")
public String files(Model model, @RequestParam("files") MultipartFile[] files)throws Exception {
    for (MultipartFile file : files) {
        if (file != null) {
            file.transferTo(new File("D:/dir/B/"+file.getOriginalFilename()));
        }
    }
    model.addAttribute("msg", "成功");
    return "index";
}
此时便可支持多个文件上传。
重定向及转发
返回值为字符串时,默认为视图名称。当返回值字符串是以”forward:”或者”redirect:”开头,则会被认为是转发或者重定向。
方式如下:
转发:forward:/hello/show.do(绝对路径)或者forward:show.do(相对路径)
重定向:redirect:/hello/show.do(绝对路径)或者redirect:show.do(相对路径)
/:表示绝对路径,指的是localhost:8080/springmvc(项目名称可以省略)
不带/:表示相对路径,相对于当前请求的路径
    如果当前请求是:localhost:8080/springmvc(项目名称可以省略)/hello/show32
    那么不带/:表示localhost:8080/springmvc(项目名称可以省略)/hello/
拦截器
拦截器的执行过程:
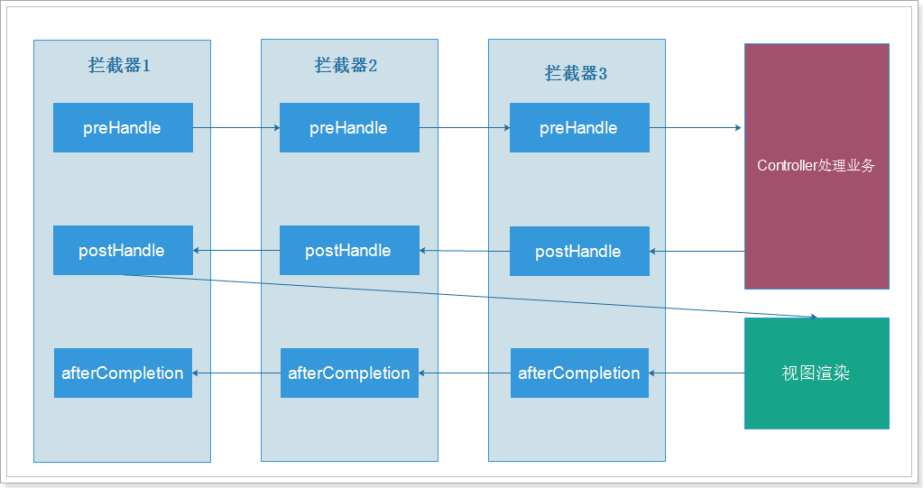
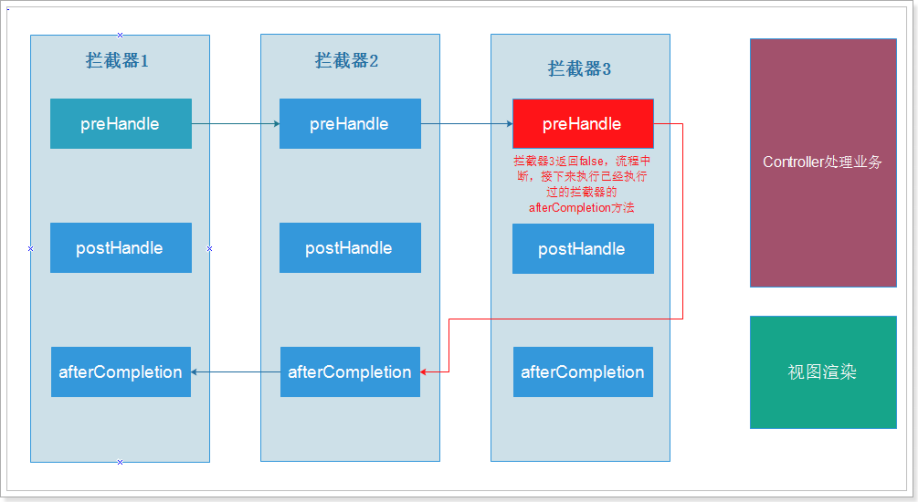
自定义拦截器:
创建类并实现HandlerInterceptor,然后注册到spring中即可。
拦截器类:
public class MyInterceptor1 implements HandlerInterceptor {

    /**
     * 在handler方法执行之前执行,
     *
     * @return true,拦截器放行,返回false,拦截器不放行,后续业务逻辑进行处理。
     * @throws Exception
     */
    @Override
    public boolean preHandle(HttpServletRequest request, HttpServletResponse response, Object handler) throws Exception {
        System.out.println("myInterceptor1,预处理方法执行执行");
        return true;
    }

    /**
     *  handler执行之后执行。
     * @throws Exception
     */
    @Override
    public void postHandle(HttpServletRequest request, HttpServletResponse response, Object handler, ModelAndView modelAndView) throws Exception {
        System.out.println("myInterceptor1,后置处理方法执行执行");
    }

    /**
     * 在视图渲染之后执行
     */
    @Override
    public void afterCompletion(HttpServletRequest request, HttpServletResponse response, Object handler, Exception ex) throws Exception {
        System.out.println("MyInterceptor1,请求完成回调方法正在执行");
    }
}
然后在spring中注册拦截器:
<!--
    /: 表示绝对路径:
    http://localhost:8080/springmvc
    /*:表示绝对路径下的任意一级路径:
    http://localhost:8080/springmvc/xxx
    /**:表示绝对路径下的任意多级目录:
    http://localhost:8080/springmvc/xxx
    http://localhost:8080/springmvc/xxx/xxx/xxx
 -->
<mvc:interceptors>
    <mvc:interceptor>
        <mvc:mapping path="/**"/>
        <bean class="com.bilibili.interceptor.MyInterceptor1"></bean>
    </mvc:interceptor>
</mvc:interceptors>
拦截器的执行顺序为注册的顺序
Post乱码过滤器
此时只需在web.xml中配置spring过滤器即可即可:
<filter>
    <filter-name>CharacterEncodingFilter</filter-name>
    <filter-class>org.springframework.web.filter.CharacterEncodingFilter</filter-class>
    <init-param>
        <param-name>encoding</param-name>
        <param-value>utf-8</param-value>
    </init-param>
</filter>
<filter-mapping>
    <filter-name>CharacterEncodingFilter</filter-name>
    <url-pattern>/*</url-pattern>
</filter-mapping>
自定义异常处理类
这种方式如果文件太大,会导致浏览器接收不到服务器返回的ModelAndView,文件小一点的话却可以
总体流程就是创建一个类实现HandlerExceptionResolver接口,然后在在spring中注册即可:
public class MyException implements HandlerExceptionResolver {
    @Override
    public ModelAndView resolveException(HttpServletRequest request, HttpServletResponse response, Object handler, Exception ex) {
        ModelAndView mv = new ModelAndView();
        if (ex instanceof MaxUploadSizeExceededException) {
            System.out.println("error");
            mv.setViewName("error");
            mv.addObject("msg", "文件过大");
        }
        return mv;
    }
}
然后在Spring容器中注册即可
附:JSP与前后端分离
以前老的方式是:
- 客户端请求
- 服务端的servlet或controller接收请求(路由规则由后端制定,整个项目开发的权重大部分在后端)
- 调用service,dao代码完成业务逻辑
- 返回jsp
- jsp展现一些动态的代码
新的方式是:
- 浏览器发送请求
- 直接到达html页面(路由规则由前端制定,整个项目开发的权重前移)
- html页面负责调用服务端接口产生数据(通过ajax等等)
- 填充html,展现动态效果。
附:URL中的字符
URL的特殊字符 当几种特定的字符集合出现在URL中时,你必须特别注意:
首先,在URL中有特殊意义的字符,也就是保留字符:
;、/、?、:、@、&、=、+、$、,,10个,这意味着,这些字符通常在URL中使用时,是有特殊含义的(如 ":"把每一个部分分隔开来), 如果一个URL的某一部分(如查询参数的一部分)可能包含这些字符之一,则应该在放入URL之前 对其进行转义处理.第二组需要注意的字符集是非保留字符集.如下:
-、_、.、!、~、*、'、(、),9个,这些字符可以被用于URL的任何位置(有些地方,不允许它们出现). 使用它们作为URL的一部分时,你不需要进行编码/转义处理.你可以对它们进行转义操作且不影响URL 的语义,但不建议这么做.第三组 不推荐字符 也就是避用字符集合使用它们是不明智的:
{、}、|、\、^、[、]、`(数字1键前),8个,不明智的原因:网关有时会修改这样的字符,或者将其作为分隔符使用.这并不意味着网关总会修改这些字符,但这种情况可能发生.如果真是要使用这些字符,请做转义处理.第四组,例外字符集,这组字符集是所有的ASCII控制字符组成.包含空格字符以下列字符:
<、>、#、%、"、`,6个,控制字符是不可打印的US-ASCII字符(十六进制00~1F及7F)如果使用,请转义处理.有些字符#(哈希)和%(百分比)在URL上下文中有着特殊含义,你可以把它们当作保留字符对待.这个集合中的其它字符无法被打印,因此对它们进行转义是唯一的表示方式,<、>、"`、这三个字符需要被转义,因为这些字符通常用来在文本中分隔URL。
参考知乎
写的有点乱,不过这只是作为学习笔记而已。┓( ´∀` )┏


 3万+
3万+

 被折叠的 条评论
为什么被折叠?
被折叠的 条评论
为什么被折叠?
 到【灌水乐园】发言


