


1、UITableView掌握
1> 设置UITableView的dataSource、delegate
2> UITableView多组数据和单组数据的展示
3> UITableViewCell的常见属性
4> UITableView的性能优化(cell的循环利用)
5> 自定义Cell
2、什么是UITableView
在iOS中,要实现展示列表数据,最常用的做法就是使用UITableView。UITableView继承自UIScrollView,因此支持垂直滚动,而且性能极佳
3、如何展示数据
-
UITableView需要一个数据源(dataSource)来显示数据
-
UITableView会向数据源查询一共有多少行数据以及每一行显示什么数据等
-
没有设置数据源的UITableView只是个空壳
-
凡是遵守UITableViewDataSource协议的OC对象,都可以是UITableView的数据源
4、UITableViewCell
4.1 UITableViewCell简介:
UITableView的每一行都是一个UITableViewCell,通过dataSource的tableView:cellForRowAtIndexPath:方法来初始化每一行
UITableViewCell内部有个默认的子视图:contentView,contentView是UITableViewCell所显示内容的父视图,可显示一些辅助指示视图
4.2 UITableViewCell的contentView
contentView下默认有3个子视图
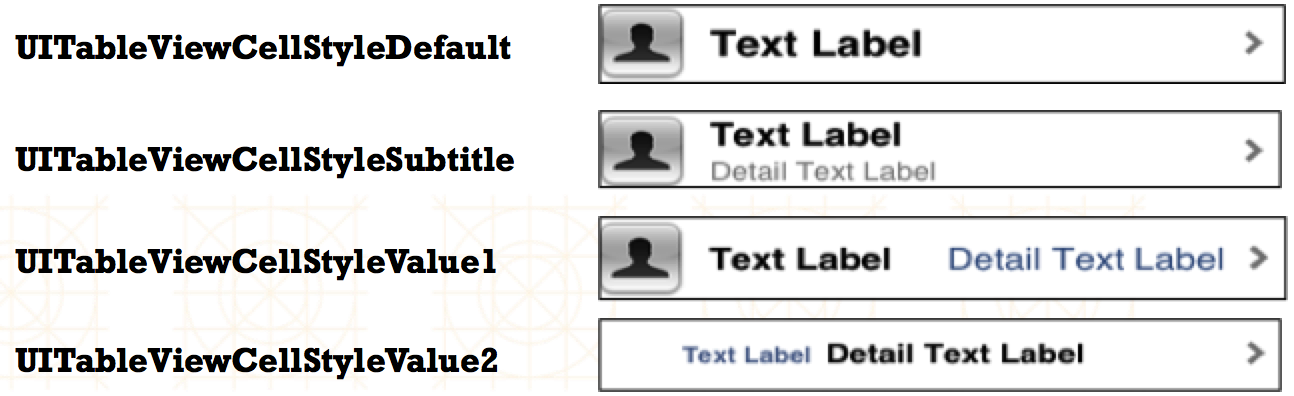
4.3 UITableViewCell结构

4.4 UITableViewCell的重用原理
4.5 Cell的重用代码
 1 - (UITableViewCell *)tableView:(UITableView *)tableView cellForRowAtIndexPath:(NSIndexPath *)indexPath
 2 {
 3     // 1.定义一个cell的标识
 4       static NSString *ID = @”czcell";
 5
 6     // 2.从缓存池中取出cell
 7       UITableViewCell *cell = [tableView dequeueReusableCellWithIdentifier:ID];
 8
 9     // 3.如果缓存池中没有cell
10       if (cell == nil) {
11         cell = [[UITableViewCell alloc] initWithStyle:UITableViewCellStyleSubtitle reuseIdentifier:ID];
12     }
5、UITableView、UITableViewController、代理与数据源之间的关系,如下图所属:

6、UITableView和数据源

1. tableView展示数据
// 1.调用数据源的下面方法得知一共有多少组数据
- (NSInteger)numberOfSectionsInTableView:(UITableView *)tableView;
// 2.调用数据源的下面方法得知每一组有多少行数据
- (NSInteger)tableView:(UITableView *)tableView numberOfRowsInSection:(NSInteger)section;
// 3.调用数据源的下面方法得知每一行显示什么内容
- (UITableViewCell *)tableView:(UITableView *)tableView cellForRowAtIndexPath:(NSIndexPath *)indexPath;
7、UITableView的常见属性
1. 常用属性
//1. 修改tableView的行高
self.tableView.rowHeight = 100;
// 2.组头组尾的高
 self.tableView.sectionHeaderHeight = 55;
 self.tableView.sectionFooterHeight = 22;
// 3.设置整个tablView的头部/尾部视图
  self.tableView.tableHeaderView = [[UISwitch alloc] init];
  self.tableView.tableFooterView = [UIButton buttonWithType:UIButtonTypeInfoDark];
// 4.设置我们分割线颜色(clearColor相当于取消系统分割线)
self.tableView.separatorColor = [UIColor clearColor]; // 5.设置分割线样式
self.tableView.separatorStyle = UITableViewCellSeparatorStyleNone;// 设置索引条内部文字颜色
self.tableView.sectionIndexColor = [UIColor colorWithRed:1 green:1 blue:1 alpha:1];
// 设置索引条背景颜色
self.tableView.sectionIndexBackgroundColor = [UIColor colorWithRed:0 green:0 blue:0 alpha:1];
// 允许UITableView多选
self.tableView.allowsMultipleSelection = YES;
// 获取选中多行
NSArray *array = self.tableView.indexPathsForSelectedRows;
// 获取选中单行
NSIndexPath *indexPath = self.tableView.indexPathForSelectedRow;
// 让UITableView进入编辑状态,会出现左滑效果(结合代理方法commitEditingStyle...处理左滑效果时编辑事件处理)
self.tableView.editing = YES;
2、常见方法(数据源与代理方法)
#pragma mark - 数据源方法
// 返回行数
- (NSInteger)tableView:(nonnull UITableView *)tableView numberOfRowsInSection:(NSInteger)section{
}

// 设置cell
- (UITableViewCell *)tableView:(nonnull UITableView *)tableView cellForRowAtIndexPath:(nonnull NSIndexPath *)indexPath{
。。。。。。。。。。。
}

#pragma mark - 代理方法
/**
*  设置行高
*/
- (CGFloat)tableView:(nonnull UITableView *)tableView heightForRowAtIndexPath:(nonnull NSIndexPath *)indexPath{
   return 100;
}

// 添加每组的组头
- (UIView *)tableView:(nonnull UITableView *)tableView viewForHeaderInSection:(NSInteger)section{

}

// 返回每组的组尾
- (UIView *)tableView:(nonnull UITableView *)tableView viewForFooterInSection:(NSInteger)section{

}

// 选中某行cell时会调用
- (void)tableView:(nonnull UITableView *)tableView didSelectRowAtIndexPath:(nonnull NSIndexPath *)indexPath{
   NSLog(@"选中didSelectRowAtIndexPath row = %ld", indexPath.row);
}

/*
2015-07-21 10:01:56.261 02-UITableView单组数据展示[1305:36752] 选中didSelectRowAtIndexPath row = 0
2015-07-21 10:01:58.212 02-UITableView单组数据展示[1305:36752] 取消选中 didDeselectRowAtIndexPath row = 0
2015-07-21 10:01:58.212 02-UITableView单组数据展示[1305:36752] 选中didSelectRowAtIndexPath row = 1
*/
// 取消选中某行cell会调用 (当我选中第0行的时候,如果现在要改为选中第1行 - 》会先取消选中第0行,然后调用选中第1行的操作)
- (void)tableView:(nonnull UITableView *)tableView didDeselectRowAtIndexPath:(nonnull NSIndexPath *)indexPath{
   NSLog(@"取消选中 didDeselectRowAtIndexPath row = %ld ", indexPath.row);
}

//  设置UITableView的索引条方法:
// 设置UITableView的索引条,返回数组字符串集合
- (nullable NSArray<NSString *> *)sectionIndexTitlesForTableView:(UITableView *)tableView;{
   NSArray *carGroupModels = self.carGroups;
   // 利用KVC获取指定属性的集合
   NSArray *array = [carGroupModels valueForKeyPath:@"title"];
   return array;
}
索引条颜色与背景设置: // 设置索引条内部文字颜色
self.tableView.sectionIndexColor = [UIColor colorWithRed:1 green:1 blue:1 alpha:1];
// 设置索引条背景颜色
self.tableView.sectionIndexBackgroundColor = [UIColor colorWithRed:0 green:0 blue:0 alpha:1];
3、数据刷新
注意:
* 添加刷新:使用UITableView的 insertRowsAtIndexPaths...方法
* 修改刷新:使用UITableView的 reloadRowsAtIndexPaths...方法(该方法使用的前提是模型数据的个数不变,所以添加与删除不能采用此方法进行UITableView刷新功能。)
* 删除刷新:使用UITableView的 deleteRowsAtIndexPaths...方法
谢谢自己的坚持 ,而没有懈怠,今天就到处结束,明天我讲系统的梳理自定义等高与不等高UITableViewCell,分别用frame、xib、storyboard、Autolayout实现,也将在其中使用第三方框架:Masonry与MJExtension,以便大家互相学习。睡觉了,晚安,^_^


 740
740

 被折叠的 条评论
为什么被折叠?
被折叠的 条评论
为什么被折叠?
 到【灌水乐园】发言


