


◇大家都知道,ios开发里很多数据文件都是保存在一个plist文件中的,这个plist文件我们就称作字典文件,我们先来看一看字典文件里面是怎样的吧(需要把.plist文件导入到我们项目文件下的Supporting File文件夹下,在xcode中双击打开即可查看):
:
◇字典文件我们是不能直接拿来用的,需要通过代码,建立模型,模型就是对应字典的每一子项(item)。模型中的每一个属性,对应的就是就是每个子项中的小元素(icon、intro、name)。接下来,我们就来来实现这个图形列表功能,来详细说明字典转文件是如何实现的。
◇首先来看看我们所要做的图形列表界面:
◇说明:游戏人物头像、名字、详细说明,分别对应字典文件中的icon、name、intro。
◇主要实现步骤:(字典——》模型——》数组——》输出到界面),利用的是MVC的思想
◇1、依据字典文件,建立所对应的模型
◇2、初始化一个数组,把每一个实例化的模型都存入到对应的数组中
◇3、把数组元素放到相应的UITableView的每一行每一列中(根据数组长度,数组下标来确定每一行所要放的元素是什么)
◇具体实现代码
◇1、建立模型
◇①、首先是新建一个Hero类,并且在Hero.h文件中,声明属性并且声明类方法和对象方法:
1 @property (nonatomic,copy) NSString *name;
2 @property (nonatomic,copy) NSString *intro;
3 @property (nonatomic,copy) NSString *icon;
4
5 +(instancetype)heroWithDict:(NSDictionary *)dict;
6 -(instancetype)initWithDict:(NSDictionary *)dict;
◇②、然后再Hero.m文件中,实现类方法和对象方法(其中类方法的实现写法固定)
 1 //类方法和对象方法的命名格式固定,其中类方法的实现格式也是固定的
 2 + (instancetype)heroWithDict:(NSDictionary *)dict
 3 {
 4     return [[self alloc] initWithDict:dict];
 5 }
 6
 7 - (instancetype)initWithDict:(NSDictionary *)dict
 8 {
 9     //先将父类实例化,才能实例化子类
10     if (self = [super init]) {
11         [self setValuesForKeysWithDictionary:dict];      //KVC赋值
12     }
13     return self;
14 }
◇在控制器中声明一个数组,并初始化它,将模型文件的数据存入数组中去:
◇①、在控制器中声明数组元素
1 //在声明里声明一个heros数组
2 @property (nonatomic,strong) NSArray *heros;
◇②、初始化这个数组(模型存入数组中)
 1 //字典通过Hero模型存入数组
 2 -(NSArray *)heros{
 3     if(_heros == nil)
 4     {
 5         // 初始化
 6         // 1.获得plist的全路径
 7         NSString *path = [[NSBundle mainBundle] pathForResource:@"heros.plist" ofType:nil];
 8         // 2.加载数组
 9         NSArray *dictArray = [NSArray arrayWithContentsOfFile:path];
10         // 3.将dictArray里面的所有字典数据放到新的dictArray数组中,dictArray里面存的是都是NSDictionary数据
11         NSMutableArray *heroArray = [NSMutableArray array];
12         //循环遍历 dictArray 取出每一个字典项,然后通过我们已经写好的
13         for (NSDictionary *dict in dictArray) {
14             // 3.1.创建模型对象
15             Hero *hero = [Hero heroWithDict:dict];
16             // 3.2.添加模型对象到数组中
17             [heroArray addObject:hero];
18         }
19         // 4.赋值,(可变数组赋值给不可变数组)
20         _heros = heroArray;
21     }
22     return _heros;
23 }
◇3、在UITableView界面中,输出数据
 1 //从模型中获取具体的信息来分配给每一组的每一行数据
 2 - (UITableViewCell *)tableView:(UITableView *)tableView cellForRowAtIndexPath:(NSIndexPath *)indexPath{
 3     //下面的1、2两步,是UITableViewCell的内存优化(利用标识符)         static修饰局部变量:可以保证局部变量只分配一次存储空间(只初始化一次)
 4     static NSString *ID = @"hero";
 5
 6     // 1.通过一个标识去缓存池中寻找可循环利用的cell
 7     // dequeue : 出列 (查找)
 8     UITableViewCell *cell = [tableView dequeueReusableCellWithIdentifier:ID];
 9
10     // 2.如果没有可循环利用的cell
11     if (cell == nil){
12         cell = [[UITableViewCell alloc] initWithStyle:UITableViewCellStyleSubtitle reuseIdentifier:ID];
13         //        NSLog(@"------缓存池找不到cell--%d", indexPath.row);
14     }
15     // 取出模型
16     Hero *hero = self.heros[indexPath.row];
17
18     // 设置cell的数据
19     cell.textLabel.text = hero.name;
20     cell.detailTextLabel.text = hero.intro;
21     cell.imageView.image = [UIImage imageNamed:hero.icon];
22
23     return cell;
24 }
◇以上就依据这个小功能,详细讲解了字典转模型,今后将会经常用到该方法,所以必须牢牢掌握。
◇扩展一下,如何将嵌套的字典文件转成模型,先看看嵌套的字典文件是怎样的:
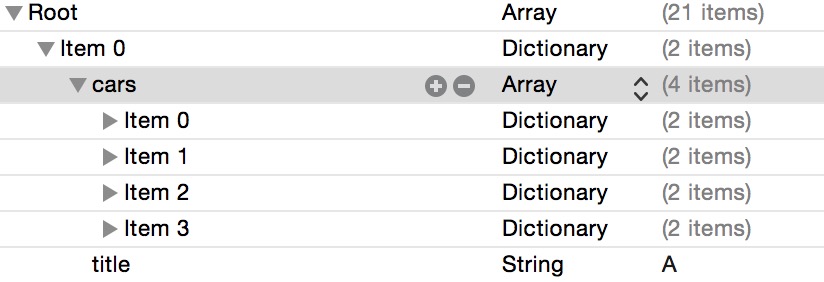
◇其实原理很简单,在模型内部再做一个中间层,用来获取另一个模型的数据即可,有一点类似递归的思想.
◇1、Car.h的代码(字典文件的内层item)
1 @property (nonatomic,copy) NSString *name;
2 @property (nonatomic,copy) NSString *icon;
3
4 + (instancetype)carWithDict:(NSDictionary *)dict;
5 - (instancetype)initWithDict:(NSDictionary *)dict;
◇2、Car.m的代码
1 + (instancetype)carWithDict:(NSDictionary *)dict{
2     return [[self alloc] initWithDict:dict];
3 }
4 - (instancetype)initWithDict:(NSDictionary *)dict{
5     if (self = [super init]) {
6         [self setValuesForKeysWithDictionary:dict];
7     }
8     return self;
9 }
◇3、CarGroup.h的代码(字典文件的外层item)
1 @property (nonatomic,copy) NSString *title;
2 @property (nonatomic,strong) NSArray *cars;
3
4 + (instancetype)groupWithDict:(NSDictionary *)dict;
5 - (instancetype)initWithDict:(NSDictionary *)dict;
◇4、CarGroup.的代码
 1 + (instancetype)groupWithDict:(NSDictionary *)dict{
 2     return [[self alloc] initWithDict:dict];
 3 }
 4 - (instancetype)initWithDict:(NSDictionary *)dict{
 5
 6     if (self = [super init]) {
 7         // 赋值标题
 8         self.title = dict[@"title"];
 9
10         // 取出原来的字典数组
11         NSArray *dictArray = dict[@"cars"];
12         NSMutableArray *arrCars = [NSMutableArray array];
13         for (NSDictionary *dict in dictArray) {
14             Car *car = [Car carWithDict:dict];
15
16             [arrCars addObject:car];
17         }
18         self.cars = arrCars;
19
20     }
21     return self;
22 }
◇5、在控制器中的初始化数组也是一样的
 1 - (NSArray *)groups
 2 {
 3     if (_groups == nil) {
 4         // 初始化
 5         // 1.获得plist的全路径
 6         NSString *path = [[NSBundle mainBundle] pathForResource:@"cars_total.plist" ofType:nil];
 7
 8         // 2.加载数组
 9         NSArray *dictArray = [NSArray arrayWithContentsOfFile:path];
10
11         // 3.将dictArray里面的所有字典转成模型对象,放到新的数组中
12         NSMutableArray *groupArray = [NSMutableArray array];
13         for (NSDictionary *dict in dictArray) {
14             // 3.1.创建模型对象
15             CarGroup *group = [CarGroup groupWithDict:dict];
16
17             // 3.2.添加模型对象到数组中
18             [groupArray addObject:group];
19         }
20
21         // 4.赋值
22         _groups = groupArray;
23     }
24     return _groups;
25 }
◇这样就完了,其实原理和简单的字典转模型是一样的。(*^__^*) ……


 211
211


 被折叠的 条评论
为什么被折叠?
被折叠的 条评论
为什么被折叠?
 到【灌水乐园】发言


