


现在非常流行单页面应用,传统都是通过ajax请求数据,前端拿到数据渲染到页面,这种无刷新的视图切换非常棒!但是致命的缺点就是刷新後无法保持原来的视图,解决此问题的一个方法是使用 hash,监听hashchange事件来进行视图切换,另一个方法是用HTML5的history API,通过pushState()记录操作历史,监听popstate事件来进行视图切换,也有人把这叫pjax技术。
现在开始介绍angular的$route!
$routevar m1 = angular.module('myApp',['ngRoute']);
m1.config(['$routeProvider',function($routeProvider){
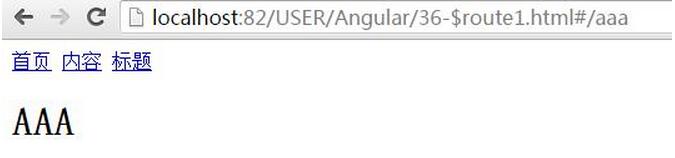
$routeProvider.when('/aaa',{
template : '
AAA
'}).when('/bbb',{
template : '
BBB
'}).when('/ccc',{
template : '
CCC
'}).otherwise({ //默认哈希值,哈希值出现错误也可以执行
redirectTo : '/aaa'
});
}]);
m1.controller('Aaa',['$scope',function($scope){
}]);
上面的例子很简单, 除了用template之外还可以用templateUrl引入html的模板文件。
在when传入控制器的指向,实现不同的页面显示不同的数据。
$routevar m1 = angular.module('myApp',['ngRoute']);
m1.config(['$routeProvider',function($routeProvider){
$routeProvider.when('/aaa',{
template : '
AAA
{{name}}',controller : 'Aaa' //控制器指向
}).when('/bbb',{
template : '
BBB
{{name}}',controller : 'Bbb'
}).when('/ccc',{
template : '
CCC
{{name}}',controller : 'Ccc'
}).otherwise({
redirectTo : '/aaa'
});
}]);
m1.controller('Aaa',['$scope',function($scope){
$scope.name = 'xiecg-Aaa';
}]);
m1.controller('Bbb',['$scope',function($scope){
$scope.name = 'xiecg-Bbb';
}]);
m1.controller('Ccc',['$scope',function($scope){
$scope.name = 'xiecg-Ccc';
}]);
以事件的方式映射路由页面。
$route首页
内容
标题
var m1 = angular.module('myApp',['ngRoute']);
m1.config(['$routeProvider',function($routeProvider){
$routeProvider.when('/aaa',{
template : '
AAA
{{name}}',controller : 'Aaa' //控制器指向
}).when('/bbb',{
template : '
BBB
{{name}}',controller : 'Bbb'
}).when('/ccc',{
template : '
CCC
{{name}}',controller : 'Ccc'
}).otherwise({
redirectTo : '/aaa'
});
}]);
m1.controller('Aaa',['$scope','$location',function($scope,$location){
$scope.name = 'xiecg-Aaa';
$scope.$location = $location;
}]);
m1.controller('Bbb',['$scope',function($scope){
$scope.name = 'xiecg-Bbb';
}]);
m1.controller('Ccc',['$scope',function($scope){
$scope.name = 'xiecg-Ccc';
}]);
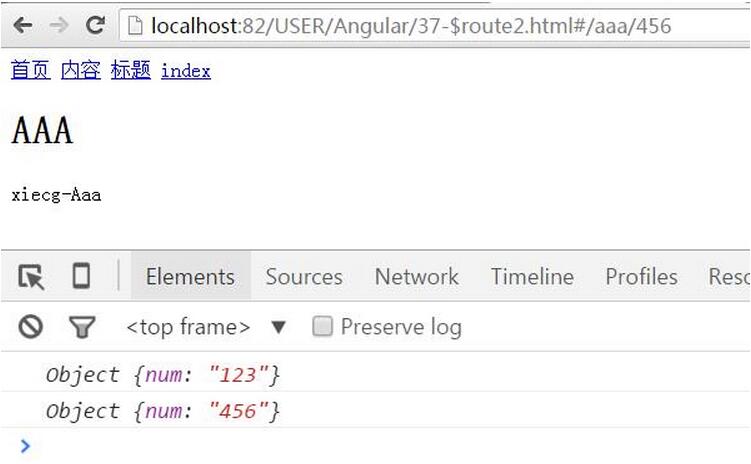
项目更复杂,页面相同(首页&index),数据不同,需要对url进行传参。
$route首页
内容
标题
index
var m1 = angular.module('myApp',['ngRoute']);
m1.config(['$routeProvider',function($routeProvider){
$routeProvider.when('/aaa/:num',{
template : '
AAA
{{name}}',controller : 'Aaa'
}).when('/bbb',{
template : '
BBB
{{name}}',controller : 'Bbb'
}).when('/ccc',{
template : '
CCC
{{name}}',controller : 'Ccc'
}).otherwise({
redirectTo : '/aaa/:num'
});
}]);
m1.controller('Aaa',['$scope','$location','$routeParams',function($scope,$location,$routeParams){
$scope.name = 'xiecg-Aaa';
$scope.$location = $location;
console.log($routeParams); //不同的数据
}]);
m1.controller('Bbb',['$scope',function($scope){
$scope.name = 'xiecg-Bbb';
}]);
m1.controller('Ccc',['$scope',function($scope){
$scope.name = 'xiecg-Ccc';
}]);
路由的事件监听。
$routevar m1 = angular.module('myApp',['ngRoute']);
m1.run(['$rootScope',function($rootScope){
//路由切换之前触发的事件
$rootScope.$on('$routeChangeStart',function(event,current,pre){
console.log(event); //事件对象
console.log(current); //路径对应的数据值
console.log(pre); //上一个路径
});
}]);
m1.config(['$routeProvider',function($routeProvider){
$routeProvider.when('/aaa',{
template : '
AAA
'//templateUrl : 'temp.html'
}).when('/bbb',{
template : '
BBB
'}).when('/ccc',{
template : '
CCC
'}).otherwise({ //默认哈希值,哈希值出现错误也可以执行
redirectTo : '/aaa'
});
}]);
m1.controller('Aaa',['$scope',function($scope){
}]);
补充:angular事件的传播机制。
{{count}}
{{count}}
{{count}}
var m1 = angular.module('myApp',[]);
m1.controller('Aaa',['$scope',function($scope){
$scope.count = 0;
$scope.$on('myEvent',function(e){
//console.log(e.targetScope); //当前的
//console.log(e.currentScope); //目标的
//console.log(e.name); //事件名
//e.stopPropagation(); //阻止冒泡
$scope.count++;
});
}]);
前面嵌套了三个controller,我们在中间的controller上绑定了click事件,使用$emit点击的时候,上面的controller也会触发事件。
如果是$broadcast点击就是往下传播。

以上就是本文的全部内容,希望对大家的学习有所帮助,也希望大家多多支持脚本之家。


 5万+
5万+


 被折叠的 条评论
为什么被折叠?
被折叠的 条评论
为什么被折叠?
 到【灌水乐园】发言


