


转载出处:http://blog.csdn.net/mabeijianxi/article/details/72983362
预热
时光荏苒,光阴如梭,离上一次吹牛逼已经过去了两三个月,身边很多人的女票已经分了又合,合了又分,本屌依旧骄傲单身。上一次啊我们大致说了一些简单的FFmpeg命令以及Java层简单的调用方式,然后有很多朋友在github或者csdn上给我留言,很多时候我都选择避而不答,原因是本库以前用的so包是不开源的,我根本改不了里面东西。但是这一次啊我们玩点大的,我重新编译了FFmpeg且重写JNI的接口函数,这次将从C到Java全面开源,2.0项目花了本尊两个多月的业余时间,今天终于完工,非常鸡冻,且本博客将抒发出作者的全部心声,有没有很鸡冻,有没有。鸡冻之余,我也想吐槽下其软便的效率,确实不是很高,3.0的时候将会试试硬编码,或则在2.0迭代的时候会采用H265编码,这都是后话了,不过看微信把小视频换成大视频的节奏,应该可以搞。
本文涉及知识点:
- Andorid 视频和音频采集
- YUV视频处理(手动剪切、旋转、镜像等)PCM音频处理
- 利用FFmpeg API ,YUV编码为H264、PCM编码为AAC
- FFmpeg 编码器的配置
- JNI在工程中的实际运用
- Android下FFmpeg命令工具的制作与应用
- Android Studio插件 cMake 在工程中的应用
充能:
- 至少需要知道YUV、PCM、MP4是什么(视音频编解码技术零基础学习方法)。
- 最好能先阅读编译Android下可用的FFmpeg(包含libx264与libfdk-aac)、编译Android下可执行命令的FFmpeg、Android下玩JNI的新老三种姿势,为了不太啰嗦,这些文章中分享过的大多数知识将不再重复。
- 对C/C++基本语法有基本的了解。
本人环境与工具
- 系统: macOS-10.12.5
- 编译器: Android Studio-2.3.2
- ndk: r14
- FFmpeg: 3.2.5
项目概括:
1. 效果图:

项目地址没变:https://github.com/mabeijianxi/small-video-record
这里复用了1.0版本的gif图,因为界面一点没变,功能的话暂时没封装那么多,没关系后期会补上。
2. 整体流程:

3. 工程目录浏览:


新建项目
我们新建一个项目,也许与以往不同,需要勾选上 C++ 支持与 C++ standard选项时选择 C++ 11,如下图:


C++支持是必须的,至于选用C++ 11也是有原因的,后面我们会用的里面的一些API。
然后我们把在编译Android下可用的FFmpeg(包含libx264与libfdk-aac)中编译好的六个动态库、头文件还有 cmdutils.c cmdutils.h cmdutils_common_opts.h config.h ffmpeg.c ffmpeg.h ffmpeg_filter.c ffmpeg_opt.c copy到我们工程的cpp目录下,完成后你cpp目录应该如下

也许你会比我多一个自动生成的native-lib.cpp,这个文件暂时保留它。
编写JNI接口:
我新建了一个接口类FFmpegBridge.java,且根据我的需求暂时定义了如下方法:
package com.mabeijianxi.smallvideorecord2.jniinterface;

import java.util.ArrayList;

/**
 * Created by jianxi on 2017/5/12.
 * https://github.com/mabeijianxi
 * mabeijianxi@gmail.com
 */

public class FFmpegBridge { private static ArrayList<FFmpegStateListener> listeners=new ArrayList(); static { System.loadLibrary("avutil"); System.loadLibrary("swresample"); System.loadLibrary("avcodec"); System.loadLibrary("avformat"); System.loadLibrary("swscale"); System.loadLibrary("avfilter"); System.loadLibrary("jx_ffmpeg_jni"); } /** * 结束录制并且转码保存完成 */ public static final int ALL_RECORD_END =1; public final static int ROTATE_0_CROP_LF=0; /** * 旋转90度剪裁左上 */ public final static int ROTATE_90_CROP_LT =1; /** * 暂时没处理 */ public final static int ROTATE_180=2; /** * 旋转270(-90)裁剪左上,左右镜像 */ public final static int ROTATE_270_CROP_LT_MIRROR_LR=3; /** * * @return 返回ffmpeg的编译信息 */ public static native String getFFmpegConfig(); /** * 命令形式运行ffmpeg * @param cmd * @return 返回0表示成功 */ private static native int jxCMDRun(String cmd[]); /** * 编码一帧视频,暂时只能编码yv12视频 * @param data * @return */ public static native int encodeFrame2H264(byte[] data); /** * 编码一帧音频,暂时只能编码pcm音频 * @param data * @return */ public static native int encodeFrame2AAC(byte[] data); /** * 录制结束 * @return */ public static native int recordEnd(); /** * 初始化 * @param debug * @param logUrl */ public static native void initJXFFmpeg(boolean debug,String logUrl); public static native void nativeRelease(); /** * * @param mediaBasePath 视频存放目录 * @param mediaName 视频名称 * @param filter 旋转镜像剪切处理 * @param in_width 输入视频宽度 * @param in_height 输入视频高度 * @param out_height 输出视频高度 * @param out_width 输出视频宽度 * @param frameRate 视频帧率 * @param bit_rate 视频比特率 * @return */ public static native int prepareJXFFmpegEncoder(String mediaBasePath, String mediaName, int filter,int in_width, int in_height, int out_width, int out_height, int frameRate, long bit_rate); /** * 命令形式执行 * @param cmd */ public static int jxFFmpegCMDRun(String cmd){ String regulation="[ \\t]+"; final String[] split = cmd.split(regulation); return jxCMDRun(split); } /** * 底层回调 * @param state * @param what */ public static synchronized void notifyState(int state,float what){ for(FFmpegStateListener listener: listeners){ if(listener!=null){ if(state== ALL_RECORD_END){ listener.allRecordEnd(); } } } } /** *注册录制回调 * @param listener */ public static void registFFmpegStateListener(FFmpegStateListener listener){ if(!listeners.contains(listener)){ listeners.add(listener); } } public static void unRegistFFmpegStateListener(FFmpegStateListener listener){ if(listeners.contains(listener)){ listeners.remove(listener); } } public interface FFmpegStateListener { void allRecordEnd(); } }
你新建这些方法的时候由于native没有定义,这时候它们都会爆红,不要担心不要纠结,光标放到对应的方法上,轻轻按下Atl + Enter你就会出现如图的效果了:

再次确定之后这个接口就会在native添加。我不太喜欢叫native-lib.cpp,于是我改成了jx_ffmpeg_jni.cpp,其内容暂时如下:
/**
 * Created by jianxi on 2017/5/12.
 * https://github.com/mabeijianxi
 * mabeijianxi@gmail.com
 */
#include <jni.h> #include <string> using namespace std; /** * 编码准备,写入配置信息 */ extern "C" JNIEXPORT jint JNICALL Java_com_mabeijianxi_smallvideorecord2_jniinterface_FFmpegBridge_prepareJXFFmpegEncoder(JNIEnv *env, jclass type, jstring media_base_path_, jstring media_name_, jint v_custom_format, jint in_width, jint in_height, jint out_width, jint out_height, jint frame_rate, jlong video_bit_rate) { } /** * 编码一帧视频 */ extern "C" JNIEXPORT jint JNICALL Java_com_mabeijianxi_smallvideorecord2_jniinterface_FFmpegBridge_encodeFrame2H264(JNIEnv *env, jclass type, jbyteArray data_) { return 0; } /** * 获取ffmpeg编译信息 */ extern "C" JNIEXPORT jstring JNICALL Java_com_mabeijianxi_smallvideorecord2_jniinterface_FFmpegBridge_getFFmpegConfig(JNIEnv *env, jclass type) { return NULL; } /** * 编码一帧音频 */ extern "C" JNIEXPORT jint JNICALL Java_com_mabeijianxi_smallvideorecord2_jniinterface_FFmpegBridge_encodeFrame2AAC(JNIEnv *env, jclass type, jbyteArray data_) { return 0; } /** *结束 */ extern "C" JNIEXPORT jint JNICALL Java_com_mabeijianxi_smallvideorecord2_jniinterface_FFmpegBridge_recordEnd(JNIEnv *env, jclass type) { return 0; } JNIEXPORT void JNICALL Java_com_mabeijianxi_smallvideorecord2_jniinterface_FFmpegBridge_nativeRelease(JNIEnv *env, jclass type) { // TODO }
编写native代码
我用c/c++用的不多,Java又用习惯了,所以在命名上有时候很纠结,看不惯亲的怎么办?那就些许的忍一忍吧~~
1. 准备log函数:
不管玩什么语言,没日志玩毛线啊,所以这是第一步。新建jx_log.cpp与jx_log.h。
jx_log.h:
/**
 * Created by jianxi on 2017/6/2.
 * https://github.com/mabeijianxi
 * mabeijianxi@gmail.com
 */
#ifndef JIANXIFFMPEG_JX_LOG_H
#define JIANXIFFMPEG_JX_LOG_H #include <android/log.h> extern int JNI_DEBUG; #define LOGE(debug, format, ...) if(debug){__android_log_print(ANDROID_LOG_ERROR, "jianxi_ffmpeg", format, ##__VA_ARGS__);} #define LOGI(debug, format, ...) if(debug){__android_log_print(ANDROID_LOG_INFO, "jianxi_ffmpeg", format, ##__VA_ARGS__);} #endif //JIANXIFFMPEG_JX_LOG_H
jx_log.cpp:
/**
 * Created by jianxi on 2017/6/2.
 * https://github.com/mabeijianxi
 * mabeijianxi@gmail.com
 */
#include "jx_log.h" int JNI_DEBUG= 1;
当然我们也定义了一个是否开启debug的标志 JNI_DEBUG。
2.准备好可执行命令的FFmpeg接口:
这里假设你已经看完了编译Android下可执行命令的FFmpeg,因为我们要对之前copy进来的源码做些修改,不然没法用的。我们新建两个文件来对接FFmpeg,文件中一个函数给Java层调用,一个给Native调用,还有一个是初始化debug控制日志用的,可以先不管。
jx_ffmpeg_cmd_run.h:
/**
 * Created by jianxi on 2017/6/4.
 * https://github.com/mabeijianxi
 * mabeijianxi@gmail.com
 */
#ifndef JIANXIFFMPEG_FFMPEG_RUN_H
#define JIANXIFFMPEG_FFMPEG_RUN_H #include <jni.h> JNIEXPORT jint JNICALL Java_com_mabeijianxi_smallvideorecord2_jniinterface_FFmpegBridge_jxCMDRun(JNIEnv *env, jclass type, jobjectArray commands); void log_callback(void* ptr, int level, const char* fmt, va_list vl); JNIEXPORT void JNICALL Java_com_mabeijianxi_smallvideorecord2_jniinterface_FFmpegBridge_initJXFFmpeg(JNIEnv *env, jclass type, jboolean debug, jstring logUrl_); int ffmpeg_cmd_run(int argc, char **argv); #endif //JIANXIFFMPEG_FFMPEG_RUN_H
jx_ffmpeg_cmd_run.c:
/**
 * Created by jianxi on 2017/6/4..
 * https://github.com/mabeijianxi
 * mabeijianxi@gmail.com
 */
#include "jx_ffmpeg_cmd_run.h" #include "ffmpeg.h" #include "jx_log.h" /** * 以命令行方式运行,返回0表示成功 */ JNIEXPORT jint JNICALL Java_com_mabeijianxi_smallvideorecord2_jniinterface_FFmpegBridge_jxCMDRun(JNIEnv *env, jclass type, jobjectArray commands){ int argc = (*env)->GetArrayLength(env,commands); char *argv[argc]; int i; for (i = 0; i < argc; i++) { jstring js = (jstring) (*env)->GetObjectArrayElement(env,commands, i); argv[i] = (char *) (*env)->GetStringUTFChars(env,js, 0); } return ffmpeg_cmd_run(argc,argv); } int ffmpeg_cmd_run(int argc, char **argv){ return jxRun(argc, argv); } char *logUrl; /** * 初始化debug工具 */ JNIEXPORT void JNICALL Java_com_mabeijianxi_smallvideorecord2_jniinterface_FFmpegBridge_initJXFFmpeg(JNIEnv *env, jclass type, jboolean debug, jstring logUrl_) { JNI_DEBUG = debug; if (JNI_DEBUG&&logUrl_!=NULL) { av_log_set_callback(log_callback); const char* log = (*env)->GetStringUTFChars(env,logUrl_, 0); logUrl = (char*)malloc(strlen(log)); strcpy(logUrl,log); (*env)->ReleaseStringUTFChars(env,logUrl_, log); } } void log_callback(void *ptr, int level, const char *fmt, va_list vl) { FILE *fp = NULL; if (!fp) fp = fopen(logUrl, "a+"); if (fp) { vfprintf(fp, fmt, vl); fflush(fp); fclose(fp); } }
一口气写到这里,必定会四处爆红,惨不忍睹,各种找不到文件,找不到方法,那是因为你添加了这么多文件,cMake工具不知道,正确的做法是每添加一个C/C++文件然后就去 CMakeLists.txt 里面告诉人家一声,完了还别忘了点击 Sync 同步下子。
3. CMakeLists.txt编写:
先强上一个脚本:
# For more information about using CMake with Android Studio, read the
# documentation: https://d.android.com/studio/projects/add-native-code.html

# Sets the minimum version of CMake required to build the native library.

cmake_minimum_required(VERSION 3.4.1) # Creates and names a library, sets it as either STATIC # or SHARED, and provides the relative paths to its source code. # You can define multiple libraries, and CMake builds them for you. # Gradle automatically packages shared libraries with your APK. add_library( # Sets the name of the library. jx_ffmpeg_jni # Sets the library as a shared library. SHARED # Provides a relative path to your source file(s). src/main/cpp/jx_yuv_encode_h264.cpp src/main/cpp/jx_pcm_encode_aac.cpp src/main/cpp/jx_media_muxer.cpp src/main/cpp/jx_jni_handler.cpp src/main/cpp/jx_ffmpeg_jni.cpp src/main/cpp/threadsafe_queue.cpp src/main/cpp/jx_log.cpp src/main/cpp/cmdutils.c src/main/cpp/ffmpeg.c src/main/cpp/ffmpeg_filter.c src/main/cpp/ffmpeg_opt.c src/main/cpp/jx_ffmpeg_cmd_run.c src/main/cpp/jx_ffmpeg_config.cpp ) add_library( avcodec SHARED IMPORTED ) set_target_properties( avcodec PROPERTIES IMPORTED_LOCATION ${CMAKE_SOURCE_DIR}/src/main/cpp/libavcodec.so ) add_library( avfilter SHARED IMPORTED ) set_target_properties( avfilter PROPERTIES IMPORTED_LOCATION ${CMAKE_SOURCE_DIR}/src/main/cpp/libavfilter.so ) add_library( avformat SHARED IMPORTED ) set_target_properties( avformat PROPERTIES IMPORTED_LOCATION ${CMAKE_SOURCE_DIR}/src/main/cpp/libavformat.so ) add_library( avutil SHARED IMPORTED ) set_target_properties( avutil PROPERTIES IMPORTED_LOCATION ${CMAKE_SOURCE_DIR}/src/main/cpp/libavutil.so ) add_library( swresample SHARED IMPORTED ) set_target_properties( swresample PROPERTIES IMPORTED_LOCATION ${CMAKE_SOURCE_DIR}/src/main/cpp/libswresample.so ) add_library( swscale SHARED IMPORTED ) set_target_properties( swscale PROPERTIES IMPORTED_LOCATION ${CMAKE_SOURCE_DIR}/src/main/cpp/libswscale.so ) add_library( jxffmpegcmd SHARED IMPORTED ) set_target_properties( jxffmpegcmd PROPERTIES IMPORTED_LOCATION ${CMAKE_SOURCE_DIR}/src/main/cpp/libjxffmpegrun.so ) include_directories( ${CMAKE_SOURCE_DIR}/ffmpeg-3.2.5/ ) # Searches for a specified prebuilt library and stores the path as a # variable. Because CMake includes system libraries in the search path by # default, you only need to specify the name of the public NDK library # you want to add. CMake verifies that the library exists before # completing its build. find_library( # Sets the name of the path variable. log-lib # Specifies the name of the NDK library that # you want CMake to locate. log ) # Specifies libraries CMake should link to your target library. You # can link multiple libraries, such as libraries you define in this # build script, prebuilt third-party libraries, or system libraries. target_link_libraries( # Specifies the target library. jx_ffmpeg_jni avcodec avfilter avformat avutil swresample swscale # Links the target library to the log library # included in the NDK. ${log-lib} )
当然这个脚本是整个完整工程的,有些文件我们到后面才会建出来,现在就忍耐一下,如果你不想被爆红那么就需要每添加一个文件然后就在第一个 add_library 里面也添加一下,再点击Android Studio的同步按钮。 里面其他 library 都是我们事先编译好copy进来的,所以采用预构建的方式添加,这里都是相对路径,所以你不需要修改什么。
include_directories 里面写上你已经编译过的源码的路径,很关键。这里面的头文件才是全的~。
4. 准备一个安全的队列:
我们在采集音视频数据后会发送给FFmpeg做一系列的处理,由于是软编码所以编码快慢和CPU有很大的关系,就现在的x264的算法结合当今的CPU是跟不上咋们采集每秒20帧+的速度的,直接采集一帧就编码一帧的话肯定会丢帧的,所以我决定把它放入一个队里里面,由于存在多线程编程,我们的队列需要 safety,就跟几个男的抢一个妹子一样,妹子自然需要我这样的人保护她咯。这个队列的代码是我网上copy的,没啥说的~~
threadsafe_queue.cpp
/**
 * Created by jianxi on 2017/5/31.
 * https://github.com/mabeijianxi
 * mabeijianxi@gmail.com
 */
#ifndef JIANXIFFMPEG_THREADSAFE_QUEUE_CPP
#define JIANXIFFMPEG_THREADSAFE_QUEUE_CPP #include <queue> #include <memory> #include <mutex> #include <condition_variable> /** * 一个安全的队列 */ template<typename T> class threadsafe_queue { private: mutable std::mutex mut; std::queue<T> data_queue; std::condition_variable data_cond; public: threadsafe_queue() {} threadsafe_queue(threadsafe_queue const &other) { std::lock_guard<std::mutex> lk(other.mut); data_queue = other.data_queue; } void push(T new_value)//入队操作 { std::lock_guard<std::mutex> lk(mut); data_queue.push(new_value); data_cond.notify_one(); } void wait_and_pop(T &value)//直到有元素可以删除为止 { std::unique_lock<std::mutex> lk(mut); data_cond.wait(lk, [this] { return !data_queue.empty(); }); value = data_queue.front(); data_queue.pop(); } std::shared_ptr<T> wait_and_pop() { std::unique_lock<std::mutex> lk(mut); data_cond.wait(lk, [this] { return !data_queue.empty(); }); std::shared_ptr<T> res(std::make_shared<T>(data_queue.front())); data_queue.pop(); return res; } bool try_pop(T &value)//不管有没有队首元素直接返回 { std::lock_guard<std::mutex> lk(mut); if (data_queue.empty()) return false; value = data_queue.front(); data_queue.pop(); return true; } std::shared_ptr<T> try_pop() { std::lock_guard<std::mutex> lk(mut); if (data_queue.empty()) return std::shared_ptr<T>(); std::shared_ptr<T> res(std::make_shared<T>(data_queue.front())); data_queue.pop(); return res; } bool empty() const { return data_queue.empty(); } }; #endif //JIANXIFFMPEG_THREADSAFE_QUEUE_CPP
这里面用的几个 lib 就是 C++ 11标准里面的啦~
5. 准备一个储存配置信息的结构体:
其实这玩意和JavaBean差不多嘛,直接搞代码,代码中的JXJNIHandler
字段姑且当做没看到。
jx_user_arguments.h:
/**
 * Created by jianxi on 2017/5/26.
 * https://github.com/mabeijianxi
 * mabeijianxi@gmail.com
 */
#ifndef JIANXIFFMPEG_JX_USER_ARGUMENTS_H
#define JIANXIFFMPEG_JX_USER_ARGUMENTS_H #include "jni.h" class JXJNIHandler; typedef struct UserArguments { const char *media_base_path; //文件储存地址 const char *media_name; // 文件命令前缀 char *video_path; //视频储存地址 char *audio_path; //音频储存地址 char *media_path; //合成后的MP4储存地址 int in_width; //输出宽度 int in_height; //输入高度 int out_height; //输出高度 int out_width; //输出宽度 int frame_rate; //视频帧率控制 long long video_bit_rate; //视频比特率控制 int audio_bit_rate; //音频比特率控制 int audio_sample_rate; //音频采样率控制(44100) int v_custom_format; //一些滤镜操作控制 JNIEnv *env; //env全局指针 JavaVM *javaVM; //jvm指针 jclass java_class; //java接口类的calss对象 JXJNIHandler *handler; // 一个全局处理对象的指针 } ; #endif //JIANXIFFMPEG_JX_USER_ARGUMENTS_H
这个结构体在整个过程中都会用到。
6. 编写一个base.h
其实啊,当时写这个头文件是不想老去include同样的东西,我们视频编码与音频编码都需要要include的头文件放在了这里,并且定义了一些规则性的宏。
base_include.h:
/**
 * Created by jianxi on 2017/5/18.
 * https://github.com/mabeijianxi
 * mabeijianxi@gmail.com
 */

#ifndef JIANXIFFMPEG_BASE_INCLUDE_H
#define JIANXIFFMPEG_BASE_INCLUDE_H extern "C" { #include "include/libavcodec/avcodec.h" #include "include/libavformat/avformat.h" #include "include/libavcodec/avcodec.h" #include "include/libavutil/opt.h" } #include "threadsafe_queue.cpp" #include <jni.h> #include <string> #define END_STATE 1 #define START_STATE 0 #define ROTATE_0_CROP_LT 0 /** * 旋转90度剪裁左上 */ #define ROTATE_90_CROP_LT 1 /** * 暂时没处理 */ #define ROTATE_180 2 /** * 旋转270(-90)裁剪左上,左右镜像 */ #define ROTATE_270_CROP_LT_MIRROR_LR 3 using namespace std; #endif //JIANXIFFMPEG_BASE_INCLUDE_H
FFmpeg源码C的,include时 extern "C"很关键
7. 编写视频(YUV)编码代码
这小节是本文的核心之一,简化后的思路是这样的:
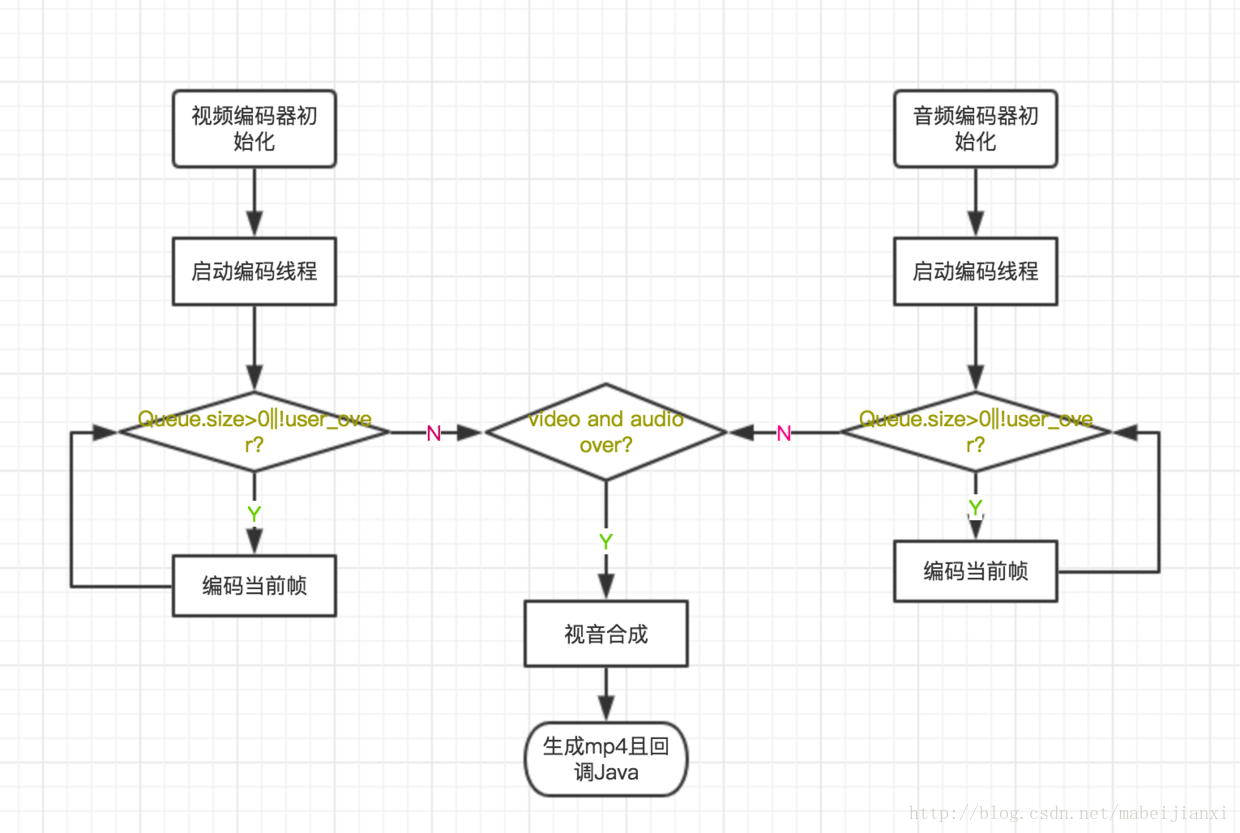
有的兄弟可能会问为什么不编码一帧合成一帧,因为啊我测试了下合成时间,基本都是毫秒级别的,还有就是嫌麻烦,我这样做的话直接用我们制作的FFmpeg命令工具然后几行代码就搞定了,先上代码。
jx_yuv_encode_h264.h:
/**
 * Created by jianxi on 2017/5/12.
 * https://github.com/mabeijianxi
 * mabeijianxi@gmail.com
 */
#ifndef JIANXIFFMPEG_JX_YUV_ENCODE_H264_H
#define JIANXIFFMPEG_JX_YUV_ENCODE_H264_H #include "base_include.h" #include "jx_user_arguments.h" using namespace std; /** * yuv编码h264 */ class JXYUVEncodeH264 { public: JXYUVEncodeH264(UserArguments* arg); public: int initVideoEncoder(); static void* startEncode(void * obj); int startSendOneFrame(uint8_t *buf); void user_end(); int encodeEnd(); void custom_filter(const JXYUVEncodeH264 *h264_encoder, const uint8_t *picture_buf, int in_y_size, int format); private: int flush_encoder(AVFormatContext *fmt_ctx, unsigned int stream_index); private: UserArguments *arguments; int is_end = 0; threadsafe_queue<uint8_t *> frame_queue; AVFormatContext *pFormatCtx; AVOutputFormat *fmt; AVStream *video_st; AVCodecContext *pCodecCtx; AVCodec *pCodec; AVPacket pkt; AVFrame *pFrame; int picture_size; int out_y_size; int framecnt = 0; int frame_count = 0; ~JXYUVEncodeH264() { } }; #endif //JIANXIFFMPEG_JX_YUV_ENCODE_H264_H
jx_yuv_encode_h264.cpp:
/**
* Created by jianxi on 2017/5/12.
* https://github.com/mabeijianxi
* mabeijianxi@gmail.com
*/
#include "jx_yuv_encode_h264.h" #include "jx_jni_handler.h" #include "jx_log.h" #include <pthread.h> JXYUVEncodeH264::JXYUVEncodeH264(UserArguments *arg) : arguments(arg) { } /** * 结束编码时刷出还在编码器里面的帧 * @param fmt_ctx * @param stream_index * @return */ int JXYUVEncodeH264::flush_encoder(AVFormatContext *fmt_ctx, unsigned int stream_index) { int ret; int got_frame; AVPacket enc_pkt; if (!(fmt_ctx->streams[stream_index]->codec->codec->capabilities & CODEC_CAP_DELAY)) return 0; while (1) { enc_pkt.data = NULL; enc_pkt.size = 0; av_init_packet(&enc_pkt); ret = avcodec_encode_video2(fmt_ctx->streams[stream_index]->codec, &enc_pkt, NULL, &got_frame); av_frame_free(NULL); if (ret < 0) break; if (!got_frame) { ret = 0; break; } LOGI(JNI_DEBUG, "_Flush Encoder: Succeed to encode 1 frame video!\tsize:%5d\n", enc_pkt.size); /* mux encoded frame */ ret = av_write_frame(fmt_ctx, &enc_pkt); if (ret < 0) break; } return ret; } /** * 初始化视频编码器 * @return */ int JXYUVEncodeH264::initVideoEncoder() { LOGI(JNI_DEBUG, "视频编码器初始化开始") size_t path_length = strlen(arguments->video_path); char *out_file = (char *) malloc(path_length + 1); strcpy(out_file, arguments->video_path); av_register_all(); //Method1. // pFormatCtx = avformat_alloc_context(); // //Guess Format // fmt = av_guess_format(NULL, out_file, NULL); // // LOGE(JNI_DEBUG,",fmt==null?:%s", fmt == NULL ? "null" : "no_null"); // pFormatCtx->oformat = fmt; //Method 2. avformat_alloc_output_context2(&pFormatCtx, NULL, NULL, out_file); fmt = pFormatCtx->oformat; //Open output URL if (avio_open(&pFormatCtx->pb, out_file, AVIO_FLAG_READ_WRITE) < 0) { LOGE(JNI_DEBUG, "_Failed to open output file! \n"); return -1; } video_st = avformat_new_stream(pFormatCtx, 0); //video_st->time_base.num = 1; //video_st->time_base.den = 25; if (video_st == NULL) { LOGE(JNI_DEBUG, "_video_st==null"); return -1; } //Param that must set pCodecCtx = video_st->codec; //pCodecCtx->codec_id =AV_CODEC_ID_HEVC; pCodecCtx->codec_id = AV_CODEC_ID_H264; pCodecCtx->codec_type = AVMEDIA_TYPE_VIDEO; pCodecCtx->pix_fmt = AV_PIX_FMT_YUV420P; if (arguments->v_custom_format == ROTATE_0_CROP_LT || arguments->v_custom_format == ROTATE_180) { pCodecCtx->width = arguments->out_width; pCodecCtx->height = arguments->out_height; } else { pCodecCtx->width = arguments->out_height; pCodecCtx->height = arguments->out_width; } pCodecCtx->bit_rate = arguments->video_bit_rate; pCodecCtx->gop_size = 250; pCodecCtx->thread_count = 16; pCodecCtx->time_base.num = 1; pCodecCtx->time_base.den = arguments->frame_rate; // pCodecCtx->me_pre_cmp = 1; //H264 //pCodecCtx->me_range = 16; //pCodecCtx->max_qdiff = 4; //pCodecCtx->qcompress = 0.6; pCodecCtx->qmin = 10; pCodecCtx->qmax = 51; //Optional Param pCodecCtx->max_b_frames = 3; // Set Option AVDictionary *param = 0; //H.264 if (pCodecCtx->codec_id == AV_CODEC_ID_H264) { av_opt_set(pCodecCtx->priv_data, "preset", "superfast", 0); // av_dict_set(¶m, "tune", "animation", 0); av_dict_set(¶m, "profile", "baseline", 0); } //Show some Information av_dump_format(pFormatCtx, 0, out_file, 1); pCodec = avcodec_find_encoder(pCodecCtx->codec_id); if (!pCodec) { LOGE(JNI_DEBUG, "Can not find encoder! \n"); return -1; } if (avcodec_open2(pCodecCtx, pCodec, ¶m) < 0) { LOGE(JNI_DEBUG, "Failed to open encoder! \n"); return -1; } pFrame = av_frame_alloc(); picture_size = avpicture_get_size(pCodecCtx->pix_fmt, pCodecCtx->width, pCodecCtx->height); LOGI(JNI_DEBUG, " picture_size:%d", picture_size); uint8_t *buf = (uint8_t *) av_malloc(picture_size); avpicture_fill((AVPicture *) pFrame, buf, pCodecCtx->pix_fmt, pCodecCtx->width, pCodecCtx->height); //Write File Header avformat_write_header(pFormatCtx, NULL); av_new_packet(&pkt, picture_size); out_y_size = pCodecCtx->width * pCodecCtx->height; is_end = START_STATE; pthread_t thread; pthread_create(&thread, NULL, JXYUVEncodeH264::startEncode, this); LOGI(JNI_DEBUG, "视频编码器初始化完成") return 0; } /** * 发送一帧到编码队列 * @param buf * @return */ int JXYUVEncodeH264::startSendOneFrame(uint8_t *buf) { int in_y_size = arguments->in_width * arguments->in_height; uint8_t *new_buf = (uint8_t *) malloc(in_y_size * 3 / 2); memcpy(new_buf, buf, in_y_size * 3 / 2); frame_queue.push(new_buf); return 0; } /** * 启动编码线程 * @param obj * @return */ void *JXYUVEncodeH264::startEncode(void *obj) { JXYUVEncodeH264 *h264_encoder = (JXYUVEncodeH264 *) obj; while (!h264_encoder->is_end||!h264_encoder->frame_queue.empty()) { if (h264_encoder->frame_queue.empty()) { continue; } uint8_t *picture_buf = *h264_encoder->frame_queue.wait_and_pop().get(); LOGI(JNI_DEBUG, "send_videoframe_count:%d", h264_encoder->frame_count); int in_y_size = h264_encoder->arguments->in_width * h264_encoder->arguments->in_height; h264_encoder->custom_filter(h264_encoder, picture_buf, in_y_size, h264_encoder->arguments->v_custom_format); // h264_encoder->pFrame->data[0] = picture_buf; // h264_encoder->pFrame->data[2] = picture_buf + h264_encoder->out_y_size; // h264_encoder->pFrame->data[1] = picture_buf + h264_encoder->out_y_size * 5 / 4; // memcpy(h264_encoder->pFrame->data[0],picture_buf,h264_encoder->out_y_size); // memcpy(h264_encoder->pFrame->data[2],picture_buf+h264_encoder->out_y_size,h264_encoder->out_y_size/4); // memcpy(h264_encoder->pFrame->data[1],picture_buf+h264_encoder->out_y_size*5/4,h264_encoder->out_y_size/4); //PTS h264_encoder->pFrame->pts = h264_encoder->frame_count; h264_encoder->frame_count++; int got_picture = 0; //Encode int ret = avcodec_encode_video2(h264_encoder->pCodecCtx, &h264_encoder->pkt, h264_encoder->pFrame, &got_picture); if (ret < 0) { LOGE(JNI_DEBUG, "Failed to encode! \n"); } if (got_picture == 1) { LOGI(JNI_DEBUG, "Succeed to encode frame: %5d\tsize:%5d\n", h264_encoder->framecnt, h264_encoder->pkt.size); h264_encoder->framecnt++; h264_encoder->pkt.stream_index = h264_encoder->video_st->index; ret = av_write_frame(h264_encoder->pFormatCtx, &h264_encoder->pkt); av_free_packet(&h264_encoder->pkt); } delete (picture_buf); } if (h264_encoder->is_end) { h264_encoder->encodeEnd(); delete h264_encoder; } return 0; } /** * 对视频做一些处理 * @param h264_encoder * @param picture_buf * @param in_y_size * @param format */ void JXYUVEncodeH264::custom_filter(const JXYUVEncodeH264 *h264_encoder, const uint8_t *picture_buf, int in_y_size, int format) { // y值在H方向开始行 int y_height_start_index=h264_encoder->arguments->in_height-h264_encoder->arguments->out_height; // uv值在H方向开始行 int uv_height_start_index=y_height_start_index/2; if (format == ROTATE_90_CROP_LT) { for (int i = y_height_start_index; i < h264_encoder->arguments->in_height; i++) { for (int j = 0; j < h264_encoder->arguments->out_width; j++) { int index = h264_encoder->arguments->in_width * i + j; uint8_t value = *(picture_buf + index); *(h264_encoder->pFrame->data[0] + j * h264_encoder->arguments->out_height + (h264_encoder->arguments->out_height - (i-y_height_start_index) - 1)) = value; } } for (int i = uv_height_start_index; i < h264_encoder->arguments->in_height / 2; i++) { for (int j = 0; j < h264_encoder->arguments->out_width / 2; j++) { int index = h264_encoder->arguments->in_width / 2 * i + j; uint8_t v = *(picture_buf + in_y_size + index); uint8_t u = *(picture_buf + in_y_size * 5 / 4 + index); *(h264_encoder->pFrame->data[2] + (j * h264_encoder->arguments->out_height / 2 + (h264_encoder->arguments->out_height / 2 - (i-uv_height_start_index) - 1))) = v; *(h264_encoder->pFrame->data[1] + (j * h264_encoder->arguments->out_height / 2 + (h264_encoder->arguments->out_height / 2 - (i-uv_height_start_index) - 1))) = u; } } } else if (format == ROTATE_0_CROP_LT) { for (int i = y_height_start_index; i < h264_encoder->arguments->in_height; i++) { for (int j = 0; j < h264_encoder->arguments->out_width; j++) { int index = h264_encoder->arguments->in_width * i + j; uint8_t value = *(picture_buf + index); *(h264_encoder->pFrame->data[0] + (i-y_height_start_index) * h264_encoder->arguments->out_width + j) = value; } } for (int i = uv_height_start_index; i < h264_encoder->arguments->in_height / 2; i++) { for (int j = 0; j < h264_encoder->arguments->out_width / 2; j++) { int index = h264_encoder->arguments->in_width / 2 * i + j; uint8_t v = *(picture_buf + in_y_size + index); uint8_t u = *(picture_buf + in_y_size * 5 / 4 + index); *(h264_encoder->pFrame->data[2] + ((i-uv_height_start_index) * h264_encoder->arguments->out_width / 2 + j)) = v; *(h264_encoder->pFrame->data[1] + ((i-uv_height_start_index) * h264_encoder->arguments->out_width / 2 + j)) = u; } } } else if (format == ROTATE_270_CROP_LT_MIRROR_LR) { int y_width_start_index=h264_encoder->arguments->in_width-h264_encoder->arguments->out_width; int uv_width_start_index=y_width_start_index/