前提:xampp安装成功
1. 打开xampp的shell
2. 查看pear是否正确
使用pear -V命令查看pear是否正确,若出现如下类似信息,则表示正确(注意,V大写)
pear -V
PEAR Version: 1.9.4
PHP Version: 5.4.6
Zend Engine Version: 2.4.0
Running on: Windows NT WN7X64-D9WWDV1 6.1 build 7601 (Windows 7 Enterprise Editi
on Service Pack 1) i586
3. 安装phpunit
如果直接升级,会发现失败,所以可以先卸载,再安装。执行如下命令:
pear uninstall pear/phpUnit
pear config-set auto_discover 1
pear channel-discover components.ez.no
pear channel-discover pear.phpunit.de
pear channel-discover pear.symfony-project.com
pear install --alldeps phpunit/PHPUnit
如果出现如下提示,不要管,在执行一次安装,直到成功为止
pear install --alldeps phpunit/PHPUnit
phpunit/PHP_Invoker requires PHP extension "pcntl"
Could not download from "http://pear.phpunit.de/get/PHPUnit-3.7.9.tgz", cannot d
ownload "phpunit/PHPUnit" (Connection to `pear.phpunit.de:80' failed: A connecti
on attempt failed because the connected party did not properly respond after a p
eriod of time, or established connection failed because connected host has faile
d to respond.
)
Error: cannot download "phpunit/PHPUnit"
Download failed
install failed
成功结果如下:
pear install --alldeps phpunit/PHPUnit
phpunit/PHP_Invoker requires PHP extension "pcntl"
downloading PHPUnit-3.7.9.tgz ...
Starting to download PHPUnit-3.7.9.tgz (116,997 bytes)
.........................done: 116,997 bytes
install ok: channel://pear.phpunit.de/PHPUnit-3.7.9
出现版本,则表示成功:
phpunit -v
PHPUnit 3.7.9 by Sebastian Bergmann.
4. 在Eclipse中设置PHPUnit
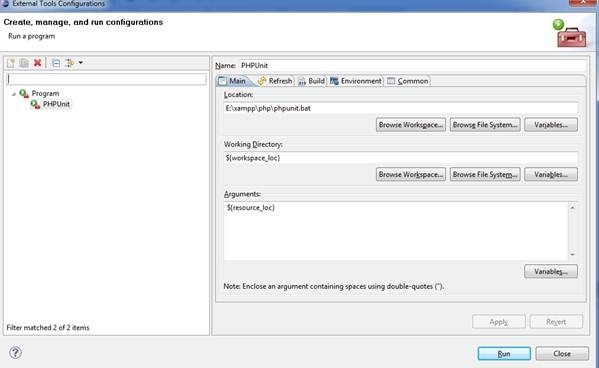
打开菜单:Run --> External Tools --> External Tools Conrigurations...,然后新建一个Program。如下图: 
说明:
1)新建一个 Program,命名为 PHPUnit(名称可自定义)。
2)Location 中填写phpunit.bat所在的绝对路径(xampp安装目录下的php文件夹)。
3)Working Directory 中填写 ${workspace_loc}。
4)Arguments 中填写${resource_loc}(3、4步骤直接点击Variables可以直接选择)。
5. 编写测试用例
HelloUnit.php
<?php
class HelloUnit
{
public function add($a, $b)
{
return $a + $b;
}
}
?>
test.php
<?php
require_once 'PHPUnit/Framework/TestCase.php';
require_once dirname(__FILE__) . '/HelloUnit.php';//测试文件引用
class ReflectionUtilsTest extends PHPUNIT_Framework_TestCase
{
function testAdd()
{
$_helloUnit = new HelloUnit();
$this->assertEquals(3, $_helloUnit->add(1, 2));
}
}
?>
点击"Run Program"按钮,选中“PHPUnit”,控制台(Console)的输出结果如下,则表示成功:
PHPUnit 3.7.9 by Sebastian Bergmann.
.
Time: 0 seconds, Memory: 1.75Mb
OK (1 test, 1 assertion)
6. 参考资料
PHP学习笔记 - 在Eclipse中使用PHPUnit进行单元测试 | Using PHPUnit with eclipse


 170
170


 被折叠的 条评论
为什么被折叠?


