


jQuery
https://www.cnblogs.com/Dominic-Ji/p/10490669.html
jQuery介绍
jQuery就类似于python的模块,帮你封装了一对复杂的操作暴露给你一些简易的接口前端的模块 叫 "类库"。
- jQuery是一个轻量级的、兼容多浏览器的JavaScript库。
- jQuery使用户能够更方便地处理HTML Document、Events、实现动画效果、方便地进行Ajax交互,能够极大地简化JavaScript编程。它的宗旨就是:“Write less, do more.“
下载链接:jQuery官网
中文文档:jQuery AP中文文档
jQuery版本
- 1.x:兼容IE678,使用最为广泛的,官方只做BUG维护,功能不再新增。因此一般项目来说,使用1.x版本就可以了,最终版本:1.12.4 (2016年5月20日)
- 2.x:不兼容IE678,很少有人使用,官方只做BUG维护,功能不再新增。如果不考虑兼容低版本的浏览器可以使用2.x,最终版本:2.2.4 (2016年5月20日)
- 3.x:不兼容IE678,只支持最新的浏览器。需要注意的是很多老的jQuery插件不支持3.x版。目前该版本是官方主要更新维护的版本。
维护IE678是一件让人头疼的事情,一般我们都会额外加载一个CSS和JS单独处理。值得庆幸的是使用这些浏览器的人也逐步减少,PC端用户已经逐步被移动端用户所取代,如果没有特殊要求的话,一般都会选择放弃对678的支持
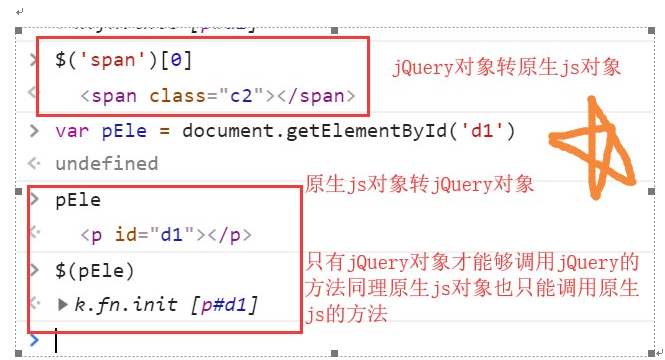
jQuery对象
jQuery对象就是通过jQuery包装DOM对象后产生的对象。jQuery对象是 jQuery独有的。如果一个对象是 jQuery对象,那么它就可以使用jQuery里的方法:例如$(“#i1”).html()。
$("#i1").html()的意思是:获取id值为 i1的元素的html代码。其中 html()是jQuery里的方法。

相当于: document.getElementById("i1").innerHTML;

一个约定,我们在声明一个jQuery对象变量的时候在变量名前面加上$:
var $variable = jQuery对像
var variable = DOM对象
$variable[0]//jQuery对象转成DOM对象

$("#i1").html();//jQuery对象可以使用jQuery的方法
$("#i1")[0].innerHTML;// DOM对象使用DOM的方法
jQuery基础语法
基本选择器
id选择器
$("#id")
标签选择器:
$("tagName")
class选择器:
$(".className")
配合使用:
$("div.c1") // 找到有c1 class类的div标签
所有元素选择器:
$("*")
组合选择器
$("#id, .className, tagName")
属性选择器
[attribute]
[attribute=value]// 属性等于
[attribute!=value]// 属性不等于

// 示例
<input type="text">
<input type="password">
<input type="checkbox">
$("input[type='checkbox']");// 取到checkbox类型的input标签
$("input[type!='text']");// 取到类型不是text的input标签

层级选择器:
x和y可以为任意选择器

$("x y");// x的所有后代y(子子孙孙)
$("x > y");// x的所有儿子y(儿子)
$("x + y")// 找到所有紧挨在x后面的y
$("x ~ y")// x之后所有的兄弟y
基本筛选器
:first // 第一个
:last // 最后一个
:eq(index)// 索引等于index的那个元素
:even // 匹配所有索引值为偶数的元素,从 0 开始计数
:odd // 匹配所有索引值为奇数的元素,从 0 开始计数
:gt(index)// 匹配所有大于给定索引值的元素
:lt(index)// 匹配所有小于给定索引值的元素
:not(元素选择器)// 移除所有满足not条件的标签
:has(元素选择器)// 选取所有包含一个或多个标签在其内的标签(指的是从后代元素找)

#事例:
$("div:has(h1)")// 找到所有后代中有h1标签的div标签
$("div:has(.c1)")// 找到所有后代中有c1样式类的div标签
$("li:not(.c1)")// 找到所有不包含c1样式类的li标签
$("li:not(:has(a))")// 找到所有后代中不含a标签的li标签


表单筛选器:
主要是通过表单里的input的type属性值和其他属性值来进行查找input标签
:text
:password
:file
:radio
:checkbox

:submit
:reset
:button

#特别注意:如果input标签的为单选框或多选框有checked时只能用下列方法查找不然会连select标签一起查找到
$('input:checked')

表单对象属性:
:enabled
:disabled
:checked
:selected

事例:
<select id="s1">
  <option value="beijing">北京市</option>
  <option value="shanghai">上海市</option>
  <option selected value="guangzhou">广州市</option>
  <option value="shenzhen">深圳市</option>
</select>

$(":selected")  // 找到所有被选中的option


筛选器方法
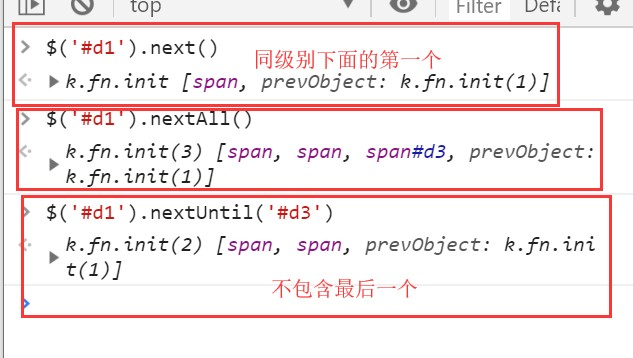
同等级下一个元素:
$("#id").next()   同等级下一个
$("#id").nextAll() 同等级下面所有
$("#id").nextUntil("#i2") 同等级下面一直查找不包括id为i2的标签
同等级上一个元素(与next相反):
$("#id").prev()   同等级上一个
$("#id").prevAll()  同等级上所有
$("#id").prevUntil("#i2")  同等级一直下不包括id为i2的标签
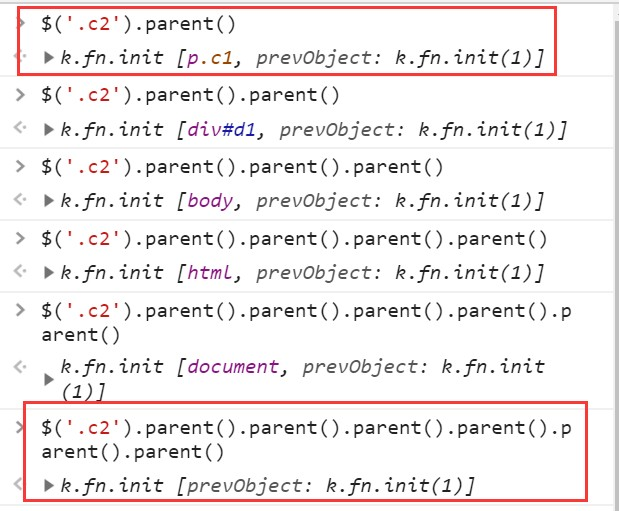
父亲元素:
$("#id").parent() 上一级标签(父标签,可叠加)
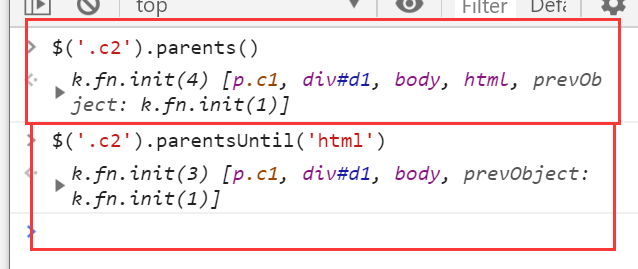
$("#id").parents() // 查找当前元素的所有的父辈元素(当前标签的父类,父类的父类,...)
$("#id").parentsUntil() // 查找当前元素的所有的父辈元素,直到遇到匹配的那个元素为止。
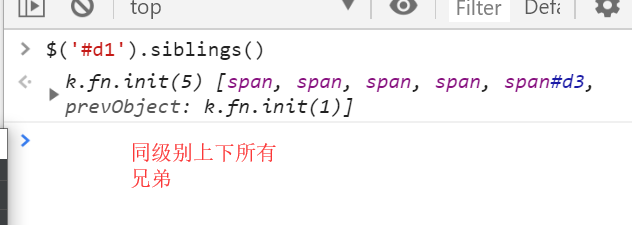
儿子和兄弟元素:
$("#id").children();// 儿子们(不包括孙子)
$("#id").siblings();// 兄弟们(同级别上下所有)

查找
搜索所有与指定表达式匹配的元素。这个函数是找出正在处理的元素的后代元素的好方法。
$("div").find("p")  div的后代中查找p标签
等价于$("div p")
筛选
筛选出与指定表达式匹配的元素集合。这个方法用于缩小匹配的范围。用逗号分隔多个表达式。
$("div").filter(".c1")  // 从结果集中过滤出有c1样式类的
等价于 $("div.c1")
.first() // 获取匹配的第一个元素
.last() // 获取匹配的最后一个元素
.not() // 从匹配元素的集合中删除与指定表达式匹配的元素
.has() // 保留包含特定后代的元素,去掉那些不含有指定后代的元素。
.eq() // 索引值等于指定值的元素
#菜单栏


<!DOCTYPE html>
<html lang="en">
<head>
  <meta charset="UTF-8">
  <meta http-equiv="x-ua-compatible" content="IE=edge">
  <meta name="viewport" content="width=device-width, initial-scale=1">
  <title>左侧菜单示例</title>
  <style>
    .left {
      position: fixed;
      left: 0;
      top: 0;
      width: 20%;
      height: 100%;
      background-color: rgb(47, 53, 61);
    }

    .right {
      width: 80%;
      height: 100%;
    }

    .menu {
      color: white;
    }

    .title {
      text-align: center;
      padding: 10px 15px;
      border-bottom: 1px solid #23282e;
    }

    .items {
      background-color: #181c20;

    }
    .item {
      padding: 5px 10px;
      border-bottom: 1px solid #23282e;
    }

    .hide {
      display: none;
    }
  </style>
</head>
<body>

<div class="left">
  <div class="menu">
    <div class="item">
      <div class="title">菜单一</div>
      <div class="items">
        <div class="item">111</div>
        <div class="item">222</div>
        <div class="item">333</div>
    </div>
    </div>
    <div class="item">
      <div class="title">菜单二</div>
      <div class="items hide">
      <div class="item">111</div>
      <div class="item">222</div>
      <div class="item">333</div>
    </div>
    </div>
    <div class="item">
      <div class="title">菜单三</div>
      <div class="items hide">
      <div class="item">111</div>
      <div class="item">222</div>
      <div class="item">333</div>
    </div>
    </div>
  </div>
</div>
<div class="right"></div>
<script src="https://cdn.bootcss.com/jquery/3.2.1/jquery.min.js"></script>

<script>
  $(".title").click(function (){  // jQuery绑定事件
    // 隐藏所有class里有.items的标签
    // $(".items").addClass("hide");  //批量操作
    // $(this).next().removeClass("hide");

    // jQuery链式操作
    $(this).next().removeClass('hide').parent().siblings().find('.items').addClass('hide')
  });
</script>
操作标签
样式操作
样式类(增删判断删除添加)
addClass();// 添加指定的CSS类名。
removeClass();// 移除指定的CSS类名。
hasClass();// 判断样式存不存在
toggleClass();// 切换CSS类名,如果有就移除,如果没有就添加。
位置操作
offset()// 获取匹配元素在当前窗口的相对偏移或设置元素位置
position()// 获取匹配元素相对父元素的偏移
scrollTop()// 获取匹配元素相对滚动条顶部的偏移
scrollLeft()// 获取匹配元素相对滚动条左侧的偏移
.offset()方法允许我们检索一个元素相对于文档(document)的当前位置。和 .position()的差别在于: .position()是相对于相对于父级元素的位移
# 滚动条事件
<!DOCTYPE html>
<html lang="en">
<head>
    <meta charset="UTF-8">
    <title>Title</title>
    <script src="https://cdn.bootcss.com/jquery/3.4.1/jquery.min.js"></script>
    <style>
        .c1 {
            position: fixed;
            height: 50px;
            width: 100px;
            background-color: yellow;
            color: black;
            bottom: 20px;
            right: 10px;
        }

        .hidden {
            display: none;
        }
    </style>
</head>
<body>
    <a href="" id="d1"></a>
    <div style="background-color: red;height: 1000px"></div>
    <div style="background-color: green;height: 1000px"></div>
    <div style="background-color: mediumspringgreen;height: 1000px"></div>
    <div class="c1 hidden">
        <a href="#d1">回到顶部</a>
    </div>


    <script>
        $(window).scroll(function () {
            if($(window).scrollTop() > 600){
                $('.c1').removeClass('hidden')
            }
            else {
      $(".c1").addClass("hidden");
    }
        })
    </script>
</body>
</html>
尺寸相关的:
height()  标签盒子模型中content高度
width()   标签盒子模型中content宽度
innerHeight() 标签盒子模型中content高度+padding区域的高度
innerWidth() 标签盒子模型中content高度+padding区域的宽度
outerHeight() 签盒子模型中content高度+padding区域的宽度+边框border
outerWidth() 标签盒子模型中content高度+padding区域的宽度+边框border
文本操作
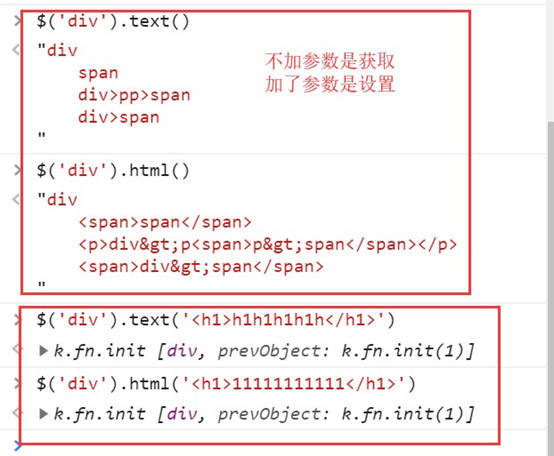
html()// 取得第一个匹配元素的html内容
html(val)// 设置所有匹配元素的html内容
text()// 取得所有匹配元素的内容
text(val)// 设置所有匹配元素的内容
# 输入框 单选 多选框
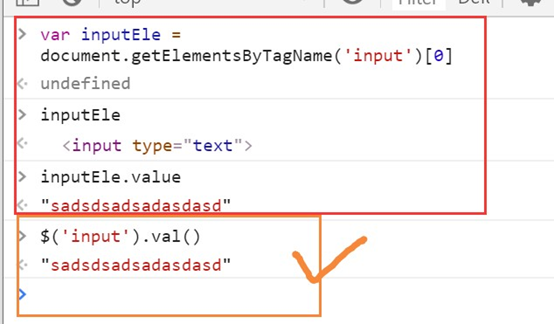
val()// 取得第一个匹配元素的当前值
val(val)// 设置所有匹配元素的值
val([val1, val2])// 设置多选的checkbox、多选select的值
获取被选中的checkbox或radio的值
获取被选中的checkbox或radio的值:
<label for="c1">女</label>
<input name="gender" id="c1" type="radio" value="0">
<label for="c2">男</label>
<input name="gender" id="c2" type="radio" value="1">

$("input[name='gender']:checked").val()
<!DOCTYPE html>
<html lang="en">
<head>
    <meta charset="UTF-8">
    <title>Title</title>
    <script src="https://cdn.bootcss.com/jquery/3.4.1/jquery.min.js"></script>
    <style>
        .errors {
            color: red;
        }
    </style>
</head>
<body>
<h3>登陆页面</h3>
<form action="">
    <p><label for="d1">username:
        <input type="text" id="d1">
        <span class="errors"></span>
    </label></p>
    <p><label for="d2">password:
        <input type="text" id="d2">
        <span class="errors"></span>
    </label>
    </p>
    <input type="submit" id="d3">
</form>

<script>
    var submitEle = document.getElementById('d3');
    submitEle.onclick = function () {
        // 先获取input框中的内容
        var userNameVal = $('#d1').val();
        var passWordVal = $('#d2').val();
        // 判断是否为空
        if (userNameVal.length === 0){
            // 将username对应的span标签渲染内容
            $('.errors').first().text('用户名不能为空');
        }
        if (passWordVal.length === 0){
            // 将username对应的span标签渲染内容
            $('.errors').last().text('密码不能为空 你个大傻逼');

        }
        // 取消标签默认的动作
            return false
    };

    var inputEle = document.getElementsByTagName('input');
    for (let i=0;i<inputEle.length;i++){
        inputEle[i].onfocus = function () {
            $(this).next().text('')
        }
    }

</script>
</body>
</html>
属性操作
用于ID等或自定义属性:
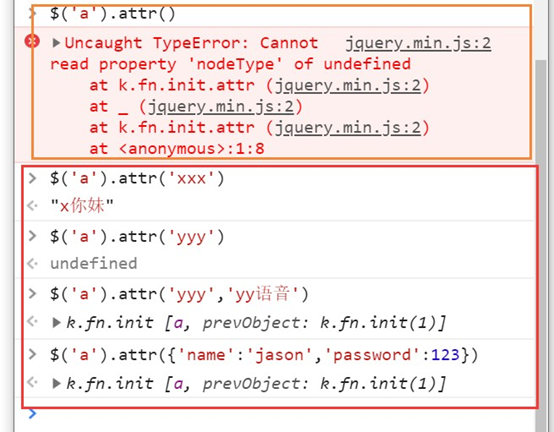
attr(attrName)// 返回第一个匹配元素的属性值
attr(attrName, attrValue)// 为所有匹配元素设置一个属性值
attr({k1: v1, k2:v2})// 为所有匹配元素设置多个属性值
removeAttr()// 从每一个匹配的元素中删除一个属性
用于checkbox和radio
prop() // 获取属性
removeProp() // 移除属性
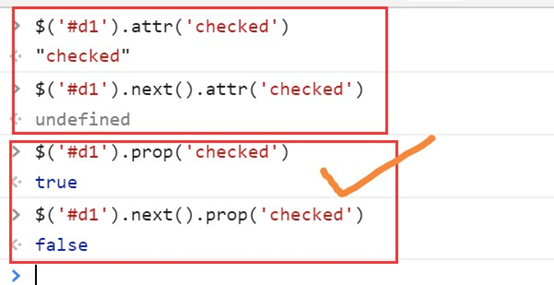
prop和attr的区别:

attr全称attribute(属性)

prop全称property(属性)

虽然都是属性,但他们所指的属性并不相同,attr所指的属性是HTML标签属性,而prop所指的是DOM对象属性,可以认为attr是显式的,而prop是隐式的。
添加到指定元素内部的后面
总结一下:

对于标签上有的能看到的属性和自定义属性都用attr
对于返回布尔值的比如checkbox、radio和option的是否被选中都用prop。
文档处理
添加到指定元素内部的后面
$(A).append(B)// 把B追加到A
$(A).appendTo(B)// 把A追加到B
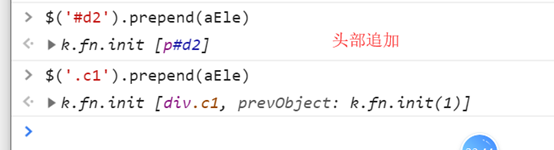
添加到指定元素内部的前面
$(A).prepend(B)// 把B前置到A
$(A).prependTo(B)// 把A前置到B
添加到指定元素外部的后面
$(A).after(B)// 把B放到A的后面
$(A).insertAfter(B)// 把A放到B的后面
添加到指定元素外部的前面
$(A).before(B)// 把B放到A的前面
$(A).insertBefore(B)// 把A放到B的前面
克隆
clone()// 参数

克隆示例:
<!DOCTYPE html>
<html lang="en">
<head>
    <meta charset="UTF-8">
    <title>Title</title>
    <script src="https://cdn.bootcss.com/jquery/3.4.1/jquery.min.js"></script>

    <style>
        button {
            height: 50px;
            width: 100px;
            background-color: orange;
        }
    </style>
</head>
<body>
<button>多重影分身之术</button>

<script>
    // var butEle = document.getElementsByTagName('button')[0];
    // butEle.onclick = function () {
    //     // $(this).after($(this).clone(true))
    //     // clone只克隆标签和文本  不克隆事件  加参数true即可克隆事件
    //     $(this).clone(true).insertAfter(this);
    // }
    $('button').on('click',function () {
         $(this).clone(true).insertAfter(this);
    })
</script>
</body>
</html>
事件
常用事件
click(function(){...})
hover(function(){...})
blur(function(){...})
focus(function(){...})
change(function(){...})
keyup(function(){...})
hover事件示例:
<!DOCTYPE html>
<html lang="en">
<head>
    <meta charset="UTF-8">
    <title>Title</title>
    <script src="https://cdn.bootcss.com/jquery/3.4.1/jquery.min.js"></script>
</head>
<body>
<span>宜春院</span>

<script>
    $('span').hover(
        // 鼠标悬浮上去  如果只写一个函数  那么悬浮和移开都会执行
        function () {
            alert('大爷你终于来了!')
        },
        // 鼠标移开
        function () {
            alert('没钱滚蛋!')
        }
    )
</script>
</body>
</html>
事件绑定
jq对象.on( events [, selector ],function(){})

events: 事件
selector: 选择器(可选的)
function: 事件处理函数
移除事件
jq对象.off( events [, selector ][,function(){}])
off() 方法移除用 .on()绑定的事件处理程序。

events: 事件
selector: 选择器(可选的)
function: 事件处理函数
input实时检测
指的是用户在input标签里每输入一个内容时就可以实时检测和获取内容。
阻止后续事件执行(2种方式)
#1.
return false; // 常见阻止表单提交等
#2.
e.preventDefault();

例如:点击提交标签,会出现消息弹框点击弹框,页面会刷新解决方案如下<!DOCTYPE html> <html lang="en"> <head> <meta charset="UTF-8"> <title>Title</title> <script src="https://cdn.bootcss.com/jquery/3.4.1/jquery.min.js"></script> </head> <body> <form action=""> <input type="submit"> </form> <script> $('input').click(function (e) { alert(123); // 第一种 // return false // 第二种 e.preventDefault() }) </script> </body> </html>
阻止事件冒泡
多个标签嵌套,每个标签绑定点击事件消息弹框,当点击最里面的标签时相当于点击了所有外部的标签就会触发所有点击事件。这是不合理的 解决方案如下
<!DOCTYPE html>
<html lang="en">
<head>
    <meta charset="UTF-8">
    <title>Title</title>
    <script src="https://cdn.bootcss.com/jquery/3.4.1/jquery.min.js"></script>
</head>
<body>
<div>div
    <p>p
        <span>span</span>
    </p>
</div>


<script>
    $('div').click(function (e) {
        alert('div')
    });
    $('p').click(function (e) {
        alert('p');
        // 第一种取消事件冒泡的方式
        // return false
        e.stopPropagation()
    });
    $('span').click(function (e) {
        alert('span');
        // 第二种取消事件冒泡的方式
        // e.stopPropagation()
    })
</script>
</body>
</html>
页面载入
页面加载
    第一种
        $(document).ready(function(){
        // 在这里写你的JS代码...
        })
    第二种

        $(function(){
        // 你在这里写你的代码
        })
    第三种
        直接写在body内最下方
事件委托
事件委托是通过事件冒泡的原理,利用父标签去捕获子标签的事件。
 // 事件委托
    // 将点击事件委托给body内所有的button按钮(无论是button标签是事先创建,还是jq动态创建)
    $('body').on('click','button',function () {
        alert(123)
    })
<!DOCTYPE html>
<html lang="en">
<head>
    <meta charset="UTF-8">
    <title>Title</title>
    <script src="https://cdn.bootcss.com/jquery/3.4.1/jquery.min.js"></script>
</head>
<body>
<button>屠龙宝刀,点击就送!</button>

<script>
    // $('button').on('click',function () {
    //     alert(123)
    // })

    // 事件委托
    // 将点击事件委托给body内所有的button按钮
    $('body').on('click','button',function () {
        alert(123)
    })
</script>
</body>
</html>
动画效果
// 基本
show([s,[e],[fn]])   #多少时间后显现
hide([s,[e],[fn]])  #多少时间后隐藏
toggle([s],[e],[fn])
// 滑动
slideDown([s],[e],[fn]) 多少时间后上拉
slideUp([s,[e],[fn]]) 多少时间后下拉
slideToggle([s],[e],[fn])
// 淡入淡出
fadeIn([s],[e],[fn])  #多少时间后显现
fadeOut([s],[e],[fn]) #多少时间后隐藏
fadeTo([[s],o,[e],[fn]])  多少时间后变多少透明度
fadeToggle([s,[e],[fn]])
// 自定义(了解即可)
animate(p,[s],[e],[fn])
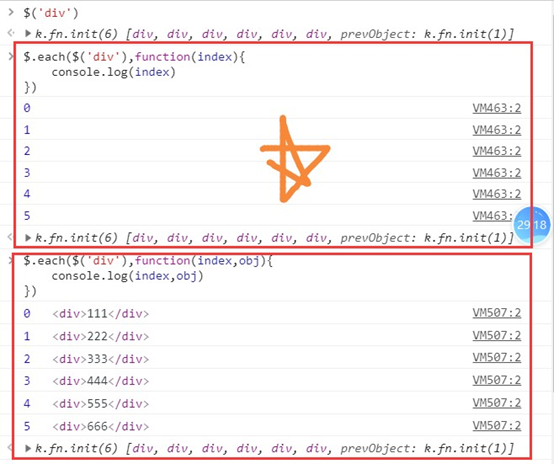
each
li =[10,20,30,40]
$.each(li,function(i, v){
  console.log(i, v);//index是索引,ele是每次循环的具体元素。
})


0 10
1 20
2 30
3 40

原理:把li里的每个元素循环出来交给函数
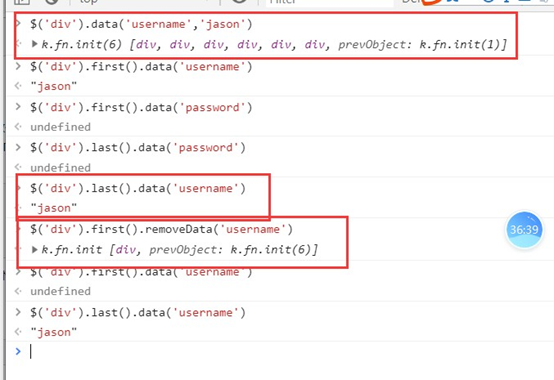
data(key)
.data(key, value):
$("div").data("k",100);//给所有div标签都保存一个名为k,值为100


 597
597


 被折叠的 条评论
为什么被折叠?
被折叠的 条评论
为什么被折叠?
 到【灌水乐园】发言


