


一、Quartz2D介绍
1、什么是Quartz2D?
他是一个二维的绘图引擎,同时支持iOS和Mac系统
能够画基本线条,绘制文字,图片,截图,自定义UIView.
当我们的控件样式极其复杂时,可以把控件内部的结构给画出画,就是自定义控件.
2.什么是图形上下文(core Graphics Context)?
图形上下文是用来保存用户绘制的内容状态,并决定绘制到哪个地方的.
用户把绘制好的内容先保存到图形上下文,
然后根据选择的图形上下文的不同,绘制的内容显示到地方也不相同,即输出目标也不相同.

图形上下文的类型有:
Bitmap Graphics Context(位图上下文)
PDF Graphics Context
Window Graphics Context
Layer Graphics Context(图层上下文,自定义UIView取得上下文就是图层上下文.
UIView之所以能够显示就是因为他内部有一个图层)
Printer Graphics Context
3.什么时候调用drawRect?
1、重写drawRect,不用调用父类方法。
2、调用[self setNeedsDisplay];方法后会重新调用drawRect方法 ,重新绘制图形。
4. 关键代码
获取上下文 CGContextRef ctx = UIGraphicsGetCurrentContext();
贝塞尔曲线 UIBezierPath *path = [UIBezierPath bezierPath]; (其中[UIBezierPath bezierPath]是获取路径的一种方法);
设置的路径添加的上下文 CGContextAddPath(ctx, path.CGPath);
上下文渲染到view视图上 CGContextStrokePath(ctx);
设置线宽 CGContextSetLineWidth(ctx, 1);
设置线的起点 [path moveToPoint:x,y值]; 添加线 [path addLineToPoint:x,y值];
画圆角矩形 [UIBezierPath bezierPathWithRoundedRect:x,y,width,height cornerRadius:圆角半径];5.基本操作(画直线、曲线、矩形、圆、进度条)
5.1 画直线
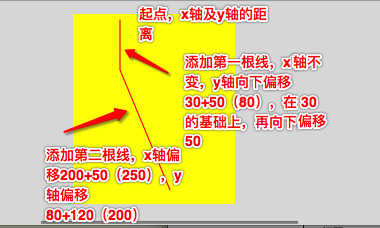
核心思路: 起点,终点。起点是线的初始位置,终点是x,y.就是距离x轴,y轴的偏移位置,再添加线时也是按照偏移位置来定,最终距离x,y轴的偏移量,详见图1
  //1上下文,获取当前上下文,Graphics图形化
    CGContextRef ctx = UIGraphicsGetCurrentContext();
    //2.绘制贝塞尔曲线路径
    UIBezierPath *path = [UIBezierPath bezierPath];
    //设置起点
    [path moveToPoint:CGPointMake(200,30)];
    //添加一根线到终点,距离x轴200,y轴40(相当于终点200-200,40-10,在x轴200的位置,向下移10+20个点)
    [path addLineToPoint:CGPointMake(200, 80)];

    //画第二条线,距离x轴250,y轴200(在上一个线200的基础上向右偏移50,在上一个y轴40的基础上向下偏移160)
    //addLineToPoint:把上一条线的终点当作是下一条线的起点
    [path addLineToPoint:CGPointMake(250, 200)];
    //上下文的状态
    //设置线的宽度
    CGContextSetLineWidth(ctx, 1);
    //下面的样式没有发现有什么不一样的,然并卵,
    //设置线的连接样式
    CGContextSetLineJoin(ctx, kCGLineJoinRound);
    //设置线的顶角样式
    CGContextSetLineCap(ctx, kCGLineCapRound);
    //设置颜色
    [[UIColor redColor] set];
    //3.把绘制的内容添加到上下文当中.
    CGContextAddPath(ctx, path.CGPath);
    //4.把上下文的内容显示到View上(渲染到View的layer)(stroke fill)
    CGContextStrokePath(ctx);
图1 效果图及图解
5.2 画曲线
    CGContextRef ref = UIGraphicsGetCurrentContext();
    UIBezierPath *path = [UIBezierPath bezierPath];
    [path moveToPoint:CGPointMake(50, 50)];
//controlPoint:CGPointMake(233, 30) 曲线的点
    [path addQuadCurveToPoint:CGPointMake(20, 150) controlPoint:CGPointMake(233, 30)];
    CGContextAddPath(ref, path.CGPath);
    CGContextStrokePath(ref);
5.3 画矩形、图、椭圆
圆角矩形 CGContextRef ref = UIGraphicsGetCurrentContext();
UIBezierPath *path = [UIBezierPath bezierPathWithRoundedRect:CGRectMake(50, 50, 100, 100) cornerRadius:50];
[[UIColor cyanColor]set];
CGContextAddPath(ref, path.CGPath);
//完成路径的绘制,stroke储存
CGContextStrokePath(ref);
画椭圆或圆
    CGContextRef ref = UIGraphicsGetCurrentContext();
    UIBezierPath *path = [UIBezierPath bezierPathWithOvalInRect:CGRectMake(40, 50, 250, 200)];
    CGContextAddPath(ref, path.CGPath);
    CGContextStrokePath(ref);
画圆孤
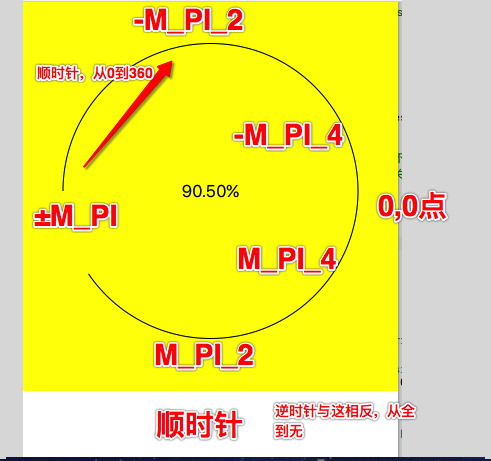
   //Center:弧所在的圆心
    //radius:圆的半径
    //startAngle:开始角度
    //endAngle:截至角度
    //clockwise: YES:顺时针 NO:逆时针
    CGPoint center = CGPointMake(rect.size.width*0.5, rect.size.height*0.5);
    CGFloat radius = rect.size.width*0.5 - 10;
    //M_PI 代表PI,M_PI_2 代表 PI/2,M_PI_4 代表PI/4,-M_PI_2 相反
    UIBezierPath *path = [UIBezierPath bezierPathWithArcCenter:center radius:radius startAngle:0 endAngle:-M_PI_2 clockwise:NO];
    //添加一根线到圆心
    [path addLineToPoint:center];
    //设置颜色
    [[UIColor redColor] set];
    //画扇形,填充路径
    [path fill];
5.4 进度条思路及代码分析
业务逻辑:拖动滑竿的时候让他里面的能够跟着我的拖动,数字在改变.
拖动的同时,具有下载进度的效果
思路:拖动滑竿的时候就是在上面画弧.
从最上面,按顺时针画,所以,它的起始角度是-90度.结束角度也是-90度
也是从起始角度开始画,
起始角度-90度, 看你下载进度是多少
假如说你下载进度是100,就是1 * 360度
也就是说这个进度占你360度多少分之一
详见图2
//1.添加silder及绘图的视图
    //1.添加silder
    UISlider *slidder = [[UISlider alloc] initWithFrame:CGRectMake(20, 20, 200, 40)];
    [slidder addTarget:self action:@selector(slidderChange:) forControlEvents:UIControlEventValueChanged];
    [self.view addSubview:slidder];

    //2.添加显示图视图
    DrawView *drawView = [[DrawView alloc] initWithFrame:CGRectMake(0, CGRectGetMaxY(slidder.frame),self.view.bounds.size.width, 400)];
    [drawView setBackgroundColor:[UIColor yellowColor]];
    self.valueLabel = [[UILabel alloc] initWithFrame:drawView.bounds];
    [self.valueLabel setTextAlignment:NSTextAlignmentCenter];
    [drawView addSubview:self.valueLabel];

    [self.view addSubview:drawView];
    self.drawView = drawView;
//2.当slider发生变化时,
- (void)slidderChange:(UISlider *)sender{
    self.valueLabel.text = [NSString stringWithFormat:@"%.2f%%",sender.value*100];
    self.drawView.progressValue = sender.value;
}
//3.更新绘制图形
- (void)progressView:(CGRect)rect{
    CGContextRef ref = UIGraphicsGetCurrentContext();
    CGPoint center = CGPointMake(rect.size.width*0.5, rect.size.height*0.5);
    CGFloat radius =  rect.size.width*0.5 -40;
    CGFloat startAngle = M_PI_2;
    CGFloat Angle = self.progressValue*M_PI *2;
    CGFloat endAngle = startAngle+Angle;
    NSLog(@"%f,%f",startAngle,endAngle);
    UIBezierPath *path = [UIBezierPath bezierPathWithArcCenter:center radius:radius startAngle:startAngle endAngle:endAngle clockwise:NO];
    CGContextAddPath(ref, path.CGPath);
    CGContextStrokePath(ref);
}
图2,效果图及图解


 177
177


 被折叠的 条评论
为什么被折叠?
被折叠的 条评论
为什么被折叠?
 到【灌水乐园】发言


