


Reference:Github-Tutorial Exercise 2: Implementing TCP flowlet switching
实验准备:
参考之前的博客:Run P4 without P4factory - A Simple Example In Tutorials.
由于本次实验在初始阶段大部分内容已经完成,所以贴出几个关键文件的内容。
command.txt(无需改动)
table_set_default ecmp_group _drop
table_set_default ecmp_nhop _drop
table_set_default forward _drop
table_set_default send_frame _drop
table_add ecmp_group set_ecmp_select 10.0.0.1/32 => 0 2
table_add ecmp_nhop set_nhop 0 => 10.0.1.1 1
table_add ecmp_nhop set_nhop 1 => 10.0.2.1 2
table_add forward set_dmac 10.0.1.1 => 00:04:00:00:00:00
table_add forward set_dmac 10.0.2.1 => 00:04:00:00:00:01
table_add send_frame rewrite_mac 1 => 00:aa:bb:00:00:00
table_add send_frame rewrite_mac 2 => 00:aa:bb:00:00:01
env.sh(其中bmv2和p4c-bm修改为自己的路径)
拷贝到目录:/home/wasdns/tutorials/SIGCOMM_2015/flowlet_switching
THIS_DIR=$( cd "$( dirname "${BASH_SOURCE[0]}" )" && pwd )

# ---------------- EDIT THIS ------------------
BMV2_PATH=/home/wasdns/bmv2
# e.g. BMV2_PATH=$THIS_DIR/../bmv2
P4C_BM_PATH=/home/wasdns/p4c-bmv2
# e.g P4C_BM_PATH=$THIS_DIR/../p4c-bm
# ---------------- END ------------------
run_demo.sh(修改路径)
#!/bin/bash

# Copyright 2013-present Barefoot Networks, Inc.
#
# Licensed under the Apache License, Version 2.0 (the "License");
# you may not use this file except in compliance with the License.
# You may obtain a copy of the License at
#
#    http://www.apache.org/licenses/LICENSE-2.0
#
# Unless required by applicable law or agreed to in writing, software
# distributed under the License is distributed on an "AS IS" BASIS,
# WITHOUT WARRANTIES OR CONDITIONS OF ANY KIND, either express or implied.
# See the License for the specific language governing permissions and
# limitations under the License.

THIS_DIR=$( cd "$( dirname "${BASH_SOURCE[0]}" )" && pwd )

source $THIS_DIR/env.sh

P4C_BM_SCRIPT=$P4C_BM_PATH/p4c_bm/__main__.py

SWITCH_PATH=$BMV2_PATH/targets/simple_switch/simple_switch

CLI_PATH=$BMV2_PATH/tools/runtime_CLI.py

# Probably not very elegant but it works nice here: we enable interactive mode
# to be able to use fg. We start the switch in the background, sleep for 2
# minutes to give it time to start, then add the entries and put the switch
# process back in the foreground
set -m
$P4C_BM_SCRIPT p4src/simple_router.p4 --json simple_router.json
# This gets root permissions, and gives libtool the opportunity to "warm-up"
sudo $SWITCH_PATH >/dev/null 2>&1
sudo $SWITCH_PATH simple_router.json \
    -i 0@veth0 -i 1@veth2 -i 2@veth4 -i 3@veth6 -i 4@veth8 \
    --nanolog ipc:///tmp/bm-0-log.ipc \
    --pcap &
sleep 2
$CLI_PATH --json simple_router.json < commands.txt
echo "READY!!!"
fg
实验过程:
实验中运行的交换机如图所示:
             --------------------------------- nhop-0 10.0.1.1
             |                                        00:04:00:00:00:00
          1 - 00:aa:bb:00:00:00
             |
-------- 3--sw
             |
          2 - 00:aa:bb:00:00:01
             |
             --------------------------------- nhop-1 10.0.2.1
                                                      00:04:00:00:00:01
第一部分
原理
使用的P4程序(详细的代码:->Github),关键部分:
field_list l3_hash_fields {
    ipv4.srcAddr;
    ipv4.dstAddr;
    ipv4.protocol;
    tcp.srcPort;
    tcp.dstPort;
}

field_list_calculation ecmp_hash {
    input {
        l3_hash_fields;
    }
    algorithm : crc16;
    output_width : ECMP_BIT_WIDTH;
}
可以看到,采用的是简单的五元组匹配进行路径和端口的选择,实现简单的ECMP - flowlet switching。
Github中的介绍:
Flowlet switching leverages the burstiness of TCP flows to achieve better load balancing of TCP traffic. In this exercise, you will start from a program that load-balances based on layer 4 flows: this is generally considered "classic" ECMP. To do this, we compute a hash over the 5-tuple and use this value to choose from a set of possible next hops. This means that all packets belonging to the same flow (i.e. with the same 5-tuple) will be routed to the same nexthop.
通过五元组hash的计算,我们知道,多个属于同一条业务流的数据报结果计算会产生相同的hash值,从而走同一个端口。
1.启动交换机
首先,执行打开端口:
./veth_setup.sh运行P4交换机:
./run_demo.sh结果如下:
root@ubuntu:/home/wasdns/tutorials/SIGCOMM_2015/flowlet_switching# ./run_demo. h
parsing successful
semantic checking successful
Header type standard_metadata_t not byte-aligned, adding padding
Header type ingress_metadata_t not byte-aligned, adding padding
WARNING:gen_json:The P4 program defines a checksum verification on field 'ipv4.hdrChecksum'; as of now bmv2 ignores all checksum verifications; checksum updates are processed correctly.
Generating json output to /home/wasdns/tutorials/SIGCOMM_2015/flowlet_switching/simple_router.json
Thrift port was not specified, will use 9090
Calling target program-options parser
Adding interface veth0 as port 0
Adding interface veth2 as port 1
Adding interface veth4 as port 2
Adding interface veth6 as port 3
Adding interface veth8 as port 4
Thrift server was started
Control utility for runtime P4 table manipulation
RuntimeCmd: Setting default action of ecmp_group
action:              _drop
runtime data:
RuntimeCmd: Setting default action of ecmp_nhop
action:              _drop
runtime data:
RuntimeCmd: Setting default action of forward
action:              _drop
runtime data:
RuntimeCmd: Setting default action of send_frame
action:              _drop
runtime data:
RuntimeCmd: Adding entry to lpm match table ecmp_group
match key:           LPM-0a:00:00:01/32
action:              set_ecmp_select
runtime data:        00:00  00:02
Entry has been added with handle 0
RuntimeCmd: Adding entry to exact match table ecmp_nhop
match key:           EXACT-00:00
action:              set_nhop
runtime data:        0a:00:01:01    00:01
Entry has been added with handle 0
RuntimeCmd: Adding entry to exact match table ecmp_nhop
match key:           EXACT-00:01
action:              set_nhop
runtime data:        0a:00:02:01    00:02
Entry has been added with handle 1
RuntimeCmd: Adding entry to exact match table forward
match key:           EXACT-0a:00:01:01
action:              set_dmac
runtime data:        00:04:00:00:00:00
Entry has been added with handle 0
RuntimeCmd: Adding entry to exact match table forward
match key:           EXACT-0a:00:02:01
action:              set_dmac
runtime data:        00:04:00:00:00:01
Entry has been added with handle 1
RuntimeCmd: Adding entry to exact match table send_frame
match key:           EXACT-00:01
action:              rewrite_mac
runtime data:        00:aa:bb:00:00:00
Entry has been added with handle 0
RuntimeCmd: Adding entry to exact match table send_frame
match key:           EXACT-00:02
action:              rewrite_mac
runtime data:        00:aa:bb:00:00:01
Entry has been added with handle 1
RuntimeCmd:
READY!!!
sudo $SWITCH_PATH simple_router.json -i 0@veth0 -i 1@veth2 -i 2@veth4 -i 3@veth6 -i 4@veth8 --nanolog ipc:///tmp/bm-0-log.ipc --pcap
其中,veth3是实验中的端口1,veth5是实验中的端口2,veth7是实验中的端口3.
2.打开新的终端运行test样例:
New Terminal:
./run_test.py这里我对脚本略作修改,将脚本中的:
NUM_PACKETS = 500改为
NUM_PACKETS = 100从发500个包,变为发100个包,以节省运行时间。
此时,数据报的目的IP地址为:10.0.0.1,TTL均为64.
结果如下:
root@ubuntu:/home/wasdns/tutorials/SIGCOMM_2015/flowlet_switching# ./run_test1.py
WARNING: No route found for IPv6 destination :: (no default route?)
Sending 100 packets ...
[2, 2, 2, 2, 2, 2, 2, 2, 2, 2, 2, 2, 2, 2, 2, 2, 2, 2, 2, 2, 2, 2, 2, 2, 2, 2, 2, 2, 2, 2, 2, 2, 2, 2, 2, 2, 2, 2, 2, 2, 2, 2, 2, 2, 2, 2, 2, 2, 2, 2, 2, 2, 2, 2, 2, 2, 2, 2, 2, 2, 2, 2, 2, 2, 2, 2, 2, 2, 2, 2, 2, 2, 2, 2, 2, 2, 2, 2, 2, 2, 2, 2, 2, 2, 2, 2, 2, 2, 2, 2, 2, 2, 2, 2, 2, 2, 2, 2, 2, 2]
可以看到,这一条流所有的数据报均选择了端口2作为出端口。
第二部分:
原理
在上面的实验中,我们看到五元组匹配局限于源目IP、源目Mac以及传输层协议,同一条的业务流所属的数据报只能走同一条路由。
通过改动交换机的P4程序,我们可以实现基于Flowlet_switching的L4LB。
这里的原理是利用时间戳,当某条流的某一个数据报的时间戳-第一个数据报的时间戳大于某一个值的时候,从这个数据报开始改变它的流id,从而走不同的路。
For each flow, you need to store 2 things: a) a timestamp for the last observed packet belonging to this flow and b) a flowlet_id. Flowlet switching is very simple: for each packet which belongs to the flow, you need to update the timestamp. Then, if the time delta between the last observed packet and the current packet exceeds a certain timeout value (in our case, we suggest using 50ms), then the flowlet_id needs to be incremented.
P4程序中,利用寄存器register来实现这个方法:
To maintain state in P4, you will need to use 'register' objects (look them up in the spec). In this case, you will need to use two separate registers for each packet (one for the timestamp and one for the flowlet_id).
P4程序中的关键部分,时间戳和流id的寄存器及Table如下:
register flowlet_lasttime {
    width : 32;
    instance_count : 8192;
}

register flowlet_id {
    width : 16;
    instance_count : 8192;
}

action lookup_flowlet_map() {
    modify_field_with_hash_based_offset(ingress_metadata.flowlet_map_index, 0,
                                        flowlet_map_hash, FLOWLET_MAP_SIZE);

    register_read(ingress_metadata.flowlet_id,
                  flowlet_id, ingress_metadata.flowlet_map_index);

    modify_field(ingress_metadata.flow_ipg,
                 intrinsic_metadata.ingress_global_timestamp);
    register_read(ingress_metadata.flowlet_lasttime,
    flowlet_lasttime, ingress_metadata.flowlet_map_index);
    subtract_from_field(ingress_metadata.flow_ipg,
                        ingress_metadata.flowlet_lasttime);

    register_write(flowlet_lasttime, ingress_metadata.flowlet_map_index,
                   intrinsic_metadata.ingress_global_timestamp);
}

table flowlet {
    actions { lookup_flowlet_map; }
}
command.txt如下:
table_set_default ecmp_group _drop
table_set_default ecmp_nhop _drop
table_set_default forward _drop
table_set_default send_frame _drop
table_set_default flowlet lookup_flowlet_map
table_set_default new_flowlet update_flowlet_id
table_add ecmp_group set_ecmp_select 10.0.0.1/32 => 0 2
table_add ecmp_nhop set_nhop 0 => 10.0.1.1 1
table_add ecmp_nhop set_nhop 1 => 10.0.2.1 2
table_add forward set_dmac 10.0.1.1 => 00:04:00:00:00:00
table_add forward set_dmac 10.0.2.1 => 00:04:00:00:00:01
table_add send_frame rewrite_mac 1 => 00:aa:bb:00:00:00
table_add send_frame rewrite_mac 2 => 00:aa:bb:00:00:01
1.启动P4交换机(同上)
变化:
RuntimeCmd: Setting default action of flowlet
action:              lookup_flowlet_map
runtime data:
RuntimeCmd: Setting default action of new_flowlet
action:              update_flowlet_id
runtime data:
新增了两个默认动作。
2.运行测试样例
打开新终端,进入目录,执行命令。
New Terminal:
./run_test.py这里我没有对脚本进行修改,以便看的更加清晰。
结果:
root@ubuntu:/home/wasdns/tutorials/SIGCOMM_2015/flowlet_switching# ./run_test.py
WARNING: No route found for IPv6 destination :: (no default route?)
Sending 500 packets ...
[1, 1, 1, 1, 1, 1, 1, 1, 1, 1, 1, 1, 1, 1, 1, 1, 1, 1, 1, 1, 1, 1, 1, 1, 1, 1, 1, 1, 1, 1, 1, 1, 1, 1, 1, 1, 1, 1, 1, 1, 2, 2, 2, 2, 2, 2, 2, 2, 2, 2, 1, 1, 1, 1, 1, 1, 1, 1, 1, 1, 2, 2, 2, 2, 2, 2, 2, 2, 2, 2, 2, 2, 2, 2, 2, 2, 2, 2, 2, 2, 1, 1, 1, 1, 1, 1, 1, 1, 1, 1, 1, 1, 1, 1, 1, 1, 1, 1, 1, 1, 1, 1, 1, 1, 1, 1, 1, 1, 1, 1, 2, 2, 2, 2, 2, 2, 2, 2, 2, 2, 2, 2, 2, 2, 2, 2, 2, 2, 2, 2, 2, 2, 2, 2, 2, 2, 2, 2, 2, 2, 1, 1, 1, 1, 1, 1, 1, 1, 1, 1, 2, 2, 2, 2, 2, 2, 2, 2, 2, 2, 2, 2, 2, 2, 2, 2, 2, 2, 2, 2, 2, 2, 2, 2, 2, 2, 2, 2, 2, 2, 1, 1, 1, 1, 1, 1, 1, 1, 1, 1, 1, 1, 1, 1, 1, 1, 1, 1, 1, 1, 1, 1, 1, 1, 1, 1, 1, 1, 1, 1, 2, 2, 2, 2, 2, 2, 2, 2, 2, 2, 1, 1, 1, 1, 1, 1, 1, 1, 1, 1, 2, 2, 2, 2, 2, 2, 2, 2, 2, 2, 2, 2, 2, 2, 2, 2, 2, 2, 2, 2, 1, 1, 1, 1, 1, 1, 1, 1, 1, 1, 2, 2, 2, 2, 2, 2, 2, 2, 2, 2, 2, 2, 2, 2, 2, 2, 2, 2, 2, 2, 1, 1, 1, 1, 1, 1, 1, 1, 1, 1, 1, 1, 1, 1, 1, 1, 1, 1, 1, 1, 2, 2, 2, 2, 2, 2, 2, 2, 2, 2, 2, 2, 2, 2, 2, 2, 2, 2, 2, 2, 2, 2, 2, 2, 2, 2, 2, 2, 2, 2, 1, 1, 1, 1, 1, 1, 1, 1, 1, 1, 1, 1, 1, 1, 1, 1, 1, 1, 1, 1, 2, 2, 2, 2, 2, 2, 2, 2, 2, 2, 2, 2, 2, 2, 2, 2, 2, 2, 2, 2, 1, 1, 1, 1, 1, 1, 1, 1, 1, 1, 2, 2, 2, 2, 2, 2, 2, 2, 2, 2, 2, 2, 2, 2, 2, 2, 2, 2, 2, 2, 2, 2, 2, 2, 2, 2, 2, 2, 2, 2, 1, 1, 1, 1, 1, 1, 1, 1, 1, 1, 1, 1, 1, 1, 1, 1, 1, 1, 1, 1, 1, 1, 1, 1, 1, 1, 1, 1, 1, 1, 2, 2, 2, 2, 2, 2, 2, 2, 2, 2, 2, 2, 2, 2, 2, 2, 2, 2, 2, 2, 2, 2, 2, 2, 2, 2, 2, 2, 2, 2, 2, 2, 2, 2, 2, 2, 2, 2, 2, 2, 1, 1, 1, 1, 1, 1, 1, 1, 1, 1, 2, 2, 2, 2, 2, 2, 2, 2, 2, 2]
root@ubuntu:/home/wasdns/tutorials/SIGCOMM_2015/flowlet_switching# 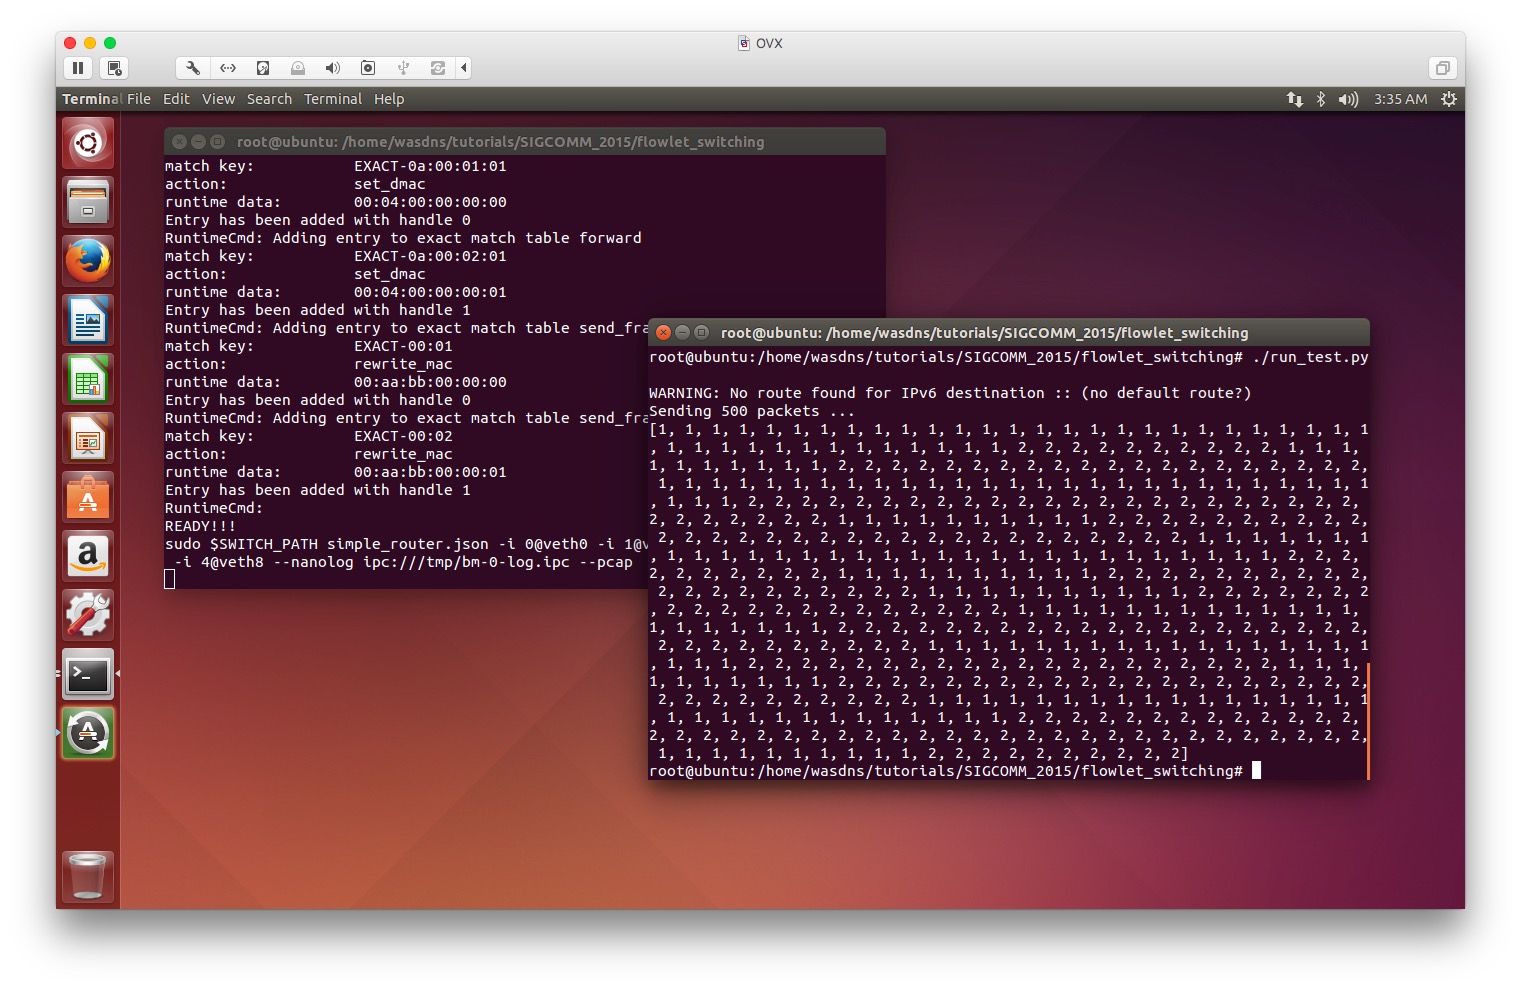
可以看到,该条流的数据报基于流id选择了不同的端口。
实验结论
我们能够通过P4语言编写程序,部署到P4交换机中来实现L4的LB,从而更好的支持ECMP,妥善的处理多条TCP业务流并发的情况,最大化链路利用率。
2016/12/21 冬至阳生


 794
794


 被折叠的 条评论
为什么被折叠?
被折叠的 条评论
为什么被折叠?
 到【灌水乐园】发言


