


1.设置资源限额
详细参考
https://docs.openshift.com/enterprise/3.2/admin_guide/quota.html#sample-resource-quota-definitions
先切换成system
ricdeMacBook-Pro:minishift ericnie$ oc login -u system:admin
Logged into "https://192.168.99.100:8443" as "system:admin" using existing credentials.
添加一个compute-resource.yaml
ericdeMacBook-Pro:minishift ericnie$ cat compute-resource.yaml
apiVersion: v1
kind: ResourceQuota
metadata:
  name: compute-resources
spec:
  hard:
    pods: "4"
    requests.cpu: "1"
    requests.memory: 1Gi
    limits.cpu: "2"
    limits.memory: 2Gi
针对nodejs-examples项目建立资源限额
ericdeMacBook-Pro:minishift ericnie$ oc create -f compute-resource.yaml -n nodejs-examples
resourcequota "compute-resources" created
在界面中查看

2.oc和kubectl的区别
可以参考文档
https://docs.openshift.com/container-platform/3.10/cli_reference/differences_oc_kubectl.html
详细的增强包括
Full support for OpenShift resources
Resources such as DeploymentConfigs, BuildConfigs, Routes, ImageStreams, and ImageStreamTags are specific to OpenShift distributions, and not available in standard Kubernetes.

Authentication
The oc binary offers a built-in login command which allows authentication. See developer authentication and configuring authentication for more information.

Additional commands
For example, the additional command new-app makes it easier to get new applications started using existing source code or pre-built images.
3.Openshift和kubernetes的概念区别
摘了一张图,黄色的是openshift组件,紫色的是Kubernetes的组件。
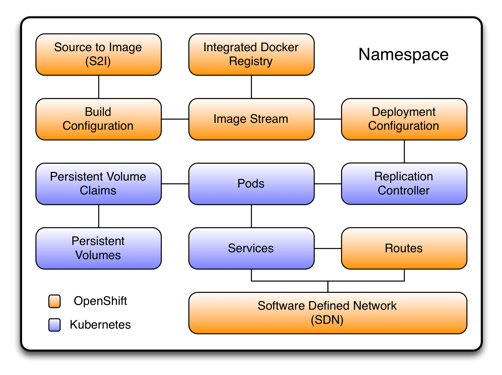
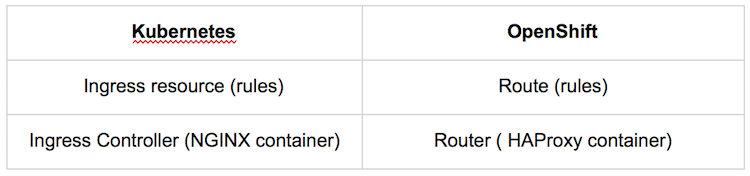
首先的区别在于Route和Router的概念,openshift暴露内部服务是通过Route的模式,也是通过一个域名,外部的调用可以通过域名来访问到服务,在Openshift中,Router是通过HAProxy容器实现,提供反向代理的功能。和Kubernetes的概念映射的如下
第二个主要的概念是Project

在kubernetes里面,namspaces是没有权限控制的,任何集群里的节点都可以看到不同的命名空间以及内部的资源,project是封装了namespace的概念,同时加入了权限控制,通过用户,组,认证和授权模块可以控制不同的项目之间的允许的访问。
4.Openshift启动参数
启动openshift start时,可以指定--public-master,如果没有指定,则采用openshift-web-console命名空间的webconsole-config的configmap中的masterPublicURL
ericdeMacBook-Pro:templates ericnie$ oc get configmap --all-namespaces
NAMESPACE                  NAME                                    DATA      AGE
kube-system                extension-apiserver-authentication      6         5d
kube-system                kube-controller-manager                 0         5d
kube-system                kube-scheduler                          0         5d
kube-system                openshift-master-controllers            0         5d
openshift-core-operators   openshift-web-console-operator-config   1         5d
openshift-core-operators   openshift-web-console-operator-lock     0         5d
openshift-web-console      webconsole-config                       1         5d
ericdeMacBook-Pro:templates ericnie$ oc get configmap webconsole-config -n openshift-web-console -o yaml
apiVersion: v1
data:
  webconsole-config.yaml: |
    {"kind":"WebConsoleConfiguration","apiVersion":"webconsole.config.openshift.io/v1","servingInfo":{"bindAddress":"0.0.0.0:8443","bindNetwork":"tcp4","certFile":"/var/serving-cert/tls.crt","keyFile":"/var/serving-cert/tls.key","clientCA":"","namedCertificates":null,"maxRequestsInFlight":0,"requestTimeoutSeconds":0},"clusterInfo":{"consolePublicURL":"https://192.168.99.100:8443/console/","masterPublicURL":"https://192.168.99.100:8443","loggingPublicURL":"","metricsPublicURL":"","logoutPublicURL":""},"features":{"inactivityTimeoutMinutes":0,"clusterResourceOverridesEnabled":false},"extensions":{"scriptURLs":[],"stylesheetURLs":[],"properties":null}}
kind: ConfigMap
metadata:
  creationTimestamp: 2018-09-17T23:35:09Z
  name: webconsole-config
  namespace: openshift-web-console
  resourceVersion: "1765"
  selfLink: /api/v1/namespaces/openshift-web-console/configmaps/webconsole-config
  uid: 50a5db2f-bad2-11e8-b431-0800276bcf3b
5.推送镜像到minishift/CDK Registry
设置环境变量链接到CDK的Docker Daemon
eval $(minishift docker-env)
login到镜像仓库
ericdeMacBook-Pro:template ericnie$ docker login -u `whoami` --password  `oc whoami -t` 172.30.1.1:5000
WARNING! Using --password via the CLI is insecure. Use --password-stdin.
Login Succeeded
运行构建
ricdeMacBook-Pro:nginx ericnie$ docker build -t 172.30.1.1:5000/s2i-tomcat/nginx:1.14 .
Sending build context to Docker daemon  57.34kB
Step 1/5 : FROM docker.io/nginx:1.14
Trying to pull repository docker.io/library/nginx ...
sha256:2fa968a4b4013c2521115f6dde277958cf03229b95f13a0c8df831d3eca1aa61: Pulling from docker.io/library/nginx
802b00ed6f79: Pull complete
ed418bf9bf60: Pull complete
94fedb7de3b4: Pull complete
Digest: sha256:2fa968a4b4013c2521115f6dde277958cf03229b95f13a0c8df831d3eca1aa61
Status: Downloaded newer image for docker.io/nginx:1.14
 ---> 86898218889a
Step 2/5 : LABEL io.openshift.expose-services "8080:http"
 ---> Running in 73734282ca2a
 ---> eec013f84ad9
Removing intermediate container 73734282ca2a
Step 3/5 : COPY ./default.conf /etc/nginx/conf.d/default.conf
 ---> 4551d15551a0
Removing intermediate container 38608031666f
Step 4/5 : RUN chmod -R 777 /var/log/nginx /var/cache/nginx /var/run     && chgrp -R 0 /etc/nginx     && chmod -R g=u /etc/nginx
 ---> Running in 4116c4e42749

 ---> 33c661ad8f2c
Removing intermediate container 4116c4e42749
Step 5/5 : EXPOSE 8080
 ---> Running in e53201093cc2
 ---> a755a18084c7
Removing intermediate container e53201093cc2
Successfully built a755a18084c7
因为只是形成在本地所以需要push到镜像仓库
ericdeMacBook-Pro:nginx ericnie$ docker push 172.30.1.1:5000/s2i-tomcat/nginx:1.14
The push refers to a repository [172.30.1.1:5000/s2i-tomcat/nginx]
c80e750e02fe: Pushed
efab8e612298: Pushed
935e451e5168: Pushed
4be6f9c212cc: Pushed
8b15606a9e3e: Pushed
1.14: digest: sha256:b6609de5c201305fd6b1061f8165bf6b9ff981714423ace6799217c11643f01b size: 1363
列出镜像
ericdeMacBook-Pro:nginx ericnie$ oc get is -n s2i-tomcat
NAME        DOCKER REPO                            TAGS      UPDATED
myapp       172.30.1.1:5000/s2i-tomcat/myapp       latest
nginx       172.30.1.1:5000/s2i-tomcat/nginx       1.14      32 minutes ago
s2itomcat   172.30.1.1:5000/s2i-tomcat/s2itomcat   latest    26 hours ago
6.minishift 启动报错
minishift启动如果报错,信息为
-- Registering machine using subscription-manager
   Registration in progress .......................................................... FAIL [4m16.1s]
Error to register VM: ssh command error:
command : sudo -E subscription-manager register --auto-attach --username eric.nie@163.com --password ********
err     : exit status 70
output  : Registering to: subscription.rhsm.redhat.com:443/subscription
The system has been registered with ID: 0db491ae-a8fd-4e7d-b4c7-e97653f9a5db
The registered system name is: minishift
System certificates corrupted. Please reregister.
解决方法,启动加入参数
minishift start --vm-driver=virtualbox --memory=4096 --skip-registration
7.mac上minishift或CDK无法上网情况
CDK启动报错,虚拟机无法访问外网,折腾两晚 :(
-- Checking if external host is reachable from the Minishift VM ...
   Pinging 8.8.8.8 ... fail
先检查terminal自己是否能够上网
nc -w 3 -z www.baidu.com 80
nc -w 3 -z 8.8.8.8 53
再检查dns设置/etc/reslov.conf,结果发现reslov.conf已经修改成路由器的ip了。
在mac界面中手工把设置成外部dns

再次启动
minishift start --vm-driver virtualbox --skip-registration
8.minishift启动指定ip问题
多次构建中可能minishift启动得到不同的ip,这会导致启动认证失败,错误如下:
- Starting OpenShift container ...
   Starting OpenShift using container 'origin'
   Waiting for API server to start listening
FAIL
   Error: cannot access master readiness URL https://192.168.99.100:8443/healthz/ready
   Details:
     Last 10 lines of "origin" container log:
     I1011 16:12:05.043763    2490 cache.go:32] Waiting for caches to sync for APIServiceRegistrationController controller
     I1011 16:12:05.084713    2490 logs.go:41] http: TLS handshake error from 192.168.99.100:48274: EOF
     I1011 16:12:05.088441    2490 logs.go:41] http: TLS handshake error from 192.168.99.100:48278: EOF
     I1011 16:12:05.095914    2490 logs.go:41] http: TLS handshake error from 192.168.99.100:48282: EOF
     I1011 16:12:05.099899    2490 logs.go:41] http: TLS handshake error from 192.168.99.100:48284: EOF
     I1011 16:12:05.103700    2490 logs.go:41] http: TLS handshake error from 192.168.99.100:48286: EOF
     I1011 16:12:05.103750    2490 autoregister_controller.go:136] Starting autoregister controller
     I1011 16:12:05.103759    2490 cache.go:32] Waiting for caches to sync for autoregister controller
     I1011 16:12:05.103791    2490 customresource_discovery_controller.go:152] Starting DiscoveryController
     I1011 16:12:05.103814    2490 naming_controller.go:274] Starting NamingConditionController


   Caused By:
     Error: Get https://192.168.99.100:8443/healthz/ready: x509: certificate is valid for 10.0.2.15, 127.0.0.1, 172.17.0.1, 172.30.0.1, 192.168.99.104, not 192.168.99.100
第一次成功启动是获取的192.168.99.104,而第二次启动系统自动获取了192.168.99.100的地址,导致环境变量minishift_kubeconfig中配置的地址和证书错误,通过下面命令把主机地址重新设置104.
minishift start --vm-driver virtualbox --public-hostname=192.168.99.104 --routing-suffix 192.168.99.104.nip.io
9.添加用户
在master节点上运行
htpasswd /etc/origin/master/htpasswd ericnie
然后就可以登录和建立项目了.


 1958
1958

 被折叠的 条评论
为什么被折叠?
被折叠的 条评论
为什么被折叠?
 到【灌水乐园】发言


