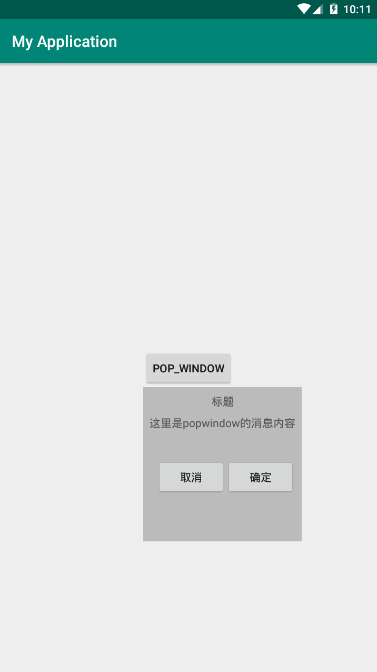
使用PopupWindow实现一个悬浮框,悬浮在Activity之上,显示位置可以指定
首先创建pop_window.xml:
<?xml version="1.0" encoding="utf-8"?>
<android.support.constraint.ConstraintLayout
    xmlns:android="http://schemas.android.com/apk/res/android"
    xmlns:app="http://schemas.android.com/apk/res-auto"
    android:background="#bbbbbb"
    android:layout_width="match_parent"
    android:layout_height="match_parent">

    <TextView
        android:id="@+id/tv_title"
        android:layout_width="wrap_content"
        android:layout_height="wrap_content"
        android:layout_marginStart="8dp"
        android:layout_marginLeft="8dp"
        android:layout_marginTop="8dp"
        android:layout_marginEnd="8dp"
        android:layout_marginRight="8dp"
        android:layout_marginBottom="8dp"
        app:layout_constraintBottom_toTopOf="@+id/tv_msg"
        app:layout_constraintEnd_toEndOf="parent"
        app:layout_constraintStart_toStartOf="parent"
        app:layout_constraintTop_toTopOf="parent" />

    <TextView
        android:id="@+id/tv_msg"
        android:layout_width="wrap_content"
        android:layout_height="wrap_content"
        android:layout_marginStart="8dp"
        android:layout_marginLeft="8dp"
        android:layout_marginTop="8dp"
        android:layout_marginEnd="8dp"
        android:layout_marginRight="8dp"
        android:layout_marginBottom="8dp"
        app:layout_constraintBottom_toTopOf="@+id/linearLayout"
        app:layout_constraintEnd_toEndOf="parent"
        app:layout_constraintStart_toStartOf="parent"
        app:layout_constraintTop_toTopOf="parent" />

    <LinearLayout
        android:id="@+id/linearLayout"
        android:layout_width="match_parent"
        android:layout_height="wrap_content"
        android:layout_marginStart="8dp"
        android:layout_marginLeft="8dp"
        android:layout_marginTop="8dp"
        android:layout_marginEnd="8dp"
        android:layout_marginRight="8dp"
        android:layout_marginBottom="8dp"
        android:orientation="horizontal"
        app:layout_constraintBottom_toBottomOf="parent"
        app:layout_constraintEnd_toEndOf="parent"
        app:layout_constraintHorizontal_bias="1.0"
        app:layout_constraintStart_toStartOf="parent"
        app:layout_constraintTop_toTopOf="parent"
        app:layout_constraintVertical_bias="0.625">

        <Button
            android:id="@+id/btn_cancel"
            android:layout_width="wrap_content"
            android:layout_height="wrap_content"
            android:text="取消" />

        <Button
            android:id="@+id/btn_ok"
            android:layout_width="wrap_content"
            android:layout_height="wrap_content"
            android:text="确定" />
    </LinearLayout>

</android.support.constraint.ConstraintLayout>
使用ConstraintLayout看起来比较麻烦,用拖拽还是很方便的。这里设置四个组件,两个TextView,两个Button
activity_main.xml:
<?xml version="1.0" encoding="utf-8"?>
<android.support.constraint.ConstraintLayout
    xmlns:android="http://schemas.android.com/apk/res/android"
    xmlns:app="http://schemas.android.com/apk/res-auto"
    xmlns:tools="http://schemas.android.com/tools"
    android:layout_width="match_parent"
    android:layout_height="match_parent"
    tools:context=".MainActivity">

    <Button
        android:id="@+id/btn_pop_window"
        android:layout_width="wrap_content"
        android:layout_height="wrap_content"
        android:layout_marginStart="8dp"
        android:layout_marginLeft="8dp"
        android:layout_marginTop="8dp"
        android:layout_marginEnd="8dp"
        android:layout_marginRight="8dp"
        android:layout_marginBottom="8dp"
        android:text="pop_window"
        app:layout_constraintBottom_toBottomOf="parent"
        app:layout_constraintEnd_toEndOf="parent"
        app:layout_constraintStart_toStartOf="parent"
        app:layout_constraintTop_toTopOf="parent" />

</android.support.constraint.ConstraintLayout>
主界面放置一个按钮。
MainActivity:
package com.fitsoft;

import android.os.Bundle;
import android.support.v7.app.AppCompatActivity;
import android.view.Gravity;
import android.view.LayoutInflater;
import android.view.View;
import android.view.WindowManager;
import android.widget.Button;
import android.widget.PopupWindow;
import android.widget.TextView;
import android.widget.Toast;

public class MainActivity extends AppCompatActivity {

    Button button;
    PopupWindow popupWindow;


    @Override
    protected void onCreate(Bundle savedInstanceState) {
        super.onCreate(savedInstanceState);
        setContentView(R.layout.activity_main);

        button = findViewById(R.id.btn_pop_window);

        button.setOnClickListener(new View.OnClickListener() {
            @Override
            public void onClick(View v) {

                popupWindow.showAsDropDown(v);

            }
        });


        //载入界面
        View view = LayoutInflater.from(this).inflate(R.layout.pop_window, null);
        {
            TextView textView = view.findViewById(R.id.tv_title);
            textView.setText("标题");
        }
        {
            TextView textView = view.findViewById(R.id.tv_msg);
            textView.setText("这里是popwindow的消息内容");
        }
        {
            Button button = view.findViewById(R.id.btn_ok);
            button.setOnClickListener(new View.OnClickListener() {
                @Override
                public void onClick(View v) {
                    Toast.makeText(v.getContext(), "您点击了确定按钮", Toast.LENGTH_SHORT).show();
                    popupWindow.dismiss();
                }
            });
        }
        {
            Button button = view.findViewById(R.id.btn_cancel);
            button.setOnClickListener(new View.OnClickListener() {
                @Override
                public void onClick(View v) {
                    Toast.makeText(v.getContext(), "您点击了取消按钮", Toast.LENGTH_SHORT).show();
                    popupWindow.dismiss();
                }
            });
        }

        //绑定
        popupWindow = new PopupWindow(view, WindowManager.LayoutParams.WRAP_CONTENT,
                WindowManager.LayoutParams.WRAP_CONTENT);

    }

}
这里调用了PopupWindow的构造方法:
/**
 * <p>Create a new non focusable popup window which can display the
 * <tt>contentView</tt>. The dimension of the window must be passed to
 * this constructor.</p>
 *
 * <p>The popup does not provide any background. This should be handled
 * by the content view.</p>
 *
 * @param contentView the popup's content
 * @param width the popup's width
 * @param height the popup's height
 */
public PopupWindow(View contentView, int width, int height) {
    this(contentView, width, height, false);
}
绑定视图,设置宽高...很好用...
最后用按钮的点击事件弹出窗口:
popupWindow.showAsDropDown(v);效果图:

左对齐,显示在下方....调整一下弹出代码,将刚刚的弹出代码注释掉,用下面的代码替换:
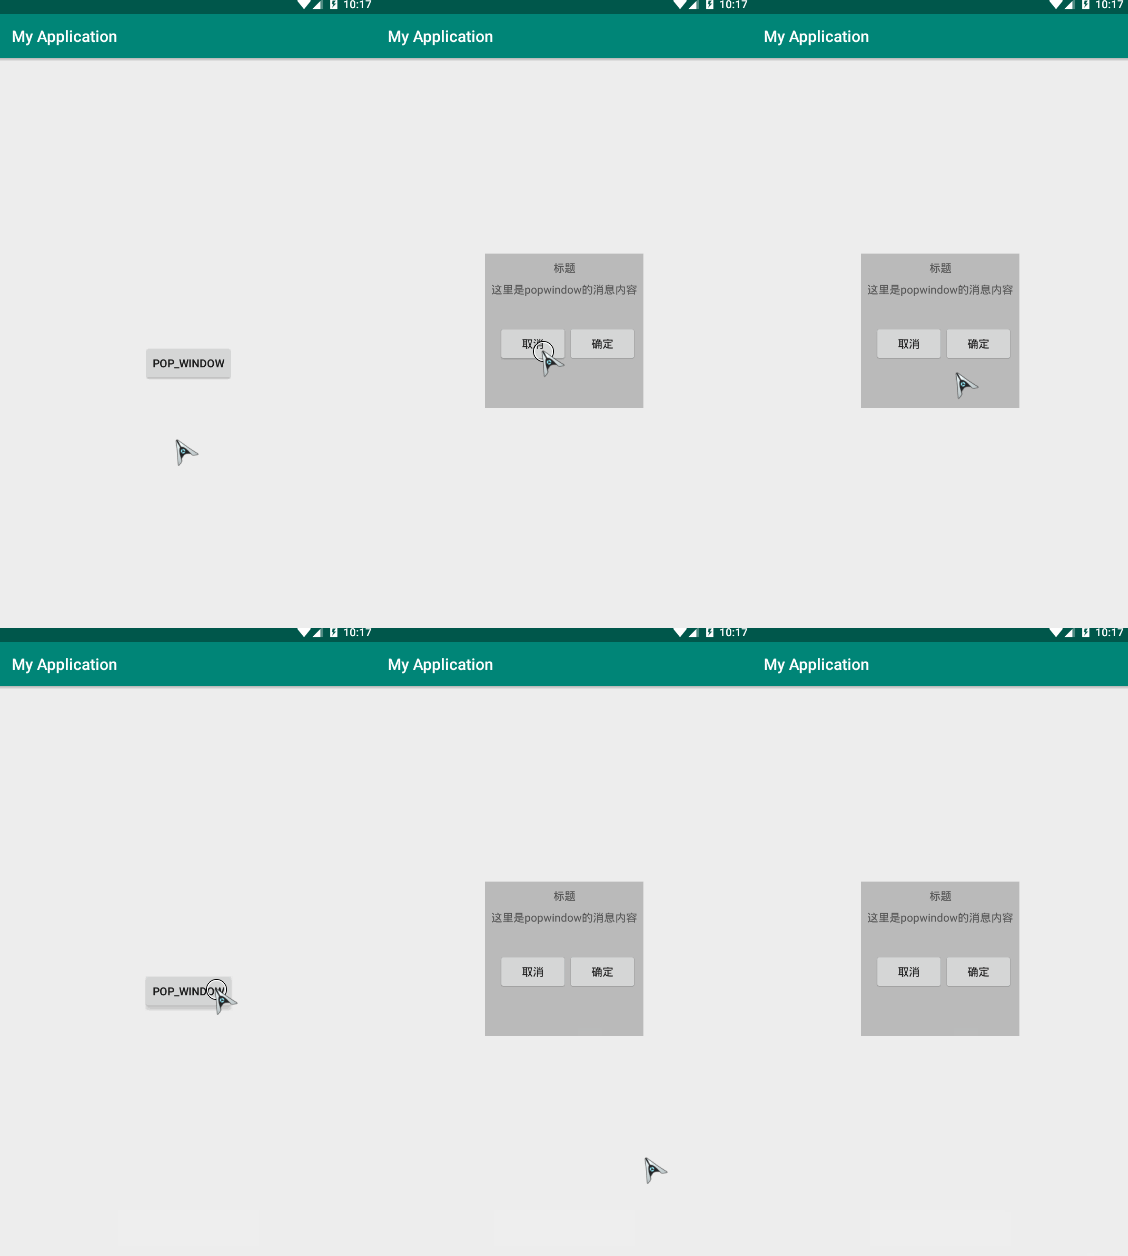
popupWindow.showAtLocation(MainActivity.this.getWindow().getDecorView(),
                    Gravity.CENTER, 0, 0);
获取顶级布局,设置居中显示,x、y不偏移。
效果图:


 299
299

 被折叠的 条评论
为什么被折叠?


