一、WPF样式
类似于Web应用程序中的CSS,在WPF中可以为控件定义统一的样式(Style)。样式属于资源的一种,例如为Button定义统一的背景颜色和字体:
1: <Window.Resources>
2: <Style
3: TargetType="Button">
4: <Setter Property="Background" Value="Yellow" />
5: <Setter Property="Margin" Value="5" />
6: <Setter Property="FontFamily" Value="Comic Sans MS"/>
7: <Setter Property="FontSize" Value="14"/>
8: </Style>
9: </Window.Resources>
10: <StackPanel>
11: <Button>Button A</Button>
12: <Button Foreground="Red" Background="White">Button B</Button>
13: </StackPanel>

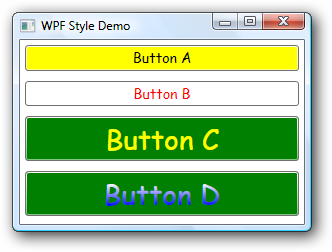
从执行的结果上来看:
- 在Style中定义的属性及值,影响到Window中的所有类型为Button的控件的样式
- 在Button中可以新定义其他属性(如Foreground),覆盖Style中的定义(Background)
这种样式,类似于CSS中的类型选择器,为某种类型定义样式。
此外还可以在Style中加入x:Key属性,做为特定的样式(注意,这种也需要定义TargetType);定义时还可以基于已定义的某种样式,例如,基于刚才的Button的样式,更改字体的大小及文本的前景及背景颜色:
1: <Window.Resources>
2: <Style
3: TargetType="Button">
4: <Setter Property="Background" Value="Yellow" />
5: <Setter Property="Margin" Value="5" />
6: <Setter Property="FontFamily" Value="Comic Sans MS"/>
7: <Setter Property="FontSize" Value="14"/>
8: </Style>
9: <Style
10: TargetType="Button"
11: x:Key="ButtonStyleA"
12: BasedOn="{StaticResource {x:Type Button}}">
13: <Setter Property="Background" Value="Green" />
14: <Setter Property="Foreground" Value="Yellow" />
15: <Setter Property="FontSize" Value="28"/>
16: </Style>
17: </Window.Resources>
18: <StackPanel>
19: <Button>Button A</Button>
20: <Button Foreground="Red" Background="White">Button B</Button>
21: <Button Style="{StaticResource ButtonStyleA}">Button C</Button>
22: <Button Style="{StaticResource ButtonStyleA}" Content="Button D">
23: <Button.Foreground>
24: <LinearGradientBrush StartPoint="0.5,0" EndPoint="0.5,1">
25: <LinearGradientBrush.GradientStops>
26: <GradientStop Offset="0.0" Color="#FFFFFF" />
27: <GradientStop Offset="1.0" Color="#0000FF" />
28: </LinearGradientBrush.GradientStops>
29: </LinearGradientBrush>
30: </Button.Foreground>
31: </Button>
32: </StackPanel>

二、控件模板(ControlTemplate)
当使用一个控件时,如果控件的属性、方法、事件满足程序的需求,但控件的外观不满足要求的时候,除了自定义控件这种方法外,我们还可以通过使用“控件模板”的方式更改控件的外观。例如定义一个圆形的按钮:
1: <Window.Resources>
2: <Style TargetType="Button" x:Key="ButtonStyle">
3: <!--设置按钮的默认的样式-->
4: <Setter Property="FontFamily" Value="Comic Sans MS"/>
5: <Setter Property="FontSize" Value="14"/>
6: <Setter Property="Foreground" Value="Black" />
7: <Setter Property="Background">
8: <Setter.Value>
9: <LinearGradientBrush StartPoint="0.5,0" EndPoint="0.5,1">
10: <LinearGradientBrush.GradientStops>
11: <GradientStop Offset="0.0" Color="#fff" />
12: <GradientStop Offset="1.0" Color="#009" />
13: </LinearGradientBrush.GradientStops>
14: </LinearGradientBrush>
15: </Setter.Value>
16: </Setter>
17: <!--设置按钮的模板-->
18: <Setter Property="Template">
19: <Setter.Value>
20: <ControlTemplate TargetType="Button">
21: <Grid>
22: <Ellipse Fill="{TemplateBinding Background}"/>
23: <ContentPresenter
24: Margin="5"
25: HorizontalAlignment="Center"
26: VerticalAlignment="Center"/>
27: </Grid>
28: </ControlTemplate>
29: </Setter.Value>
30: </Setter>
31: </Style>
32: </Window.Resources>
33: <StackPanel>
34: <Button Margin="5" Style="{StaticResource ButtonStyle}"
35: Width="100" Height="100"
36: Content="My Button">
37: </Button>
38: <Button Margin="5" Width="200">Common Button</Button>
39: </StackPanel>
三、触发器
值得注意的是,这个时候,对于此按钮,无论是否获得焦点、鼠标是处于其上方,显示的外观均是相同的,如果要定义以上的一些效果,可以使用触发器来实现。
Style、ControlTemplate 和 DataTemplate 都具有 Triggers 属性,该属性可以包含一组触发器。某个属性值更改时,或某个事件引发时,触发器会相应地设置属性或启动操作(如动画操作)。
触发器包含以下几种:
- 属性触发器
- EventTrigger 和 Storyboard
- MultiTrigger、DataTrigger 和 MultiDataTrigger
我们这里可以使用属性触发器来实现:
例如,在ControlTemplate中(即上段代码28行前插入以下代码):
1: <ControlTemplate.Triggers>
2: <Trigger Property="IsMouseOver" Value="True">
3: <!--鼠标在上移动时-->
4: <Setter Property="Foreground" Value="Yellow" />
5: </Trigger>
6: <Trigger Property="IsKeyboardFocused" Value="True">
7: <!--控件获得键盘焦点时-->
8: <Setter Property="Foreground" Value="White" />
9: </Trigger>
10: </ControlTemplate.Triggers>
当按键获得键盘焦点时:

鼠标在其上时:


 4106
4106

 被折叠的 条评论
为什么被折叠?


