


上两篇文件介绍了如何安装和封装redis 本篇主要是记录下怎么实现 nginx+redis实现session共享
目前session问题点
又爱又恨的Session
刚接触程序开发的人一定爱死Session了,因为Session让Http从无状态变成有状态了,页面之间传值、用户相关信息、一些不变的数据、甚至于查出来的DataTable也可以放进去,取值的时候只需要Session[Key]即可,真是方便极了。Session真是个利器,人挡杀人佛挡杀佛,但任何事物被封为利器基本也是双刃剑,Session的许多问题我们不得不去面对。
【常见问题请见下图】

我相信一见到这个问题,老程序员都会心里一哆嗦,Session是导致这个原因之一,大家也会想到这个情景,“我去,是不是Session又丢了,让用户重新登录”,事故报告中会填写:.NET规定,用户登陆后长时间没操作导致的。解决方案为:把Session时间调到9999。
结果该发生的还是继续发生着,Session照样丢失。
【常见Session丢失原因】
1、Session超时,用户打开页面,页面长时间不操作会导致此原因
2、IIS应用程序池回收,或者重启
3、Web.Config修改,即IIS应用程序池重启
4、dll被替换或者动态页面修改,即IIS应用程序池重启
5、杀毒软件对.config文件进行扫描,可能会导致IIS应用程序池回收
6、用户浏览器禁用cookie
7、其他原因
其他原因有点不负责,但是好多程序员无法查明是什么原因导致Session丢失,但Session丢失我归结为两大类,一个是数据的Key丢了,一个是Session内容数据库的丢了,大家这样就好理解了,用户浏览器禁用cookie一定是Key没了。IIS应用程序池回收必定会导致Session的内容缓存表丢失,当然还有一些其他原因。
3、解决Session丢失的漫长路
解决过Session丢失的都会用到这几种方法
1、InProc:将Session存到进程内。
2、StateServer:将Session存到独立的状态服务中(Asp.Net State Service)。
3、SqlServer:将Session存到SqlServer中。
4、Cookieless:设置客户端Session存储的方式。
用了这些方法之后,有的是该丢还丢,有的是稳定了速度却慢了。
下面一步步实现nginx+redis 代替session
redis 前面我们已经安装好了
1.下载nginx。
地址:http://nginx.org/download/nginx-1.9.9.zip
2.编写bat文件操作 nginx
cls
@ECHO OFF
SET NGINX_PATH=D:
SET NGINX_DIR="D:\Test\nginx-1.9.3\"
color 0a
TITLE Nginx 管理程序 Power By Ants (http://leleroyn.cnblogs.com)
GOTO MENU
:MENU
CLS
ECHO.
ECHO. * * * *  Nginx 管理程序 Power By Ants (http://leleroyn.cnblogs.com) * * *
ECHO. * *
ECHO. * 1 启动Nginx *
ECHO. * *
ECHO. * 2 关闭Nginx *
ECHO. * *
ECHO. * 3 重启Nginx *
ECHO. * *
ECHO. * 4 退 出 *
ECHO. * *
ECHO. * * * * * * * * * * * * * * * * * * * * * * * *
ECHO.
ECHO.请输入选择项目的序号:
set /p ID=
IF "%id%"=="1" GOTO cmd1
IF "%id%"=="2" GOTO cmd2
IF "%id%"=="3" GOTO cmd3
IF "%id%"=="4" EXIT
PAUSE
:cmd1
ECHO.
ECHO.启动Nginx......
IF NOT EXIST %NGINX_DIR%nginx.exe ECHO %NGINX_DIR%nginx.exe不存在
%NGINX_PATH%
cd %NGINX_DIR%
IF EXIST %NGINX_DIR%nginx.exe start nginx.exe
ECHO.OK
PAUSE
GOTO MENU
:cmd2
ECHO.
ECHO.关闭Nginx......
taskkill /F /IM nginx.exe > nul
ECHO.OK
PAUSE
GOTO MENU
:cmd3
ECHO.
ECHO.关闭Nginx......
taskkill /F /IM nginx.exe > nul
ECHO.OK
GOTO cmd1
GOTO MENU
3.配置nginx
#user  nobody;
worker_processes  1;

#error_log  logs/error.log;
#error_log  logs/error.log  notice;
#error_log  logs/error.log  info;

#pid        logs/nginx.pid;


events {
    worker_connections  1024;
}


http {
    include       mime.types;
    default_type  application/octet-stream;

    #log_format  main  '$remote_addr - $remote_user [$time_local] "$request" '
    #                  '$status $body_bytes_sent "$http_referer" '
    #                  '"$http_user_agent" "$http_x_forwarded_for"';

    #access_log  logs/access.log  main;

    sendfile        on;
    #tcp_nopush     on;

    #keepalive_timeout  0;
    keepalive_timeout  65;
    upstream  Jq_one {
             server 10.110.1.42:1100;
             server 10.110.1.42:1101;
            }
    #gzip  on;

    server {
        listen       1108;
        server_name   localhost;

        #charset koi8-r;

        #access_log  logs/host.access.log  main;


        location / {
            root   html;
            index  index.html index.htm;
            #其中jq_one 对应着upstream设置的集群名称
            proxy_pass         http://Jq_one;
            #设置主机头和客户端真实地址,以便服务器获取客户端真实IP
            proxy_set_header   Host             $host;
            proxy_set_header   X-Real-IP        $remote_addr;
            proxy_set_header   X-Forwarded-For  $proxy_add_x_forwarded_for;
        }

        #error_page  404              /404.html;

        # redirect server error pages to the static page /50x.html
        #
        error_page   500 502 503 504  /50x.html;
        location = /50x.html {
            root   html;
        }

        # proxy the PHP scripts to Apache listening on 127.0.0.1:80
        #
        #location ~ \.php$ {
        #    proxy_pass   http://127.0.0.1;
        #}

        # pass the PHP scripts to FastCGI server listening on 127.0.0.1:9000
        #
        #location ~ \.php$ {
        #    root           html;
        #    fastcgi_pass   127.0.0.1:9000;
        #    fastcgi_index  index.php;
        #    fastcgi_param  SCRIPT_FILENAME  /scripts$fastcgi_script_name;
        #    include        fastcgi_params;
        #}

        # deny access to .htaccess files, if Apache's document root
        # concurs with nginx's one
        #
        #location ~ /\.ht {
        #    deny  all;
        #}
    }


    # another virtual host using mix of IP-, name-, and port-based configuration
    #
    #server {
    #    listen       8000;
    #    listen       somename:8080;
    #    server_name  somename  alias  another.alias;

    #    location / {
    #        root   html;
    #        index  index.html index.htm;
    #    }
    #}


    # HTTPS server
    #
    #server {
    #    listen       443 ssl;
    #    server_name  localhost;

    #    ssl_certificate      cert.pem;
    #    ssl_certificate_key  cert.key;

    #    ssl_session_cache    shared:SSL:1m;
    #    ssl_session_timeout  5m;

    #    ssl_ciphers  HIGH:!aNULL:!MD5;
    #    ssl_prefer_server_ciphers  on;

    #    location / {
    #        root   html;
    #        index  index.html index.htm;
    #    }
    #}

}
其重要注意 upstream Jq_one { server 10.110.1.42:1100; server 10.110.1.42:1101; } 一定要放在HTTP{}中 否则nginx无法启动。
4.启动Nginx成功后,搭建自己的两个网站 发布到iis
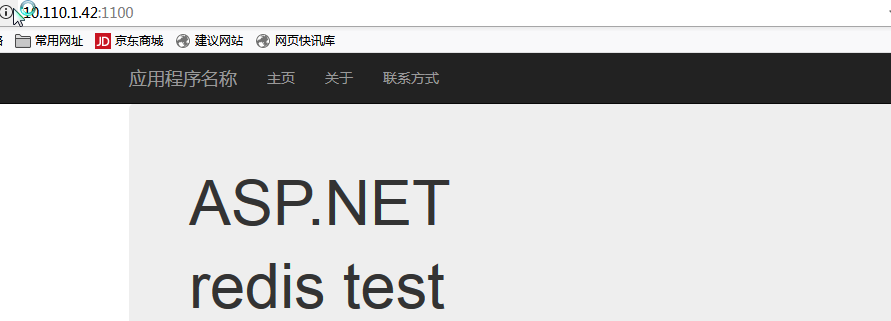
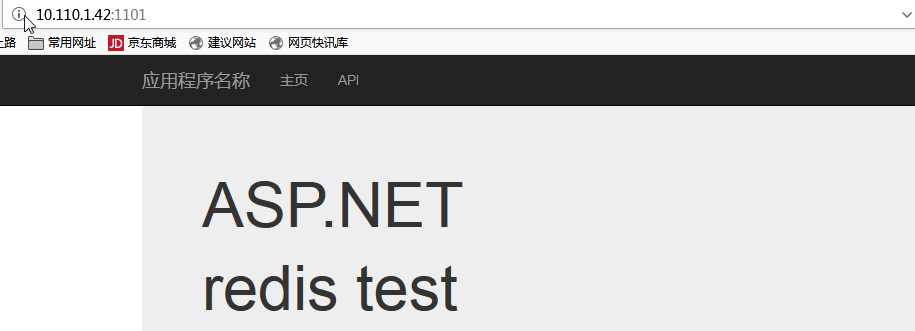
我这里搭建的事一个webapi 一个 webmvc 注意 redis test 这几个字 这是我用redis 代替session 存储的值。
5.详解搭建站点注意事项
首先 通过nuget下载 RedisSessionProvider/StackExchange.Redis

修改两个站点的webconfig
<system.web>
    <!--redis session 共享-->
    <sessionState mode="Custom" customProvider="RedisSessionProvider">
      <providers>
        <add name="RedisSessionProvider" type="RedisSessionProvider.RedisSessionStateStoreProvider, RedisSessionProvider" />
      </providers>
    </sessionState>
  </system.web>
在Global.asax文件中注册redis session共享
protected void Application_Start()
        {
            //redis 实现session 共享
            StackExchange.Redis.ConfigurationOptions redisConfigOpts = StackExchange.Redis.ConfigurationOptions.Parse("127.0.0.1:6379");
            RedisSessionProvider.Config.RedisConnectionConfig.GetSERedisServerConfig = (HttpContextBase context) =>
            {
                return new KeyValuePair<string, StackExchange.Redis.ConfigurationOptions>(
                    "DefaultConnection",
                    redisConfigOpts);
            };
            AreaRegistration.RegisterAllAreas();
            GlobalConfiguration.Configure(WebApiConfig.Register);
            FilterConfig.RegisterGlobalFilters(GlobalFilters.Filters);
            RouteConfig.RegisterRoutes(RouteTable.Routes);
            BundleConfig.RegisterBundles(BundleTable.Bundles);
        }
注册时的redis服务器地址和端口,可以通过配置的方式存储和获取。
注册完成后 下面测试使用redis session
public ActionResult Index()
        {
            ViewBag.Title = "Home Page";
            Session["test"] = "redis test";
            ViewBag.session = Session["test"].ToString();
            return View();
        }
存储 Session["test"] = "redis test";
读取 Session["test"].ToString();
打开网页时 redis 会接受到存储的数据

6.测试nginx+redis+session
mvc网站
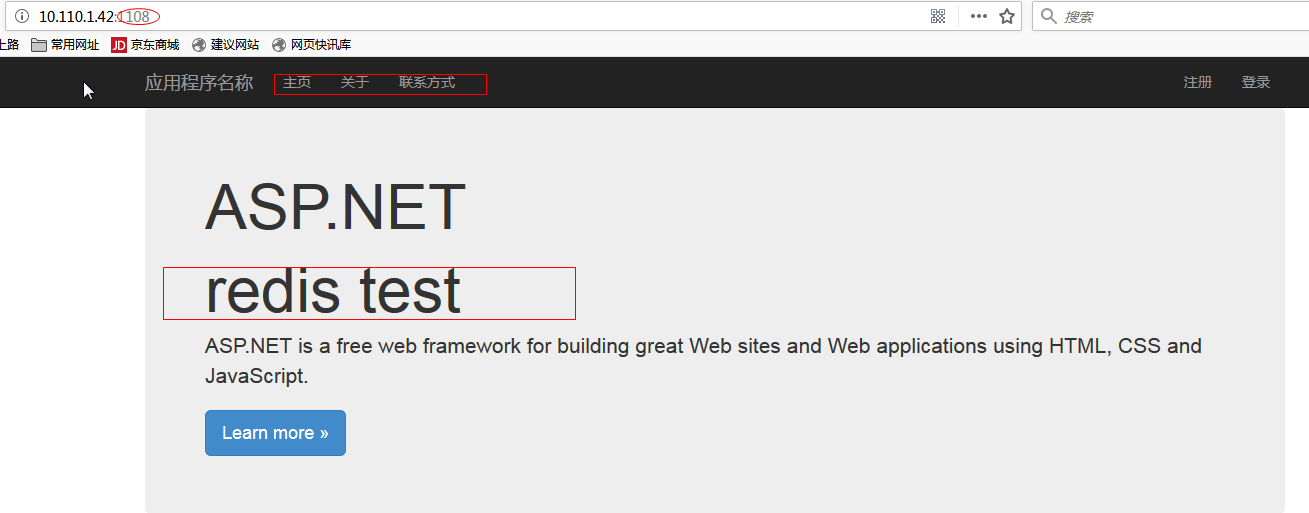
F5 刷新几次
webapi 网站

成功!!!


 151
151


 被折叠的 条评论
为什么被折叠?
被折叠的 条评论
为什么被折叠?
 到【灌水乐园】发言


