


初始化项目
本来想详细讲一讲dotnet core的,但我对于dotnet core的研究还不到一星期,半吊子,脑子又笨,就不写那些理论出来误人子弟了,还是直接来一篇实践给大家做个参考。废话不多说,直接上项目,这里我设计了一个简单的控制台应用程序,抓取
的双色球信息,并持久化到SQL Server,同时还引用了Json.NET和Dapper两个外部组件。
使用dotnet new新建项目,并入下图所示新建Common、Persistent、Service三个文件夹:

- Common文件夹中用于存放公共组件类;
- Persistent用于存放实体和实体操作类;
- Service用于处理实现抓取业务并将数据通过Common将数据插入到数据库总。
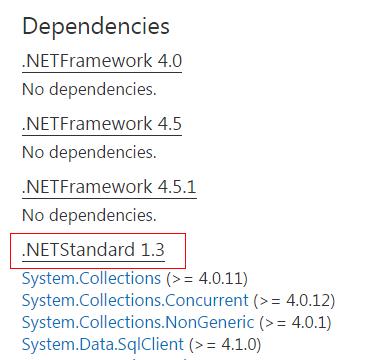
接着,我们需要引入Json.NET和Dapper两个外部组件,传统的.net项目可以通过nuget来管理,.net core项目也是如此,但是他并不会像.net项目那样把package下载到项目的根目录下,而是package下载到用户根目录下集中管理(例:C:\Users\Administrator\.nuget),不得不说,这一套和maven很像,这样的好处是管理起来方便,实现了依赖包的复用,项目看起来也更为清爽,不过如果你需要引入自己开发的项目,就需要使用dotnet pack先对项目进行打包后再做本地引入,project.json的配置如下:
{
    "version": "1.0.0-*",
    "buildOptions": {
        "debugType": "portable",
        "emitEntryPoint": true,
        "copyToOutPut": "appconfig.json"
    },
    "dependencies": {
        "Newtonsoft.Json": "9.0.1",
        "Dapper": "1.50.2",
        "System.Data.SqlClient": "4.1.0",
        "Microsoft.Extensions.Configuration": "1.0.0-rc2-final",
        "Microsoft.Extensions.Options.ConfigurationExtensions": "1.0.0-rc2-final",
        "Microsoft.Extensions.Configuration.Json": "1.0.0-rc2-final",
        "System.Text.Encoding.CodePages": "4.0.1"
    },
    "frameworks": {
        "netcoreapp1.0": {
            "dependencies": {
                "Microsoft.NETCore.App": {
                    "version": "1.0.0"
                }
            },
            "imports": "dnxcore50"
        }
    },
    "runtimes": {
        "win7-x64": {},
        "osx.10.11-x64": {}
    },
    "publishOptions": {
        "include": [
            "appconfig.json"
        ]
    }
}
我们可以看到在project.json的dependencies节点中定义了项目依赖,以"Dapper": "1.50.2"为例,Dapper是我们需要引用的包的名称,1.50.2是引入的版本号,不过请务必使用 https://www.nuget.org 上的名称和版本号,并确认当前包包是否支持.net core。按照微软的官方说法是他们打算在未来启用这个project.json,不过有兴趣的同学可以访问:
https://docs.microsoft.com/en-us/dotnet/articles/core/tools/project-json
查看有关它的详细介绍。
数据库设计
创建Lotto数据库,并执行脚本如下:
    USE [Lotto]
    CREATE TABLE [dbo].[UnionLotto](
    [Id] [bigint] IDENTITY(1,1) NOT NULL,
    [SN] [bigint] NOT NULL,
    [PublishDate] [datetime] NOT NULL,
    [Red1] [int] NOT NULL,
    [Red2] [int] NOT NULL,
    [Red3] [int] NOT NULL,
    [Red4] [int] NOT NULL,
    [Red5] [int] NOT NULL,
    [Red6] [int] NOT NULL,
    [Blue1] [int] NOT NULL,
 CONSTRAINT [PK_UnionLotto] PRIMARY KEY CLUSTERED
(
    [Id] ASC
)WITH (PAD_INDEX = OFF, STATISTICS_NORECOMPUTE = OFF, IGNORE_DUP_KEY = OFF, ALLOW_ROW_LOCKS = ON, ALLOW_PAGE_LOCKS = ON) ON [PRIMARY]
) ON [PRIMARY]
编码实现
在Common文件夹下新建QuickConfig和QuickBrowser类,QuickBrowser用于发起Http请求抓取数据,QuickConfig用于获取系统配置:


using System;
using System.IO;
using System.Net;
using System.Threading;

namespace JokeBuy.Common
{
    /// <summary>
    /// Http请求工具类。
    /// </summary>
    public class QuickBrowser
    {
        public static string BrowseByGet(string url)
        {
            return Browse(url, "get", 3000);
        }

        public static string BrowseByPost(string url)
        {
            return Browse(url, "post", 3000);
        }

        static ManualResetEvent allDone = new ManualResetEvent(false);

        static string Browse(string url, string method, int timeout, string contenttype = "application/x-www-form-urlencoded")
        {
            HttpWebRequest hwr = (HttpWebRequest)WebRequest.Create(url);
            hwr.Method = method.ToLower();
            hwr.ContinueTimeout = timeout;
            hwr.ContentType = contenttype;
            BrowserContext bc = new BrowserContext();
            bc.BrowseRequest = hwr;
            var asyncR = hwr.BeginGetResponse(new AsyncCallback(ResponseCallback), bc);
            allDone.WaitOne();
            using (Stream repStream = bc.BrowseResponse.GetResponseStream())
            {
                using (StreamReader sr = new StreamReader(repStream))
                {
                    return sr.ReadToEnd();
                }
            }
        }

        static void ResponseCallback(IAsyncResult asyncR)
        {
            try
            {
                var bc = (BrowserContext)asyncR.AsyncState;
                bc.BrowseResponse = (HttpWebResponse)bc.BrowseRequest.EndGetResponse(asyncR);
                Stream repStream = bc.BrowseResponse.GetResponseStream();
                return;
            }
            catch (Exception ex)
            {
                Console.WriteLine(ex.Message);
            }
            finally
            {
                allDone.Set();
            }
        }
    }

    public class BrowserContext
    {
        public HttpWebRequest BrowseRequest { get; set; }

        public HttpWebResponse BrowseResponse { get; set; }
    }
}
在QuickBrowser中,可以看到我并未使用WebRequest.GetResponse()去抓取使用,而是使用了BeginGetResponse的异步方法进行操作,因为.net core中并未发现GetResponse()方法,看来微软在重新设计.net core时,该方法被摒弃了,所以在使用.net core时还是小心为好。
using System;
using Microsoft.Extensions.Configuration;

namespace JokeBuy.Common
{
    public class QuickConfig
    {

        static IConfiguration AppConfig;
        static object Lock = new object();

        public static string GetConfig(string key)
        {
            key = string.Format("AppSettings:{0}", key);
            if (string.IsNullOrEmpty(key))
                throw new ArgumentNullException("配置键不能为空值!");
            if (AppConfig == null)
            {
                lock (Lock)
                {
                    if (AppConfig == null)
                    {
                        AppConfig = new ConfigurationBuilder().AddJsonFile(@"appconfig.json").Build();
                    }
                }
            }
            return AppConfig[key];
        }
    }
}
在QuickConfig中,我们可以看到配置文件的获取方式也和.net有了很大的不同,可以使用mermory、json、xml等多种方式,具体可以参考博客园大神
http://www.cnblogs.com/artech/p/new-config-system-01.html
的文章,本例中会去加载自定义的appconfig.josn文件。
使用VS Code新建Class真的很麻烦,namespace和class的声明均需要自己去拼写,不知道有没有人知道什么简便的方法。
在Presistent下新建UnionLotto、UnionLottoFactory和UnionLottoDbWork类:
using System;

namespace JokeBuy.Presistent
{
    /// <summary>
    /// 双色球实体。
    /// </summary>
    public class UnionLotto
    {
        /// <summary>
        /// 标识。
        /// </summary>
        public long Id { get; set; }

        /// <summary>
        /// 批次号。
        /// </summary>
        public long SN { get; set; }

        /// <summary>
        /// 公布日期。
        /// </summary>

        public DateTime PublishDate { get; set; }

        /// <summary>
        /// 红球1。
        /// </summary>
        public int Red1 { get; set; }

        /// <summary>
        /// 红球1。
        /// </summary>
        public int Red2 { get; set; }

        /// <summary>
        /// 红球1。
        /// </summary>
        public int Red3 { get; set; }

        /// <summary>
        /// 红球1。
        /// </summary>
        public int Red4 { get; set; }

        /// <summary>
        /// 红球1。
        /// </summary>
        public int Red5 { get; set; }

        /// <summary>
        /// 红球1。
        /// </summary>
        public int Red6 { get; set; }

        /// <summary>
        /// 蓝球1。
        /// </summary>
        public int Blue1 { get; set; }
    }
}
using System;

namespace JokeBuy.Presistent
{
    /// <summary>
    /// 双色球实体操作工厂。
    /// </summary>
    public class UnionLottoFactory
    {
        /// <summary>
        /// 创建双色球。
        /// </summary>
        /// <returns>双色球实体。</returns>
        public static UnionLotto CreateUnionLotto(
            long sn,
            DateTime pd,
            int red1,
            int red2,
            int red3,
            int red4,
            int red5,
            int red6,
            int blue1
        )
        {
            if (red1 < 1 || red2 < 1 || red3 < 1 || red4 < 1 || red5 < 1 || red6 < 1 || blue1 < 1)
                throw new Exception("Create failed,wrong number!");
            if (red1 > 33 || red2 > 33 || red3 > 33 || red4 > 33 || red5 > 33 || red6 > 33 || blue1 > 16)
                throw new Exception("Create failed,wrong number!");

            return new UnionLotto
            {
                SN = sn,
                PublishDate = pd,
                Red1 = red1,
                Red2 = red2,
                Red3 = red3,
                Red4 = red4,
                Red5 = red5,
                Red6 = red6,
                Blue1 = blue1
            };
        }
    }
}
using System.Collections.Generic;
using System.Data.Common;
using System.Data.SqlClient;
using System.Linq;
using Dapper;
using JokeBuy.Common;

namespace JokeBuy.Presistent
{
    /// <summary>
    ///
    /// </summary>
    public class UnionLottoDbWork
    {
        public static void AddUnionLotto(UnionLotto entity)
        {
            using (DbConnection conn = (DbConnection)new SqlConnection(QuickConfig.GetConfig("DbConnStr")))
            {
                conn.Open();
                string insertSql = "INSERT INTO UnionLotto(SN,PublishDate,Red1,Red2,Red3,Red4,Red5,Red6,Blue1)VALUES(@SN,@PublishDate,@Red1,@Red2,@Red3,@Red4,@Red5,@Red6,@Blue1)";
                conn.Execute(insertSql, entity);
                conn.Close();
            }
        }

        public static UnionLotto GetUnionLottoBySN(long sn)
        {

            using (DbConnection conn = (DbConnection)new SqlConnection(QuickConfig.GetConfig("DbConnStr")))
            {
                conn.Open();
                string querySql = "select * from UnionLotto where SN=@sn";
                var info = conn.Query<UnionLotto>(querySql, new { sn = sn }).SingleOrDefault();
                conn.Close();
                return info;
            }
        }

        public static void BatchAddUnionLotto(List<UnionLotto> entities)
        {
            foreach (var entity in entities)
            {
                if (GetUnionLottoBySN(entity.SN) == null)
                {
                    AddUnionLotto(entity);
                }
            }
        }
    }
}
在Servie下新建DataSpiderService和UnionLottoService类:
using System;
using System.Collections.Generic;
using JokeBuy.Common;
using JokeBuy.Presistent;
using Newtonsoft.Json;

namespace JokeBuy.Service
{

    internal class DataSpiderService
    {

        /// <summary>
        /// 从百度抓取数据。
        /// </summary>
        /// <returns>数据集合。</returns>
        public static List<UnionLotto> BaiduSpider()
        {
            List<UnionLotto> lottos = new List<UnionLotto>();

            return lottos;
        }


        /// <summary>
        /// 从Api抓取数据。
        /// </summary>
        /// <returns>数据集合。</returns>
        public static List<UnionLotto> ApiPlusSpider()
        {
            List<UnionLotto> lottos = new List<UnionLotto>();
            try
            {
                var json = QuickBrowser.BrowseByGet(QuickConfig.GetConfig("PlusApi"));
                var jsonObj = JsonConvert.DeserializeObject<dynamic>(json);
                if (jsonObj.rows > 0)
                {
                    List<PlusSSQ> ssqs = JsonConvert.DeserializeObject<List<PlusSSQ>>(jsonObj.data.ToString());
                    for (int i = 0; i < ssqs.Count; i++)
                    {
                        var nums = ssqs[i].opencode.Split(new char[] { ',', '+' }, StringSplitOptions.RemoveEmptyEntries);
                        lottos.Add(UnionLottoFactory.CreateUnionLotto(
                                                     ssqs[i].expect,
                                                     ssqs[i].opentime,
                                                     int.Parse(nums[0]), int.Parse(nums[1]), int.Parse(nums[2]), int.Parse(nums[3]), int.Parse(nums[4]), int.Parse(nums[5]), int.Parse(nums[6])));

                    }
                }
            }
            catch (Exception ex)
            {
                Console.WriteLine(ex.Message);
            }
            return lottos;
        }
    }

    internal class PlusSSQ
    {
        public long expect;
        public string opencode;
        public DateTime opentime;
    }
}
using JokeBuy.Presistent;

namespace JokeBuy.Service
{
    public class UnionLottoService
    {
        public static void DataInitial()
        {

        }


        /// <summary>
        /// 从API中同步数据。
        /// </summary>
        public static void DataSync()
        {
            var lottos = DataSpiderService.ApiPlusSpider();
            UnionLottoDbWork.BatchAddUnionLotto(lottos);
        }
    }
}
在根目录下添加appconfig.json文件:
{
    "AppSettings": {
        "DbConnStr": "Data Source=.\\SQL2012;Initial Catalog=Lotto;Persist Security Info=True;User ID=sa;Password=1234567;",
        "PlusApi": "http://f.apiplus.cn/ssq-1.json"
    }
}
appconfig.json中定义了项目数据库链接和api抓取地址,回顾一下project.json中的配置,我们可以发现publishOptions.include配置,因为发布时appconfig.json并不会被拷贝到发布包中,需要手动将其引入进来。
执行
最后在Program中调用:
using System;
using System.Text;
using JokeBuy.Service;

namespace ConsoleApplication
{
    public class Program
    {
        public static void Main(string[] args)
        {
            Encoding.RegisterProvider(CodePagesEncodingProvider.Instance);             //主要用于解决控制台中文输出乱码问题
            UnionLottoService.DataSync();
            Console.WriteLine("执行完毕!");
            Console.ReadLine();
        }
    }
}
使用dotnet publish后,在..\bin\Debug\netcoreapp1.0\win7-x64\publish下找到JokeBuy.exe执行后,数据成功插入到数据库:
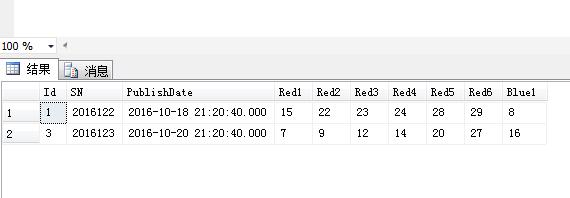
执行成功!


 被折叠的 条评论
为什么被折叠?
被折叠的 条评论
为什么被折叠?
 到【灌水乐园】发言


