


1.工具/原料
• apache-tomcat-7.0.63 http://download.csdn.net/detail/lxfhahaha/9778163
• apache-maven-3.3.3 http://download.csdn.net/detail/lxfhahaha/9778158
• MySQL Server 5.0 http://download.csdn.net/detail/lxfhahaha/9763675
• Navicat for mysql http://download.csdn.net/detail/lxfhahaha/9763671
• jdk1.8.0_73
• IntelliJ IDEA 2016.3.4
2.前言
SSM ( spring、SpringMVC 和Mybatis )框架集由Spring、SpringMVC、MyBatis三个开源框架整合而成,常作为数据源较简单的web项目的框架,现在我们用IDEA来做开发工具,选择mysql当数据库,从无到有,来创建一个简单的基于ssm框架的maven web项目——hello world。
3.步骤
1).准备工作
1.1 mysql数据库安装
http://blog.csdn.net/lxfhahaha/article/details/56847353
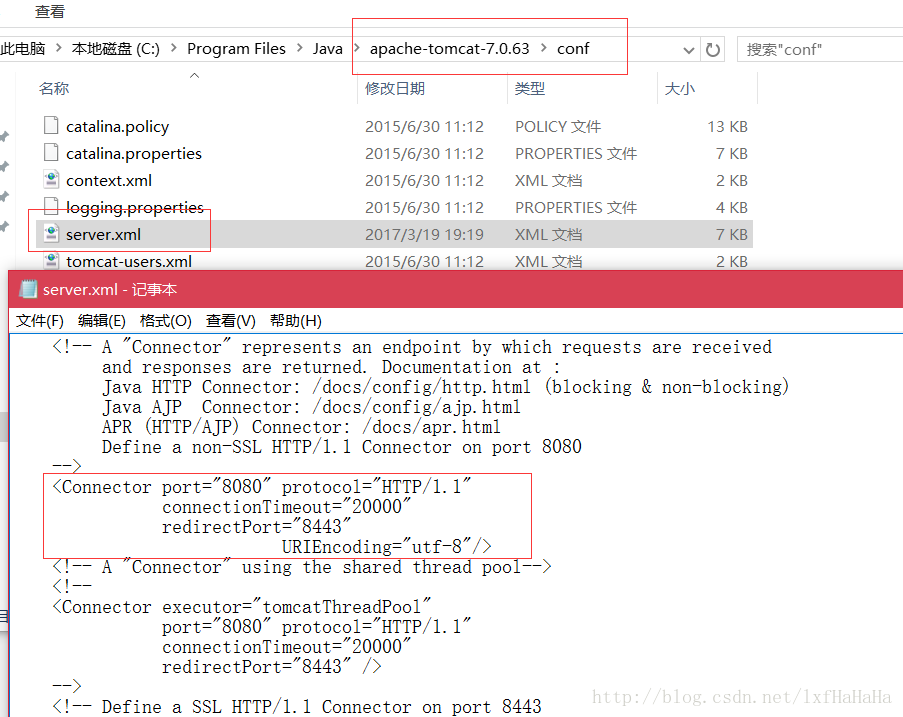
1.2 tomcat安装
把tomcat下过来后,解压在本地,修改server.xml文件
增加URIEncoding="utf-8"
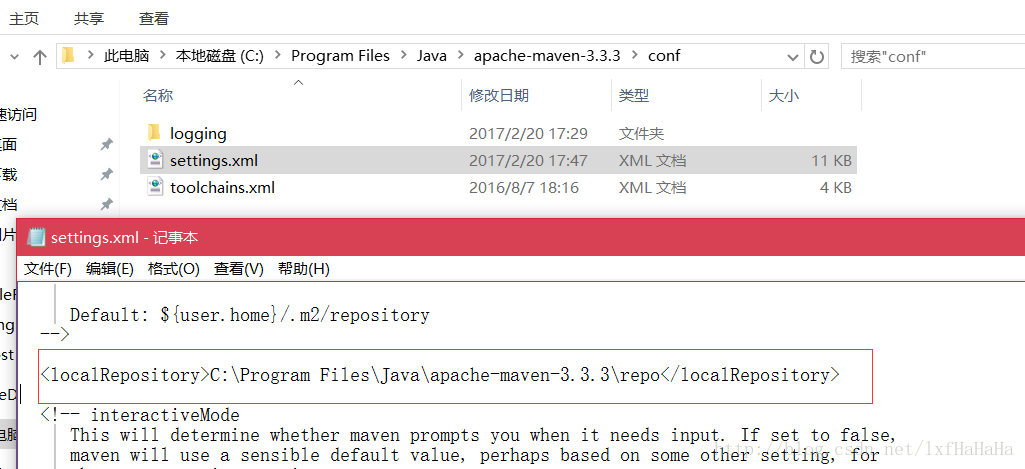
1.3 maven安装
把maven下过来之后,解压在本地,修改settings.xml <localRepository>对应的是maven的放置目录
1.4 jdk安装
1.4.1 jdk安装
1.4.2 jdk环境变量配置
这个网上很多,就不累述了
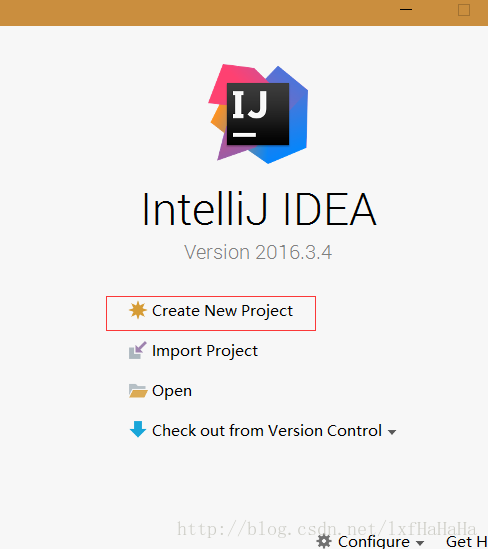
1.5 idea安装
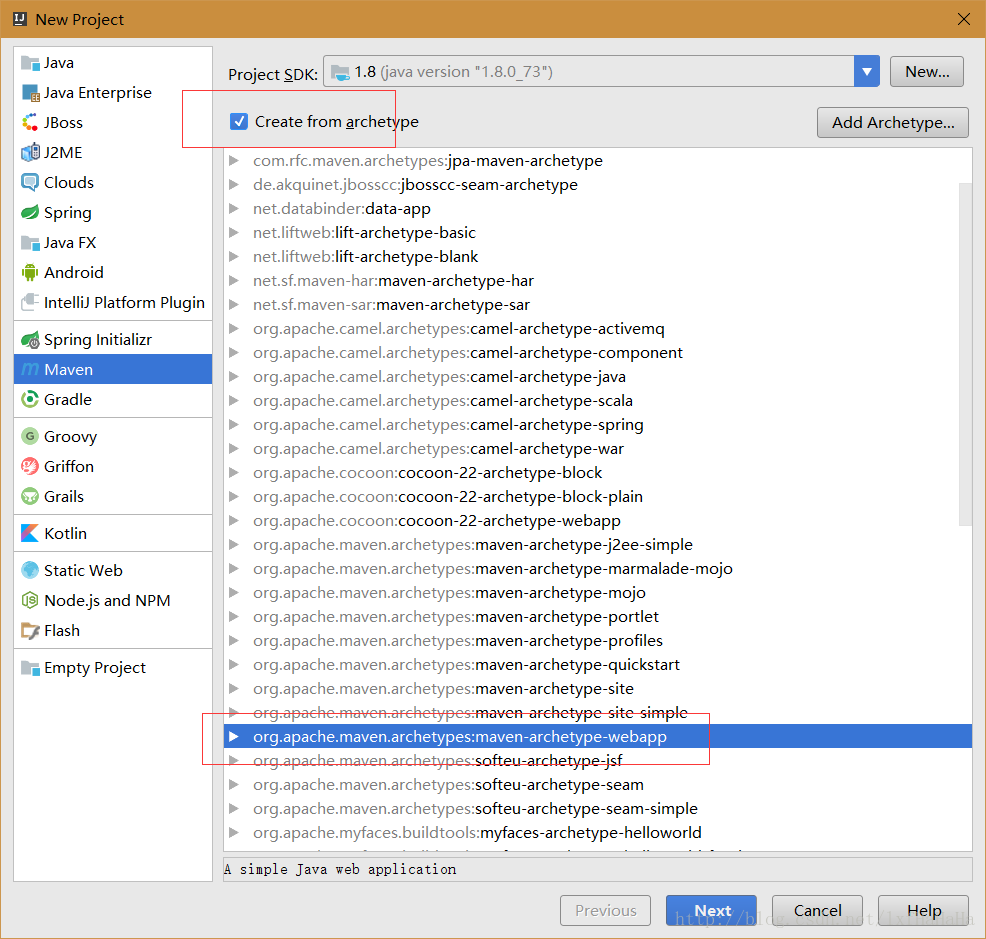
2).创建maven web项目
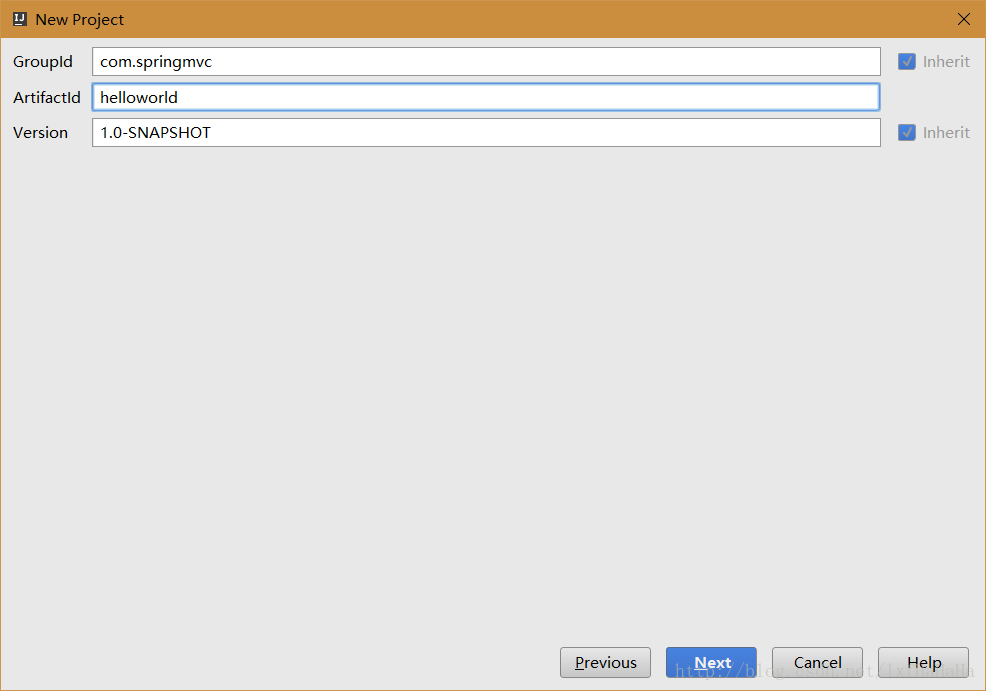
点击Next,填写GroupId、ArtifactId(groupId一般是域名的反写,也作为项目中类的包名,artifactId是工程名,也就是根文件夹名)
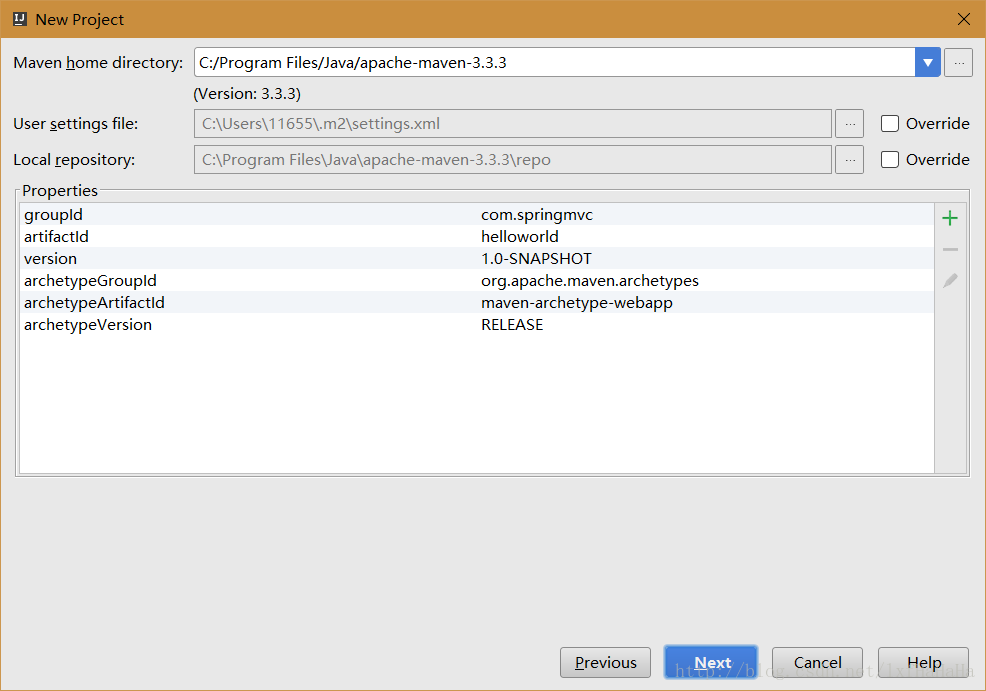
然后next,选择本地maven的位置
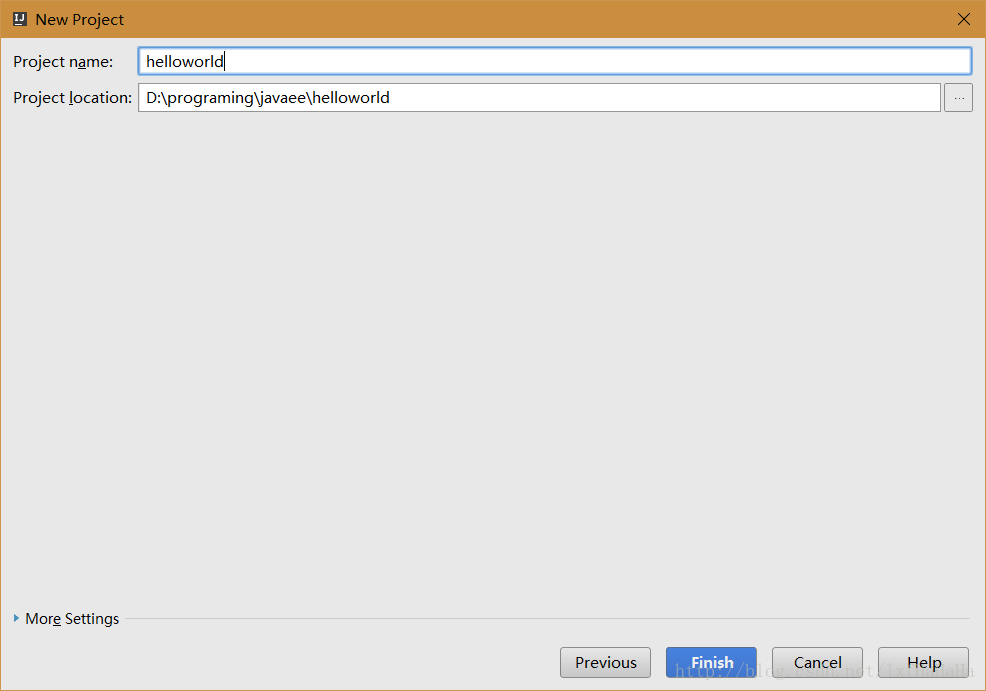
继续next,选择项目保存的位置
点击finish,他会自动生成maven骨架,下载所需要的jar包,第一次创建所需要的时间可能比较长,以后就快了,等待其完成。
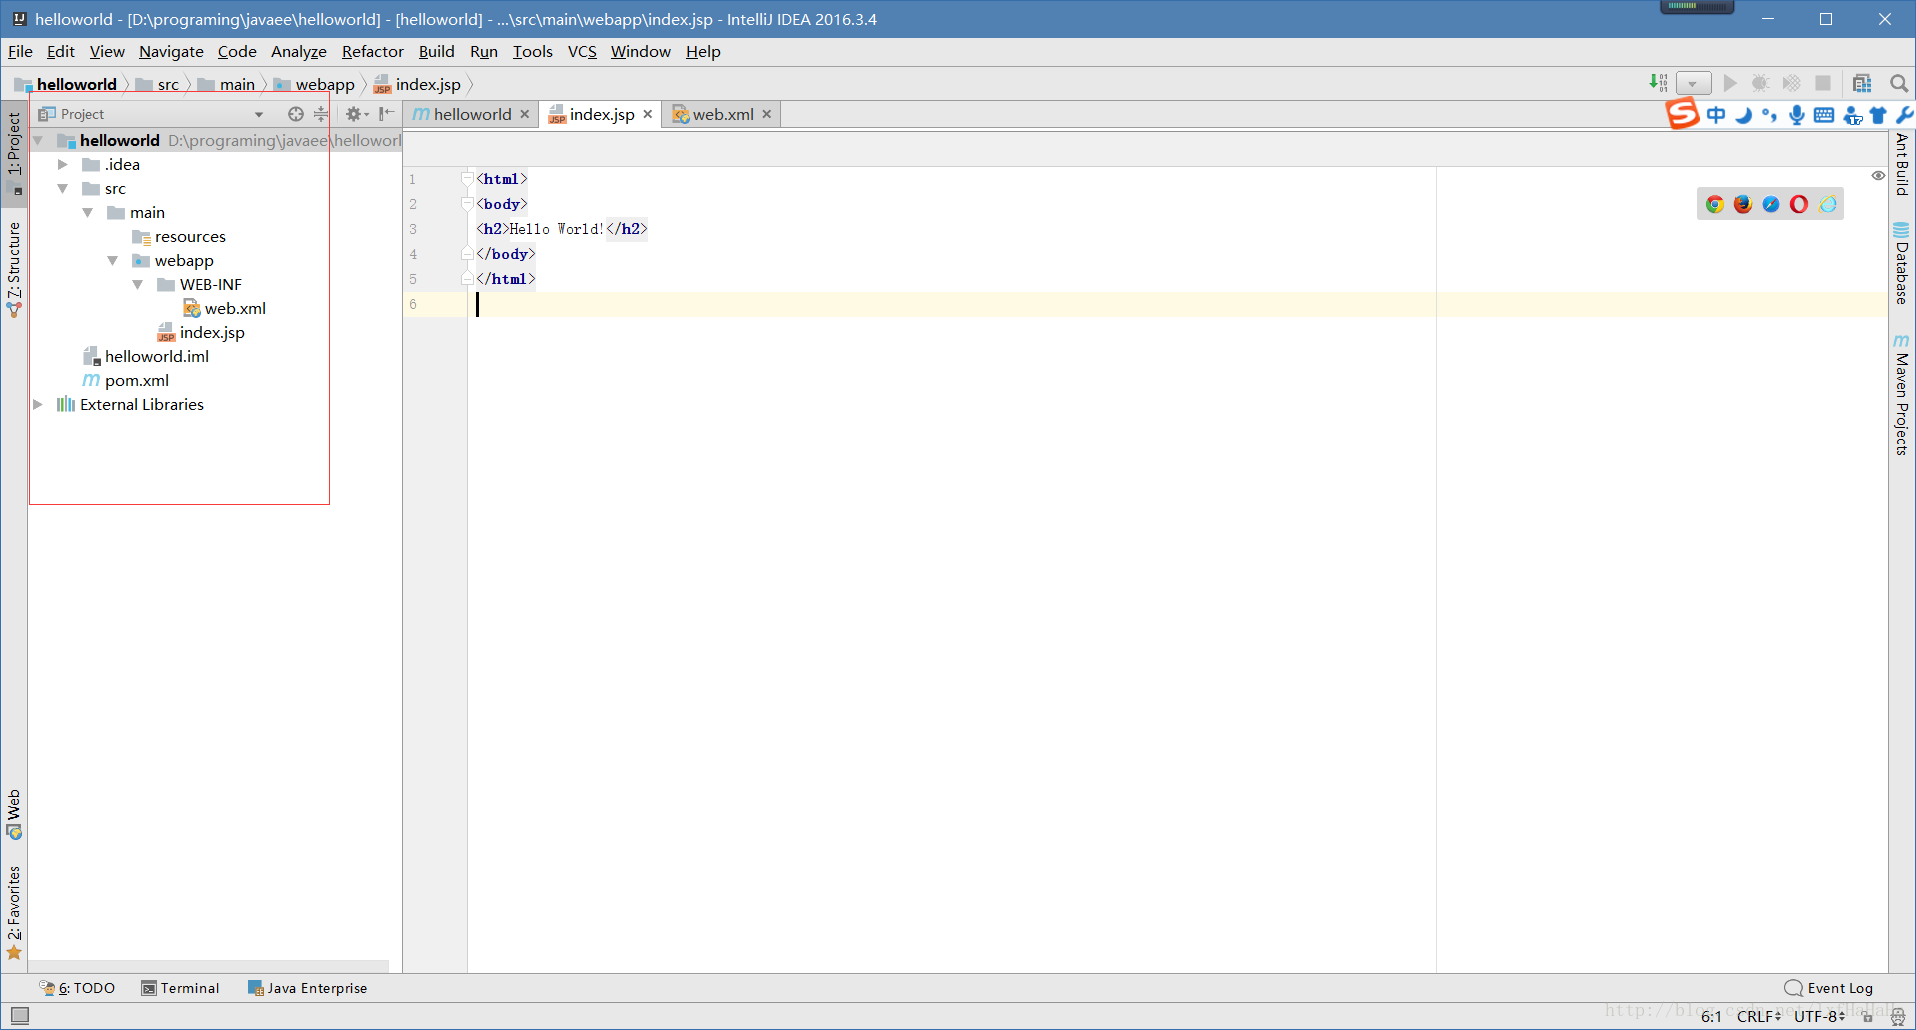
创建完后的项目结构如图
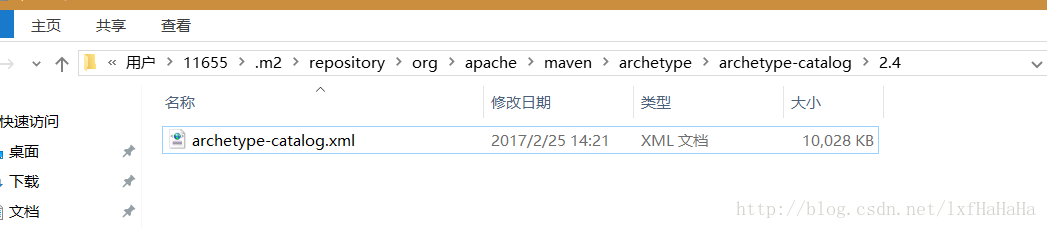
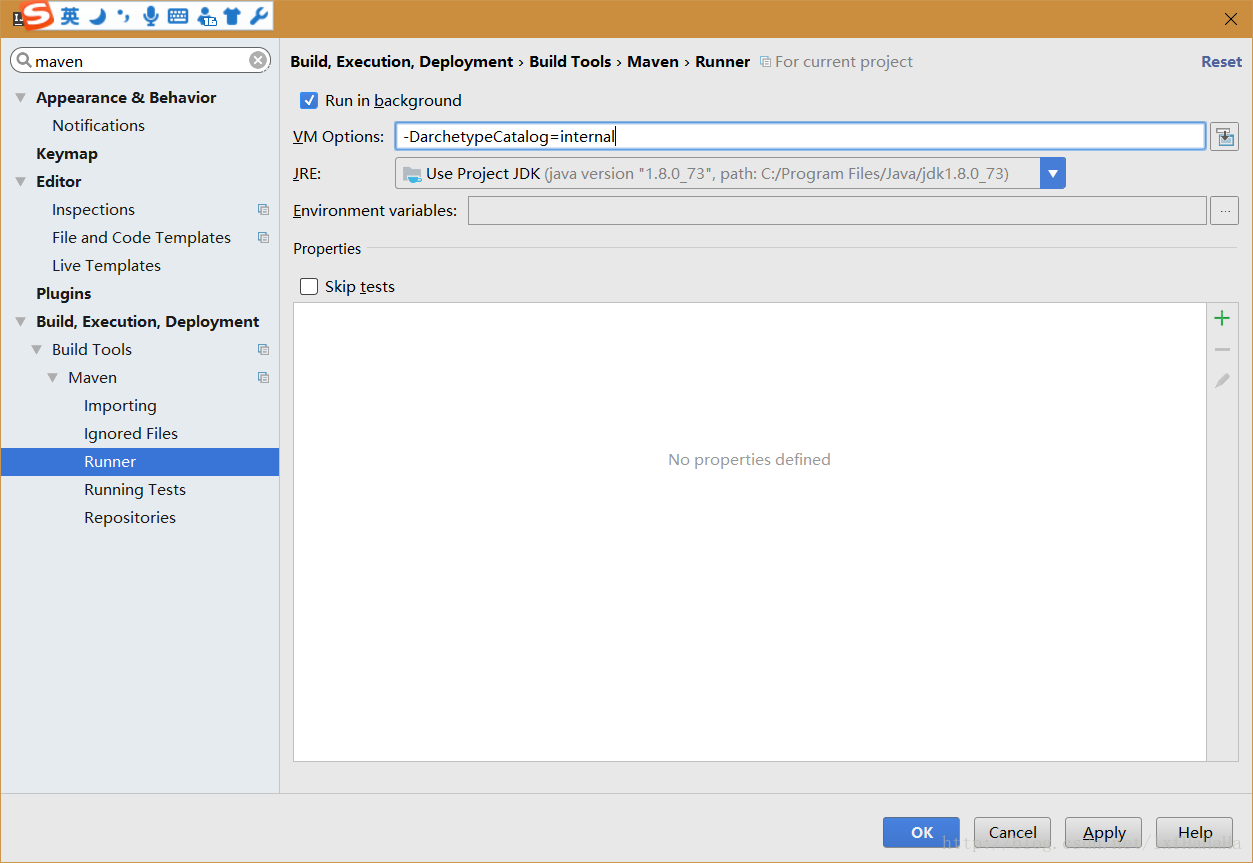
(Tips:这里要注意的是,如果idea生成maven速度很慢很慢,一直在下载东西,name可以试试看以下方法:用游览器打开http://repo1.maven.org/maven2/archetype-catalog.xml,打开这个东西速度很慢很慢。。看来生成慢也不是没有道理的了,把这个东西打开后,全部复制到本地为archetype-catalog.xml,放在复制到如下目录:
.m2\repository\org\apache\maven\archetype\archetype-catalog\2.4目录下,没有就新建
然后到idea的file-setting里面添加参数,-DarchetypeCatalog=local,以替换网络上的catalog.xml。
然后重新来一遍,速度应该就快多了)
2017-2-27 20:25:57
最近比较懒,,理理看思路。。上回讲到哪了,,继续继续。。
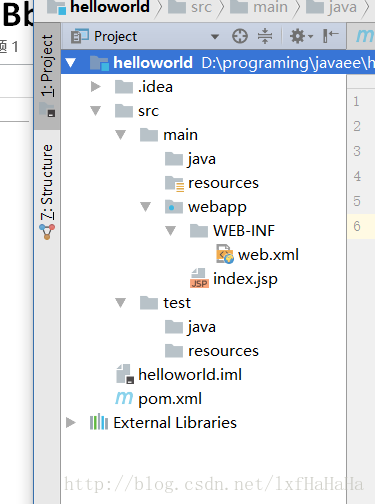
新建完之后,是下面这样的,大家可以看看目录结构
- .idea文件夹和helloworld.iml是idea的一些配置文件,我们不用管,就算删了也没事,当然删了,重新打开项目,就得重新配置了
- src文件夹就是我们放项目代码的地方
- pom.xml是maven的配置文件,我们需要什么jar包,都可以在里面添加依赖,然后maven就会自己帮我们下到本地仓库里面
然后自己新建几个文件夹,src下新建一个test,用来放测试文件,main下新建一个Java,用来放java文件,建好后是这样的
接着,执行如下操作:
1. 在main的java文件夹上,鼠标右键,找到 make directory as,选择Sources root
2. 在main的resources文件夹上,鼠标右键,找到make directory as,选择Resources root
3. 在test的java文件夹上,鼠标右键,找到make directory as,选择Test Sources root
4. 在test的resources文件夹上,鼠标右键,找到make directory as,选择Test Resources root
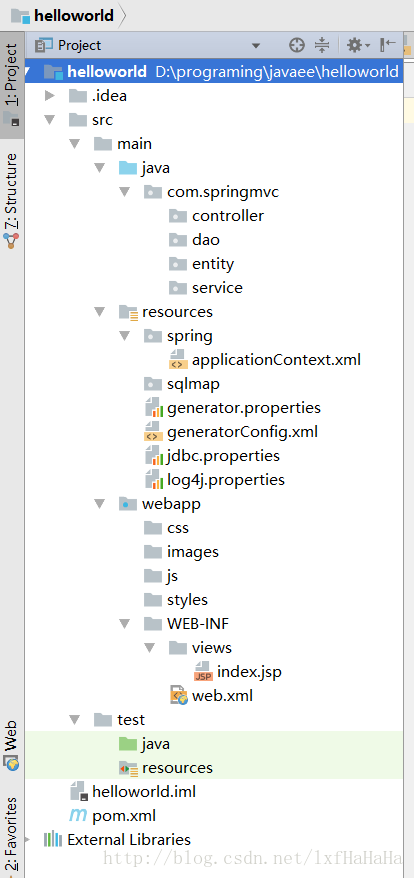
继续修改目录结构,增加一些文件夹及文件,这些都是等一下要用的到的
1. src->main->java下新建package com,再新建package springmvc,这两个对应我们刚开始的groupid
2. springmvc包下新建四个包,controller包用来放前台url映射文件,dao用来放与数据库的接口文件,entity用来放实体类文件,service用来放自己定义的接口
3. applicationContext.xml是spring配置文件
4. sqlmap文件夹里面放实体与数据库的映射文件
5. generator.xml和generator.properties是mybatis的配置文件
6. jdbc.properties是数据库相关信息
7. log4j.properties是日志配置文件
8. webapp下新建css、images等文件,用来放前端资源
9. web-inf下新建views文件件,jsp文件就放这里面了
修改好后的目录结构是这样的
3).项目配置文件
1. 配置pom.xml文件,maven引入jar包
   为了方便后面说的时候不需要引入JAR包,我这里直接给出所有需要的JAR包,这都是基本的JAR包,每个包的是干什么的都有注释,就不再多说了。
   **pom.xml**
   (Ps:如果哪里显示红色报错,就将光标移到那一行,然后键入alt+enter,选择update)
<project xmlns="http://maven.apache.org/POM/4.0.0" xmlns:xsi="http://www.w3.org/2001/XMLSchema-instance" xsi:schemaLocation="http://maven.apache.org/POM/4.0.0 http://maven.apache.org/maven-v4_0_0.xsd"> <modelVersion>4.0.0</modelVersion> <groupId>com.springmvc</groupId> <artifactId>helloworld</artifactId> <packaging>war</packaging> <version>1.0-SNAPSHOT</version> <name>helloworld Maven Webapp</name> <url>http://maven.apache.org</url> <properties> <!-- spring版本号 --> <spring.version>4.2.5.RELEASE</spring.version> <!-- mybatis版本号 --> <mybatis.version>3.2.4</mybatis.version> <!-- log4j日志文件管理包版本 --> <slf4j.version>1.6.6</slf4j.version> <log4j.version>1.2.12</log4j.version> </properties> <dependencies> <!-- spring核心包 --> <!-- springframe start --> <dependency> <groupId>org.springframework</groupId> <artifactId>spring-core</artifactId> <version>${spring.version}</version> </dependency> <dependency> <groupId>org.springframework</groupId> <artifactId>spring-web</artifactId> <version>${spring.version}</version> </dependency> <dependency> <groupId>org.springframework</groupId> <artifactId>spring-oxm</artifactId> <version>${spring.version}</version> </dependency> <dependency> <groupId>org.springframework</groupId> <artifactId>spring-tx</artifactId> <version>${spring.version}</version> </dependency> <dependency> <groupId>org.springframework</groupId> <artifactId>spring-jdbc</artifactId> <version>${spring.version}</version> </dependency> <dependency> <groupId>org.springframework</groupId> <artifactId>spring-webmvc</artifactId> <version>${spring.version}</version> </dependency> <dependency> <groupId>org.springframework</groupId> <artifactId>spring-aop</artifactId> <version>${spring.version}</version> </dependency> <dependency> <groupId>org.springframework</groupId> <artifactId>spring-context-support</artifactId> <version>${spring.version}</version> </dependency> <dependency> <groupId>org.springframework</groupId> <artifactId>spring-test</artifactId> <version>${spring.version}</version> </dependency> <!-- springframe end --> <!-- mybatis核心包 --> <dependency> <groupId>org.mybatis</groupId> <artifactId>mybatis</artifactId> <version>${mybatis.version}</version> </dependency> <!-- mybatis/spring包 --> <dependency> <groupId>org.mybatis</groupId> <artifactId>mybatis-spring</artifactId> <version>1.2.2</version> </dependency> <!-- mysql驱动包 --> <dependency> <groupId>mysql</groupId> <artifactId>mysql-connector-java</artifactId> <version>5.1.29</version> </dependency> <!-- junit测试包 --> <dependency> <groupId>junit</groupId> <artifactId>junit</artifactId> <version>4.11</version> <scope>test</scope> </dependency> <!-- jstl --> <dependency> <groupId>javax.servlet</groupId> <artifactId>jstl</artifactId> <version>1.2</version> </dependency> <dependency> <groupId>javax.servlet.jsp</groupId> <artifactId>jsp-api</artifactId> <version>2.2.1-b03</version> <scope>provided</scope> </dependency> <!-- servlet --> <dependency> <groupId>javax.servlet</groupId> <artifactId>servlet-api</artifactId> <version>2.5</version> <scope>provided</scope> </dependency> <!-- json数据 --> <dependency> <groupId>com.fasterxml.jackson.core</groupId> <artifactId>jackson-core</artifactId> <version>2.7.1</version> </dependency> <dependency> <groupId>com.fasterxml.jackson.core</groupId> <artifactId>jackson-annotations</artifactId> <version>2.7.1</version> </dependency> <dependency> <groupId>com.fasterxml.jackson.core</groupId> <artifactId>jackson-databind</artifactId> <version>2.7.1</version> </dependency> <dependency> <groupId>net.sf.json-lib</groupId> <artifactId>json-lib</artifactId> <version>2.4</version> <classifier>jdk15</classifier> </dependency> <!-- commons --> <dependency> <groupId>commons-lang</groupId> <artifactId>commons-lang</artifactId> <version>2.4</version> </dependency> <dependency> <groupId>commons-logging</groupId> <artifactId>commons-logging</artifactId> <version>1.1</version> </dependency> <dependency> <groupId>commons-pool</groupId> <artifactId>commons-pool</artifactId> <version>1.5.6</version> </dependency> <dependency> <groupId>commons-dbcp</groupId> <artifactId>commons-dbcp</artifactId> <version>1.4</version> </dependency> <dependency> <groupId>commons-beanutils</groupId> <artifactId>commons-beanutils</artifactId> <version>1.8.3</version> </dependency> <dependency> <groupId>commons-httpclient</groupId> <artifactId>commons-httpclient</artifactId> <version>3.1</version> </dependency> <dependency> <groupId>commons-collections</groupId> <artifactId>commons-collections</artifactId> <version>3.1</version> </dependency> <dependency> <groupId>commons-codec</groupId> <artifactId>commons-codec</artifactId> <version>1.9</version> </dependency> <dependency> <groupId>javax.annotation</groupId> <artifactId>jsr250-api</artifactId> <version>1.0</version> </dependency> <dependency> <groupId>net.sf.ezmorph</groupId> <artifactId>ezmorph</artifactId> <version>1.0.6</version> </dependency> <dependency> <groupId>javax.activation</groupId> <artifactId>activation</artifactId> <version>1.1</version> </dependency> <dependency> <groupId>taglibs</groupId> <artifactId>standard</artifactId> <version>1.1.2</version> </dependency> <!-- 日志文件管理包 --> <!-- log start --> <dependency> <groupId>log4j</groupId> <artifactId>log4j</artifactId> <version>${log4j.version}</version> </dependency> <dependency> <groupId>org.slf4j</groupId> <artifactId>slf4j-api</artifactId> <version>${slf4j.version}</version> </dependency> <dependency> <groupId>org.slf4j</groupId> <artifactId>slf4j-log4j12</artifactId> <version>${slf4j.version}</version> </dependency> <!-- log end --> </dependencies> <build> <finalName>helloworld</finalName> <plugins> <plugin> <groupId>org.mybatis.generator</groupId> <artifactId>mybatis-generator-maven-plugin</artifactId> <version>1.3.2</version> <configuration> <!--允许移动生成的文件--> <verbose>true</verbose> <!--允许覆盖生成的文件--> <overwrite>true</overwrite> </configuration> </plugin> </plugins> </build> </project> - 1
- 2
- 3
- 4
- 5
- 6
- 7
- 8
- 9
- 10
- 11
- 12
- 13
- 14
- 15
- 16
- 17
- 18
- 19
- 20
- 21
- 22
- 23
- 24
- 25
- 26
- 27
- 28
- 29
- 30
- 31
- 32
- 33
- 34
- 35
- 36
- 37
- 38
- 39
- 40
- 41
- 42
- 43
- 44
- 45
- 46
- 47
- 48
- 49
- 50
- 51
- 52
- 53
- 54
- 55
- 56
- 57
- 58
- 59
- 60
- 61
- 62
- 63
- 64
- 65
- 66
- 67
- 68
- 69
- 70
- 71
- 72
- 73
- 74
- 75
- 76
- 77
- 78
- 79
- 80
- 81
- 82
- 83
- 84
- 85
- 86
- 87
- 88
- 89
- 90
- 91
- 92
- 93
- 94
- 95
- 96
- 97
- 98
- 99
- 100
- 101
- 102
- 103
- 104
- 105
- 106
- 107
- 108
- 109
- 110
- 111
- 112
- 113
- 114
- 115
- 116
- 117
- 118
- 119
- 120
- 121
- 122
- 123
- 124
- 125
- 126
- 127
- 128
- 129
- 130
- 131
- 132
- 133
- 134
- 135
- 136
- 137
- 138
- 139
- 140
- 141
- 142
- 143
- 144
- 145
- 146
- 147
- 148
- 149
- 150
- 151
- 152
- 153
- 154
- 155
- 156
- 157
- 158
- 159
- 160
- 161
- 162
- 163
- 164
- 165
- 166
- 167
- 168
- 169
- 170
- 171
- 172
- 173
- 174
- 175
- 176
- 177
- 178
- 179
- 180
- 181
- 182
- 183
- 184
- 185
- 186
- 187
- 188
- 189
- 190
- 191
- 192
- 193
- 194
- 195
- 196
- 197
- 198
- 199
- 200
- 201
- 202
- 203
- 204
- 205
- 206
- 207
- 208
- 209
- 210
- 211
- 212
- 213
- 214
- 215
- 216
- 217
- 218
- 219
- 220
- 221
- 222
- 223
- 224
- 225
- 226
- 227
- 228
- 229
- 230
- 231
- 232
- 233
- 234
- 235
- 236
- 237
- 238
- 239
- 240
- 241
- 242
- 243
- 1
- 2
- 3
- 4
- 5
- 6
- 7
- 8
- 9
- 10
- 11
- 12
- 13
- 14
- 15
- 16
- 17
- 18
- 19
- 20
- 21
- 22
- 23
- 24
- 25
- 26
- 27
- 28
- 29
- 30
- 31
- 32
- 33
- 34
- 35
- 36
- 37
- 38
- 39
- 40
- 41
- 42
- 43
- 44
- 45
- 46
- 47
- 48
- 49
- 50
- 51
- 52
- 53
- 54
- 55
- 56
- 57
- 58
- 59
- 60
- 61
- 62
- 63
- 64
- 65
- 66
- 67
- 68
- 69
- 70
- 71
- 72
- 73
- 74
- 75
- 76
- 77
- 78
- 79
- 80
- 81
- 82
- 83
- 84
- 85
- 86
- 87
- 88
- 89
- 90
- 91
- 92
- 93
- 94
- 95
- 96
- 97
- 98
- 99
- 100
- 101
- 102
- 103
- 104
- 105
- 106
- 107
- 108
- 109
- 110
- 111
- 112
- 113
- 114
- 115
- 116
- 117
- 118
- 119
- 120
- 121
- 122
- 123
- 124
- 125
- 126
- 127
- 128
- 129
- 130
- 131
- 132
- 133
- 134
- 135
- 136
- 137
- 138
- 139
- 140
- 141
- 142
- 143
- 144
- 145
- 146
- 147
- 148
- 149
- 150
- 151
- 152
- 153
- 154
- 155
- 156
- 157
- 158
- 159
- 160
- 161
- 162
- 163
- 164
- 165
- 166
- 167
- 168
- 169
- 170
- 171
- 172
- 173
- 174
- 175
- 176
- 177
- 178
- 179
- 180
- 181
- 182
- 183
- 184
- 185
- 186
- 187
- 188
- 189
- 190
- 191
- 192
- 193
- 194
- 195
- 196
- 197
- 198
- 199
- 200
- 201
- 202
- 203
- 204
- 205
- 206
- 207
- 208
- 209
- 210
- 211
- 212
- 213
- 214
- 215
- 216
- 217
- 218
- 219
- 220
- 221
- 222
- 223
- 224
- 225
- 226
- 227
- 228
- 229
- 230
- 231
- 232
- 233
- 234
- 235
- 236
- 237
- 238
- 239
- 240
- 241
- 242
- 243
2.配置jdbc
jdbc.properties (记得输入自己数据库的密码)
driver=com.mysql.jdbc.Driver
url=jdbc:mysql://localhost:3306/example?useUnicode=true&characterEncoding=utf-8
username=root
#下面输入自己数据库的密码
password=************************************************ #定义初始连接数 initialSize=0 #定义最大连接数 maxActive=20 #定义最大空闲 maxIdle=20 #定义最小空闲 minIdle=1 #定义最长等待时间 maxWait=60000- 1
- 2
- 3
- 4
- 5
- 6
- 7
- 8
- 9
- 10
- 11
- 12
- 13
- 14
- 15
- 1
- 2
- 3
- 4
- 5
- 6
- 7
- 8
- 9
- 10
- 11
- 12
- 13
- 14
- 15
3. spring配置
applicationContext.xml
(Tips:这里面有些地方是要修改的,com.springmvc,你自己的项目的话,换成你自己的就行)
<?xml version="1.0" encoding="UTF-8"?>
<beans xmlns="http://www.springframework.org/schema/beans" xmlns:xsi="http://www.w3.org/2001/XMLSchema-instance" xmlns:context="http://www.springframework.org/schema/context" xmlns:beans="http://www.springframework.org/schema/beans" xmlns:mvc="http://www.springframework.org/schema/mvc" xsi:schemaLocation="http://www.springframework.org/schema/beans http://www.springframework.org/schema/beans/spring-beans-4.3.xsd http://www.springframework.org/schema/context http://www.springframework.org/schema/context/spring-context-4.3.xsd http://www.springframework.org/schema/mvc http://www.springframework.org/schema/mvc/spring-mvc-4.3.xsd" > <!-- ①:对com.springmvc包中的所有类进行扫描,以完成Bean创建和自动依赖注入的功能 --> <context:component-scan base-package="com.springmvc"/> <mvc:annotation-driven /> <!-- 静态资源访问 --> <!--如果webapp下你新建了文件夹,想访问里面的静态资源,那么就要在这配置一下--> <mvc:resources location="/images/" mapping="/images/**"/> <mvc:resources location="/css/" mapping="/css/**"/> <mvc:resources location="/styles/" mapping="/styles/**"/> <mvc:resources location="/js/" mapping="/js/**"/> <!-- Configures the @Controller programming model <mvc:annotation-driven />--> <!-- ②:启动Spring MVC的注解功能,完成请求和注解POJO的映射 --> <bean class="org.springframework.web.servlet.mvc.annotation.AnnotationMethodHandlerAdapter"> <property name="messageConverters"> <list> <ref bean="mappingJacksonHttpMessageConverter"/> </list> </property> </bean> <bean id="mappingJacksonHttpMessageConverter" class="org.springframework.http.converter.json.MappingJackson2HttpMessageConverter"> <property name="supportedMediaTypes"> <list> <value>application/json;charset=UTF-8</value> </list> </property> </bean> <!-- 配置视图解析器,把控制器的逻辑视频映射为真正的视图 --> <!-- /WEB-INF/jsp/start.jsp --> <bean class="org.springframework.web.servlet.view.InternalResourceViewResolver"> <property name="viewClass" value="org.springframework.web.servlet.view.JstlView"/> <property name="prefix" value="/WEB-INF/views/" /> <property name="suffix" value=".jsp" /> </bean> <!-- 配置dbcp数据库连接池 --> <!-- <context:property-placeholder location="classpath:db.properties"/> --> <!--数据库配置 --> <bean id = "propertyConfigurer" class = "org.springframework.beans.factory.config.PropertyPlaceholderConfigurer"> <property name="locations"> <list> <value>classpath:jdbc.properties</value> </list> </property> </bean> <!-- 数据库连接池 --> <bean id="dataSource" class="org.apache.commons.dbcp.BasicDataSource" destroy-method="close"> <property name="driverClassName" value="${driver}"/> <property name="url" value="${url}"/> <property name="username" value="${username}"/> <property name="password" value="${password}"/> <property name="initialSize" value="1"/> <property name="maxActive" value="100"/> <property name="maxIdle" value="5"/> <property name="maxWait" value="80000"/> </bean> <!-- 配置事务管理器 --> <bean id="transactionManager" class="org.springframework.jdbc.datasource.DataSourceTransactionManager"> <property name="dataSource" ref="dataSource" /> </bean> <!-- 拦截器 --> <mvc:interceptors> <!-- 国际化操作拦截器 如果采用基于(请求/Session/Cookie)则必需配置 --> <bean class="org.springframework.web.servlet.i18n.LocaleChangeInterceptor" /> </mvc:interceptors> <!-- 定义无Controller的path<->view直接映射 --> <mvc:view-controller path="/" view-name="redirect:/" /> </beans> - 1
- 2
- 3
- 4
- 5
- 6
- 7
- 8
- 9
- 10
- 11
- 12
- 13
- 14
- 15
- 16
- 17
- 18
- 19
- 20
- 21
- 22
- 23
- 24
- 25
- 26
- 27
- 28
- 29
- 30
- 31
- 32
- 33
- 34
- 35
- 36
- 37
- 38
- 39
- 40
- 41
- 42
- 43
- 44
- 45
- 46
- 47
- 48
- 49
- 50
- 51
- 52
- 53
- 54
- 55
- 56
- 57
- 58
- 59
- 60
- 61
- 62
- 63
- 64
- 65
- 66
- 67
- 68
- 69
- 70
- 71
- 72
- 73
- 74
- 75
- 76
- 77
- 78
- 79
- 80
- 81
- 82
- 83
- 84
- 85
- 86
- 87
- 88
- 89
- 90
- 91
- 92
- 93
- 94
- 95
- 96
- 97
- 98
- 99
- 100
- 1
- 2
- 3
- 4
- 5
- 6
- 7
- 8
- 9
- 10
- 11
- 12
- 13
- 14
- 15
- 16
- 17
- 18
- 19
- 20
- 21
- 22
- 23
- 24
- 25
- 26
- 27
- 28
- 29
- 30
- 31
- 32
- 33
- 34
- 35
- 36
- 37
- 38
- 39
- 40
- 41
- 42
- 43
- 44
- 45
- 46
- 47
- 48
- 49
- 50
- 51
- 52
- 53
- 54
- 55
- 56
- 57
- 58
- 59
- 60
- 61
- 62
- 63
- 64
- 65
- 66
- 67
- 68
- 69
- 70
- 71
- 72
- 73
- 74
- 75
- 76
- 77
- 78
- 79
- 80
- 81
- 82
- 83
- 84
- 85
- 86
- 87
- 88
- 89
- 90
- 91
- 92
- 93
- 94
- 95
- 96
- 97
- 98
- 99
- 100
4. log4j配置
为了方便调试,一般都会使用日志来输出信息,Log4j是Apache的一个开放源代码项目,通过使用Log4j,我们可以控制日志信息输送的目的地是控制台、文件、GUI组件,甚至是套接口服务器、NT的事件记录器、UNIX Syslog守护进程等;我们也可以控制每一条日志的输出格式;通过定义每一条日志信息的级别,我们能够更加细致地控制日志的生成过程。 Log4j的配置很简单,而且也是通用的,下面给出一个基本的配置,换到其他项目中也无需做多大的调整
log4j.properties
### set log levels ###
log4j.rootLogger = INFO,D

###输出到控制台###
log4j.logger.toConsole=debug,stdout log4j.appender.stdout = org.apache.log4j.ConsoleAppender log4j.appender.stdout.Target = System.out log4j.appender.stdout.layout = org.apache.log4j.PatternLayout log4j.appender.stdout.layout.ConversionPattern =%d{yyyy-MM-dd HH\:mm\:ss} [%5p] - %c -%F(%L) -%m%n ### 输出到日志文件 ### ## 其中File 可以采用绝对路径 亦可以采用相对路径 catalina.home 是tomcat目录 如果没有logs文件夹 将会报错 ## ## 更加倾向于将日志文件放在 tomcat的日志目录下${catalina.home}/logs/salesmanb2bError.log ## ## 绝对路径如:e:/salesmanb2bError.log ## log4j.logger.daily=INFO,D log4j.appender.D = org.apache.log4j.DailyRollingFileAppender log4j.appender.D.File = ${catalina.home}/logs/helloworld/helloworld.log log4j.appender.D.Append = true log4j.appender.D.Threshold = INFO log4j.appender.D.layout = org.apache.log4j.PatternLayout log4j.appender.D.layout.ConversionPattern =%d{yyyy-MM-dd HH\:mm\:ss} [%5p] - %c -%F(%L) -%m%n ##log4j.logger.org.apache.ibatis=debug,stdout ##log4j.logger.java.sql=debug,stdout - 1
- 2
- 3
- 4
- 5
- 6
- 7
- 8
- 9
- 10
- 11
- 12
- 13
- 14
- 15
- 16
- 17
- 18
- 19
- 20
- 21
- 22
- 23
- 24
- 25
- 26
- 27
- 28
- 1
- 2
- 3
- 4
- 5
- 6
- 7
- 8
- 9
- 10
- 11
- 12
- 13
- 14
- 15
- 16
- 17
- 18
- 19
- 20
- 21
- 22
- 23
- 24
- 25
- 26
- 27
- 28
2017年2月27日22:31:23
今天就到这了,未完待续~
5. web.xml配置
web.xml
<?xml version="1.0" encoding="UTF-8"?>
<web-app xmlns:xsi="http://www.w3.org/2001/XMLSchema-instance" xmlns="http://java.sun.com/xml/ns/javaee" xsi:schemaLocation="http://java.sun.com/xml/ns/javaee http://java.sun.com/xml/ns/javaee/web-app_3_0.xsd" version="3.0"> <display-name>helloworld</display-name> <!-- 配置编码方式--> <filter> <filter-name>encodingFilter</filter-name> <filter-class>org.springframework.web.filter.CharacterEncodingFilter</filter-class> <init-param> <param-name>encoding</param-name> <param-value>UTF-8</param-value> </init-param> <init-param> <param-name>forceEncoding</param-name> <param-value>true</param-value> </init-param> </filter> <filter-mapping> <filter-name>encodingFilter</filter-name> <url-pattern>/*</url-pattern> </filter-mapping> <!-- 配置springmvc的前端控制器 指向spring-mvc.xml 程序在启动的时候就加载springmvc 可以接受所有请求 load-on-startup:表示启动容器时初始化该Servlet; --> <servlet> <servlet-name>springServlet</servlet-name> <servlet-class>org.springframework.web.servlet.DispatcherServlet</servlet-class> <!-- 可以自定义servlet.xml配置文件的位置和名称, 默认为WEB-INF目录下,名称为[<servlet-name>]-servlet.xml,如spring-servlet.xml --> <init-param> <param-name>contextConfigLocation</param-name> <param-value> classpath:spring/applicationContext.xml</param-value> </init-param> <load-on-startup>1</load-on-startup> </servlet> <!-- 将前端URL请求和后台处理方法controller建立对应关系--> <servlet-mapping> <servlet-name>springServlet</servlet-name> <url-pattern>/</url-pattern> </servlet-mapping> <!-- Spring配置 --> <listener> <listener-class> org.springframework.web.context.ContextLoaderListener </listener-class> </listener> <!-- 取消对某一类文件的拦截--> <servlet-mapping> <servlet-name>default</servlet-name> <url-pattern>*.md</url-pattern> </servlet-mapping> <context-param> <param-name>contextConfigLocation</param-name> <param-value> classpath:spring/applicationContext.xml</param-value> </context-param> <!-- 欢迎页面--> <welcome-file-list> <welcome-file>/WEB-INF/views/index.jsp</welcome-file> </welcome-file-list> <!--404错误展示页面,可自行配置--> <!--<error-page>--> <!--<error-code>404</error-code>--> <!--<location>/WEB-INF/views/404.jsp</location>--> <!--</error-page>--> <!--设置session失效时间为30分钟 --> <session-config> <session-timeout>600</session-timeout> </session-config> </web-app> - 1
- 2
- 3
- 4
- 5
- 6
- 7
- 8
- 9
- 10
- 11
- 12
- 13
- 14
- 15
- 16
- 17
- 18
- 19
- 20
- 21
- 22
- 23
- 24
- 25
- 26
- 27
- 28
- 29
- 30
- 31
- 32
- 33
- 34
- 35
- 36
- 37
- 38
- 39
- 40
- 41
- 42
- 43
- 44
- 45
- 46
- 47
- 48
- 49
- 50
- 51
- 52
- 53
- 54
- 55
- 56
- 57
- 58
- 59
- 60
- 61
- 62
- 63
- 64
- 65
- 66
- 67
- 68
- 69
- 70
- 1
- 2
- 3
- 4
- 5
- 6
- 7
- 8
- 9
- 10
- 11
- 12
- 13
- 14
- 15
- 16
- 17
- 18
- 19
- 20
- 21
- 22
- 23
- 24
- 25
- 26
- 27
- 28
- 29
- 30
- 31
- 32
- 33
- 34
- 35
- 36
- 37
- 38
- 39
- 40
- 41
- 42
- 43
- 44
- 45
- 46
- 47
- 48
- 49
- 50
- 51
- 52
- 53
- 54
- 55
- 56
- 57
- 58
- 59
- 60
- 61
- 62
- 63
- 64
- 65
- 66
- 67
- 68
- 69
- 70
这个时候基本的项目配置已经完成了,我们可以先试着启动它看看,等会再配置mybatis。
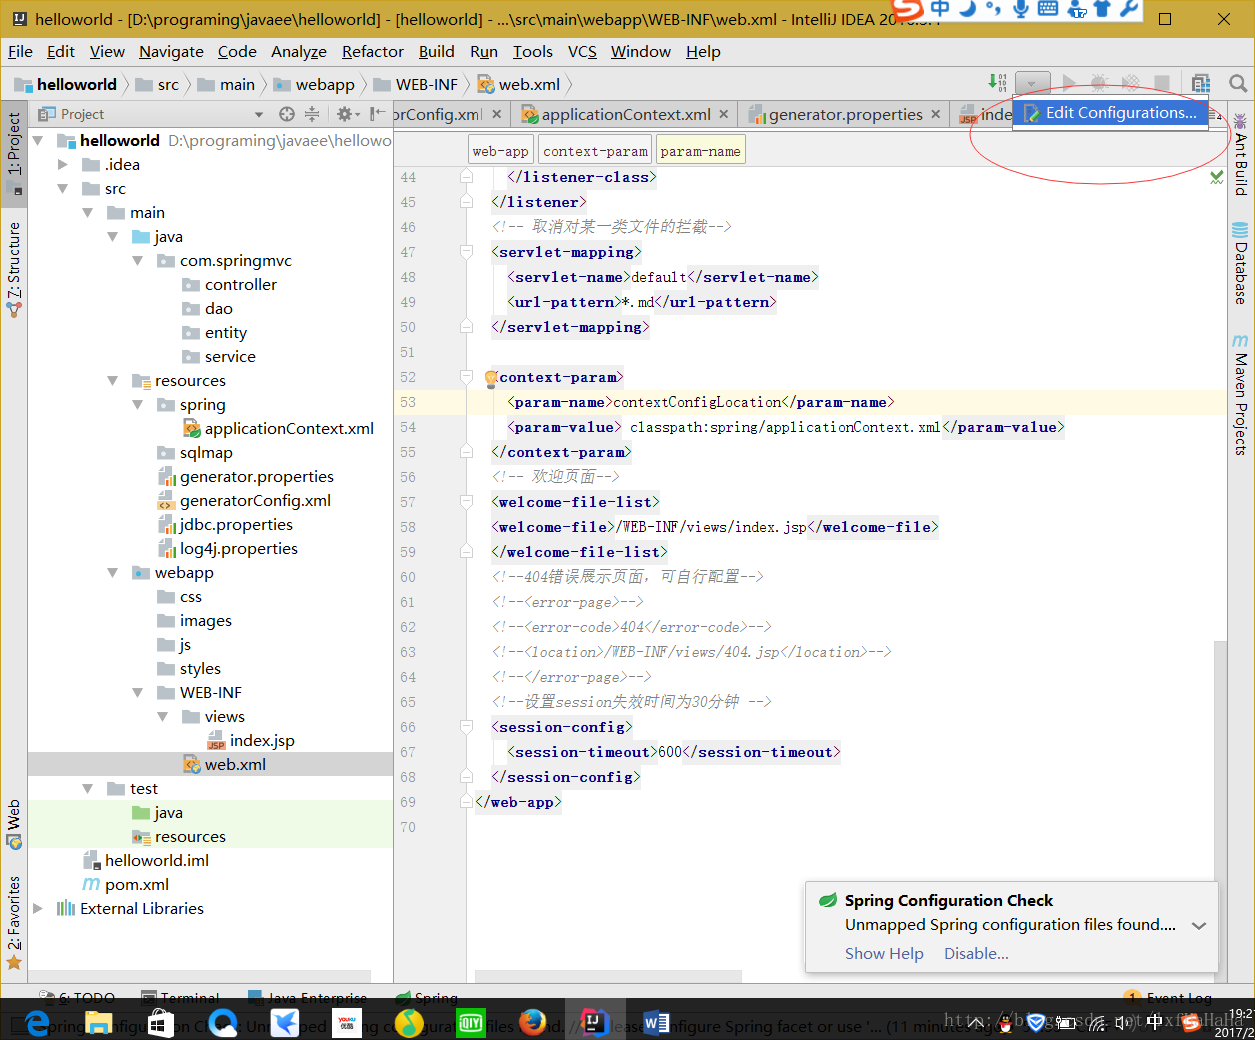
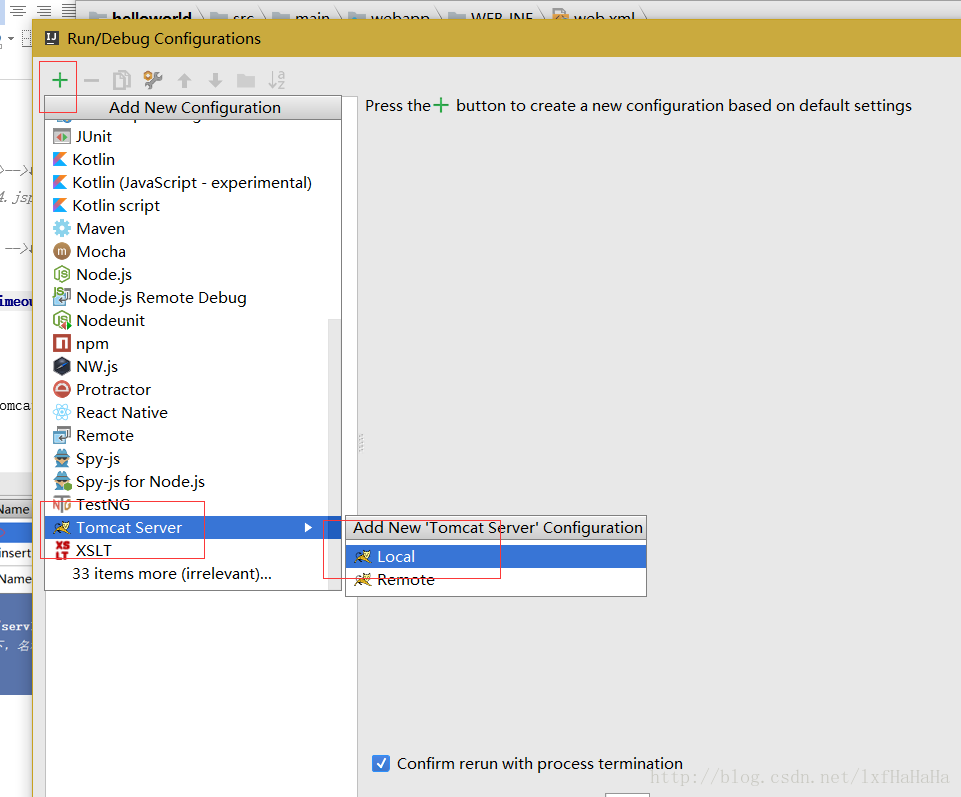
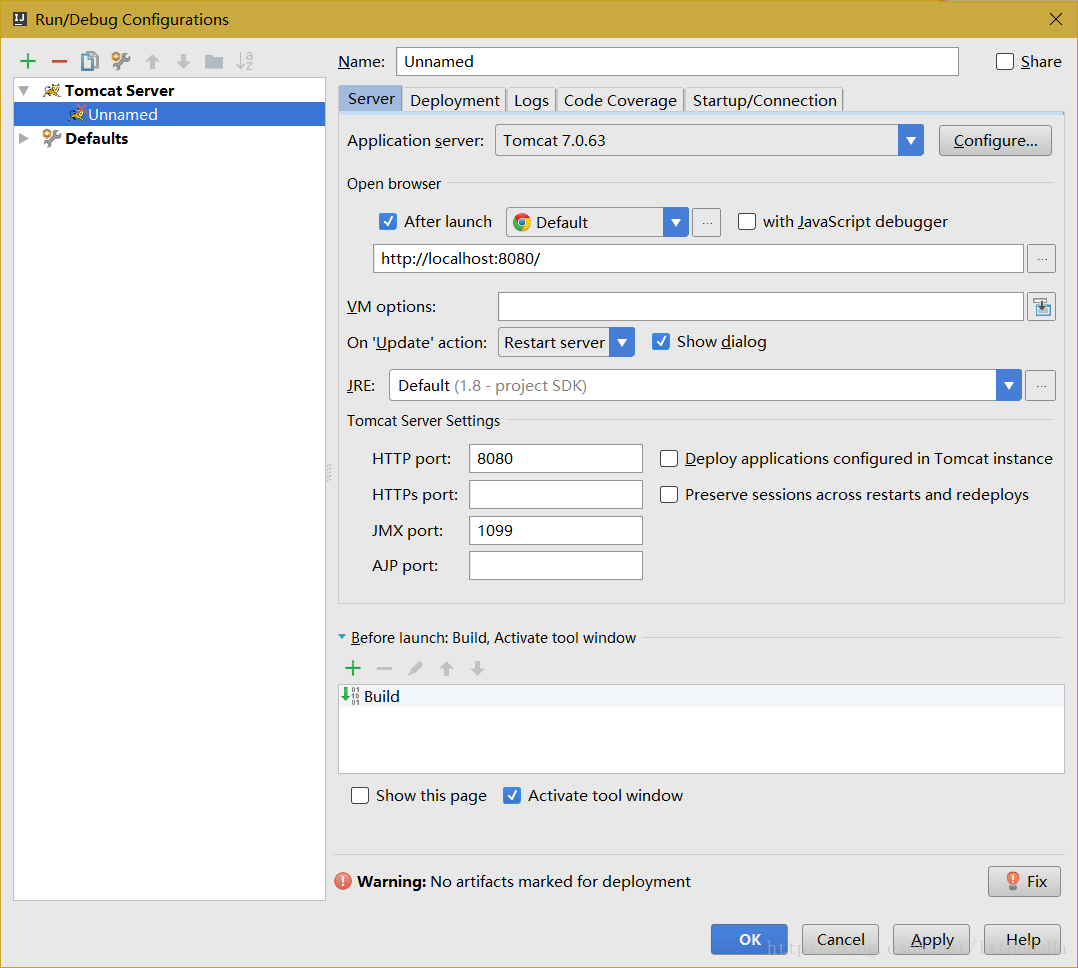
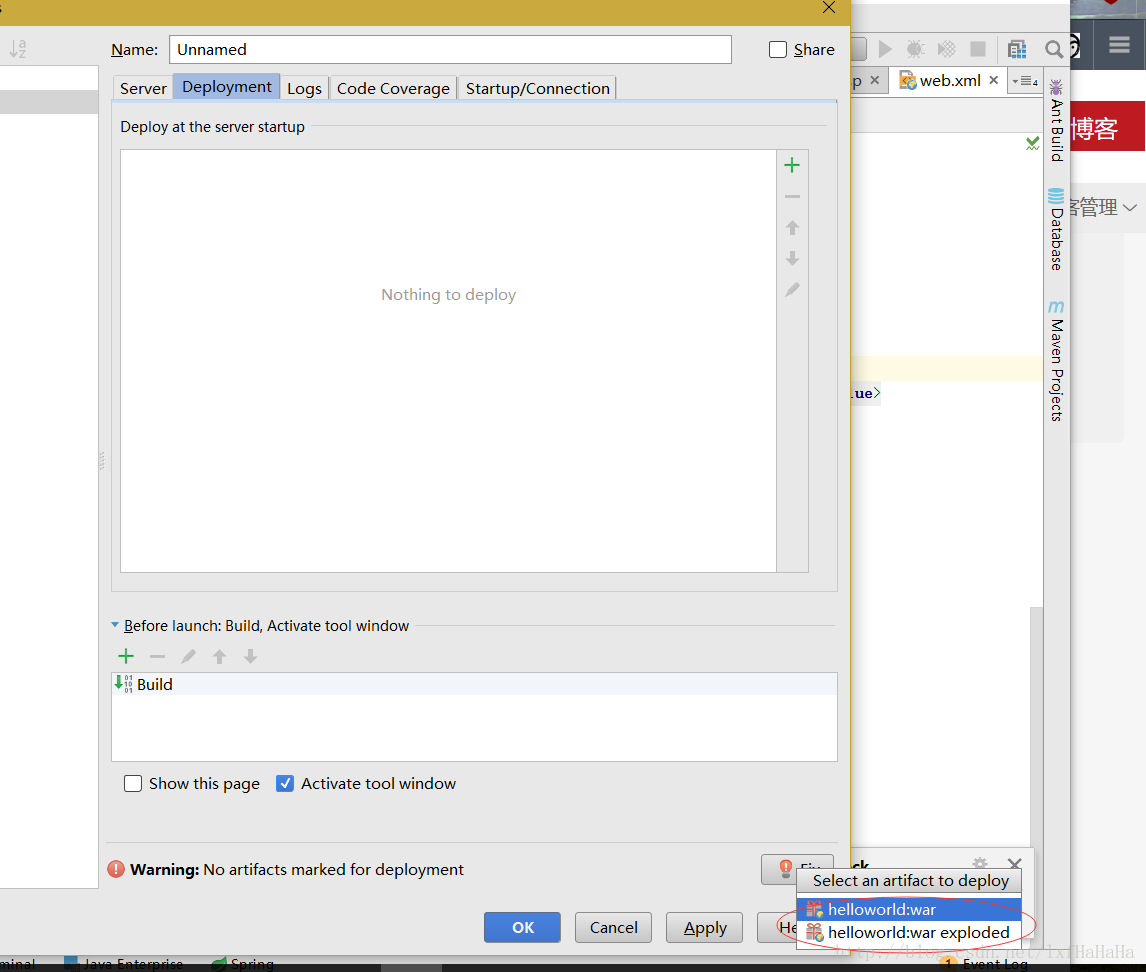
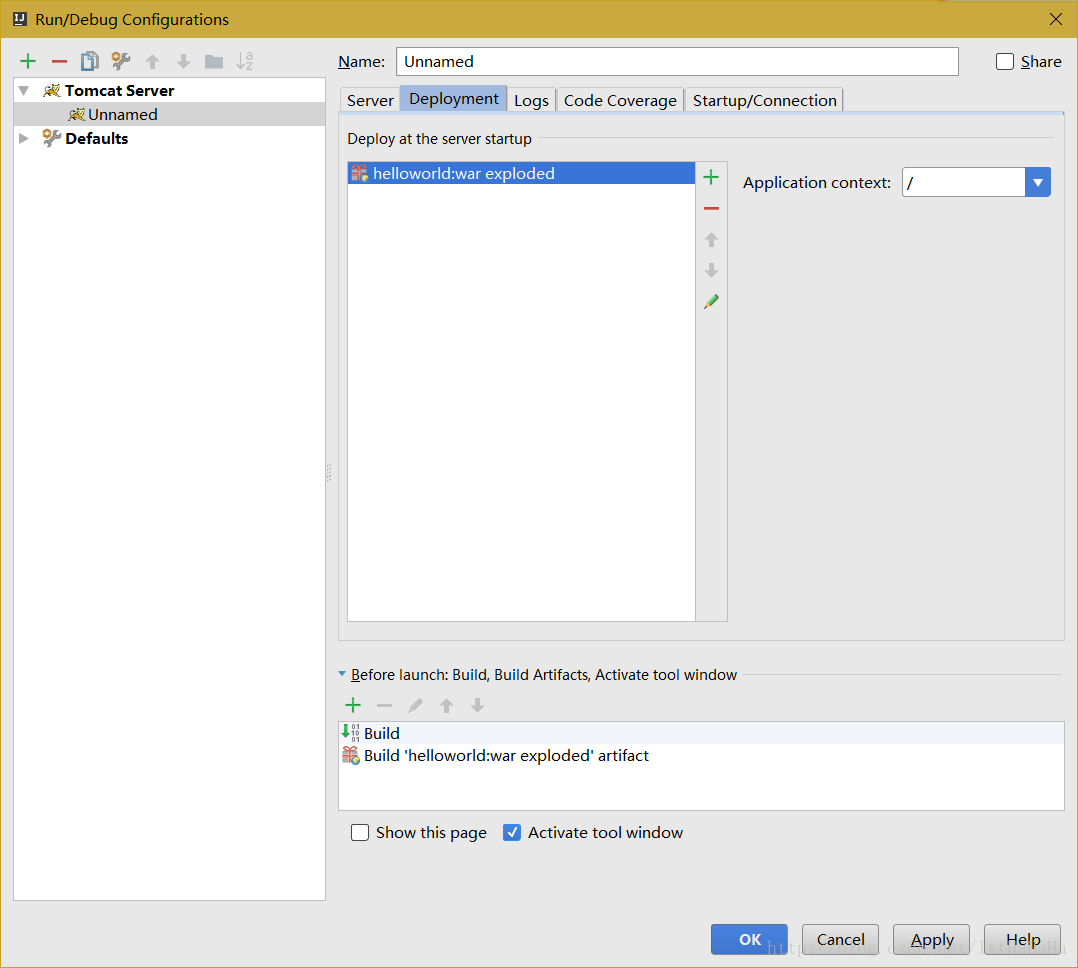
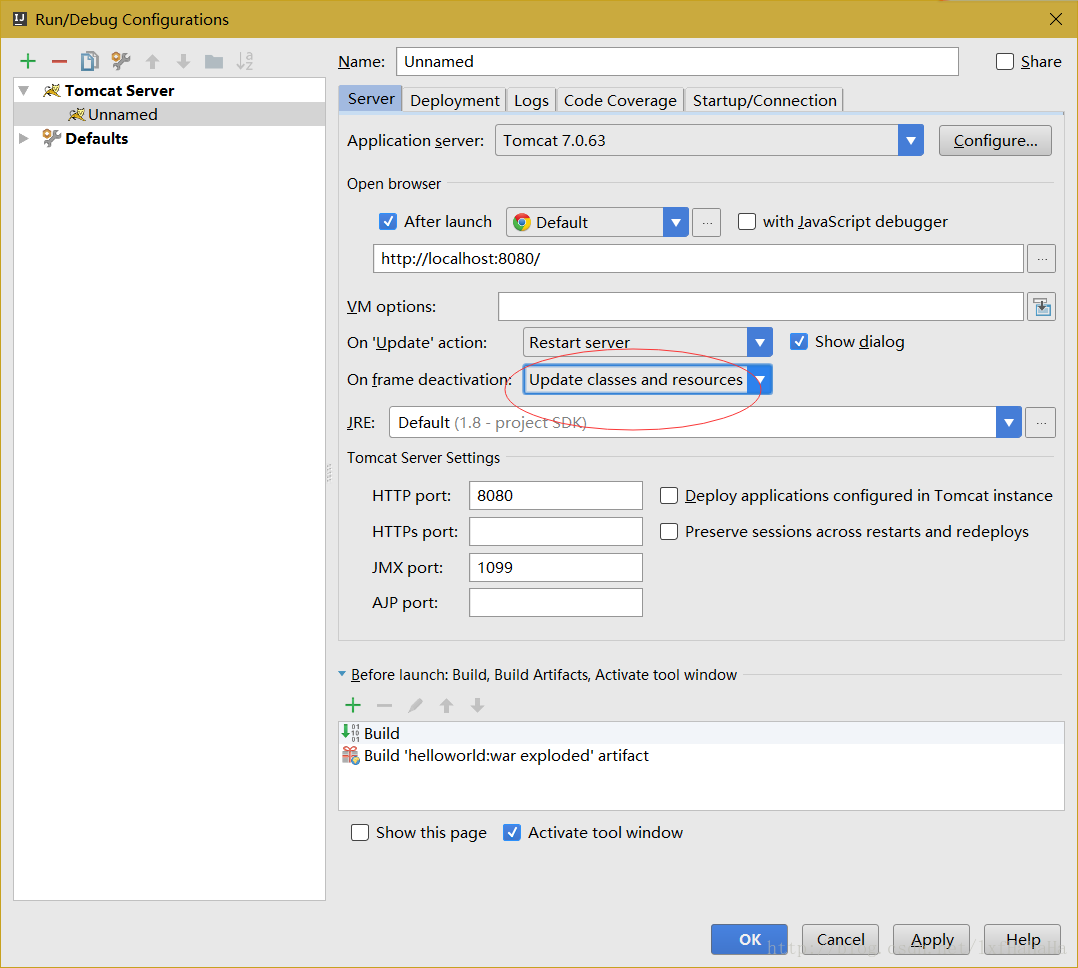
6. tomcat配置
这里我们选择war exploded模式,网上关于这两个模式的解释是
war模式—-将WEB工程以包的形式上传到服务器
war exploded模式—-将WEB工程以当前文件夹的位置关系上传到服务器
虽然我不是很懂,但做项目习惯用exploded= =
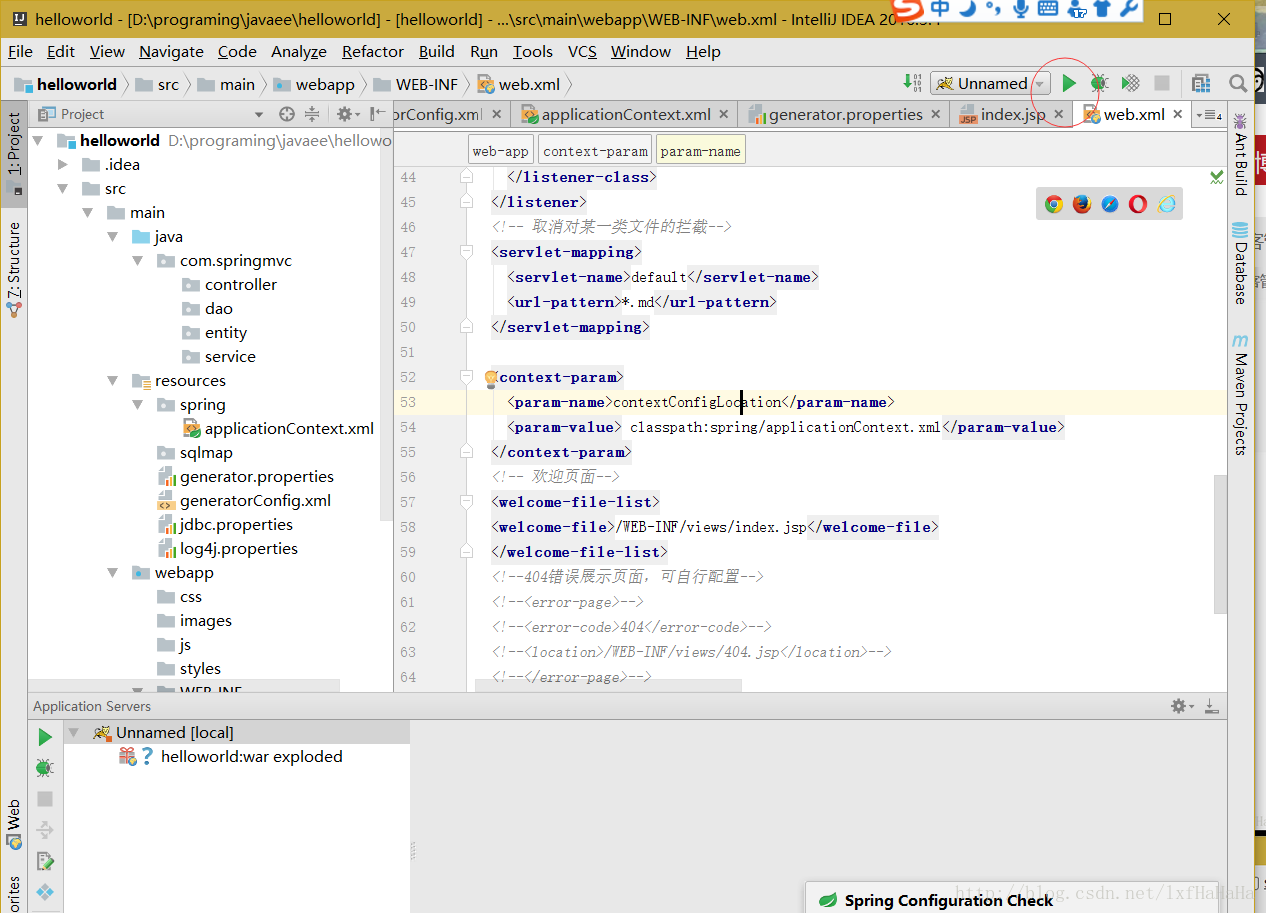
这里要注意的是,on frame换成update classes and resources,这样修改了jsp页面不用重启服务器,实现热部署,然后上面的tomcat我们要注意是自己本地的tomcat位置,没有的自己去下一个,接下来启动,看看行不行
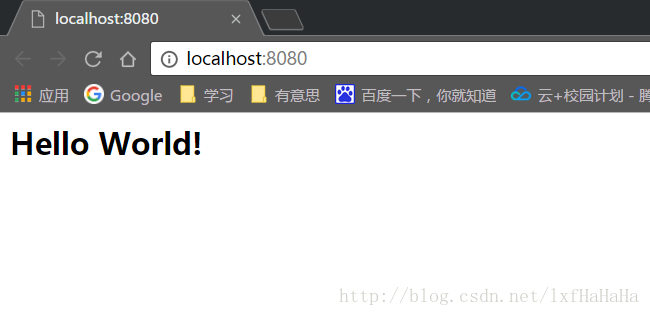
ok,正常启动,这个时候springmvc已经完全配置好了,但是ssm框架,还有个mybatis,接下来我们来配置mybatis generator,可以自动帮我们联系数据库生成实体类及映射。
7. mybatis generator配置
先在spring文件里面增加sqlsession配置,将下面这段代码写在applicationContext.xml文件里面
<!-- 配置会话工厂SqlSessionFactory -->

<bean id="sqlSessionFactory" class="org.mybatis.spring.SqlSessionFactoryBean"> <!-- 数据源 --> <property name="dataSource" ref="dataSource"/> <property name="mapperLocations" value="classpath:sqlmap/*Mapper.xml"/> <property name="typeAliasesPackage" value="com.springmvc.entity" /> </bean> <!-- 在spring容器中配置mapper的扫描器产生的动态代理对象在spring的容器中自动注册,bean的id就是mapper类名(首字母小写)--> <bean class="org.mybatis.spring.mapper.MapperScannerConfigurer"> <!-- 指定扫描包的路径,就是mapper接口的路径,多个包中间以 半角逗号隔开 --> <property name="basePackage" value="com.springmvc.dao"/> <!-- 配置sqlSessionFactoryBeanName --> <property name="sqlSessionFactoryBeanName" value="sqlSessionFactory"/> </bean>- 1
- 2
- 3
- 4
- 5
- 6
- 7
- 8
- 9
- 10
- 11
- 12
- 13
- 14
- 15
- 16
- 17
- 1
- 2
- 3
- 4
- 5
- 6
- 7
- 8
- 9
- 10
- 11
- 12
- 13
- 14
- 15
- 16
- 17
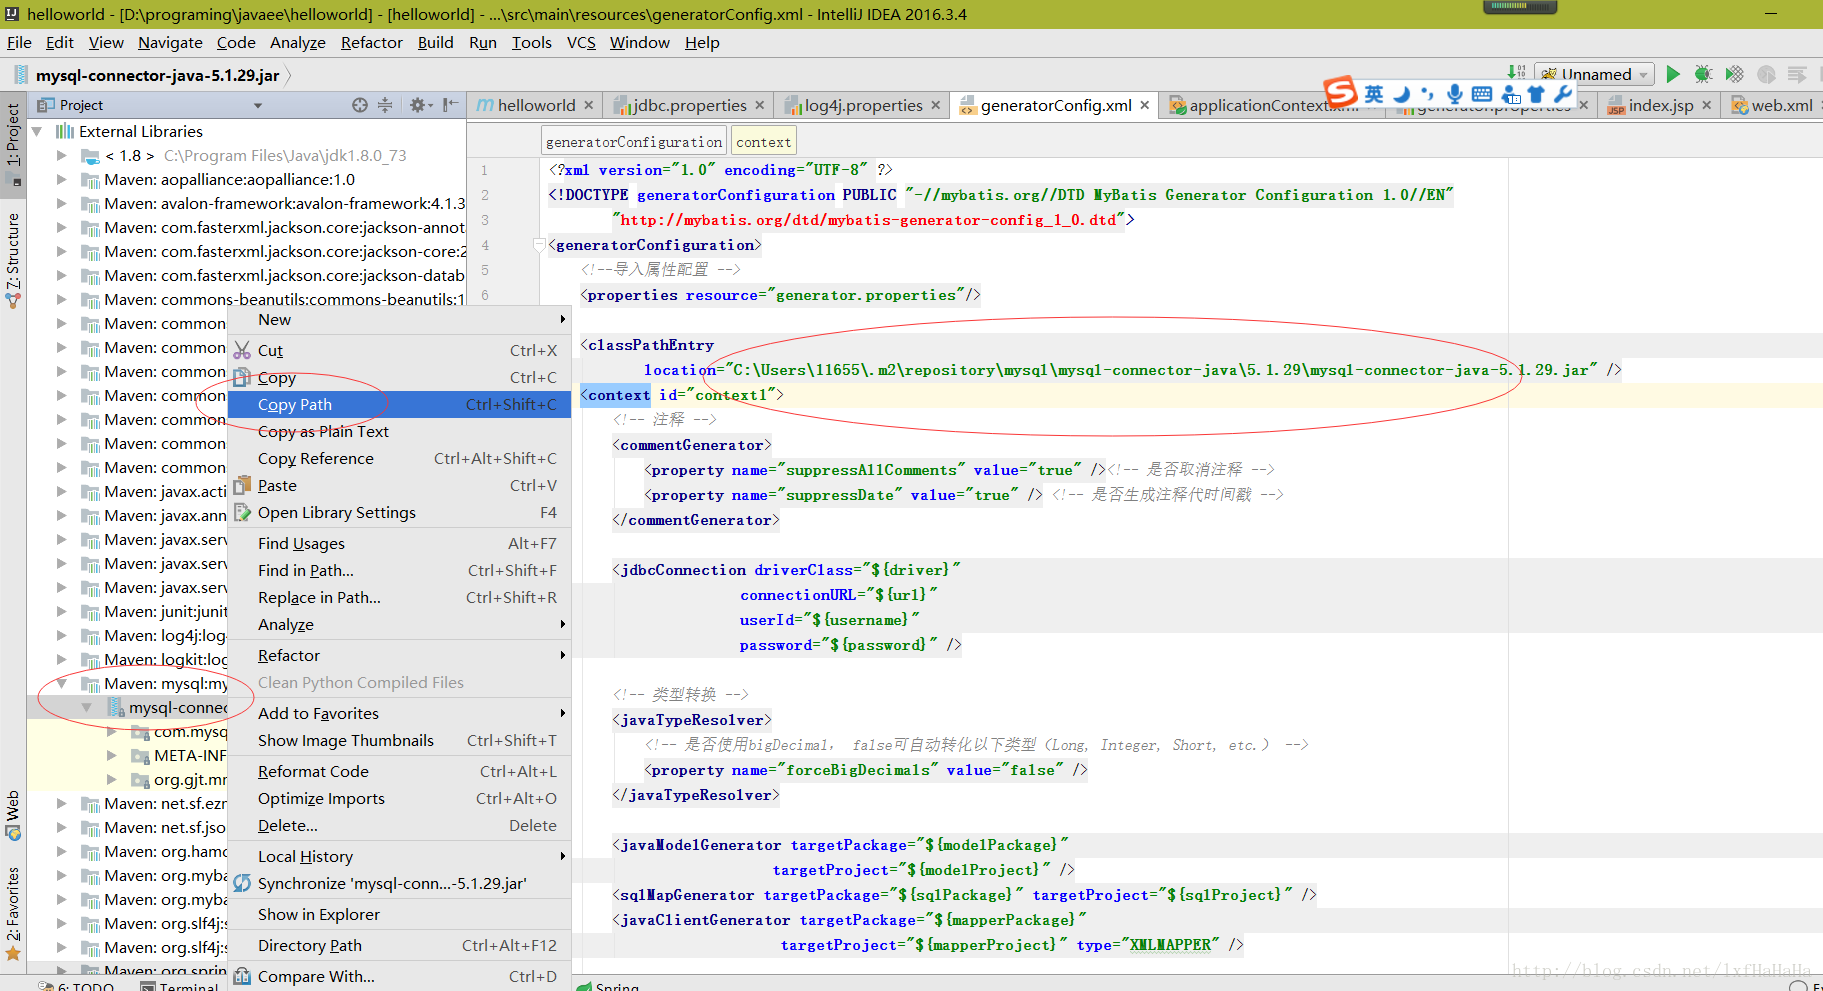
然后配置generatorConfig.xml 文件,这是mybatis-generator的配置文件
<?xml version="1.0" encoding="UTF-8" ?>
<!DOCTYPE generatorConfiguration PUBLIC "-//mybatis.org//DTD MyBatis Generator Configuration 1.0//EN"
        "http://mybatis.org/dtd/mybatis-generator-config_1_0.dtd">
<generatorConfiguration>
<!--导入属性配置 --> <properties resource="generator.properties"/> <classPathEntry location="C:\Program Files\Java\apache-maven-3.3.3\repo\mysql\mysql-connector-java\5.1.29\mysql-connector-java-5.1.29.jar" /> <context id="context1"> <!-- 注释 --> <commentGenerator> <property name="suppressAllComments" value="true" /><!-- 是否取消注释 --> <property name="suppressDate" value="true" /> <!-- 是否生成注释代时间戳 --> </commentGenerator> <jdbcConnection driverClass="${driver}" connectionURL="${url}" userId="${username}" password="${password}" /> <!-- 类型转换 --> <javaTypeResolver> <!-- 是否使用bigDecimal, false可自动转化以下类型(Long, Integer, Short, etc.) --> <property name="forceBigDecimals" value="false" /> </javaTypeResolver> <javaModelGenerator targetPackage="${modelPackage}" targetProject="${modelProject}" /> <sqlMapGenerator targetPackage="${sqlPackage}" targetProject="${sqlProject}" /> <javaClientGenerator targetPackage="${mapperPackage}" targetProject="${mapperProject}" type="XMLMAPPER" /> <!-- 如果需要通配所有表 直接用sql的通配符 %即可 --> <table schema="" tableName="${table}" enableCountByExample="false" enableUpdateByExample="false" enableDeleteByExample="false" enableSelectByExample="false" selectByExampleQueryId="false"/> </context> </generatorConfiguration> - 1
- 2
- 3
- 4
- 5
- 6
- 7
- 8
- 9
- 10
- 11
- 12
- 13
- 14
- 15
- 16
- 17
- 18
- 19
- 20
- 21
- 22
- 23
- 24
- 25
- 26
- 27
- 28
- 29
- 30
- 31
- 32
- 33
- 34
- 35
- 36
- 37
- 38
- 39
- 40
- 41
- 1
- 2
- 3
- 4
- 5
- 6
- 7
- 8
- 9
- 10
- 11
- 12
- 13
- 14
- 15
- 16
- 17
- 18
- 19
- 20
- 21
- 22
- 23
- 24
- 25
- 26
- 27
- 28
- 29
- 30
- 31
- 32
- 33
- 34
- 35
- 36
- 37
- 38
- 39
- 40
- 41
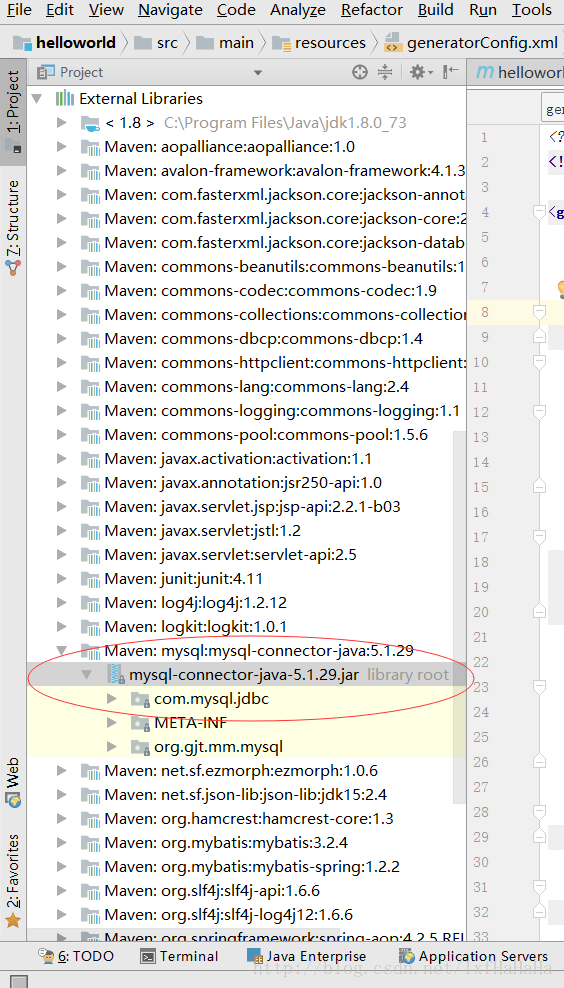
值得注意的是上面的classPathEntry location是本地的mysql-connector-java.jar的位置,因为连接数据库是需要驱动的,我们用maven已经自动帮我们下好了jar包,在左边的external libraries里面寻找
然后配置generator.properties文件,这里面保存的是连接数据库的相关信息,是在使用mybatis-generator这个功能的时候用到的;之前的jdbc.properties是系统运行时用到的。二者信息差不多,图方便的话,也可以将两个合并成一个文件,分开写的话,好实现可插拔。
driver=com.mysql.jdbc.Driver
url=jdbc:mysql://localhost:3306/example?useUnicode=true&characterEncoding=utf-8
username=root
password=*************

#entity 包名和 java目录 modelPackage=com.springmvc.entity modelProject=src/main/java #sqlmap包名 和resources目录 sqlPackage=sqlmap sqlProject=src/main/resources #mapper包名和 java目录 mapperPackage=com.springmvc.dao mapperProject=src/main/java table=user - 1
- 2
- 3
- 4
- 5
- 6
- 7
- 8
- 9
- 10
- 11
- 12
- 13
- 14
- 15
- 16
- 17
- 1
- 2
- 3
- 4
- 5
- 6
- 7
- 8
- 9
- 10
- 11
- 12
- 13
- 14
- 15
- 16
- 17
这里解释下我已经在本地mysql数据库新建了一个example数据库,里面有一张user表,如果有不太清楚的,可以参考我这篇博客,Mysql5.0+Navicat for MySQL安装,modelPackage是等会连接数据库自动生成的实体类保存的位置,sqlPackage是生成xml映射文件保存的位置,mapperPackage是生成数据库接口保存的位置,table是数据库里面的表的名字
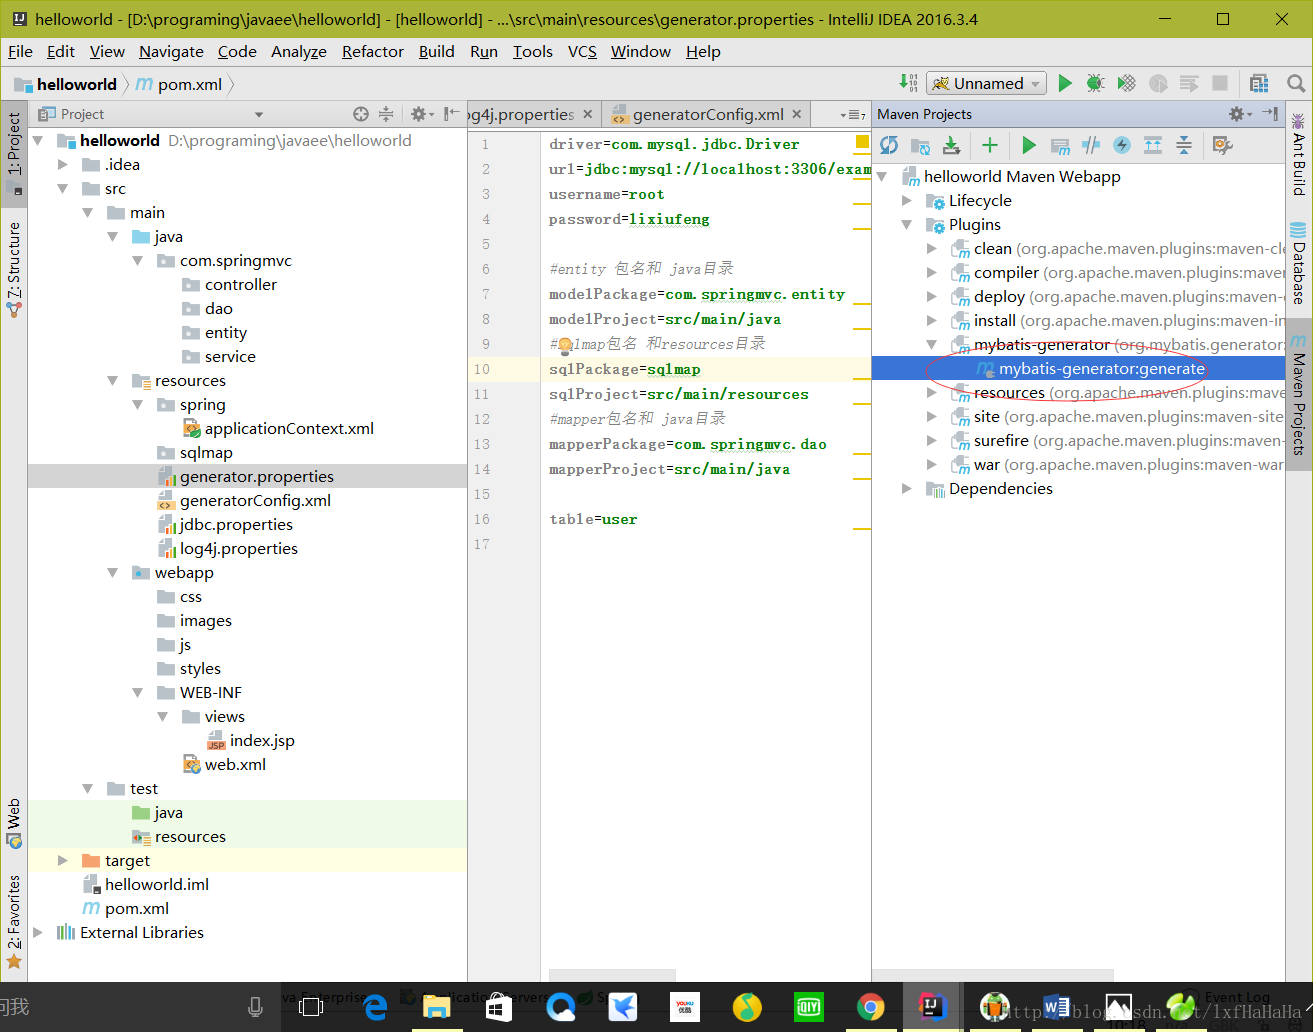
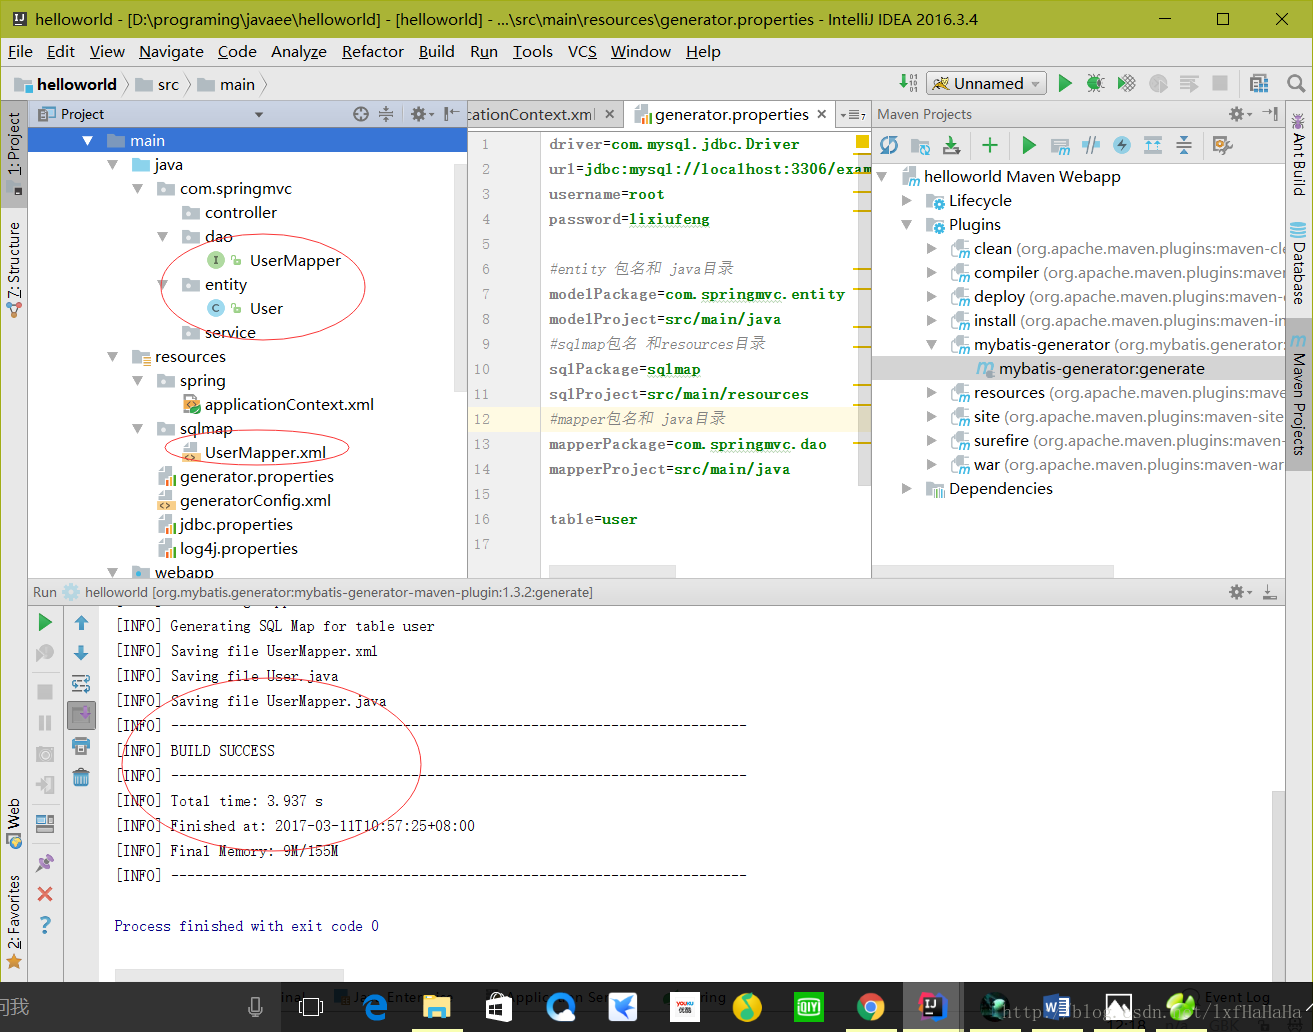
好了,现在都配置好了,让我们来看看这玩意管不管用,我们来执行maven的mybatis-generator操作,双击它
然后他就自动生成了关联文件
(Tips:如果右侧没有这些功能栏,可以通过view->tool buttons打开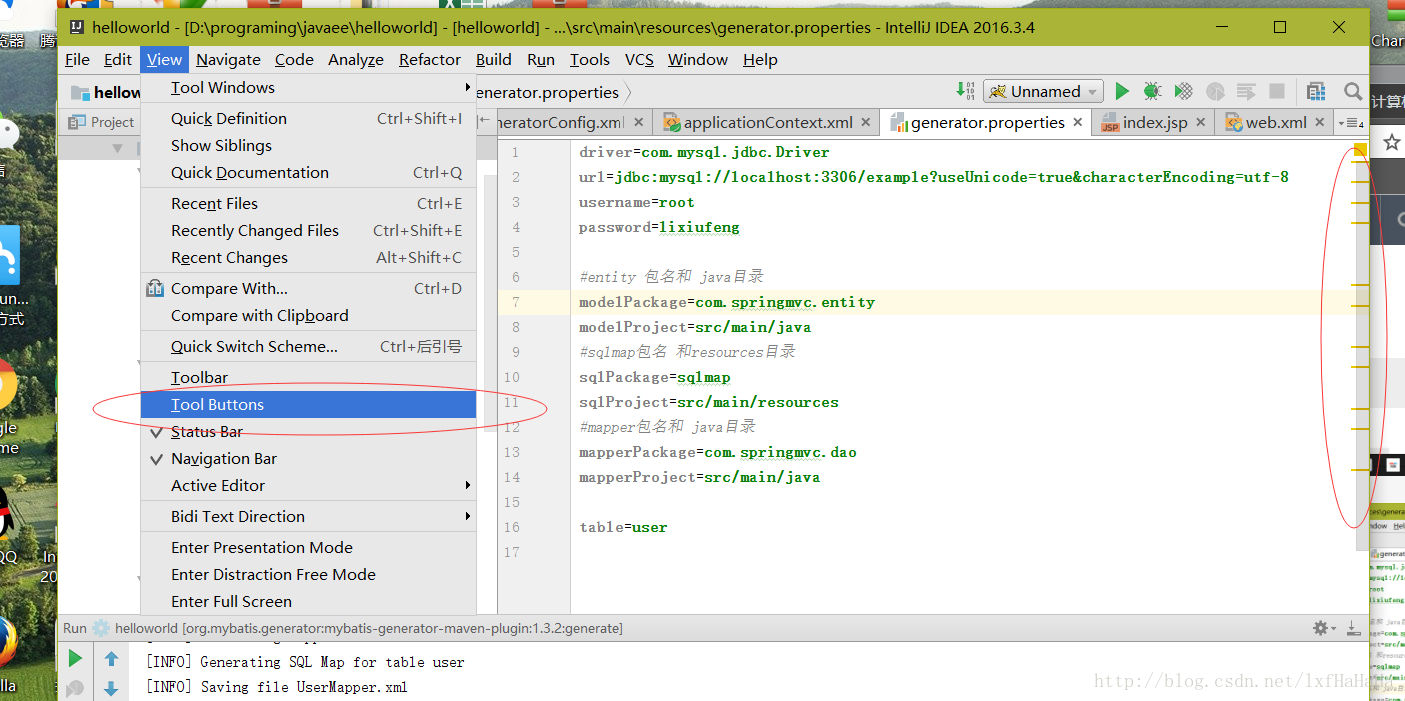
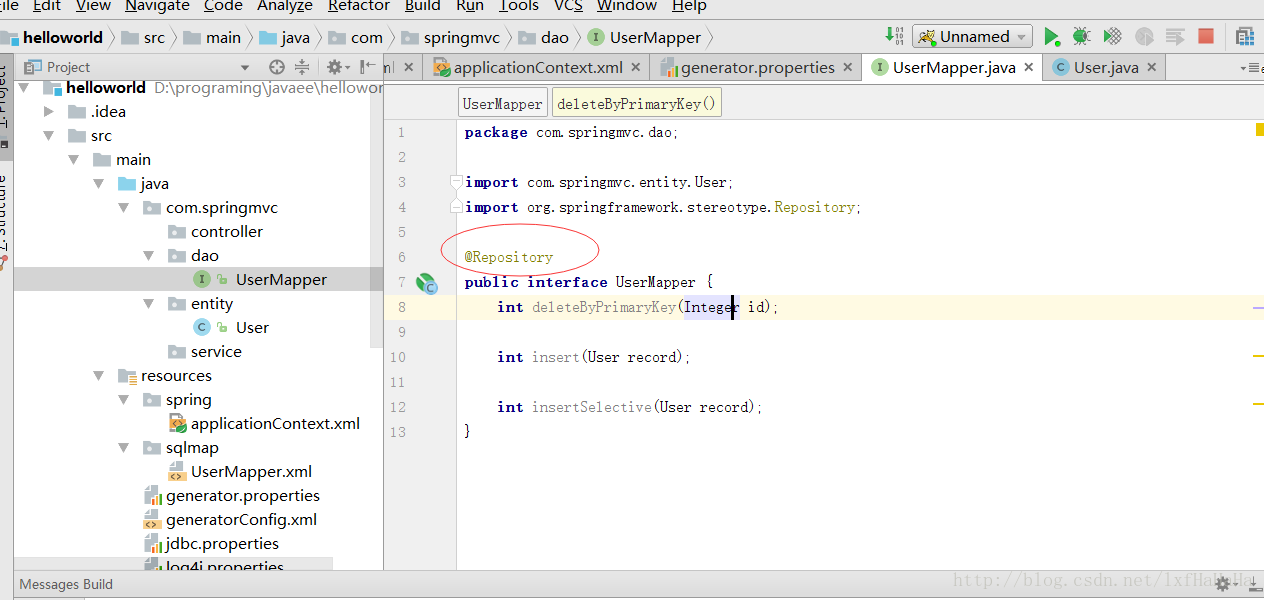
8. junit测试配置
很多时候我们写完一段代码,想去验证他的正确性,并不一定需要去启动tomcat跑跑看或者debug,我们可以使用测试工具来验证,这儿配置junit测试。
我们来测试一下刚生成的user接口有没有用,因为spring的标签,我们先去usermapper文件加一个@Repository标签,表明它是数据访问组件,即DAO组件
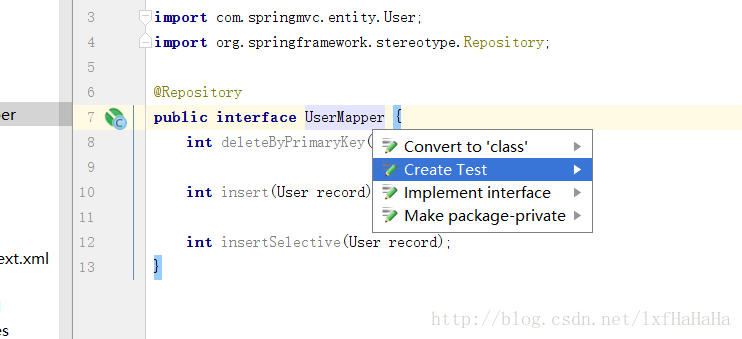
然后可以新建测试文件开始测试,将光标移到public interface UserMapper后面,然后键盘上按下alt+enter键,接着create test
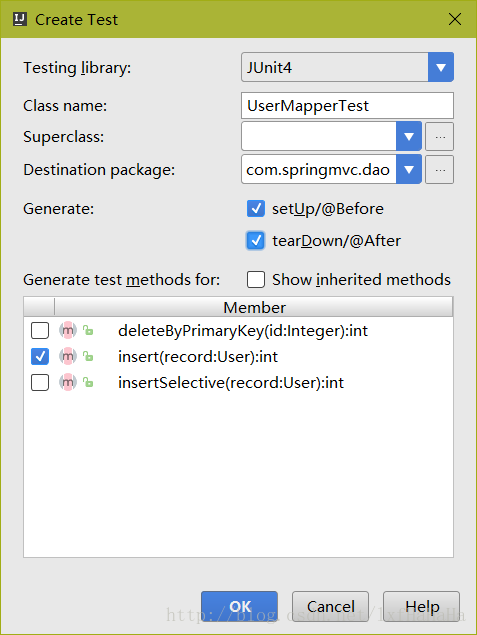
勾选你要进行测试的函数,点击ok,生成测试文件
测试文件里进行测试,我讲我写好的代码贴上来
package com.springmvc.dao;

import com.springmvc.entity.User;
import org.junit.After;
import org.junit.Before;
import org.junit.Test; import org.springframework.beans.factory.annotation.Autowired; import org.springframework.context.ApplicationContext; import org.springframework.context.support.ClassPathXmlApplicationContext; import static org.junit.Assert.*; /** * Created by 11655 on 2017/3/11. */ public class UserMapperTest { private ApplicationContext applicationContext; @Autowired private UserMapper userMapper; @Before public void setUp() throws Exception { applicationContext = new ClassPathXmlApplicationContext("classpath:spring/applicationContext.xml");//加载spring配置文件 userMapper = applicationContext.getBean(UserMapper.class);//在这里导入要测试的 } @After public void tearDown() throws Exception { } @Test public void insert() throws Exception { User user = new User(); user.setId(12); int result = userMapper.insertSelective(user); System.out.println(result); assert (result == 1); } }- 1
- 2
- 3
- 4
- 5
- 6
- 7
- 8
- 9
- 10
- 11
- 12
- 13
- 14
- 15
- 16
- 17
- 18
- 19
- 20
- 21
- 22
- 23
- 24
- 25
- 26
- 27
- 28
- 29
- 30
- 31
- 32
- 33
- 34
- 35
- 36
- 37
- 38
- 39
- 40
- 41
- 42
- 43
- 1
- 2
- 3
- 4
- 5
- 6
- 7
- 8
- 9
- 10
- 11
- 12
- 13
- 14
- 15
- 16
- 17
- 18
- 19
- 20
- 21
- 22
- 23
- 24
- 25
- 26
- 27
- 28
- 29
- 30
- 31
- 32
- 33
- 34
- 35
- 36
- 37
- 38
- 39
- 40
- 41
- 42
- 43
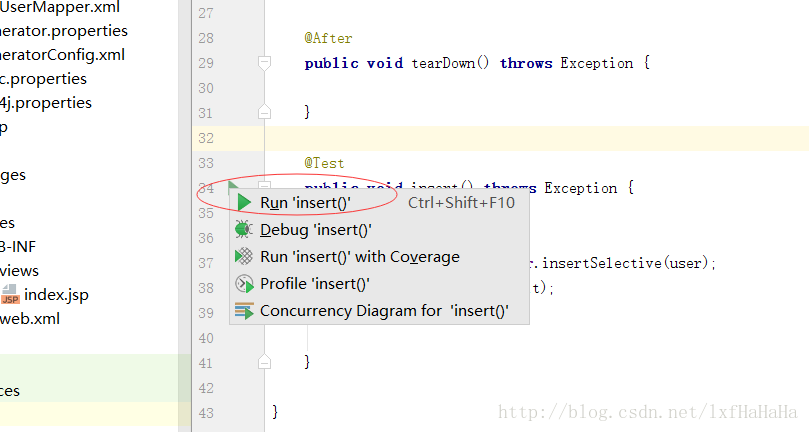
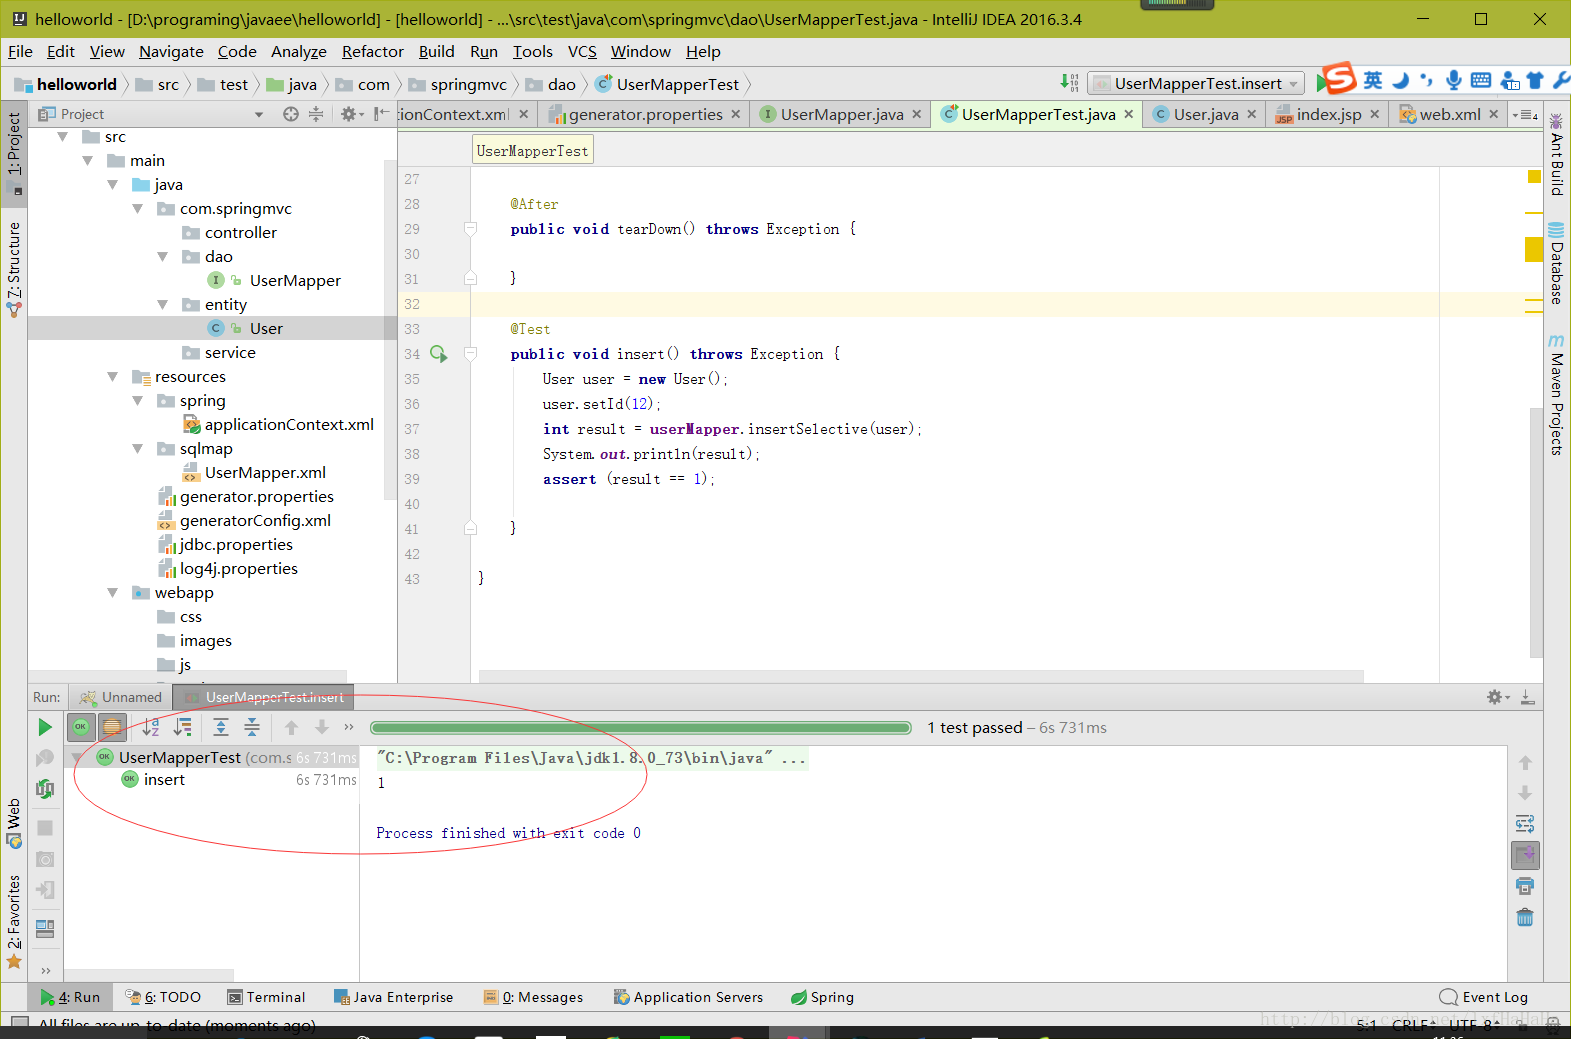
然后运行test
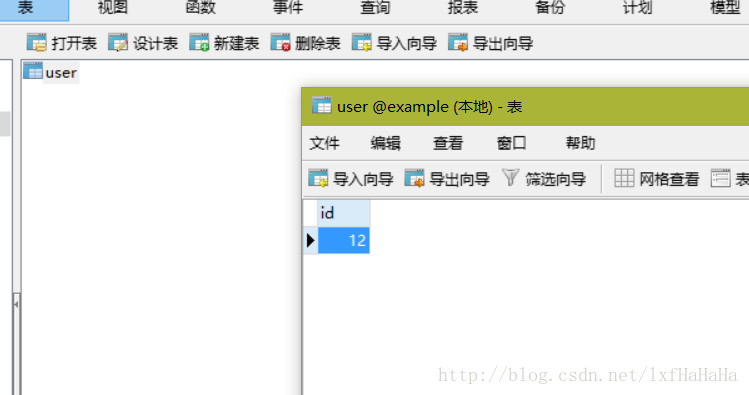
成功,我们也可以去数据库看看有没有插入
至此,springmvc整合已经完成,我会将这个源码附在下面,大家有什么问题的可以参考一下,如果我有什么讲的不对的地方,也欢迎大家指出
http://download.csdn.net/detail/lxfhahaha/9777662
欢迎加入–qq群–JAVA后台学习交流群:486055993


 1万+
1万+


 被折叠的 条评论
为什么被折叠?
被折叠的 条评论
为什么被折叠?
 到【灌水乐园】发言


