


Spring实现Ioc的多种方式
一、IoC基础
1.1、概念:
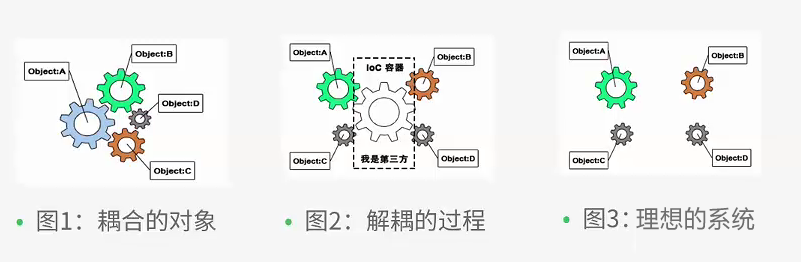
1、IoC 控制反转(Inversion of Control)
IoC是一种设计思想。
2、DI 依赖注入
依赖注入是实现IoC的一种方法,也有人认为DI只是IoC的另一种说法
没有IoC的程序中我们使用面向对象编程对象的创建与对象间的依赖关系完全硬编码在程序中,对象的创建由程序自己控制,控制反转后将对象的创建转移给第三方,所谓的控制反转就是:获得依赖对象的方式反转了。
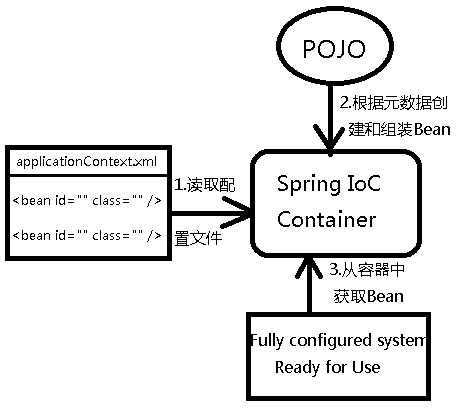
IoC是Spring框架的核心内容,使用多种方式完美的实现了IoC,可以使用XML配置,也可以使用注解,新版的spring也可以零配置实现IoC。spring容器在初始化时先读取配置文件,根据配置文件或元数据创建对象存入容器中,程序使用时再从IoC容器中取出需要的对象。
采用XML方式配置Bean的时候,Bean的定义信息是和实现分离的,而采用注解的方式可以把两者合为一体,Bean的定义信息 直接以注解的形式定义在实现类中,从而达到了零配置的目的。
二、使用XML配置的方式实现IoC
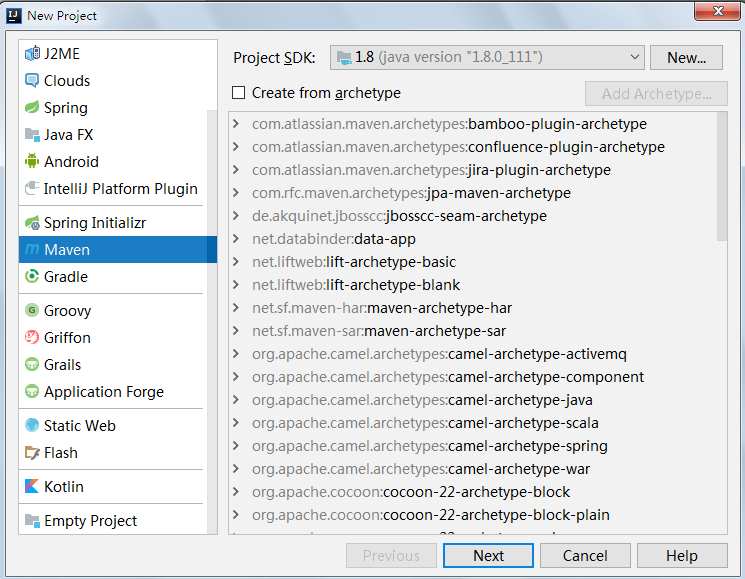
2.0、先创建一个maven项目
2.1、Maven项目的pom.xml配置如下:
<?xml version="1.0" encoding="UTF-8"?>
<project xmlns="http://maven.apache.org/POM/4.0.0"
         xmlns:xsi="http://www.w3.org/2001/XMLSchema-instance"
         xsi:schemaLocation="http://maven.apache.org/POM/4.0.0 http://maven.apache.org/xsd/maven-4.0.0.xsd">
    <modelVersion>4.0.0</modelVersion>
    <groupId>com.zhangneng</groupId><!--组织名-->
    <artifactId>springProject</artifactId><!--项目名-->
    <version>1.0-SNAPSHOT</version><!--版本号-->
    <packaging>jar</packaging>
    <name>Spring051</name>
    <url>http://maven.apache.org</url>
    <properties>
        <project.build.sourceEncoding>UTF-8</project.build.sourceEncoding>
        <spring.version>4.3.0.RELEASE</spring.version>
    </properties>
    <dependencies>
        <!--下面是本项目的依赖jar包   去这个网站:http://mvnrepository.com-->
        <dependency>
            <groupId>junit</groupId>
            <artifactId>junit</artifactId>
            <!--如果要全局使用则删掉下面这句-->
            <!--
            <scope>test</scope>
            -->
            <version>4.10</version>
        </dependency>
        <dependency>
            <groupId>org.springframework</groupId>
            <artifactId>spring-context</artifactId>
            <version>${spring.version}</version><!--一赖上文中的version-->
        </dependency>
        <dependency>
            <groupId>org.aspectj</groupId>
            <artifactId>aspectjweaver</artifactId>
            <version>1.8.9</version>
        </dependency>
        <dependency>
            <groupId>cglib</groupId>
            <artifactId>cglib</artifactId>
            <version>3.2.4</version>
        </dependency>
    </dependencies>
</project>
------------------------------------------------------------------------------------------------------------------------------------------------------------------------------------------------------------------------------------
2.2、常规的
2.2.1、IBookDao.java
package spring02;

/**图书数据访问接口*/
public interface IBookDao {
    /**添加新书*/
    void save(String name);
}
2.2.2、MySQLBookDao.java
package spring02;
/**接口的实现类*/
public class MySQLBookDao implements IBookDao {
    public void save(String name){
        System.out.println("添加图书"+name+"到MySQL数据库成功!");
    }
}
2.2.3、OracleBookDao.java
package spring02;
/**接口的实现类*/
public class OracleBookDao implements IBookDao {
    public void save(String name){
        System.out.println("添加图书"+name+"到Oracle数据库成功!");
    }
}
2.2.4、BookService.java
package spring02;

public class BookService {
    IBookDao bookDao;
    public BookService(){
       bookDao = new MySQLBookDao();
       //bookDao = new OracleBookDao();
    }
    /**新增一本书*/
    public void addNewBook(){
        String bookname="《Spring MVC学习指南》";
        bookDao.save(bookname);
    }
}
2.2.5、测试类 BookServiceTest.java
package spring02;

import org.junit.Test;

import static org.junit.Assert.*;

/**不用配置文件实现spring01里的效果,通过改变BookService中的BookService()方法实现*/
/**这样的弊端就是当代码部署到服务器上之后就不能进行控制了,所以我们弄了spring01的方式,通过配置文件来控制使用哪种数据库*/
public class BookServiceTest {
    BookService service = new BookService();
    @Test
    public void addNewBook() throws Exception {
        service.addNewBook();
    }

}
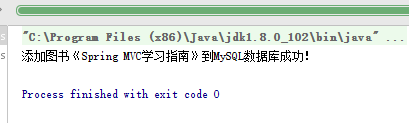
2.2.6、效果:
--------------------------------------------------------------------------------------------------------------------------------------------------------------------------------------------------------------------------------------
2.3、使用无参构造方法创建对象
2.3.1、IBookDao.java
package spring01;

/**图书数据访问接口*/
public interface IBookDao {
    /**添加新书*/
    void save(String name);
}
2.3.2、MySQLBookDao.java
package spring01;
/**IBookDao的实现类*/
public class MySQLBookDao implements IBookDao {
    /**保存一本书到MySQL数据库*/
    public void save(String name){
        /*这里将处理与MySQL数据库连接的业务功能代码*/
        System.out.println("添加图书"+name+"到MySQL数据库成功!");
    }
}
2.3.3、OracleBookDao.java
package spring01;

/**IBookDao的实现类*/
public class OracleBookDao implements IBookDao {
    /**保存一本书到Oracle数据库*/
    public void save(String name){
        /*这里将处理与Oracle数据库连接的业务功能代码*/
        System.out.println("添加图书"+name+"到Oracle数据库成功!");
    }
}
2.3.4、BookService.java
package spring01;

import javafx.application.Application;
import org.springframework.context.ApplicationContext;
import org.springframework.context.support.ClassPathXmlApplicationContext;

public class BookService {
    /**创建一个IBookDao对象属性bookDao*/
    /**bookDao一定要定义成对象类型,只有对象类型才可以接收*/
    IBookDao bookDao;

    /**通过无参构造方法来获取容器*/
    public BookService(){
        //创建容器
        ApplicationContext ctx=new ClassPathXmlApplicationContext("bookiocbean01.xml");
        /*
            从容器(bookiocbean01.xml)中获得id为bookdao的bean
            bookdao来自bookiocbean01.xml中的id属性的值
        */
        //通过IBook接口的bookDao属性来接收容器中的接口实现类
        //这里使用强转的形式实现,其实这样是不安全的。
        bookDao = (IBookDao) ctx.getBean("bookdao");
    }
    /**新增一本书*/
    public void addNewBook(){
        String bookname="《Spring MVC学习指南》";
        /**将书籍保存*/
        /*调用IBookDao对象的save()方法保存一本书*/
        bookDao.save(bookname);
    }
}
2.3.5、测试类 BookService.java
package spring01;

import org.junit.Test;

import static org.junit.Assert.*;

/**通过配置文件的形式来决定使用哪种数据库*/
public class BookServiceTest {
    BookService service = new BookService();
    //测试一下BookService中的addNewBook()方法,看是否可以成功添加书籍
    @Test
    public void addNewBook() throws Exception {
        service.addNewBook();
    }
}
2.3.6、bookiocbean01.xml
<?xml version="1.0" encoding="UTF-8"?>
<beans xmlns="http://www.springframework.org/schema/beans"
       xmlns:xsi="http://www.w3.org/2001/XMLSchema-instance"
       xsi:schemaLocation="http://www.springframework.org/schema/beans http://www.springframework.org/schema/beans/spring-beans.xsd">
    <!--将使用Oracle数据库 实现新增书籍接口的实现类 导入到这个配置文件(容器)中,且id属性值设置为bookdao,然后去BookService中创建这个容器-->
    <!--使用无参构造方法-->
    <bean id="bookdao" class="spring01.OracleBookDao"></bean>
</beans>
2.3.7、效果:

-------------------------------------------------------------------------------------------------------------------------------------------------------------------------------------------------------------------------------------
2.4、使用有参构造方法创建对象
2.4.1、Person.java
package spring03;
/**人*/
public abstract class Person {
    /**姓名*/
    public String name;
}
2.4.2、Student.java
package spring03;

/**学生*/
public class Student extends Person{
    /**身高*/
    public int height;
    /**有参构造方法*/
    public Student(String name,int height){
        this.name=name;
        this.height=height;
    }
    @Override
    public String toString() {
        return "Student{" +
                "name='" + name + '\'' +
                ", height=" + height +
                '}';
    }
}
2.4.3、Person.java
package spring03;

import org.springframework.context.ApplicationContext;
import org.springframework.context.support.ClassPathXmlApplicationContext;

public class School {
    public static void main(String[] args) {
        //ioc容器
        ApplicationContext ctx  =
                new ClassPathXmlApplicationContext("beans02.xml","bookiocbean01.xml");
        //从容器中获取对象
        Person tom = ctx.getBean("tom",Person.class);
        System.out.println(tom);
    }
}
2.4.4、beans02.xml
<?xml version="1.0" encoding="UTF-8"?>
<beans xmlns="http://www.springframework.org/schema/beans"
       xmlns:xsi="http://www.w3.org/2001/XMLSchema-instance"
       xsi:schemaLocation="http://www.springframework.org/schema/beans http://www.springframework.org/schema/beans/spring-beans.xsd">
    <bean id="tom" class="spring03.Student">
        <constructor-arg name="name" value="张百川"></constructor-arg>
        <constructor-arg name="height" value="195"></constructor-arg>
    </bean>
</beans>
2.4.5、运行结果: 
--------------------------------------------------------------------------------------------------------------------------------------------------------------------------------------------------------------------------------------
2.5、使用有参构造方法创建对象
2.5.1、person.java
package spring04;

/**人*/
public abstract class Person {
    /**姓名*/
    public String name;
    /**地址*/
    public Address address;
}
2.5.2、Student.java
package spring04;

/**
 * Created by Admin on 2017/11/6.
 */

/**学生*/
public class Student extends Person {
    /**身高*/
    public int height;
    /**有参构造方法*/
    public Student(String name,int height){
        this.name=name;
        this.height=height;
    }

    @Override
    public String toString() {
        return "Student{" +
                "name='" + name + '\'' +
                ", height=" + height +
                '}';
    }
}
2.5.3、Address.java
package spring04;

/**
 * Created by Admin on 2017/11/6.
 */
/**地址*/
public class Address {
    /**国家*/
    private String country;
    /**城市 */
    private String city;

    public Address() {
    }

    public Address(String country, String city) {
        this.country = country;
        this.city = city;
    }

    public String getCountry() {
        return country;
    }

    public void setCountry(String country) {
        this.country = country;
    }

    public String getCity() {
        return city;
    }

    public void setCity(String city) {
        this.city = city;
    }

    @Override
    public String toString() {
        return "Address{" +
                "country='" + country + '\'' +
                ", city='" + city + '\'' +
                '}';
    }
}
2.5.4、School.java
package spring04;

import org.springframework.context.ApplicationContext;
import org.springframework.context.support.ClassPathXmlApplicationContext;

public class School {
    public static void main(String[] args) {
        //ioc容器
        ApplicationContext ctx  =
                new ClassPathXmlApplicationContext("beans03.xml","bookiocbean01.xml");
        //从容器中获取对象
        Person rose = ctx.getBean("rose", Person.class);
        System.out.println(rose);
    }
}
2.5.5、beans03.xml
<?xml version="1.0" encoding="UTF-8"?>
<beans xmlns="http://www.springframework.org/schema/beans"
       xmlns:xsi="http://www.w3.org/2001/XMLSchema-instance"
       xsi:schemaLocation="http://www.springframework.org/schema/beans http://www.springframework.org/schema/beans/spring-beans.xsd">
    <!--如果在使用构造方法时不想通过参数名称指定参数则可以直接使用索引 (不推荐使用)-->
    <bean id="rose" class="spring04.Student">
        <constructor-arg index="0" value="张柏芝"></constructor-arg>
        <constructor-arg index="1" value="196"></constructor-arg>
    </bean>

</beans>
2.5.6、运行效果 
------------------------------------------------------------------------------------------------------------------------------------------------------------------------------------------------------------------------------------
2.6、通过属性赋值创建对象
2.6.1、Person.java
package spring05;

/**人*/
public abstract class Person {
    /**姓名*/
    public String name;
}
2.6.2、Student.java
package spring05;

/**学生*/
public class Student extends Person {
    /**身高*/
    public int height;
    /**有参构造方法*/
    public Student(String name,int height){
        this.name=name;
        this.height=height;
    }

    @Override
    public String toString() {
        return "Student{" +
                "name='" + name + '\'' +
                ", height=" + height +
                '}';
    }
}
2.6.3、School.java
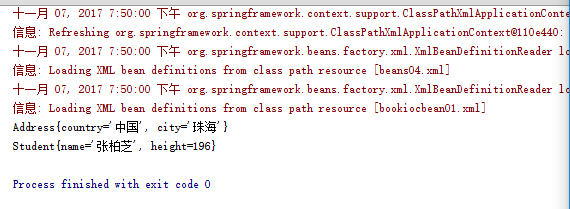
package spring05;

import org.springframework.context.ApplicationContext;
import org.springframework.context.support.ClassPathXmlApplicationContext;

public class School {
    public static void main(String[] args) {

        //ioc容器
        ApplicationContext ctx  =
                new ClassPathXmlApplicationContext("beans04.xml","bookiocbean01.xml");
        //从容器中获取对象
        Person rose = ctx.getBean("rose",Person.class);
        Address zhuhai = ctx.getBean("zhuhai",Address.class);
        System.out.println(zhuhai);
        System.out.println(rose);
    }
}
2.6.4、beans04.xml
<?xml version="1.0" encoding="UTF-8"?>
<beans xmlns="http://www.springframework.org/schema/beans"
       xmlns:xsi="http://www.w3.org/2001/XMLSchema-instance"
       xsi:schemaLocation="http://www.springframework.org/schema/beans http://www.springframework.org/schema/beans/spring-beans.xsd">
    <!--通过属性赋值-->
    <bean id="rose" class="spring05.Student">
        <constructor-arg index="0" value="张柏芝"></constructor-arg>
        <constructor-arg index="1" value="196"></constructor-arg>
    </bean>
    <bean name="zhuhai" class="spring05.Address">
        <property name="country" value="中国"></property>
        <property name="city" value="珠海"></property>
    </bean>
</beans>
2.6.5、运行效果:
-------------------------------------------------------------------------------------------------------------------------------------------------------------------------------------------------------------------------------------
2.7、使用对象引用的方式创建对象
2.7.1、Person.java
package spring06;

/**人*/
public abstract class Person {
    /**姓名*/
    public String name;
    /**地址*/
    public Address address;

    public String getName() {
        return name;
    }

    public void setName(String name) {
        this.name = name;
    }

    public Address getAddress() {
        return address;
    }

    public void setAddress(Address address) {
        this.address = address;
    }
}
2.7.2、Student.java
package spring06;

/**学生*/
public class Student extends Person {
    /**身高*/
    public int height;

    /**有参构造方法*/
    public Student(String name,int height){
        this.name=name;
        this.height=height;
    }
    /**有参构造方法*/
    public Student(String name,int height,Address address){
        this.name=name;
        this.height=height;
        this.address=address;
    }
    @Override
    public String toString() {
        return "Student{" +
                "name='" + name + '\'' +
                ", height=" + height +
                '}'+address;
    }
}
2.7.3、Address.java
package spring06;

/**地址*/
public class Address {
    /**国家*/
    private String country;
    /**城市 */
    private String city;

    public Address() {
    }

    public Address(String country, String city) {
        this.country = country;
        this.city = city;
    }

    public String getCountry() {
        return country;
    }

    public void setCountry(String country) {
        this.country = country;
    }

    public String getCity() {
        return city;
    }

    public void setCity(String city) {
        this.city = city;
    }

    @Override
    public String toString() {
        return "Address{" +
                "country='" + country + '\'' +
                ", city='" + city + '\'' +
                '}';
    }
}
2.7.4、School.java
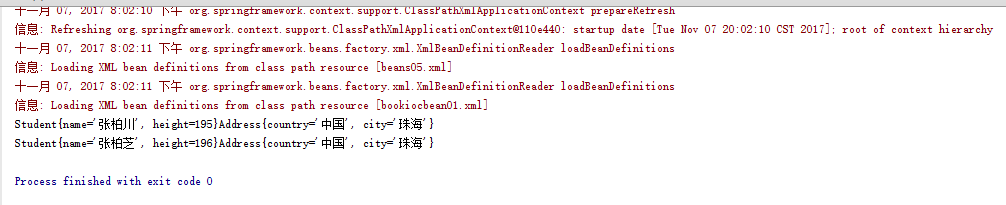
package spring06;

import org.springframework.context.ApplicationContext;
import org.springframework.context.support.ClassPathXmlApplicationContext;

public class School {
    public static void main(String[] args) {
        /**ioc容器*/
        ApplicationContext ctx  =
                new ClassPathXmlApplicationContext("beans05.xml","bookiocbean01.xml");
        //从容器中获取对象
        Person tom = ctx.getBean("tom",Person.class);
        Person rose = ctx.getBean("rose",Person.class);
        //Address zhuhai = ctx.getBean("zhuhai", Address.class);
        System.out.println(tom);
        System.out.println(rose);
    }
}
2.7.5、beans05.xml
<?xml version="1.0" encoding="UTF-8"?>
<beans xmlns="http://www.springframework.org/schema/beans"
       xmlns:xsi="http://www.w3.org/2001/XMLSchema-instance"
       xsi:schemaLocation="http://www.springframework.org/schema/beans http://www.springframework.org/schema/beans/spring-beans.xsd">
    <!--可以使用id或(和)name属性来指定bean的标识符-->
    <bean name="zhuhai" class="spring06.Address">
        <property name="country" value="中国"></property>
        <property name="city" value="珠海"></property>
    </bean>
    <bean id="tom" class="spring06.Student">
        <constructor-arg name="name" value="张柏川"></constructor-arg>
        <constructor-arg name="height" value="195"></constructor-arg>
        <constructor-arg name="address" ref="zhuhai"></constructor-arg>
    </bean>
    <bean id="rose" class="spring06.Student">
        <constructor-arg index="0" value="张柏芝"></constructor-arg>
        <constructor-arg index="1" value="196"></constructor-arg>
        <constructor-arg index="2" ref="zhuhai"></constructor-arg>
    </bean>
</beans>
2.7.6、运行结果:
------------------------------------------------------------------------------------------------------------------------------------------------------------------------------------------------------------------------------------
2.8、对象的作用域--使用scope属性可以指定作用域
2.8.1、从容器中取回的对象默认是单例的:
将2.7的实例中的School.java类的代码改为下列代码则可以验证其默认为单例模式:
package spring06;

import org.springframework.context.ApplicationContext;
import org.springframework.context.support.ClassPathXmlApplicationContext;

public class School {
    public static void main(String[] args) {
        /**ioc容器*/
        ApplicationContext ctx  =
                new ClassPathXmlApplicationContext("beans05.xml","bookiocbean01.xml");
        //从容器中获取对象
        Person rose1 = ctx.getBean("rose",Person.class);
        Person rose2 = ctx.getBean("rose",Person.class);

        System.out.println(rose1==rose2);//这句代码输出的结果为true证明默认为单例模式
        System.out.println(rose1!=rose2);
    }
}
2.8.2、作用域(使用scope属性可以指定作用域)
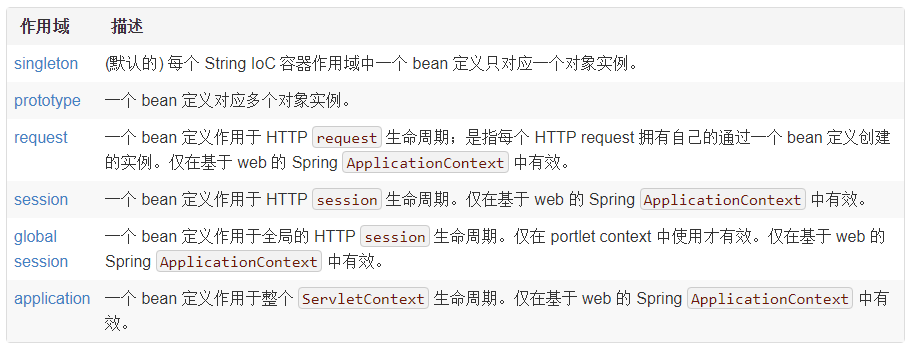
用scope="prototype"给一个Bean定义多个对象实例的示例:
1、将2.7示例中的beans05.xml中的内容改为如下代码:
   <bean id="rose" class="spring02.Student" scope="prototype">
        <constructor-arg index="0" value="张柏芝"></constructor-arg>
        <constructor-arg index="1" value="196"></constructor-arg>
        <constructor-arg index="2" ref="zhuhai"></constructor-arg>
    </bean>
2、将2.7示例中的School.java类中的代码改为如下代码:
package spring06;

import org.springframework.context.ApplicationContext;
import org.springframework.context.support.ClassPathXmlApplicationContext;

public class School {
    public static void main(String[] args) {
        /**ioc容器*/
        ApplicationContext ctx  =
                new ClassPathXmlApplicationContext("beans05.xml","bookiocbean01.xml");
          //从容器中获取对象
        Person tom=ctx.getBean("tom",Person.class);
        Person roseA=ctx.getBean("rose",Person.class);
        Person roseB=ctx.getBean("rose",Person.class);
        //Address zhuhai=ctx.getBean("zhuhai",Address.class);
        System.out.println(tom);
        System.out.println(roseA==roseB);
    }
}
3、运行结果如下: --从结果为false可以看出它不再是单例,而是多实例。

--------------------------------------------------------------------------------------------------------------------------------------------------------------------------------------------------------------------------------------
2.9、延迟初始化Bean
ApplicationContext实现的默认行为就是再启动时将所有 singleton bean提前进行实例化。 通常这样的提前实例化方式是好事,因为配置中或者运行环境的错误就会被立刻发现,否则可能要花几个小时甚至几天。如果你不想 这样,你可以将单例bean定义为延迟加载防止它提前实例化。延迟初始化bean会告诉Ioc容器在第一次需要的时候才实例化而不是在容器启动时就实例化。在XML配置文件中,延迟初始化通过<bean/>元素的lazy-init属性进行控制,比如:
<!--延迟加载-->
<bean id="lazy" class="com.foo.ExpensiveToCreateBean" lazy-init="true"/>
<!--不延迟加载-->
<bean name="not.lazy" class="com.foo.AnotherBean"/>
------------------------------------------------------------------------------------------------------------------------------------------------------------------------------------------------------------------------------------
3.0、回调方法
3.0.1、初始化回调函数
配置文件:--将2.7中的配置文件改为下面的样子
   <bean id="tom" class="spring02.Student" init-method="init" destroy-method="over">
        <constructor-arg name="name" value="张柏川"></constructor-arg>
        <constructor-arg name="height" value="195"></constructor-arg>
        <constructor-arg name="address" ref="zhuhai"></constructor-arg>
    </bean>
Student类: --将2.7中的student类改为下面的样子
package spring02;

import java.io.File;

/**学生*/
public class Student extends Person {
    /**身高*/
    public int height;
    /**有参构造方法*/
    public Student(String name,int height){
        this.name=name;
        this.height=height;
    }
    /**有参构造方法*/
    public Student(String name,int height,Address address){
        this.name=name;
        this.height=height;
        this.address=address;
    }
    @Override
    public String toString() {
        return "Student{" + "height=" + height+",name="+name +'}'+address;
    }

    public void init(){
        System.out.println("对象被创建");
    }
    public void over(){
        System.out.println("对象被回收");
    }

}
运行结果:


 357
357


 被折叠的 条评论
为什么被折叠?
被折叠的 条评论
为什么被折叠?
 到【灌水乐园】发言


