


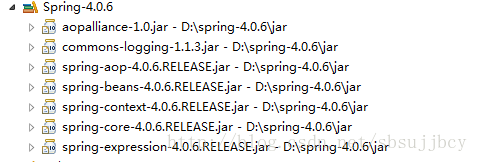
首先肯定是要导入依赖的spring包,采用spring4的包,为以后重复使用,此处采用User Libraries,打开eclispse->windows->prefrences->java->user libraries->new->输入spring->add external jars->将spring的包引入,如下图
这些包可以在maven里搜到,当然如果你会使用mavaen,输入spring的maven坐标就可以自动引入了
其次安装springsource-tool-suite,打开eclipse->help->eclipse marketplace->search->输入spring->找到spring tool suite->安装它
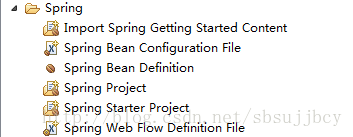
装完后新建文件的时候就可以看到spring相关的文件,如图
新建一个java项目,新建一个包,新建一个HelloWorld类,代码如下
package cn.edu.zafu;


public class HelloWorld {
	private String name;

	public void setName(String name) {
		this.name = name;
	}

	public void hello() {
		System.out.println("hello:" + name);
	}

}
在src下新建一个spring 配置文件applicationContext.xml,src右键->new->other->Spring->Spring Bean Configuration File->Finish,添加bean内容,代码如下
<?xml version="1.0" encoding="UTF-8"?>
<beans xmlns="http://www.springframework.org/schema/beans"
	xmlns:xsi="http://www.w3.org/2001/XMLSchema-instance"
	xsi:schemaLocation="http://www.springframework.org/schema/beans http://www.springframework.org/schema/beans/spring-beans.xsd">

	<bean id="helloWorld" class="cn.edu.zafu.HelloWorld">
		<property name="name" value="lizhangqu"></property>
	</bean>
</beans>
现在开始进行单元测试,在HelloWorld类上右键->new->other->Junit->Junit Test Case->输入相关内容后->Next->勾选hello方法进行测试->Finish
注意选择Junit版本的时候选择Junit4,单元测试代码如下
package cn.edu.zafu;

import org.junit.Test;
import org.springframework.context.ApplicationContext;
import org.springframework.context.support.ClassPathXmlApplicationContext;

public class HelloWorldTest {

	@Test
	public void testHello() {
		ApplicationContext context=new ClassPathXmlApplicationContext("applicationContext.xml");
		HelloWorld helloWorld=(HelloWorld)context.getBean("helloWorld");
		helloWorld.hello();
	}

}
代码完毕,开始运行单元测试,项目上右键->Run As Junit Test,如果出现下图则表示测试成功

失败的话图上不是绿色的哦
一个简单的spring project就这样完毕了。


 1257
1257


 被折叠的 条评论
为什么被折叠?
被折叠的 条评论
为什么被折叠?
 到【灌水乐园】发言


