


介绍
WebSocket是HTML5开始提供的一种在单个 TCP 连接上进行全双工通讯的协议。在WebSocket API中,浏览器和服务器只需要完成一次握手,两者之间就直接可以创建持久性的连接,并进行双向数据传输。WebSocket使用和 HTTP 相同的 TCP 端口,可以绕过大多数防火墙的限制。默认情况下,WebSocket协议使用80端口;运行在TLS之上时,默认使用443端口。
WebSocket协议建立连接的时候需要握手,握手过程中需要借助HTTP协议来完成,当连接建立后,就可以使用WebSocket协议进行通信,通信结束后,通信双方都可以关闭连接。
API文档:https://developer.mozilla.org/zh-CN/docs/Web/API/WebSocket
前端:
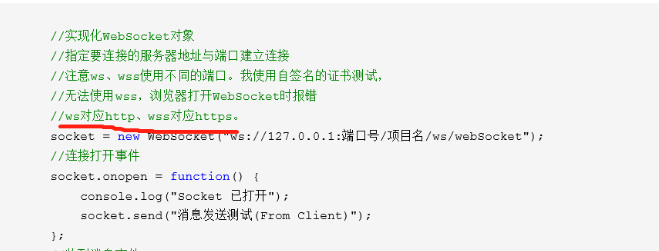
1、新建服务器的连接:var webSocket = new WebSocket(url);
2、初始化回调函数
ex:webSocket.onmessage = function (event){
var data = event.data;
console.log(“收到的消息”+data);
}
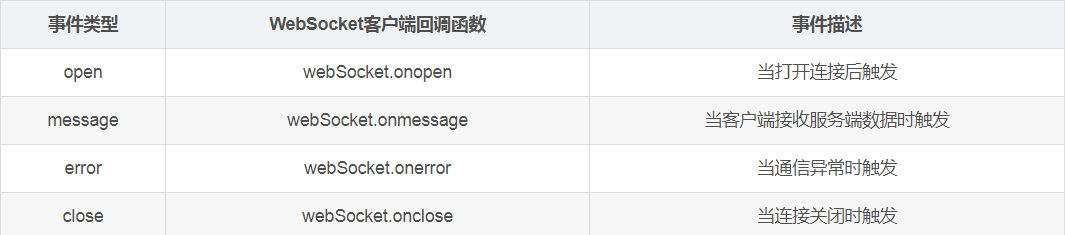
3、发送消息给服务器
webSocket.send(message);
后端:
- 配置pom文件
   <!-- 引入 websocket 依赖类-->
         <dependency>
           <groupId>org.springframework.boot</groupId>
             <artifactId>spring-boot-starter-websocket</artifactId>
        </dependency>
开启WebSocket服务端的自动注册
注意:ServerEndpointExporter 是由Spring官方提供的标准实现,用于扫描ServerEndpointConfig配置类和@ServerEndpoint注解实例。使用规则也很简单:1.如果使用默认的嵌入式容器 比如Tomcat 则必须手工在上下文提供ServerEndpointExporter。2. 如果使用外部容器部署war包,则不要提供提供ServerEndpointExporter,因为此时SpringBoot默认将扫描服务端的行为交给外部容器处理
/**
 * 开启WebSocket支持
 */
@Configuration
public class WebSocketConfig {

    @Bean
    public ServerEndpointExporter serverEndpointExporter() {
        return new ServerEndpointExporter();
    }

}
- 创建WebSocket服务端
①通过注解@ServerEndpoint来声明实例化WebSocket服务端。(注意配置@Component才能被spring扫描)
② 通过注解@OnOpen、@OnMessage、@OnClose、@OnError 来声明回调函数。
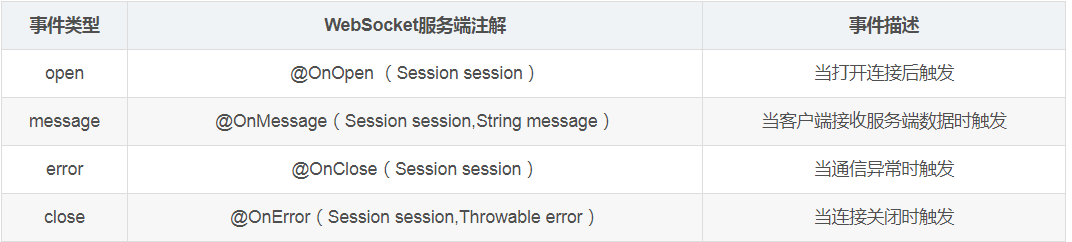
③发送消息:new Session().getBasicRemote().sendText(message);
- WebSocket服务类编写
这里对照下面的代码看:
-
-
- 第20行,@ServerEndpoint("/websocket/{userID}"),括号中的内容就是客户端请求Socket连接时的访问路径,userID是我要求客户端传来的参数,我这里算是为了标识该客户端吧。
- 第28行,在该类中添加属性 userID,并添加对应的getUserID()方法。
- 第46行,在onOpen()方法即建立连接的时候就接收参数userID,需要标识@PathParam("userID") 。接收参数后直接赋值给属性userID。
- 第140-157行,是针对特定客户端发送消息。服务器和客户端在建立连接成功后就生成了一个WebSocket对象,并存在集合中,对象里特有的属性是我们设置的userID。所以通过唯一的userID就能标识服务器与该客户端建立的那个连接啦!这样要求发送消息时,传入userID与消息,服务器在自己的WebSocket连接集合中遍历找到对应客户端的连接,就可以直接发消息过去啦~~
-
package com.cuc.happyseat.websocket;

import java.io.IOException;
import java.util.concurrent.CopyOnWriteArraySet;

import javax.websocket.EncodeException;
import javax.websocket.OnClose;
import javax.websocket.OnError;
import javax.websocket.OnMessage;
import javax.websocket.OnOpen;
import javax.websocket.Session;
import javax.websocket.server.PathParam;
import javax.websocket.server.ServerEndpoint;

import org.springframework.stereotype.Component;

/*@ServerEndpoint注解是一个类层次的注解,它的功能主要是将目前的类定义成一个websocket服务器端,
* 注解的值将被用于监听用户连接的终端访问URL地址,客户端可以通过这个URL来连接到WebSocket服务器端
*/
@ServerEndpoint("/websocket/{userID}")
@Component
public class WebSocketServer {

        //每个客户端都会有相应的session,服务端可以发送相关消息
        private Session session;

        //接收userID
        private Integer userID;

        //J.U.C包下线程安全的类,主要用来存放每个客户端对应的webSocket连接
        private static CopyOnWriteArraySet<WebSocketServer> copyOnWriteArraySet = new CopyOnWriteArraySet<WebSocketServer>();

        public Integer getUserID() {
            return userID;
        }

       /**
       * @Name:onOpen
       * @Description:打开连接。进入页面后会自动发请求到此进行连接
       * @Author:mYunYu
       * @Create Date:14:46 2018/11/15
       * @Parameters:@PathParam("userID") Integer userID
       * @Return:
       */
        @OnOpen
        public void onOpen(Session session, @PathParam("userID") Integer userID) {
            this.session = session;
            this.userID = userID;
            System.out.println(this.session.getId());
            //System.out.println("userID:" + userID);
            copyOnWriteArraySet.add(this);
            System.out.println("websocket有新的连接, 总数:"+ copyOnWriteArraySet.size());

        }

       /**
       * @Name:onClose
       * @Description:用户关闭页面,即关闭连接
       * @Author:mYunYu
       * @Create Date:14:46 2018/11/15
       * @Parameters:
       * @Return:
       */
        @OnClose
        public void onClose() {
            copyOnWriteArraySet.remove(this);
            System.out.println("websocket连接断开, 总数:"+ copyOnWriteArraySet.size());
        }

        /**
        * @Name:onMessage
        * @Description:测试客户端发送消息,测试是否联通
        * @Author:mYunYu
        * @Create Date:14:46 2018/11/15
        * @Parameters:
        * @Return:
        */
        @OnMessage
        public void onMessage(String message) {
            System.out.println("websocket收到客户端发来的消息:"+message);
        }

        /**
        * @Name:onError
        * @Description:出现错误
        * @Author:mYunYu
        * @Create Date:14:46 2018/11/15
        * @Parameters:
        * @Return:
        */
        @OnError
        public void onError(Session session, Throwable error) {
            System.out.println("发生错误:" + error.getMessage() + "; sessionId:" + session.getId());
            error.printStackTrace();
        }

        public void sendMessage(Object object){
            //遍历客户端
            for (WebSocketServer webSocket : copyOnWriteArraySet) {
                System.out.println("websocket广播消息:" + object.toString());
                try {
                    //服务器主动推送
                    webSocket.session.getBasicRemote().sendObject(object) ;
                } catch (Exception e) {
                    e.printStackTrace();
                }
            }
        }

        /**
        * @Name:sendMessage
        * @Description:用于发送给客户端消息(群发)
        * @Author:mYunYu
        * @Create Date:14:46 2018/11/15
        * @Parameters:
        * @Return:
        */
        public void sendMessage(String message) {
            //遍历客户端
            for (WebSocketServer webSocket : copyOnWriteArraySet) {
                System.out.println("websocket广播消息:" + message);
                try {
                    //服务器主动推送
                    webSocket.session.getBasicRemote().sendText(message);
                } catch (Exception e) {
                    e.printStackTrace();
                }
            }
        }

        /**
        * @throws Exception
         * @Name:sendMessage
        * @Description:用于发送给指定客户端消息
        * @Author:mYunYu
        * @Create Date:14:47 2018/11/15
        * @Parameters:
        * @Return:
        */
        public void sendMessage(Integer userID, String message) throws Exception {
            Session session = null;
            WebSocketServer tempWebSocket = null;
            for (WebSocketServer webSocket : copyOnWriteArraySet) {
                if (webSocket.getUserID() == userID) {
                    tempWebSocket = webSocket;
                    session = webSocket.session;
                    break;
                }
            }
            if (session != null) {
                //服务器主动推送
                tempWebSocket.session.getBasicRemote().sendText(message);

            } else {
                System.out.println("没有找到你指定ID的会话:{}"+ "; userId:" + userID);
            }
        }


}
- Controller类的编写。
-
- 我在看博客的时候,发现有的博主写了Controller类,有的没写,我就有点疑惑了。后来,咳咳,发现特地写了一个Controller类只是为了测试。。
- 一般在实际项目中,在确保建立连接过程没有问题的情况下,我们就直接在一些写好的接口中写 WebSocketServer.sendMessage(param, message)语句就行了。
- 也因此,你写的位置就决定了你什么时候给你的客户端发消息,这样也就实现了主动推送消息的功能咯~
前提是:在你的Controller类里,以@Resource的方式注入WebSocket,而不是@Autowired方式哦(⊙o⊙)。
@Resource
    WebSocketServer webSocket;
@Autowired
     UserService userService;

调用示例:

    if(userID>0) {
            boolean location = userService.getLocation(userID);
            if(location==false) {//验证用户当前不在馆内
                boolean i = userService.modifyLocation(userID, true);
                if(i==true) {
                modelMap.put("successEnter", true);

                //发消息给客户端
                webSocket.sendMessage(userID, "success");
                }
            }else {
                modelMap.put("successEnter", false);
                //发消息给客户端
                webSocket.sendMessage(userID, "fail");
            }
        }else {
            modelMap.put("successEnter", false);
            //发消息给客户端
            webSocket.sendMessage(userID, "fail");
        }
小程序是只支持https访问的,所以得用wss
嘿嘿嘿,下面是学习WebSocket过程中参考的几篇博文:
转载:https://www.cnblogs.com/codecheng/archive/2019/04/06/10657530.html


 775
775


 被折叠的 条评论
为什么被折叠?
被折叠的 条评论
为什么被折叠?
 到【灌水乐园】发言


