


<LinearLayout xmlns:android="http://schemas.android.com/apk/res/android"
    android:id="@+id/main_layout"
    android:layout_width="match_parent"
    android:layout_height="match_parent" >
</LinearLayout>
这个布局文件的内容非常简单,只有一个空的LinearLayout,里面什么控件都没有,因此界面上应该不会显示任何东西。
那么接下来我们再定义一个布局文件,给它取名为button_layout.xml,代码如下所示:
<Button xmlns:android="http://schemas.android.com/apk/res/android"
    android:layout_width="wrap_content"
    android:layout_height="wrap_content"
    android:text="Button" >
</Button>
这个布局文件也非常简单,只有一个Button按钮而已。现在我们要想办法,如何通过LayoutInflater来将button_layout这个布局添加到主布局文件的LinearLayout中。修改MainActivity中的代码,如下所示:
public class MainActivity extends Activity {
    private LinearLayout mainLayout;
    @Override
    protected void onCreate(Bundle savedInstanceState) {
        super.onCreate(savedInstanceState);
        setContentView(R.layout.activity_main);
        mainLayout = (LinearLayout) findViewById(R.id.main_layout);
        LayoutInflater layoutInflater = LayoutInflater.from(this);
        View buttonLayout = layoutInflater.inflate(R.layout.button_layout, null);
        mainLayout.addView(buttonLayout);
    }
}
可以看到,这里先是获取到了LayoutInflater的实例,然后调用它的inflate()方法来加载button_layout这个布局,最后调用LinearLayout的addView()方法将它添加到LinearLayout中。
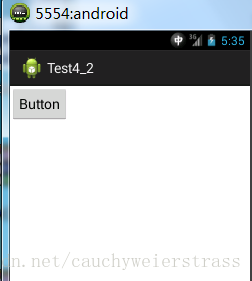
现在可以运行一下程序,结果如下图所示:
好了,现在对LayoutInflater的工作原理和流程也搞清楚了,你该满足了吧。额。。。。还嫌这个例子中的按钮看起来有点小,想要调大一些?那简单的呀,修改button_layout.xml中的代码,如下所示:
<pre name="code" class="html"><Button xmlns:android="http://schemas.android.com/apk/res/android"
    android:layout_width="300dp"
    android:layout_height="80dp"
    android:text="Button" >
</Button>
这里我们将按钮的宽度改成300dp,高度改成80dp,这样够大了吧?现在重新运行一下程序来观察效果。咦?怎么按钮还是原来的大小,没有任何变化!是不是按钮仍然不够大,再改大一点呢?还是没有用!
其实这里不管你将Button的layout_width和layout_height的值修改成多少,都不会有任何效果的,因为这两个值现在已经完全失去了作用。平时我们经常使用layout_width和layout_height来设置View的大小,并且一直都能正常工作,就好像这两个属性确实是用于设置View的大小的。而实际上则不然,它们其实是用于设置View在布局中的大小的,也就是说,首先View必须存在于一个布局中,之后如果将layout_width设置成match_parent表示让View的宽度填充满布局,如果设置成wrap_content表示让View的宽度刚好可以包含其内容,如果设置成具体的数值则View的宽度会变成相应的数值。这也是为什么这两个属性叫作layout_width和layout_height,而不是width和height。
再来看一下我们的button_layout.xml吧,很明显Button这个控件目前不存在于任何布局当中,所以layout_width和layout_height这两个属性理所当然没有任何作用。那么怎样修改才能让按钮的大小改变呢?解决方法其实有很多种,最简单的方式就是在Button的外面再嵌套一层布局,如下所示:
<pre name="code" class="html"><RelativeLayout xmlns:android="http://schemas.android.com/apk/res/android"
    android:layout_width="match_parent"
    android:layout_height="match_parent" >
    <Button
        android:layout_width="300dp"
        android:layout_height="80dp"
        android:text="Button" >
    </Button>
</RelativeLayout>
可以看到,这里我们又加入了一个RelativeLayout,此时的Button存在与RelativeLayout之中,layout_width和layout_height属性也就有作用了。当然,处于最外层的RelativeLayout,它的layout_width和layout_height则会失去作用。现在重新运行一下程序,结果如下图所示:

上面这些内容完全摘自http://blog.csdn.net/guolin_blog/article/details/12921889
其实这里不管你将Button的layout_width和layout_height的值修改成多少,都不会有任何效果的,因为这两个值现在已经完全失去了作用。平时我们经常使用layout_width和layout_height来设置View的大小,并且一直都能正常工作,就好像这两个属性确实是用于设置View的大小的。而实际上则不然,它们其实是用于设置View在布局中的大小的,也就是说,首先View必须存在于一个布局中,之后如果将layout_width设置成match_parent表示让View的宽度填充满布局,如果设置成wrap_content表示让View的宽度刚好可以包含其内容,如果设置成具体的数值则View的宽度会变成相应的数值。这也是为什么这两个属性叫作layout_width和layout_height,而不是width和height。
以上解释不能很好地解决心中的疑惑,代码是最好的老师,于是:
public void addView(View child) {
        addView(child, -1);
    }
public void addView(View child, int index) {
        LayoutParams params = child.getLayoutParams();
        if (params == null) {
            params = generateDefaultLayoutParams();
            if (params == null) {
                throw new IllegalArgumentException("generateDefaultLayoutParams() cannot return null");
            }
        }
        addView(child, index, params);
}
   protected LayoutParams generateDefaultLayoutParams() {
        return new LayoutParams(LayoutParams.WRAP_CONTENT, LayoutParams.WRAP_CONTENT);
    }
默认调用View的getLayoutParams,如果为null会调用generateDefaultLayoutParams其实是生成WRAP_CONTENT的宽高参数
// getLayoutParams
public ViewGroup.LayoutParams getLayoutParams() {
        return mLayoutParams;
}
mLayoutParams是在哪里赋值的呢?
public void setLayoutParams(ViewGroup.LayoutParams params) {
        if (params == null) {
            throw new NullPointerException("Layout parameters cannot be null");
        }
        mLayoutParams = params;
        resolveLayoutParams();
        if (mParent instanceof ViewGroup) {
            ((ViewGroup) mParent).onSetLayoutParams(this, params);
        }
        requestLayout();
    }
那么是在哪里调用这个setLayoutParams函数的呢?再来看LayoutInflater类的inflate方法,发方法是将xml填充成View
public View inflate(XmlPullParser parser, ViewGroup root, boolean attachToRoot) {
synchronized (mConstructorArgs) {
//根据xml设置生成对应的参数
        final AttributeSet attrs = Xml.asAttributeSet(parser);
        mConstructorArgs[0] = mContext;
        View result = root;
        try {
            int type;
            while ((type = parser.next()) != XmlPullParser.START_TAG &&
                    type != XmlPullParser.END_DOCUMENT) {
            }
            if (type != XmlPullParser.START_TAG) {
                throw new InflateException(parser.getPositionDescription()
                        + ": No start tag found!");
            }
            final String name = parser.getName();
            if (TAG_MERGE.equals(name)) {
                if (root == null || !attachToRoot) {
                    throw new InflateException("merge can be used only with a valid "
                            + "ViewGroup root and attachToRoot=true");
                }
                rInflate(parser, root, attrs);
            } else {
				//根据Tag生成View,同时传递给该View的参数
                View temp = createViewFromTag(name, attrs);
                ViewGroup.LayoutParams params = null;
                if (root != null) {
//root不null时才执行
//1,根据attr生成params
//2,attachToRoot为false时意味着不将该view添加到父View,那么设置该View的参数
                    params = root.generateLayoutParams(attrs);
                    if (!attachToRoot) {
                        temp.setLayoutParams(params);
                    }
                }
                rInflate(parser, temp, attrs);
// root不null时,并且设置将该View添加到当前的父View
                if (root != null && attachToRoot) {
                    root.addView(temp, params);
                }
// root为null时,或者设置将该View不添加添加到当前的父View
                if (root == null || !attachToRoot) {
                    result = temp;
                }
            }
        } catch (XmlPullParserException e) {
            InflateException ex = new InflateException(e.getMessage());
            ex.initCause(e);
            throw ex;
        } catch (IOException e) {
            InflateException ex = new InflateException(
                    parser.getPositionDescription()
                    + ": " + e.getMessage());
            ex.initCause(e);
            throw ex;
        }
        return result;
    }
}
因此可以看出:root不为null,并且添加到父View时,是直接调用root.addView(temp, params);添加View的
指定了父View时,如果不添加到父View则会设置该View的布局参数temp.setLayoutParams(params);--------这种情况少见。
未指定父View时,什么也不会设置。
回头看上面的问题。在填充Button时,什么参数也没有设置。所以在调用addView的时候,child.getLayoutParams()为null,会执行到generateDefaultLayoutParams,那么设置的宽高参数根本没起作用。因此添加控件的时候最好带着布局参数添加。
public void addView(View child, int index) {
        LayoutParams params = child.getLayoutParams();
        if (params == null) {
            params = generateDefaultLayoutParams();
            if (params == null) {
                throw new IllegalArgumentException("generateDefaultLayoutParams() cannot return null");
            }
        }
        addView(child, index, params);
}
<RelativeLayout xmlns:android="http://schemas.android.com/apk/res/android"
android:layout_width="match_parent"
android:layout_height="match_parent" >
<Button
android:layout_width="300dp"
android:layout_height="80dp"
android:text="Button" >
</Button>
</RelativeLayout>那么添加一个外部布局的原因是什么呢?其实这时将该布局addView进去时,测量该布局的宽高,父传过来的是Exactly和屏幕的size。RelativeLayout是match_parent,因此,RelativeLayout在测量的时候默认情况下是Exactly和屏幕的size,Button在测量的时候传递的是Exactly和300,80的尺寸。RelativeLayout测量完之后,肯定会设置宽高,LinearLayout里面是做了类似于下面的重新设定。
<RelativeLayout是match_parent这句错误,RelativeLayout在add的时候,由于不会设置View的参数,最终肯定会调用generateDefaultLayoutParams,默认是包裹内容wrap_content。后面:RelativeLayout在测量的时候默认情况下是AT_MOST和屏幕的size。由于是AT_MOST,测量完Button后会重新设定自身的宽高。,因此,RelativeLayout在测量的时候默认情况下是Exactly和屏幕的size>
mTotalLength = Math.max(totalLength,totalLength + childHeight + lp.topMargin +
                       lp.bottomMargin +getNextLocationOffset(child));</span>
一切搞定!
然而真正做的时候问题又出现了:发现activity_main会报错,因为没有指定方向,于是就指定成VERTICAL。默认是HORIZONTAL,于是…

真是见鬼了,同样的代码,理论上分析,View buttonLayout = layoutInflater.inflate(R.layout.r_button, null);这句不会设置View的参数,最终肯定会调用generateDefaultLayoutParams,那么肯定是包裹内容啊!那为什么实际结果却是match_parent的效果?百地不得其解…开始怀疑是版本变了,默认的设置也变了,但是查了好久不是这个原因。
把LinearLayout换成RelativeLayout竟然好了,然后去看了RelativeLayout源码的generateDefaultLayoutParams方法,确实是包裹内容wrap_content。才想起来,应该查看LinearLayout的generateDefaultLayoutParams而不是查看ViewGroup的generateDefaultLayoutParams方法protected LayoutParams generateDefaultLayoutParams() {
if (mOrientation == HORIZONTAL) {
return new LayoutParams(LayoutParams.WRAP_CONTENT, LayoutParams.WRAP_CONTENT);
} else if (mOrientation == VERTICAL) {
return new LayoutParams(LayoutParams.MATCH_PARENT, LayoutParams.WRAP_CONTENT);
}
return null;
}这下终于大功告成!!
重点:
1、xml布局中最外层的layout参数一般都不起作用!!!!除非在加载布局的时候指定他的父布局!!!!
2、不指定父布局的情况下LayoutParams为null,在addView的时候判断为null会生成默认的布局参数,一般为包裹内容。
3、在加载布局的时候如果指定了父布局,最外层的match_parent和wrap_content不是随意写的。
如:main_activity是match_parent的,需要在上面add几个布局。加载一个LinearLayout的布局,里面包含了一个wrap_content的ImageView,通过LayoutInflater加载:
如果指定了父布局,外层的布局参数就起作用了,那么add这个布局到main_activity后:LinearLayout会占满整个屏幕,ImageView在LinearLayout里面是包裹内容,这是在往main_activity里面add布局就看不见了,因为屏幕已经被占完了。
如果没有指定父布局,外层的参数倒是无所谓。根据2,设置成默认参数为包裹内容,最终add这个布局到main_activity后:LinearLayout不会占满整个屏幕,只是包裹里面控件就行了,不贪心。ImageView在LinearLayout里面是包裹内容
指定了父布局,外层的布局参数就起作用了,因此不要乱写,指定父布局,并且写成wrap_content,最终add这个布局到main_activity后:LinearLayout不会占满整个屏幕,只是包裹里面控件,ImageView在LinearLayout里面是包裹内容,和上面情况一样。


 640
640

 被折叠的 条评论
为什么被折叠?
被折叠的 条评论
为什么被折叠?
 到【灌水乐园】发言


