


本讲我们介绍silverLight的数据绑定控件:普通绑定控件、DataGrid控件、ListBox控件以及数据绑定的方式。
数据绑定的方式分为三种:
OneTime、一次性数据绑定,显示不会变更的数据,默认为这种方式,无需指定绑定模式。
OneWay、单向数据绑定,显示数据时,如果后台数据变更,那么前台界面的显示也随之变更。指定绑定模式:Mode=OneWay。
TwoWay、双向数据绑定,后台数据变更,前台界面显示的数据也随之变更;前台界面显示的数据用户可以改变,改变后,后台数据源的数据也随之变更。指定绑定模式:Mode=TwoWay。
下面将通过介绍绑定控件介绍三种绑定模式。
1、普通绑定控件
对于普通绑定控件,可以通过对其属性(Text或Content等)="{Binding 数据源的属性}",代码部分指定控件的DataContext=数据源对象,来实现数据绑定。本实例实现OneTime和OneWay方式,代码如下:
<StackPanel x:Name="sPanelBook" Margin="0,50,0,0" HorizontalAlignment="Center">
<StackPanel Orientation="Horizontal">
<TextBlock Text="书名:" FontSize="28" Foreground="Coral"/>
<TextBlock x:Name="txtTitle" FontSize="28" Foreground="Coral" Text="{Binding Title, Mode=OneWay}" />
</StackPanel>
<StackPanel Orientation="Horizontal">
<TextBlock Text="价格:" FontSize="28" Foreground="Coral"/>
<ContentControl x:Name="txtPrice" FontSize="28" Foreground="Coral" Content="{Binding Price}" />
</StackPanel>
<Button x:Name="btnUpdate" Content="更新书名" Click="btnUpdate_Click" FontSize="28" Foreground="DarkBlue" Width="400"/>
</StackPanel>
using System.ComponentModel;
public partial class Page : UserControl
{
public Page()
{
InitializeComponent();
BindContext();
}
Book book;
private void BindContext()
{
book = new Book { Title = "SilverLight 2.0 入门精典", Price = 28 };//C#3.0语法
sPanelBook.DataContext = book;//此语句等同于下面的两句
//txtTitle.DataContext = book;
//txtPrice.DataContext = book;
}
private void btnUpdate_Click(object sender, RoutedEventArgs e)
{
if (book.Title.Contains("入门精典"))
{
book.Title = "SilverLight 2.0 高级编程";//Title为OneWay绑定,所以前台会改变
book.Price = 36; //Price为OneTime绑定,所以前台不会改变
}
else
{
book.Title = "SilverLight 2.0 入门精典";//Title为OneWay绑定,所以前台会改变
book.Price = 28; //Price为OneTime绑定,所以前台不会改变
}
}
}
public class Book : INotifyPropertyChanged
{
public event PropertyChangedEventHandler PropertyChanged;
private void NotifyPropertyChanged(String info)
{
if (PropertyChanged != null)
{
PropertyChanged(this, new PropertyChangedEventArgs(info));
}
}
private string title = string.Empty;
public string Title
{
get { return title; }
set
{
if (value != title)
{
title = value;
NotifyPropertyChanged("Title");
}
}
}
public decimal Price { get; set; }
}
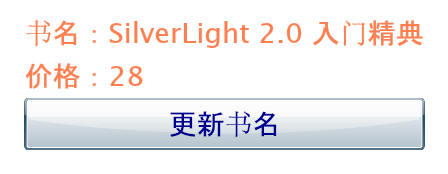
运行效果如下:
2、DataGrid控件
DataGrid控件是一种以网格为主的数据绑定控件。它有五个重要属性:
自动产生列(AutoGenerateColumns)、允许调整列大小(CanUserResizeColumns)、允许调整列排序(CanUserReorderColumns)、是否可以编辑(IsReadOnly)和数据源绑定对象(ItemsSource)。
三个列对象:DataGridTextColumn、DataGridCheckBoxColumn和DataGridTemplateColumn。
本实例实现Mode=TwoWay数据绑定模式,代码如下:
<my:DataGrid x:Name="dgTest" AutoGenerateColumns="False" Width="500" Margin="0,20,0,0"
HorizontalScrollBarVisibility="Auto" Height="450" VerticalScrollBarVisibility="Auto">
<my:DataGrid.Columns>
<my:DataGridTextColumn Header="书名" DisplayMemberBinding="{Binding Title}"></my:DataGridTextColumn>
<my:DataGridTextColumn Header="价格" DisplayMemberBinding="{Binding Price}"></my:DataGridTextColumn>
<my:DataGridCheckBoxColumn Header="是否有货" DisplayMemberBinding="{Binding IsOOS}"></my:DataGridCheckBoxColumn>
<my:DataGridTemplateColumn Header="出版日期">
<my:DataGridTemplateColumn.CellTemplate>
<DataTemplate>
<TextBlock Text="{Binding PublishDate}"></TextBlock>
</DataTemplate>
</my:DataGridTemplateColumn.CellTemplate>
<my:DataGridTemplateColumn.CellEditingTemplate>
<DataTemplate>
<my1:DatePicker SelectedDate="{Binding PublishDate, Mode=TwoWay}"></my1:DatePicker>
</DataTemplate>
</my:DataGridTemplateColumn.CellEditingTemplate>
</my:DataGridTemplateColumn>
</my:DataGrid.Columns>
<my:DataGrid.RowDetailsTemplate>
<DataTemplate>
<StackPanel>
<StackPanel Orientation="Horizontal">
<TextBlock Text="编号:" ></TextBlock>
<TextBlock Text="{Binding BookId}" ></TextBlock>
<TextBlock Text=" 标题:" ></TextBlock>
<TextBlock Text="{Binding Title}" ></TextBlock>
<TextBlock Text=" 价格:" ></TextBlock>
<TextBlock Text="{Binding Price}" ></TextBlock>
</StackPanel>
<Image Source="{Binding ImgPath}" Width="450"></Image>
</StackPanel>
</DataTemplate>
</my:DataGrid.RowDetailsTemplate>
</my:DataGrid>
public partial class Page : UserControl
{
public Page()
{
InitializeComponent();
BindDataGrid();
}
private void BindDataGrid()
{
List<Book> list = new List<Book>();
for (int i = 0; i < 10; ++i)
{
list.Add(new Book
{
BookId = i,
Title = "SilverLight 2.0 高级编程" + i.ToString(),
Price = 28 + i,
PublishDate = DateTime.Now.AddDays(i),
IsOOS = 0 == (i % 2),
ImgPath="logo.jpg"
});
}
dgTest.ItemsSource = list;
}
}
public class Book
{
public int BookId { get; set; }
public string Title{ get; set; }
public decimal Price { get; set; }
public DateTime PublishDate { get; set; }
public bool IsOOS { get; set; }
public string ImgPath { get; set; }
}
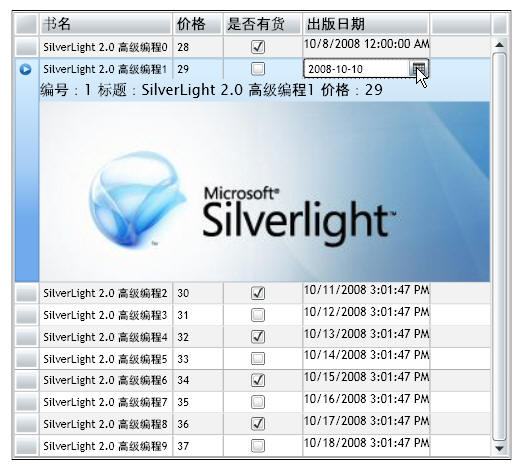
运行效果如下:
3、ListBox控件
ListBox控件是一种以显示单项数据为主的数据绑定控件,它有三个重要属性:列表项(ListBoxItem)、项模板(ItemTemplate)和项绑定对象(ItemsSource)。代码如下:
<StackPanel Orientation="Horizontal" HorizontalAlignment="Center" Margin="0,20,0,0" >
<StackPanel>
<TextBlock Text="填充项" Margin="5,5,5,0" Foreground="Coral"/>
<ListBox Height="300" Width="100" Margin="5,0,5,5">
<Rectangle Width="94" Height="30" Fill="Coral"/>
<ListBoxItem Content="填充项A"/>
<ListBoxItem Content="填充项B"/>
<ListBoxItem Content="填充项C"/>
<ListBoxItem Content="填充项D"/>
<ListBoxItem Content="填充项E"/>
<Ellipse Width="94" Height="30" Fill="Coral"></Ellipse>
</ListBox>
</StackPanel>
<StackPanel>
<TextBlock Text="绑定到项" Margin="5,5,5,0" Foreground="Coral"/>
<ListBox x:Name="lbItems" Height="300" Width="150" Margin="5,0,5,5">
</ListBox>
</StackPanel>
<StackPanel>
<TextBlock Text="绑定到项模板" Margin="5,5,5,0" Foreground="Coral"/>
<ListBox x:Name="lbDataTemplate" Height="300" Width="400" Margin="5,0,5,5">
<ListBox.ItemTemplate>
<DataTemplate>
<StackPanel>
<StackPanel Orientation="Horizontal">
<TextBlock Text="{Binding Title}"></TextBlock>
<TextBlock Text=" "></TextBlock>
<my:DatePicker SelectedDate="{Binding PublishDate}"></my:DatePicker>
<TextBlock Text=" "></TextBlock>
<CheckBox IsChecked="{Binding IsOOS}"></CheckBox>
</StackPanel>
<Image Source="{Binding ImgPath}"/>
</StackPanel>
</DataTemplate>
</ListBox.ItemTemplate>
</ListBox>
</StackPanel>
</StackPanel>
public partial class Page : UserControl
{
public Page()
{
InitializeComponent();
BindItems();
BindDataTemplate();
}
private void BindItems()
{
List<string> list = new List<string>();
for (int i = 0; i < 20; ++i)
{
list.Add(i.ToString() + "SilverLight 2.0 高级编程");
}
lbItems.ItemsSource = list;
}
private void BindDataTemplate()
{
List<Book> list = new List<Book>();
for (int i = 0; i < 10; ++i)
{
list.Add(new Book
{
BookId = i,
Title = "SilverLight 2.0 高级编程" + i.ToString(),
Price = 28 + i,
PublishDate = DateTime.Now.AddDays(i),
IsOOS = 0 == (i % 2),
ImgPath = "logo.jpg"
});
}
lbDataTemplate.ItemsSource = list;
}
}
public class Book
{
public int BookId { get; set; }
public string Title { get; set; }
public decimal Price { get; set; }
public DateTime PublishDate { get; set; }
public bool IsOOS { get; set; }
public string ImgPath { get; set; }
}
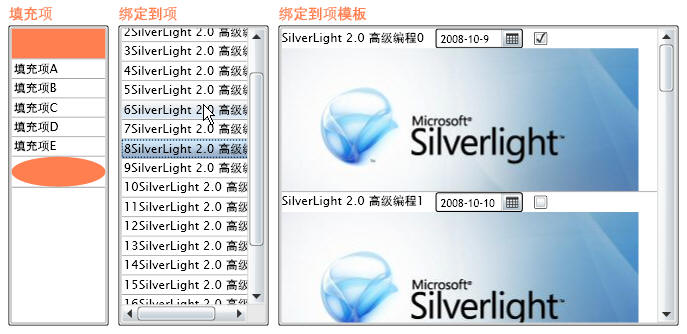
运行效果如下:
综述:本部分主要讲了silverLight的数据绑定控件:普通绑定控件、DataGrid控件、ListBox控件,下一讲我们介绍silverLight的事件处理。


 771
771


 被折叠的 条评论
为什么被折叠?
被折叠的 条评论
为什么被折叠?
 到【灌水乐园】发言


