


View类是android中非常重要的一个类.view是应用程序界面的直观体现,我们看到的应用程序界面就能够看作是View(视图)组成的.
那么我们应用程序的界面是怎么创建的呢,也就是应用程序的View是什么时候创建的?
在android中与界面直接相关的就是Activity了.
我们平时在Activity的onCreate()函数中,通过调用它的setContentView()函数,将我们应用程序的界面资源设置进去.然后执行程序就能够看到我们布局文件里描写叙述的界面了.
从我们调用setContentView()函数将界面资源设置进去,到执行完毕界面全然显示出来,当中经过了非常多过程.
这里我主要是通过源代码来分析一下当中终于界面究竟是什么样的View? 然后分析一下View的measure,layout,draw过程.
由于我们设置界面是setContentView()中设置的,所以就从该函数開始来分析.
在
分析点击android桌面app图标启动应用程序的过程一文中我们知道Activity的onCreate()函数最先被调用.第五十步
 private Activity performLaunchActivity(ActivityClientRecord r, Intent customIntent) {
       ....
        Activity activity = null;
        try {
            java.lang.ClassLoader cl = r.packageInfo.getClassLoader();
            activity = mInstrumentation.newActivity(
                    cl, component.getClassName(), r.intent);
            StrictMode.incrementExpectedActivityCount(activity.getClass());
            r.intent.setExtrasClassLoader(cl);
            if (r.state != null) {
                r.state.setClassLoader(cl);
            }
        } catch (Exception e) {
      ....
        }

        try {
            Application app = r.packageInfo.makeApplication(false, mInstrumentation);
....
            if (activity != null) {
                Context appContext = createBaseContextForActivity(r, activity);
                CharSequence title = r.activityInfo.loadLabel(appContext.getPackageManager());
                Configuration config = new Configuration(mCompatConfiguration);
              ...
                activity.attach(appContext, this, getInstrumentation(), r.token,
                        r.ident, app, r.intent, r.activityInfo, title, r.parent,
                        r.embeddedID, r.lastNonConfigurationInstances, config);

                if (customIntent != null) {
                    activity.mIntent = customIntent;
                }
                r.lastNonConfigurationInstances = null;
                activity.mStartedActivity = false;
                int theme = r.activityInfo.getThemeResource();
                if (theme != 0) {
                    activity.setTheme(theme);
                }

                activity.mCalled = false;
                mInstrumentation.callActivityOnCreate(activity, r.state);
             .....
}好了,看setContentView()函数
第一步:setContentView()
在frameworks/base/core/java/android/app/Activity.java中
public void setContentView(int layoutResID) {
        getWindow().setContentView(layoutResID);
        initActionBar();
    }
    public void setContentView(View view) {
        getWindow().setContentView(view);
        initActionBar();
    }
    public void setContentView(View view, ViewGroup.LayoutParams params) {
        getWindow().setContentView(view, params);
        initActionBar();
    }
Activity中setContentView()函数有三个重载函数,一般用第一个比較多,这里就按第一个继续往下分析,事实上它们终于实现都一样.
首先看getWindow()函数
第二步:getWindow()
在frameworks/base/core/java/android/app/Activity.java中
public Window getWindow() {
        return mWindow;
    }
这里还是到分析点击android桌面app图标启动应用程序的过程一文中第五十步 看看
private Activity performLaunchActivity(ActivityClientRecord r, Intent customIntent) {
        ....
        Activity activity = null;
        try {
            java.lang.ClassLoader cl = r.packageInfo.getClassLoader();
            activity = mInstrumentation.newActivity(
                    cl, component.getClassName(), r.intent);
            StrictMode.incrementExpectedActivityCount(activity.getClass());
            r.intent.setExtrasClassLoader(cl);
            if (r.state != null) {
                r.state.setClassLoader(cl);
            }
        } catch (Exception e) {
       ...
        }

        try {
            Application app = r.packageInfo.makeApplication(false, mInstrumentation);
...
            if (activity != null) {
                Context appContext = createBaseContextForActivity(r, activity);
                CharSequence title = r.activityInfo.loadLabel(appContext.getPackageManager());
                Configuration config = new Configuration(mCompatConfiguration);
            ...
                activity.attach(appContext, this, getInstrumentation(), r.token,
                        r.ident, app, r.intent, r.activityInfo, title, r.parent,
                        r.embeddedID, r.lastNonConfigurationInstances, config);

           ....
} 第三步:attach()
在frameworks/base/core/java/android/app/Activity.java中
final void attach(Context context, ActivityThread aThread,
            Instrumentation instr, IBinder token, int ident,
            Application application, Intent intent, ActivityInfo info,
            CharSequence title, Activity parent, String id,
            NonConfigurationInstances lastNonConfigurationInstances,
            Configuration config) {
       ...
        mWindow = PolicyManager.makeNewWindow(this);//
      ....
    }
第四步:makeNewWindow()
在frameworks/base/core/java/com/android/internal/policyPolicyManager.java中
 // The static methods to spawn new policy-specific objects
    public static Window makeNewWindow(Context context) {
        return sPolicy.makeNewWindow(context);
    }
<pre name="code" class="java">public final class PolicyManager {
private static final String POLICY_IMPL_CLASS_NAME =
"com.android.internal.policy.impl.Policy";
private static final IPolicy sPolicy;
static {
// Pull in the actual implementation of the policy at run-time
try {
Class policyClass = Class.forName(POLICY_IMPL_CLASS_NAME);
sPolicy = (IPolicy)policyClass.newInstance();
} catch (ClassNotFoundException ex) {
....
}
第五步:makeNewWindow()
在frameworks/base/policy/src/com/android/internal/policy/impl/Policy.java中
public class Policy implements IPolicy {
   .
    public Window makeNewWindow(Context context) {
        return new PhoneWindow(context);
}第六步:PhoneWindow()
在frameworks/base/policy/src/com/android/internal/policy/impl/PhoneWindow.java中
public class PhoneWindow extends Window implements MenuBuilder.Callback {
.
    public PhoneWindow(Context context) {
        super(context);
        mLayoutInflater = LayoutInflater.from(context);
}去Window类的构造函数看看
第七步:Window()
在frameworks/base/core/java/android/view/Window.java中
public Window(Context context) {
        mContext = context;
}然后回到第一步中,那么接着事实上是调用PhoneWindow.setContentView()了
第八步:setContentView()
在frameworks/base/policy/src/com/android/internal/policy/impl/PhoneWindow.java中
 public void setContentView(int layoutResID) {
        if (mContentParent == null) {
            installDecor();
        } else {
            mContentParent.removeAllViews();
        }
        mLayoutInflater.inflate(layoutResID, mContentParent);
        final Callback cb = getCallback();
        if (cb != null && !isDestroyed()) {
            cb.onContentChanged();
        }
}PhoneWindow的成员变量mContentParent是ViewGroup类型,第一次进来为null,所以调用installDecor()函数,那我们首先看看该函数
第九步:installDecor()
在frameworks/base/policy/src/com/android/internal/policy/impl/PhoneWindow.java中
private void installDecor() {
        if (mDecor == null) {
            mDecor = generateDecor();
            mDecor.setDescendantFocusability(ViewGroup.FOCUS_AFTER_DESCENDANTS);
          ...
        }
        if (mContentParent == null) {
            mContentParent = generateLayout(mDecor);

            // Set up decor part of UI to ignore fitsSystemWindows if appropriate.
            mDecor.makeOptionalFitsSystemWindows();

            mTitleView = (TextView)findViewById(com.android.internal.R.id.title);
            if (mTitleView != null) {
                mTitleView.setLayoutDirection(mDecor.getLayoutDirection());
                if ((getLocalFeatures() & (1 << FEATURE_NO_TITLE)) != 0) {
                    View titleContainer = findViewById(com.android.internal.R.id.title_container);
                    if (titleContainer != null) {
                        titleContainer.setVisibility(View.GONE);
                    } else {
                        mTitleView.setVisibility(View.GONE);
                    }
                    if (mContentParent instanceof FrameLayout) {
                        ((FrameLayout)mContentParent).setForeground(null);
                    }
                } else {
                    mTitleView.setText(mTitle);
                }
            } else {
                mActionBar = (ActionBarView) findViewById(com.android.internal.R.id.action_bar);
                if (mActionBar != null) {
                    mActionBar.setWindowCallback(getCallback());
                    if (mActionBar.getTitle() == null) {
                        mActionBar.setWindowTitle(mTitle);
                    }
                    final int localFeatures = getLocalFeatures();
                    if ((localFeatures & (1 << FEATURE_PROGRESS)) != 0) {
                        mActionBar.initProgress();
                    }
                    if ((localFeatures & (1 << FEATURE_INDETERMINATE_PROGRESS)) != 0) {
                        mActionBar.initIndeterminateProgress();
                    }

                    boolean splitActionBar = false;
                    final boolean splitWhenNarrow =
                            (mUiOptions & ActivityInfo.UIOPTION_SPLIT_ACTION_BAR_WHEN_NARROW) != 0;
                    if (splitWhenNarrow) {
                        splitActionBar = getContext().getResources().getBoolean(
                                com.android.internal.R.bool.split_action_bar_is_narrow);
                    } else {
                        splitActionBar = getWindowStyle().getBoolean(
                                com.android.internal.R.styleable.Window_windowSplitActionBar, false);
                    }
                    final ActionBarContainer splitView = (ActionBarContainer) findViewById(
                            com.android.internal.R.id.split_action_bar);
                    if (splitView != null) {
                        mActionBar.setSplitView(splitView);
                        mActionBar.setSplitActionBar(splitActionBar);
                        mActionBar.setSplitWhenNarrow(splitWhenNarrow);

                        final ActionBarContextView cab = (ActionBarContextView) findViewById(
                                com.android.internal.R.id.action_context_bar);
                        cab.setSplitView(splitView);
                        cab.setSplitActionBar(splitActionBar);
                        cab.setSplitWhenNarrow(splitWhenNarrow);
                    } else if (splitActionBar) {
                        Log.e(TAG, "Requested split action bar with " +
                                "incompatible window decor! Ignoring request.");
                    }
                  .
                }
            }
        }
}PhoneWindow的成员变量mDecor是 DecorView类型,看一下DecorView的类图结构
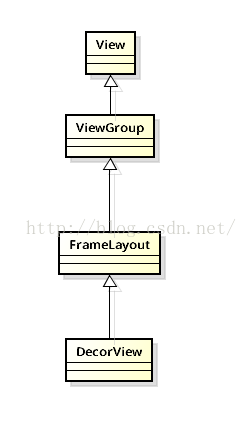
由上图可知,DecorView也是View,事实上这个DecorView也是应用程序窗体根View.
第一次进来mDecor为null,所以会执行以下:
mDecor = generateDecor();
            mDecor.setDescendantFocusability(ViewGroup.FOCUS_AFTER_DESCENDANTS);//焦点先交给mDecor的子view处理,假设子View没有处理自己再处理
第十步:generateDecor()
在frameworks/base/policy/src/com/android/internal/policy/impl/PhoneWindow.java中
protected DecorView generateDecor() {
        return new DecorView(getContext(), -1);
}回到第九步中,mContentParent == null成立,所以执行:
mContentParent = generateLayout(mDecor);第十一步:generateLayout()
在frameworks/base/policy/src/com/android/internal/policy/impl/PhoneWindow.java中
protected ViewGroup generateLayout(DecorView decor) {
     ....
        mDecor.startChanging();

        View in = mLayoutInflater.inflate(layoutResource, null);
        decor.addView(in, new ViewGroup.LayoutParams(MATCH_PARENT, MATCH_PARENT));

        ViewGroup contentParent = (ViewGroup)findViewById(ID_ANDROID_CONTENT);
     ...
        return contentParent;
}else {
// Embedded, so no decoration is needed.
layoutResource = com.android.internal.R.layout.screen_simple;
// System.out.println("Simple!");
}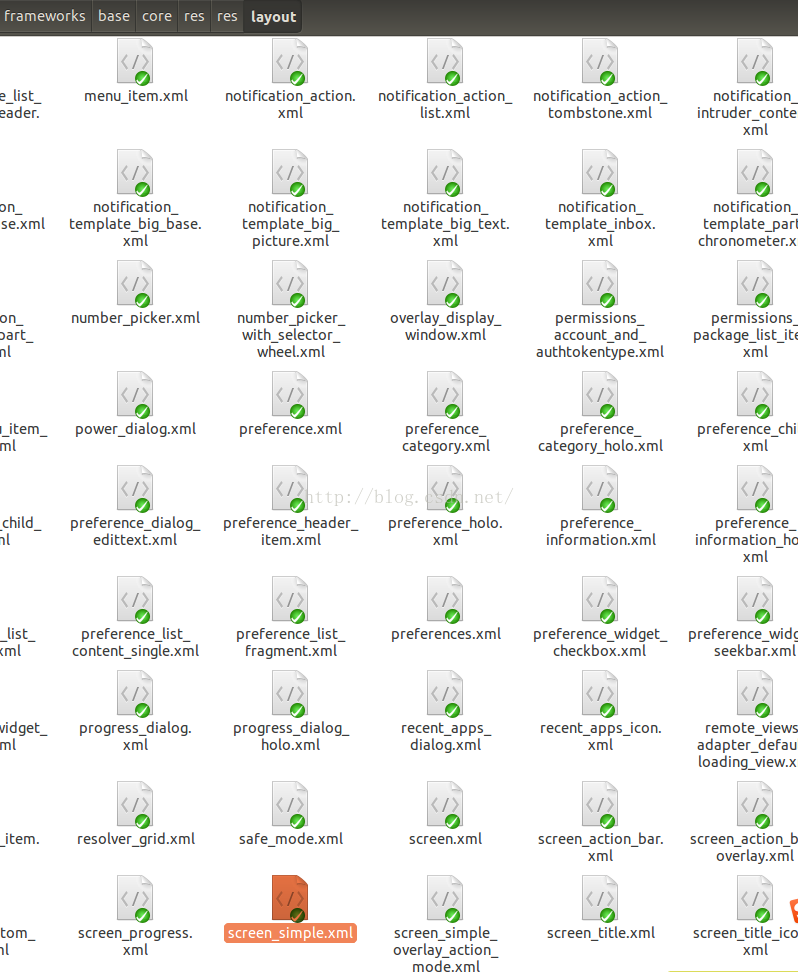
进去screen_simple.xml看一下
<?xml version="1.0" encoding="utf-8"?> <!-- /* //device/apps/common/assets/res/layout/screen_simple.xml ** ** Copyright 2006, The Android Open Source Project ** ** Licensed under the Apache License, Version 2.0 (the "License"); ** you may not use this file except in compliance with the License. ** You may obtain a copy of the License at ** ** http://www.apache.org/licenses/LICENSE-2.0 ** ** Unless required by applicable law or agreed to in writing, software ** distributed under the License is distributed on an "AS IS" BASIS, ** WITHOUT WARRANTIES OR CONDITIONS OF ANY KIND, either express or implied. ** See the License for the specific language governing permissions and ** limitations under the License. */ This is an optimized layout for a screen, with the minimum set of features enabled. --> <LinearLayout xmlns:android="http://schemas.android.com/apk/res/android" android:layout_width="match_parent" android:layout_height="match_parent" android:fitsSystemWindows="true" android:orientation="vertical"> <ViewStub android:id="@+id/action_mode_bar_stub" android:inflatedId="@+id/action_mode_bar" android:layout="@layout/action_mode_bar" android:layout_width="match_parent" android:layout_height="wrap_content" /> <FrameLayout android:id="@android:id/content" android:layout_width="match_parent" android:layout_height="match_parent" android:foregroundInsidePadding="false" android:foregroundGravity="fill_horizontal|top" android:foreground="?
android:attr/windowContentOverlay" /> </LinearLayout>
有一个id为content的控件,这个非常关键.在确定好载入哪个系统布局文件后,接下来:
View in = mLayoutInflater.inflate(layoutResource, null);
decor.addView(in, new ViewGroup.LayoutParams(MATCH_PARENT, MATCH_PARENT));接着将这个渲染成的LinearLayout加入到decor中,由于DecorView是ViewGroup类型,能加入子view.
接着往下看:
ViewGroup contentParent = (ViewGroup)findViewById(ID_ANDROID_CONTENT);这里ID_ANDROID_CONTENT为com.android.internal.R.id.content,我们进到findViewById()函数进去看看
第十二步:findViewById()
在frameworks/base/policy/src/com/android/internal/policy/impl/PhoneWindow.java中
public View findViewById(int id) {
        return getDecorView().findViewById(id);
    }
public final View getDecorView() {
if (mDecor == null) {
installDecor();
}
return mDecor;
}好了,回到第十一步,找到了这控件后就返回到第九步中,将它赋值给了mContentParent.
如今整理一下思路,mDecor赋值了,mContentParent也赋值了,它们的关系是:
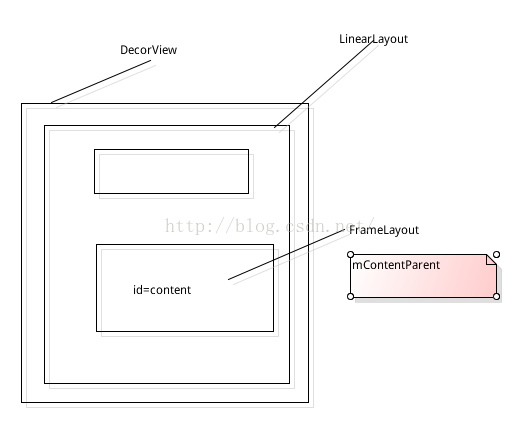
回到第九步,继续往下分析:
mTitleView = (TextView)findViewById(com.android.internal.R.id.title);
            if (mTitleView != null) {
                mTitleView.setLayoutDirection(mDecor.getLayoutDirection());
                if ((getLocalFeatures() & (1 << FEATURE_NO_TITLE)) != 0) {
                    View titleContainer = findViewById(com.android.internal.R.id.title_container);
                    if (titleContainer != null) {
                        titleContainer.setVisibility(View.GONE);
                    } else {
                        mTitleView.setVisibility(View.GONE);
                    }
                    if (mContentParent instanceof FrameLayout) {
                        ((FrameLayout)mContentParent).setForeground(null);
                    }
                } else {
                    mTitleView.setText(mTitle);
                }
            } else {
                mActionBar = (ActionBarView) findViewById(com.android.internal.R.id.action_bar);
                if (mActionBar != null) {
                    mActionBar.setWindowCallback(getCallback());
                    if (mActionBar.getTitle() == null) {
                        mActionBar.setWindowTitle(mTitle);
                    }
                    final int localFeatures = getLocalFeatures();
                    if ((localFeatures & (1 << FEATURE_PROGRESS)) != 0) {
                        mActionBar.initProgress();
                    }
                    if ((localFeatures & (1 << FEATURE_INDETERMINATE_PROGRESS)) != 0) {
                        mActionBar.initIndeterminateProgress();
                    }

                    boolean splitActionBar = false;
                    final boolean splitWhenNarrow =
                            (mUiOptions & ActivityInfo.UIOPTION_SPLIT_ACTION_BAR_WHEN_NARROW) != 0;
                    if (splitWhenNarrow) {
                        splitActionBar = getContext().getResources().getBoolean(
                                com.android.internal.R.bool.split_action_bar_is_narrow);
                    } else {
                        splitActionBar = getWindowStyle().getBoolean(
                                com.android.internal.R.styleable.Window_windowSplitActionBar, false);
                    }
                    final ActionBarContainer splitView = (ActionBarContainer) findViewById(
                            com.android.internal.R.id.split_action_bar);
                    if (splitView != null) {
                        mActionBar.setSplitView(splitView);
                        mActionBar.setSplitActionBar(splitActionBar);
                        mActionBar.setSplitWhenNarrow(splitWhenNarrow);

                        final ActionBarContextView cab = (ActionBarContextView) findViewById(
                                com.android.internal.R.id.action_context_bar);
                        cab.setSplitView(splitView);
                        cab.setSplitActionBar(splitActionBar);
                        cab.setSplitWhenNarrow(splitWhenNarrow);
                    } else if (splitActionBar) {
                        Log.e(TAG, "Requested split action bar with " +
                                "incompatible window decor! Ignoring request.");
                    }
PhoneWindow类的成员函数installDecor()还会检查前面载入的窗体布局文件是否包括有一个id值为“title”的TextView控件。假设包括有的话,就会将它保存在PhoneWindow类的成员变量mTitleView中,用来描写叙述当前应用程序窗体的标题栏。可是,假设当前应用程序窗体是没有标题栏的。即它的Feature位FEATURE_NO_TITLE的值等于1。那么PhoneWindow类的成员函数installDecor()就须要将前面得到的标题栏隐藏起来。注意,PhoneWindow类的成员变量mTitleView所描写叙述的标题栏有可能是包括在一个id值为“title_container”的容器里面的。在这样的情况下。就须要隐藏该标题栏容器。还有一方面,假设当前应用程序窗体是设置有标题栏的。那么PhoneWindow类的成员函数installDecor就会设置它的标题栏文字。应用程序窗体的标题栏文字保存在PhoneWindow类的成员变量mTitle中,我们能够调用PhoneWindow类的成员函数setTitle来设置.假设没有id值为“title”的TextView控件,就去检查前面载入的窗体布局文件是否包括有一个id值为“action_bar”的ActionBarView控件.以下就不分析了.
回到第八步setContentView()函数里,
往下接着到
mLayoutInflater.inflate(layoutResID, mContentParent);这里mLayoutInflater.inflate()方法,将应用程序的窗体布局资源渲染成一个view,然后加入到mContentParent这个ViewGroup中.
所以应用程序窗体的界面的View结构例如以下:
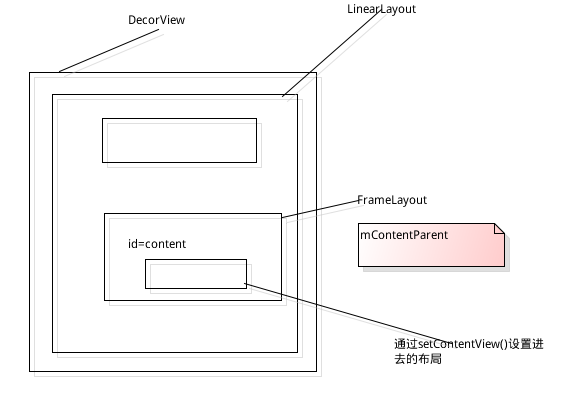
平时我们写应用,仅仅须要写上图中setContentView()的布局就能够,其它android已经实现好了.
好了,应用程序窗体的布局结构就分析完了.我们知道一个应用程序的窗体的显示区域,事实上就是DecorView及其包括的子view.
设置好应用程序的布局文件后,就要将DecorView包括内容渲染显示到屏幕上了.
至于怎样渲染不打算分析了.
在显示出来之前,DecorView还要经过measure(測量),layout(布局),draw(绘制)三个过程.后面打算分析源代码,对这三个过程加一分析下.


 621
621


 被折叠的 条评论
为什么被折叠?
被折叠的 条评论
为什么被折叠?
 到【灌水乐园】发言


