


近日研究了下IBM Lotus Mail,这货果然是麻烦,由于公司策略,没有开放smtp,很多系统邮件都没有办法发送,于是入手google学习Lotus Mail,想做成Windows服务,提供wcf服务给内部应用系统使用。在google上找了很多资料,由于是系统邮件,很多东西配置起来又比较麻烦。自己也入了很多坑,特此作为记录。废话不多说,下面开始...
服务器环境:Windows Server 2008R2+Lotus Notes 8.5中文版
特别注意:Lotus Notes 8.5中文版需要配置好账户密码,但是不需要打开它。
本地环境:Lotus Notes 8.5中文版+Visual Studio 2013
~~~~~~~~~~~~~~~~~~~~~~~我是优雅的分隔符~~~~~~~~~~~~~~~~~~~~~~~~~~~~~~~~~~~
1,打开VS,新建类库项目LotusMailHelper,添加Lotus Domino Objects引用:
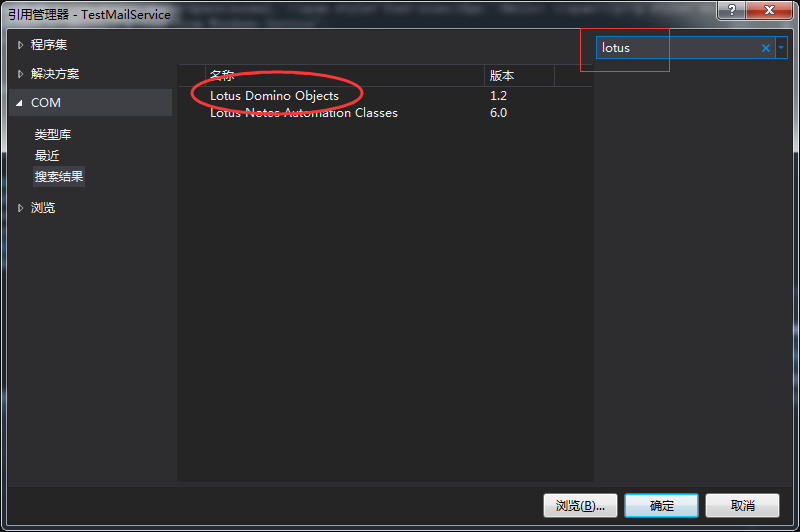
添加完之后VS会自动编译成dll
2,添加类Mail.cs,添加邮件发送方法SendMail:
/// <summary>

/// 发送邮件

/// </summary>

/// <param name="sendTo"></param>

/// <param name="subject"></param>

/// <param name="messageBody"></param>

public bool SendMail(string[] sendTo, string subject, string messageBody)
3,在Mail.cs添加Using:using Domino;
4,编写SendMail的逻辑
Domino.NotesSession nSession = new Domino.NotesSession();
string pwd = System.Configuration.ConfigurationManager.AppSettings["LotusMailPassword"];//lotus邮箱密码
string server = System.Configuration.ConfigurationManager.AppSettings["LotusMailServer"];//lotus邮箱服务器地址
string serverPath = System.Configuration.ConfigurationManager.AppSettings["LotusMailServerPath"];//存储nsf文件的路径
string saveMessageOnSend = System.Configuration.ConfigurationManager.AppSettings["SaveMessageOnSend"];//发送前是否保存
nSession.Initialize(pwd);//初始化邮件
Domino.NotesDatabase nDatabase =
nSession.GetDatabase(server, serverPath, false);
Domino.NotesDocument nDocument = nDatabase.CreateDocument();
nDocument.ReplaceItemValue("SentTo", sendTo);//收件人,数据:数组
nDocument.ReplaceItemValue("Subject", subject);//主题
if (saveMessageOnSend == "1")//为1时保存到lotus的发件箱
{
    nDocument.SaveMessageOnSend = true;
}
else
{
    nDocument.SaveMessageOnSend = false;//设置保存与否
}
NotesStream HtmlBody = nSession.CreateStream();
HtmlBody.WriteText(messageBody);//构建HTML邮件,可以在头和尾添加公司的logo和系统提醒语
NotesMIMEEntity mine = nDocument.CreateMIMEEntity("Body");//构建邮件正文
mine.SetContentFromText(HtmlBody, "text/html;charset=UTF-8", Domino.MIME_ENCODING.ENC_IDENTITY_BINARY);
nDocument.AppendItemValue("Principal", "XXX管理员");//设置邮件的发件人昵称
nDocument.Send(false, sendTo); //发送邮件
nDocument.CloseMIMEEntities();//关闭
由于最后会封装为dll,最好是添加try...catch...,加以优化,下面为优化过后:
/// <summary>
/// 發送lotus郵件(需要在web.config或者app.config中添加以下節點
///<appSettings>
/// <!--郵箱密碼-->
///<add key="LotusMailPassword" value="" />
/// <!--郵件服務器地址-->
///<add key="LotusMailServer" value="" />
/// <!--郵件數據庫路徑-->
///<add key="LotusMailServerPath" value="" />
/// <!--是否保存到發件箱(0不保存,1保存,其他值皆為不保存)-->
///<add key="SaveMessageOnSend" value="0" />
///</appSettings>
/// </summary>
/// <param name="sendTo">數組,收件人</param>
/// <param name="subject">主題</param>
/// <param name="messageBody">正文html</param>
/// <returns></returns>
public bool SendMail(string[] sendTo, string subject, string messageBody)
{
    try
    {
        Domino.NotesSession nSession = new Domino.NotesSession();
        string pwd = System.Configuration.ConfigurationManager.AppSettings["LotusMailPassword"];//lotus邮箱密码
        string server = System.Configuration.ConfigurationManager.AppSettings["LotusMailServer"];//lotus邮箱服务器地址
        string serverPath = System.Configuration.ConfigurationManager.AppSettings["LotusMailServerPath"];//存储nsf文件的路径
        string saveMessageOnSend = System.Configuration.ConfigurationManager.AppSettings["SaveMessageOnSend"];//发送前是否保存
        nSession.Initialize(pwd);//初始化邮件
        Domino.NotesDatabase nDatabase =
        nSession.GetDatabase(server, serverPath, false);
        Domino.NotesDocument nDocument = nDatabase.CreateDocument();
        nDocument.ReplaceItemValue("SentTo", sendTo);//收件人,数据:数组
        nDocument.ReplaceItemValue("Subject", subject);//主题
        if (saveMessageOnSend == "1")//为1时保存到lotus的发件箱
        {
            nDocument.SaveMessageOnSend = true;
        }
        else
        {
            nDocument.SaveMessageOnSend = false;//设置保存与否
        }
        NotesStream HtmlBody = nSession.CreateStream();
        HtmlBody.WriteText(messageBody);//构建HTML邮件,可以在头和尾添加公司的logo和系统提醒语
        NotesMIMEEntity mine = nDocument.CreateMIMEEntity("Body");//构建邮件正文
        mine.SetContentFromText(HtmlBody, "text/html;charset=UTF-8", Domino.MIME_ENCODING.ENC_IDENTITY_BINARY);
        nDocument.AppendItemValue("Principal", "XXX管理员");//设置邮件的发件人昵称
        nDocument.Send(false, sendTo); //发送邮件
        nDocument.CloseMIMEEntities();//关闭
        return true;//已经提交到lotus,返回true
    }
    catch
    {
        return false;//提交失败
    }
}
5,点击项目生成,找到Bin文件夹中的dll,保存到自己喜欢的文件夹,方便后期的调用
============我是更加优美的分隔符=============
下面一起来建立Windows service
1,打开VS,新建Windows服务项目
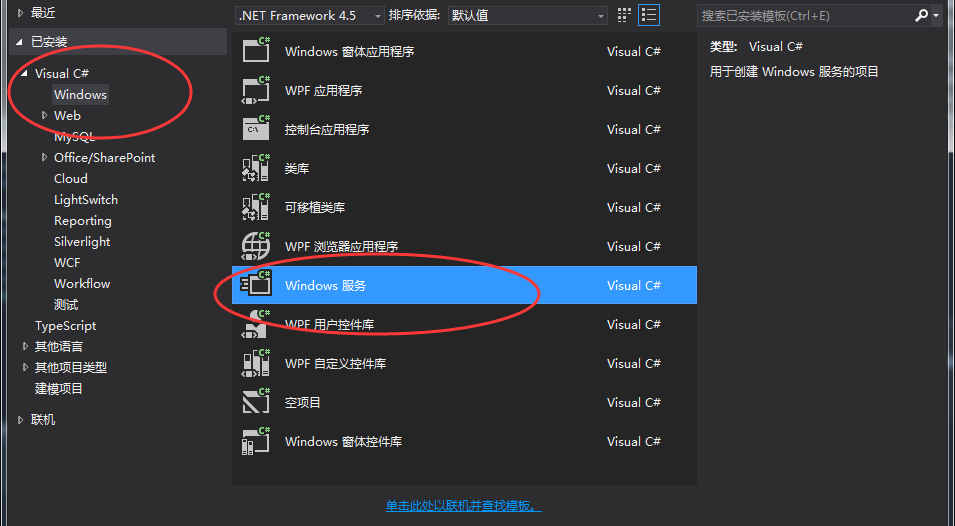
名字随便取。。。新建完成之后会自动生成Service1.cs,打开Service1.cs代码看看,主要分为以下几个方法:
public partial class Service1 : ServiceBase
{
    public Service1()
    {
        InitializeComponent();
    }

    protected override void OnStart(string[] args)
    {
    }

    protected override void OnStop()
    {
    }
}
OnStart:主要是写入要启动的逻辑代码
OnStop:主要写的是停止服务时要执行的方法,也就是逻辑代码,我一般会将日志写在这
2,将service1.cs删除,新建一个Windows服务,并命名成公司要求的。例如我的是MailService.cs。
3,新建一个处理邮件的方法:
public void SendMail()
{
    while(true)
    {
        //这里写邮件数据获取以及发送邮件
        Thread.Sleep(100);
    }
}
4,构建邮件model:在解决方案点击鼠标右键添加新建项目,选择类库项目,MailModel,新建MailInfo.cs
public class MailInfo
{
    public string mailId { get; set; }
    public string[] sendTo { get; set; }
    public string subject { get; set; }
    public string mailBody { get; set; }
}
5,新建类库DbHelper,添加类Mail.cs,在里面写GetMailData()方法,RemoveMailData(),GetMailCount(),InsertMailData()等方法,这里由于涉及到公司的信息,不是很方便写出来。大家可以自行添加进去
public MailModel.MailInfo GetMailData()
{
    //这里写获取邮件数据
    return MailInfo;//返回数据库第一封待发邮件数据
}
public void RemoveMailData(string mailId)
{
    //删除数据库中指定id的邮件数据
}
public long GetMailCount()
{
    //这里写获取邮件数量
    return 邮件数量
}
public bool InsertMailData()
{
    //这里写插入一封邮件数据
    return true;
}
6,新建类库WCF项目,添加wcf,名字为SendMail
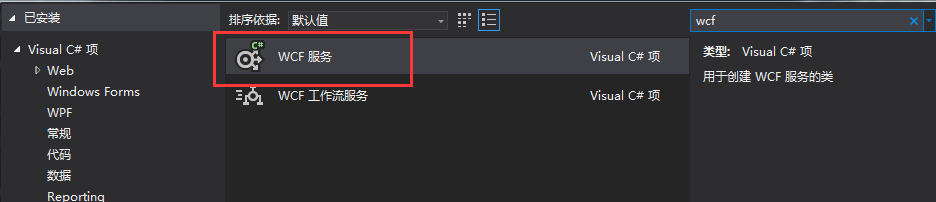
添加完成之后VS会自动生成ISendMail.cs和SendMail.cs。打开ISendMail.cs会看到如下代码
// 注意: 使用“重构”菜单上的“重命名”命令,可以同时更改代码和配置文件中的接口名“ISendMail”。
[ServiceContract]
public interface ISendMail
{
    [OperationContract]
    void DoWork();
}
里面只有一个DoWork方法,我们新建一个ApplySendMail();注意:在顶上要添加[OperationContract]否则不会公开该函数。最后的ISendMail.cs代码如下
[ServiceContract]
public interface ISendMail
{
    [OperationContract]
    string ApplySendMail(string[] sendTo, string subject, string body, string password);
}
接着打开SendMail.cs,去实现接口的ApplySendMail()方法
public class SendMail : ISendMail
{
    public string ApplySendMail(string[] sendTo, string subject, string body, string password)
    {
        string result = string.Empty;
        string mailPassword = System.Configuration.ConfigurationManager.AppSettings["password"];
        if (mailPassword == password)
        {
            try
            {
                MailModel.MailInfo mail = new MailModel.MailInfo
                {
                    sendTo = sendTo,
                    subject = subject,
                    mailBody = body
                };
                long count = DbHelper.Mail.GetMailCount();
                if (DbHelper.Mail.InsertMailData(mail))
                {
                    result = string.Format("提交成功.前面大約還有:{0}個任務", count);
                }
                return result;
            }
            catch
            {
                return "提交失敗";
            }
        }
        else
        {
            return "密码错误,无法提交";
        }
    }
}
至此wcf基础已经可以了,下面继续完成Windows服务那一块
7,完成处理邮件的方法SendMail(),这里要添加之前写好的LoutusMailHelper.dll
public void SendMail()
{
    while(true)
    {
        var mailData=DbHelper.Mail.GetMailData();
        if(mailData!=null)
        {
            if(LotusMailHelper.Mail.SendMail(mailData.sendTo,mailData.subject,mailData.mailBody))
            {
                DbHelper.Mail.RemoveMailData(mailData.mailId);
            }
            Thread.Sleep(100);//休息0.1秒
        }
        else
        {
            Thread.Sleep(10000);//休息10秒钟
        }
    }
}
8,完成OnStart()逻辑:①,先添加私有成员到MailService.cs
partial class MailService : ServiceBase
{
    public MailService()
    {
        InitializeComponent();
    }
    private System.ServiceModel.ServiceHost _host;

    /*
    此处省略部分代码
    */
}
②,编写OnStart()代码
protected override void OnStart(string[] args)
{
    _host = new System.ServiceModel.ServiceHost(typeof(WCF.Mail));
    _host.Open();
    //启动wcf服务

    //启动一个线程专门轮询发送邮件
    Thread sendMail = new Thread(new ThreadStart(SendMail));
    sendMail.IsBackground = true;
    sendMail.Start();
}
9,编写OnStop()代码,添加日志记录代码
10,配置App.config,wcf一定要配置。先看App.config中是否存在system.serviceModel节点,存在的话只需修改部分字段即可,不存在的话添加如下:
<system.serviceModel>
    <behaviors>
      <serviceBehaviors>
        <behavior name="">
          <serviceMetadata httpGetEnabled="true" httpsGetEnabled="true" />
          <serviceDebug includeExceptionDetailInFaults="false" />
        </behavior>
      </serviceBehaviors>
    </behaviors>
    <services>
      <service name="WCF.Mail">
        <endpoint address="" binding="basicHttpBinding" contract="WCF.IMail">
          <identity>
            <dns value="localhost" />
          </identity>
        </endpoint>
        <endpoint address="mex" binding="mexHttpBinding" contract="IMetadataExchange" />
        <!--wcf节点配置开始-->
        <host>
          <baseAddresses>
            <add baseAddress="http://localhost:8733/MailService/Mail/" />
          </baseAddresses>
        </host>
        <!--wcf节点配置结束-->
      </service>
    </services>
  </system.serviceModel>
~~至此,基本的都已经完成,下面到Windows service部署
1,打开MailService.cs视图界面,添加安装程序。会自动出现如下界面:

选中serviceProcessInstaller1组件,查看属性,设置account为LocalSystem
选中serviceInstaller1组件,查看属性
设置ServiceName的值, 该值表示在系统服务中的名称
设置StartType, 如果为Manual则手动启动,默认停止,如果为Automatic为自动启动
设置Description,添加服务描述
2,重新生成项目
3,打开Windows的cmd,输入C:\Windows\Microsoft.NET\Framework\v4.0.30319\InstallUtil.exe exe路径
等待安装。安装完毕之后打开计算机管理,查看服务,点击启动。
***删除服务:sc delete 服务名
至此,所有步骤都完成了,可以畅快的调用wcf来发送系统邮件了
<<<<<<<<<<<<<由于本人水平有限,可能存在很多错误,请谅解与批评指正>>>>>>>>>>>>>>
百度经验 : C#创建Windows服务与安装-图解
推荐数据库使用nosql数据库,redis或者mongodb,在接下里的随笔里我会记录mongdb和redis的使用过程。。。第一次发文,紧张死宝宝了


 437
437


 被折叠的 条评论
为什么被折叠?
被折叠的 条评论
为什么被折叠?
 到【灌水乐园】发言


