


方法1
将edittext的style设置成?android:attr/textViewStyle 取消掉默认的样式,在设置background为@null
接下来就是一个空空的edittext了, 在两个edittext中间加一个view,设置background为灰色,宽度match_parent,高度2dip看看。
如果可以了就采纳吧。不行的话我再看
|
1
2
3
4
5
6
7
8
9
10
11
12
13
14
15
16
17
18
19
20
21
22
23
24
25
26
27
28
29
30
31
32
33
34
35
36
37
38
39
|
<
RelativeLayout
xmlns:android
=
"http://schemas.android.com/apk/res/android"
xmlns:tools
=
"http://schemas.android.com/tools"
android:layout_width
=
"match_parent"
android:layout_height
=
"match_parent"
android:background
=
"@android:color/darker_gray"
>
<
LinearLayout
android:layout_width
=
"match_parent"
android:layout_height
=
"wrap_content"
android:layout_centerInParent
=
"true"
android:background
=
"@android:color/white"
android:orientation
=
"vertical"
>
<
EditText
style
=
"?android:attr/textViewStyle"
android:layout_width
=
"wrap_content"
android:layout_height
=
"wrap_content"
android:background
=
"@null"
android:hint
=
"输入用户名"
android:paddingBottom
=
"5dip"
android:paddingTop
=
"5dip"
/>
<
View
android:layout_width
=
"match_parent"
android:layout_height
=
"1dip"
android:background
=
"@android:color/darker_gray"
/>
<
EditText
style
=
"?android:attr/textViewStyle"
android:layout_width
=
"wrap_content"
android:layout_height
=
"wrap_content"
android:background
=
"@null"
android:hint
=
"输入密码"
android:inputType
=
"textPassword"
android:paddingBottom
=
"5dip"
android:paddingTop
=
"5dip"
/>
</
LinearLayout
>
</
RelativeLayout
>
|
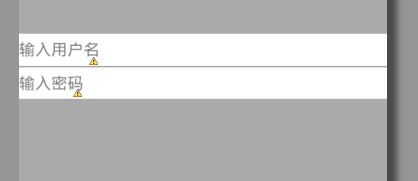
效果图:
方法2:
自定义android控件EditText边框背景
在我们进行Android应用界面设计和时候,为了界面风格的统一,我们需要对一些控件进行自定义。比如我们的应用采用的蓝色风格,但是android的EditText控制获得焦点后显示的却是黄色的边框背景。那么如何让EditText在获得焦点的时候显示的是我们自定义的蓝色的背景呢?
首先准备两张图片,一张是EditText获得焦点后的边框背景,一张是没有获得焦点时的背景,注意制作成9.png样式的图片,然后在drawable里添加一个selector_edittext_bg.xml文件,内容如下:
<?xml version="1.0" encoding="utf-8"?> <selector xmlns:android="http://schemas.android.com/apk/res/android"> <item android:drawable="@drawable/edit_pressed" android:state_focused="true"/> <item android:drawable="@drawable/edit_normal"/> </selector>
然后在values文件夹下新建一个style.xml文件,内容如下:
<?xml version="1.0" encoding="utf-8"?> <resources> <style name="my_edittext_style" parent="@android:style/Widget.EditText"> <item name="android:background">@drawable/selector_edittext_bg</item> </style> </resources>
最后在EditTex上使用我们新建的样式就可以了:
<EditText
            android:id="@+id/v_value" style="@style/my_edittext_style" android:layout_width="0.0dip" android:layout_height="wrap_content" android:layout_weight="1" android:hint="@string/edit_key" android:imeOptions="actionDone" android:inputType="" />

方法3
是重写的onDraw()方法


 989
989

 被折叠的 条评论
为什么被折叠?
被折叠的 条评论
为什么被折叠?
 到【灌水乐园】发言


