


Came From: http://www.securitysift.com/exploiting-ms14-066-cve-2014-6321-aka-winshock/
I think enough time has passed now to provide a little more detail on how to exploit MS14-066 schannel vulnerability (aka “Winshock”). In this post I won’t be providing a complete PoC exploit, but I will delve into the details on exactly how to trigger the heap overflow along with some example modifications to OpenSSL so you can replicate the issue yourself.
This vulnerability was announced while I was on vacation so I didn’t have a chance to analyze it right away. Lucky for me, the research team at BeyondTrust posted this concise write-up, keying in on the vulnerable code: http://blog.beyondtrust.com/triggering-ms14-066. When I first looked at the specifics of the vulnerability, I admittedly discounted it’s severity solely for the fact that it seemed necessary to have some form of mutual certificate-based authentication to trigger — still a big deal but not as widespread as I first imagined (or so I thought). Then, a couple of days later, Malware Tech posted this gem: http://www.malwaretech.com/2014/11/how-ms14-066-winshock-is-worse-than.html. Wow…triggering the exploit on web servers even if they were set to ignore certificates definitely renewed my interest. @MalwareTechBlog subsequently released this nice write-up with additional details, but by that time I was already deep into examining the exploit (though it’s still worth a read if you haven’t already): http://www.malwaretech.com/2014/11/ms14-066-in-depth-analysis.html.
If you’ve already had a chance to read these sources, please bear with me, because for the sake of completeness, I will be repeating some of the information.
First, let’s take a closer look at the vulnerable function…
schannel!DecodeSigAndReverse
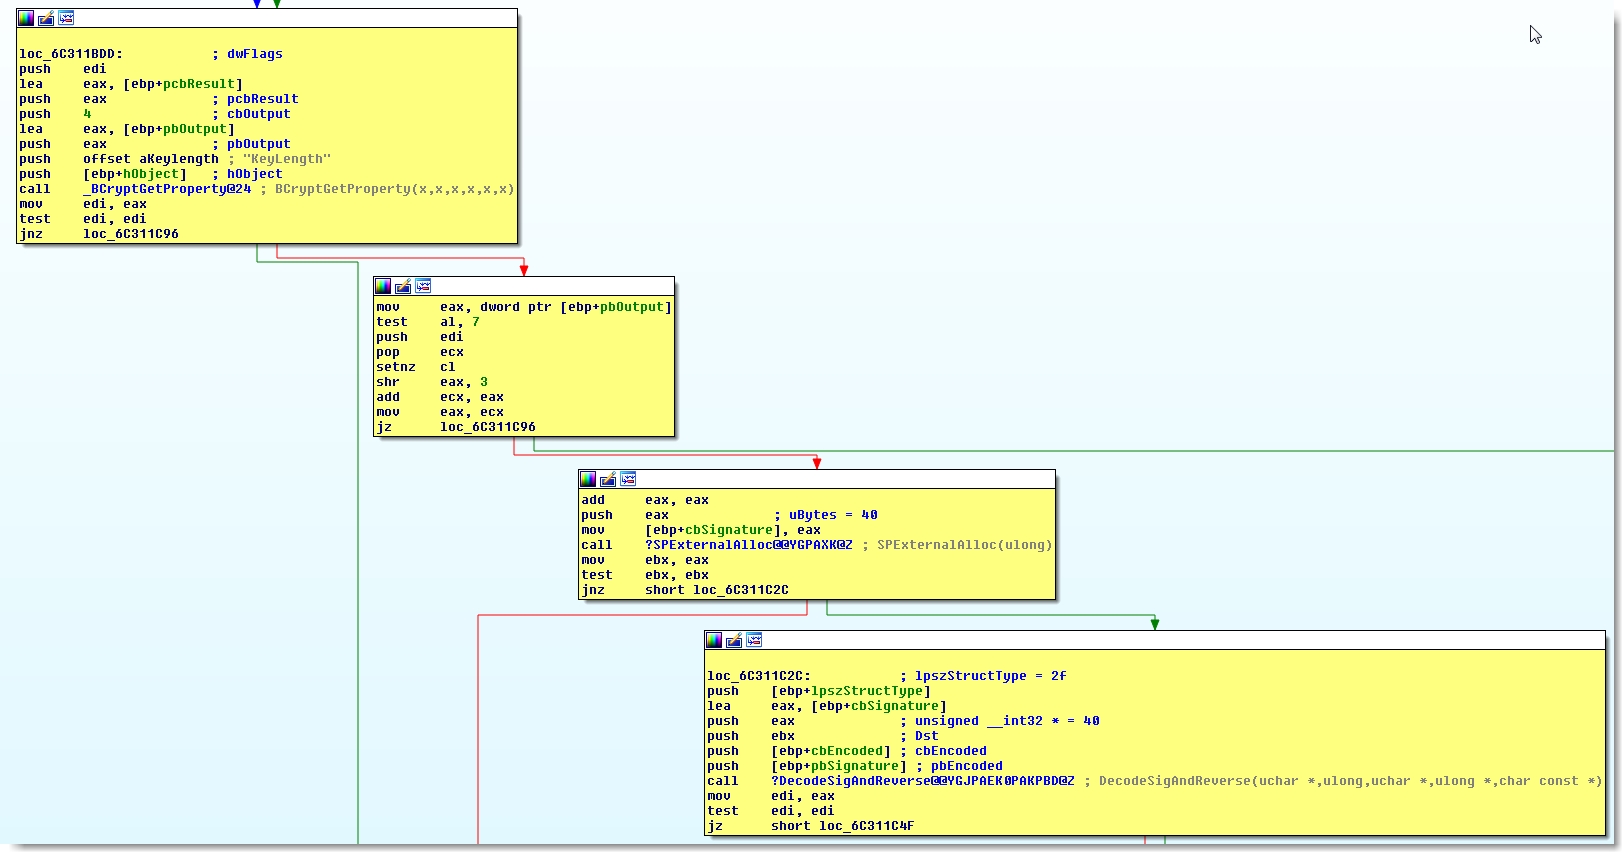
Here is the disassembly for the pertinent portions of the DecodeSigAndReverse function (found inschannel.dll) which is responsible for decoding the encoded certificate signature.
Of interest to us are the calls to CryptDecodeObject the the two subsequent calls to memcpy (found in the lower left yellow box), which is what ultimately triggers this vulnerability. I’ll get into more details but first it’s important to note that to trigger the vulnerable memcpy, we need to somehow force the server to verify a client-provided ECC certificate (as indicated by the cmp ebx, 2Fh instruction highlighted below).
Most web servers will ignore a submitted client certificate (unless certificate authentication is required). However, as @MalwareTechBlog pointed out, vulnerable IIS servers will actually process a certificate that is forcefully presented regardless of the configured SSL settings. I’ll be demonstrating this vulnerability only for IIS on port 443, though you may be able to replicate similar results for RDP.
The Setup
The first thing you’ll need to do to trigger this exploit is configure IIS SSL settings (I used a Win 7 box) as follows:

Generate a self-signed certificate (using OpenSSL), upload to your Windows box and bind it to your site:

Now generate an EC cert/key pair to use on your “attacking” machine. Next you’ll need to download the OpenSSL source. For my test setup I used version 1.0.1j on a Kali box. Since you’re probably going to be modifying and recompiling many times, you may want to use the .configure script to permanently set any desired build variables (such as install location).
Once you’ve got your web server configured, your client cert/key generated, and openSSL source downloaded, it’s time to make some modifications, specifically to s3_clnt.c. First, we need to force the sending of our client certificate which can be done as follows:

Notice I’ve altered the case statement logic to force a call to ssl3_send_client_certificate.
Next you’ll need to force certificate verification, which can be done with the following modification to make a call to ssl3_send_client_verify:
Connect a remote kernel debugger to your test IIS box and set a breakpoint onschannel!DecodeSigAndReverse. Then connect via the modified OpenSSL s_client and you should trigger your breakpoint:


Once you’ve confirmed you can enter the vulnerable function, it’s time to delve into the details to understand how to exploit it.
A Closer Look
If you refer back to the disassembly of DecodeSigAndReverse, one of the the initial things to happen is the first of two calls to CryptDecodeObject.
 This first call sets pvStructInfo to null to determine the size of the buffer needed to hold the decoded signature for proper memory allocation (which is handled by the subsequent call to SPExternalAlloc).
The second call to CryptDecodeObject is the one of interest.

Testing this with an unmodified EC cert and key pair you should see something similar to the following for pcbStructInfo and pvStructInfo:

You can see before the call that the designated size is 50h and the pvStructInfo structure is 0’d out and ready to receive the decoded signature. cbEncoded holds the size of the encoded signature, which in this case is 46h. The encoded signature looks as follows:

* Note: in the above pic, ebp+0ch shows the size of the encoded signature (46h) and the memory at location 002dc57b holds the encoded signature.
When the second CryptDecodeObject function returns, pvStructInfo now holds the decoded signature:

Now we can shift our attention to the two memcpy functions that follow.

The first memcpy will copy the number of bytes of the decoded signature designated in [esi] (in this case 20h or 32d) to a designated buffer (Dst). In the screenshot below, you can see that the contents of this buffer after the call to memcpy contain the first 32 bytes of the decoded signature returned by CryptDecodeObject.

Similarly, the second memcpy copies the remaining 32 bytes of the decoded signature to the adjacent reserved space in memory (Dst).

It’s the second memcpy function that is vulnerable to a heap overflow and will be the focus of our attention. To understand why it’s vulnerable to an overflow condition, we need to see how the destination buffer (Dst) is allocated which actually happens in the CheckClientVerifyMessage().
Notice in the third block below (before the call to DecodeSigAndReverse) is the call toSPExternalAlloc, which reserves the memory (Dst) where our decoded signature will be copied via the two calls to memcpy shown previously.
You’ll recall each of those calls to memcpy copied 32 bytes (20h) of the decoded signature to adjacent portions of memory to fill a total of 40h bytes. This 40h bytes is reserved by SPExternalAlloc by taking the total key size (in this case 256 bits), dividing it by 8 (to convert to bytes) and doubling it (256 / 8 = 32 * 2 = 64d or 40 h). The dangerous assumption here is that the decoded signature will always be twice the size of the key. We’re about to see why that’s not true.
Modifying The Encoded Signature
The first thing we want to do is have some control over the size of the encoded signature represented bycbEncoded. If you refer to the call to CheckClientVerifyMessage(), you’ll notice thatcbEncoded is passed as a parameter, which means we need to back up even further to the function DigestCertVerify().

We can see at location 0xXXXX98CE of DigestCertVerify that cbEncoded is located at [esi+1]. It turns out [esi] merely points to the start of the encoded signature structure which looks like this:

Notice [esi+1] holds the value of cbEncoded (47h). The bytes that follow make up the encoded signature that will eventually be passed to CrypteDecodeObject() withinDecodeSigAndReverse(). Here is a look at that call so you can see they are identical:

The structure that holds our encoded signature is defined on MSDN as follows:
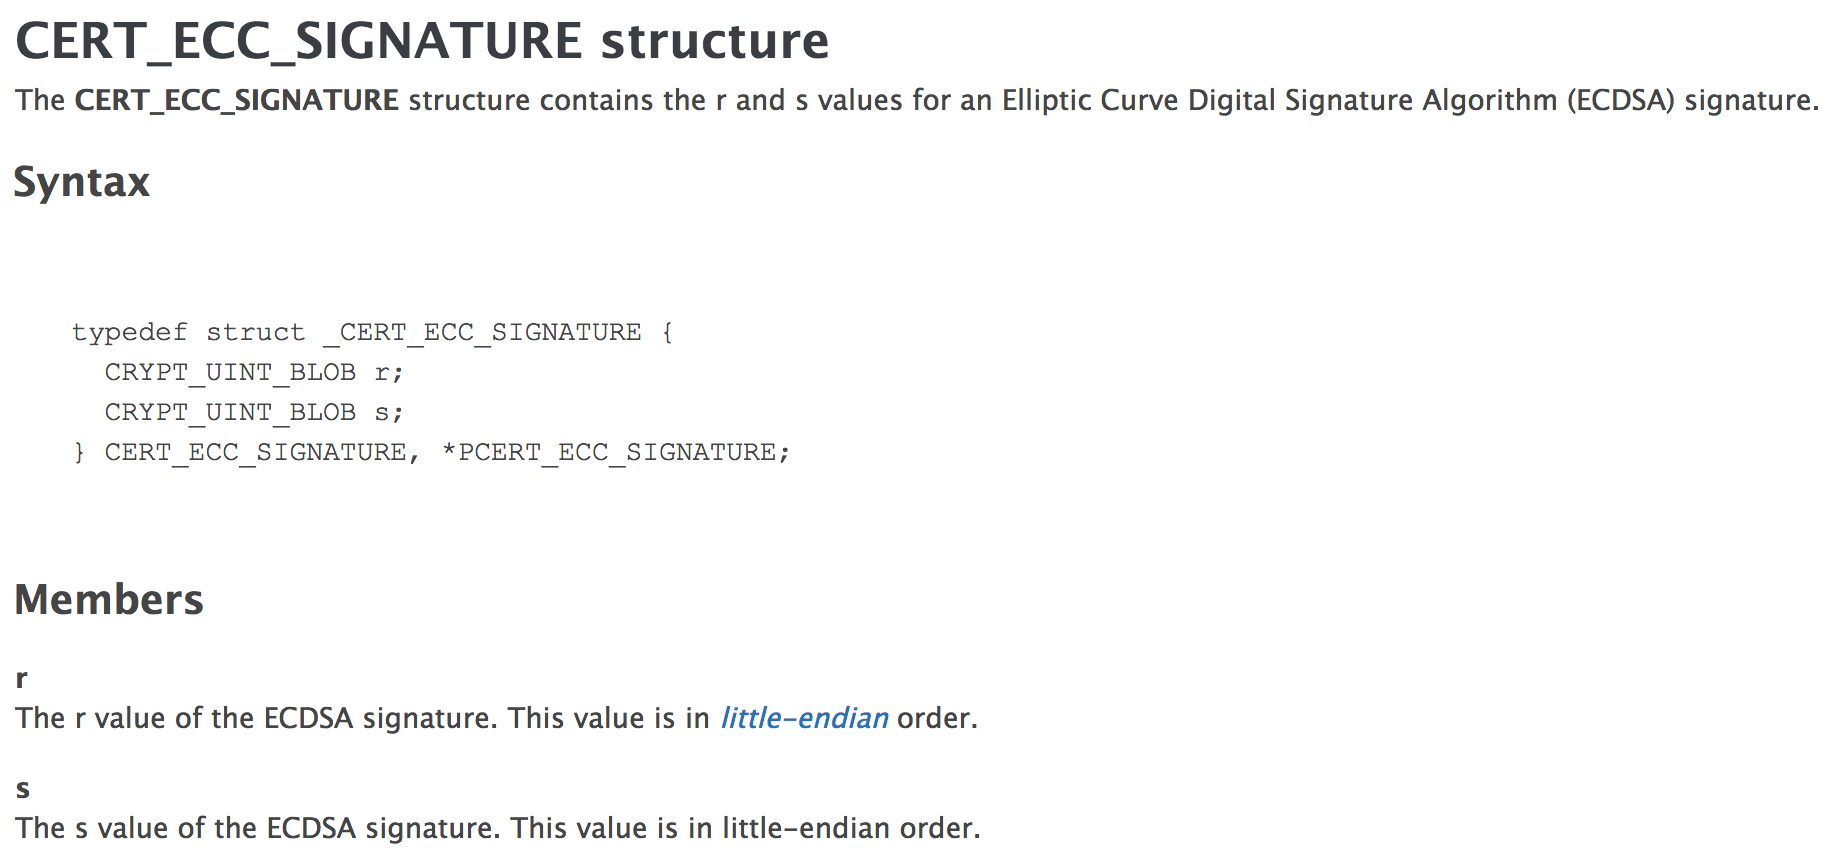
For the purpose of this demo, I’ll call this structure sig. We’ve identified the total size of sig by the byte located at sig[1]. Structure members r and s are decoded and copied via the two memcpy operations. What’s even more interesting is that two other bytes of sig (which is under our control) dictate the size of r and s used in each memcpy operation.

This means we have control over how many bytes are written via each memcpy and can use that to overwrite the reserved heap buffer. In addition, other than a few required byte values, the majority of the encoded signature is irrelevant, meaning we can inject any values we wish.
In addition, submitting an invalid encoded signature to CryptDecodeObject doesn’t result in an error. Instead, it simply returns the invalid encoded signature that we passed it and that data is subsequently written to the heap via the vulnerable memcpy functions. This means we can predict the subsequent return values that will be passed to the vulnerable memcpy functions and written via the heap overflow.
From my brief testing, I identified the following required values for sig:
- sig[1] = cbEncoded (total size of sig); my testing indicates that max size is \x81
- sig[2] = \x30; required (leave unchanged)
- sig[3] = (sig[1] -1); max size is \x7f
- sig[4] = \x02; appears to represent data type that follows
- sig[5] = size of r or memcpy 1; minimum value is 1
- sig[6] = any single byte value such as \x00
- sig[7] = \x02; appears to represent data type that follows
- sig[8] = sig[1] – 7 = \x7a
- sig[9]…sig[x] = any arbitrary values for heap oveflow
Triggering the Exploit
So, how can we influence the encoded signature value? Rather than changing the content of the certificate, we can modify the encoded signature directly in OpenSSL via thessl3_send_client_verify function.
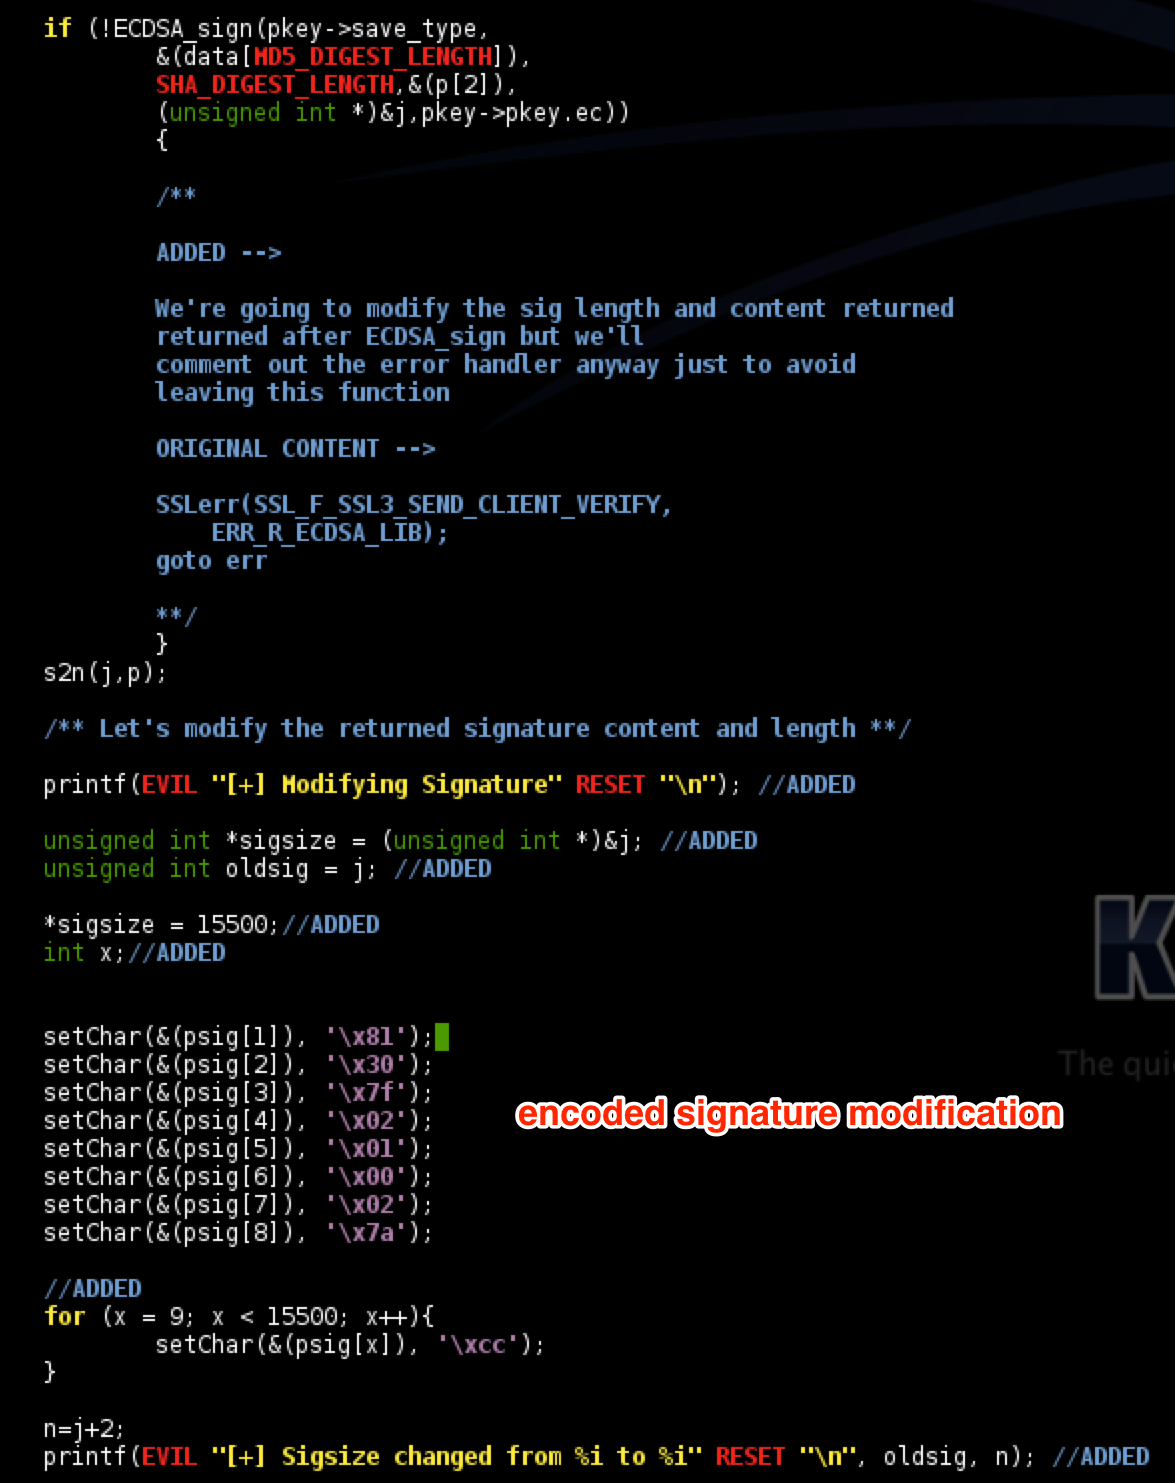
A couple things to note about the above modified signature. The first memcpy is represented by the three bytes at psig[2] – psig[4] (\x02\x01\x00). Again, I believe the first byte to represent the data type, the second byte is the size for memcpy, and the third byte is the content (src) to write. A single byte of \x00 will result in the first memcpy writing 32 null bytes to the first half of the reserved 64 bytes.
The next 32 bytes as well as up to 90 additional bytes will be consumed by what follows psig[7] andpsig[8]. This is what results in the heap overflow.
For purposes of illustration, notice I changed the total size of the signature to a much larger value of 15,500. Although CryptDecodeObject limits the size of the total signature it will process (again, my testing indicated the limit is \x81), DecodeSigAndReverse accepts much larger values for the encoded signature (pbEncoded) which means arbitrary data can be written to memory before it’s processed byCryptDecodeObject Note: it appears that DecodeSigAndReverse properly allocates memory for the encoded signature and none of my tests resulted in an overflow condition as a result submitting a large signature; however, being able to write 10,000+ bytes of arbitrary data may come in handy.
You can see an example of this below:

Following this through to the memcpy functions, the resulting heap overflow looks as follows:

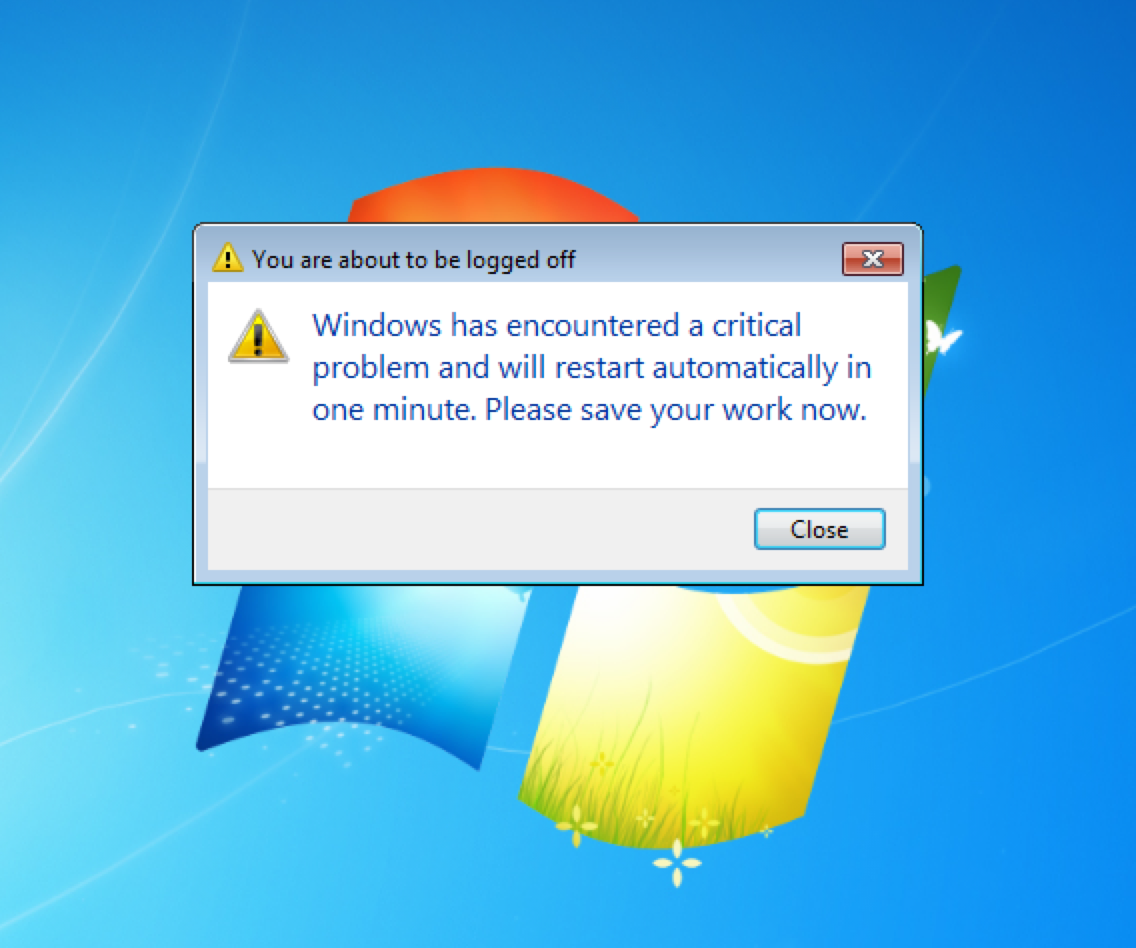
Not surprisingly, this overflow results in an Access Violation (yours may vary).

One thing to note about this basic demonstration is that the heap overflow may not be triggered immediately nor will the access violation caused by this simple demo be consistent. I found you can typically trigger it at-will by establishing another (valid) connection via an unmodified version of OpenSSL s_client.
As I said earlier, I won’t be providing a full working exploit PoC at this time nor will I be uploading my modified version of OpenSSL. That said, the information in this post should be more than enough to understand how this vulnerability can be exploited (though reliability will be a factor) and you may think of additional methods of exploitation. Regardless, this simple demo is still enough to interrupt IIS services and reboot the target machine so please do not test it against any servers unless you have explicit permission to do so!
Conclusion
To recap, the second memcpy found in schannel!DecodeSigAndReverse is vulnerable to a heap overflow condition due to the presumption of the decoded signature size (twice the size of the key) made in the calling function CheckClientVerifyMessage. Since we can control (to a degree) the size and content of the memcpy function (via the encoded signature) and CryptDecodeObject leaves the encoded signature input untouched, we can predict the values written in the heap overflow. This can all be triggered via some basic modification to OpenSSL.
Hopefully this gave you some additional insight into how this vulnerability can be triggered and exploited, and as always, apply those patches if you haven’t already!


 1684
1684


 被折叠的 条评论
为什么被折叠?
被折叠的 条评论
为什么被折叠?
 到【灌水乐园】发言


