


硬件要求
网卡得支持DPDK,见:http://dpdk.org/doc/nicsCPU得支持DPDK, 测试命令:cat /proc/cpuinfo |grep pdpe1gb
不一定非要支持DPDK硬件的网卡才能做实验,因为DPDK也支持virtio dpdk driver.
打开大页支持
hua@node1:~$ cat /etc/default/grub |grep GRUB_CMDLINE_LINUXGRUB_CMDLINE_LINUX_DEFAULT="quiet splash intel_iommu=on pci=assign-busses"
GRUB_CMDLINE_LINUX="transparent_hugepage=never hugepagesz=2M hugepages=64 default_hugepagesz=2M"
vi /etc/fstab
nodev /mnt/huge hugetlbfs pagesize=2MB 0 0
sudo update-grub
sudo mkdir -p /mnt/huge
sudo reboot
hua@node1:~$ cat /proc/meminfo |grep HugePages_
HugePages_Total: 64
HugePages_Free: 64
HugePages_Rsvd: 0
HugePages_Surp: 0
hua@node1:~$ grep Hugepagesize /proc/meminfo
Hugepagesize: 2048 kB
配置网卡使用uio_pci_generic驱动, #注意:实验发现,对于sr-iov网卡,此处必须是PF,PF试验成功,VF试验不成功。所以虚机可以使用PF去做DPDK port,也可以直接直通方式使用VF。
hua@node1:~$ sudo dpdk_nic_bind --status
Network devices using DPDK-compatible driver
============================================
<none>
Network devices using kernel driver
===================================
0000:00:19.0 'Ethernet Connection I217-V' if=eth0 drv=e1000e unused=uio_pci_generic *Active*
0000:05:00.0 '82576 Gigabit Network Connection' if=eth1 drv=igb unused=uio_pci_generic *Active*
0000:05:00.1 '82576 Gigabit Network Connection' if=eth2 drv=igb unused=uio_pci_generic *Active*
Other network devices
=====================
0000:06:10.0 '82576 Virtual Function' unused=uio_pci_generic
0000:06:10.1 '82576 Virtual Function' unused=uio_pci_generic
0000:06:10.2 '82576 Virtual Function' unused=uio_pci_generic
0000:06:10.3 '82576 Virtual Function' unused=uio_pci_generic
hua@node1:~$ sudo dpdk_nic_bind -b uio_pci_generic 0000:05:00.0
Routing table indicates that interface 0000:05:00.0 is active. Not modifying
hua@node1:~$ sudo ifconfig eth1 down
hua@node1:~$ sudo dpdk_nic_bind -b uio_pci_generic 0000:05:00.0
hua@node1:~$ sudo dpdk_nic_bind --status
Network devices using DPDK-compatible driver
============================================
0000:05:00.0 '82576 Gigabit Network Connection' drv=uio_pci_generic unused=
Network devices using kernel driver
===================================
0000:00:19.0 'Ethernet Connection I217-V' if=eth0 drv=e1000e unused=uio_pci_generic *Active*
0000:05:00.1 '82576 Gigabit Network Connection' if=eth2 drv=igb unused=uio_pci_generic *Active*
Other network devices
=====================
0000:06:10.1 '82576 Virtual Function' unused=uio_pci_generic
0000:06:10.3 '82576 Virtual Function' unused=uio_pci_generic
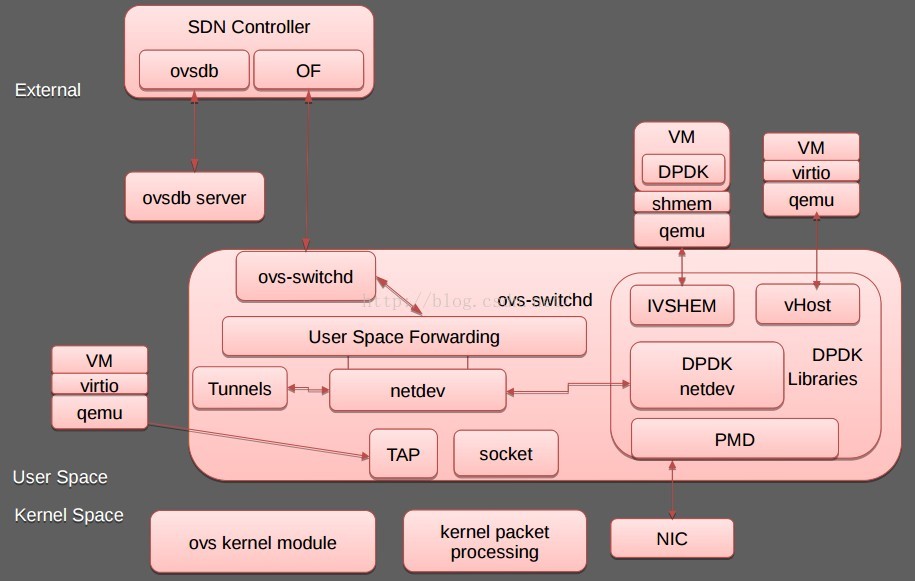
配置OVS使用DPDK
hua@node1:~$ cat /etc/default/openvswitch-switch |grep DPDKDPDK_OPTS='--dpdk -c 0x1 -n 2'
hua@node1:~$ sudo update-alternatives --set ovs-vswitchd /usr/lib/openvswitch-switch-dpdk/ovs-vswitchd-dpdk
update-alternatives: using /usr/lib/openvswitch-switch-dpdk/ovs-vswitchd-dpdk to provide /usr/sbin/ovs-vswitchd (ovs-vswitchd) in manual mode
hua@node1:~$ sudo stop openvswitch-switch; sudo start openvswitch-switch
hua@node1:~$ cat /var/log/openvswitch/ovs-ctl.log |grep dpdk
有一个bug设置了DPDK_OPTS不生效,见:https://bugs.launchpad.net/ubuntu/+source/openvswitch-dpdk/+bug/1547463, 做了这些改动:
vi /etc/default/openvswitch-switch
DPDK_OPTS='--dpdk -c 0x1 -n 4'
vi /etc/init/openvswitch-switch.conf
# To enable openvswitch-dpdk
if test X"$DPDK_OPTS" != X; then
set "$@" DPDK_OPTS="$DPDK_OPTS"
fi
vi /usr/share/openvswitch/scripts/ovs-ctl
set ovs-vswitchd
if test X"$DPDK_OPTS" != X; then
set "$@" $DPDK_OPTS --
fi
set "$@" unix:"$DB_SOCK"
但在/var/log/openvswitch/ovs-ctl.log中仍然发现了下列错误,估计是ovs-vswitchd (Open vSwitch) 2.4.0版本(dpkg -l openvswitch-switch-dpdk)不支持--dpdk-opts参数吧。
/usr/share/openvswitch/scripts/ovs-ctl: unknown option "--dpdk-opts=-c 0x1 -n 4" (use --help for help)
为避免上述ovs的bug,我们改用下列三个命令启动:
sudo restart openvswitch-switch
sudo killall ovs-vswitchd
sudo ovs-vswitchd --dpdk -c 0x1 -n 2 -- unix:/var/run/openvswitch/db.sock --pidfile --detach
or
sudo ovs-vswitchd --dpdk -c 0x1 -n 2 --socket-mem 128,0 -- unix:/var/run/openvswitch/db.sock -vconsole:emer -vsyslog:err -vfile:info --mlockall --no-chdir --log-file=/var/log/openvswitch/ovs-vswitchd.log --pidfile=/var/run/openvswitch/ovs-vswitchd.pid --detach --monitor
但仍然有下列错误。估计是保留的大页数目太少所致,后来将GRUB_CMDLINE_LINUX="transparent_hugepage=never hugepagesz=2M hugepages=64 default_hugepagesz=2M"中的hugepages从4改成64这个错误就翻过去了。
hua@node1:~$ sudo ovs-vswitchd --dpdk -c 0x1 -n 2 -- unix:/var/run/openvswitch/db.sock --pidfile --detach
2016-04-07T11:48:03Z|00001|dpdk|INFO|No -cuse_dev_name provided - defaulting to vhost-net
EAL: Detected lcore 0 as core 0 on socket 0
EAL: Detected lcore 1 as core 1 on socket 0
EAL: Detected lcore 2 as core 2 on socket 0
EAL: Detected lcore 3 as core 3 on socket 0
EAL: Support maximum 128 logical core(s) by configuration.
EAL: Detected 4 lcore(s)
EAL: No free hugepages reported in hugepages-1048576kB
EAL: Setting up memory...
EAL: Ask a virtual area of 0x200000 bytes
EAL: Virtual area found at 0x7f8609a00000 (size = 0x200000)
EAL: Ask a virtual area of 0x400000 bytes
EAL: Virtual area found at 0x7f8609400000 (size = 0x400000)
EAL: Ask a virtual area of 0x200000 bytes
EAL: Virtual area found at 0x7f8609000000 (size = 0x200000)
EAL: Requesting 4 pages of size 2MB from socket 0
EAL: rte_eal_common_log_init(): cannot create log_history mempool
PANIC in rte_eal_init():
Cannot init logs
7: [ovs-vswitchd() [0x40b053]]
6: [/lib/x86_64-linux-gnu/libc.so.6(__libc_start_main+0xf5) [0x7f860acc9ec5]]
5: [ovs-vswitchd() [0x40a059]]
4: [ovs-vswitchd() [0x639db1]]
3: [ovs-vswitchd() [0x43f7ad]]
2: [ovs-vswitchd() [0x407bad]]
1: [ovs-vswitchd() [0x444e58]]
hua@node1:~$ sudo ovs-vswitchd --dpdk -c 0x1 -n 2 -- unix:/var/run/openvswitch/db.sock --pidfile --detach
2016-04-07T13:57:08Z|00001|dpdk|INFO|No -cuse_dev_name provided - defaulting to vhost-net
EAL: Detected lcore 0 as core 0 on socket 0
EAL: Detected lcore 1 as core 1 on socket 0
EAL: Detected lcore 2 as core 2 on socket 0
EAL: Detected lcore 3 as core 3 on socket 0
EAL: Support maximum 128 logical core(s) by configuration.
EAL: Detected 4 lcore(s)
EAL: No free hugepages reported in hugepages-1048576kB
EAL: VFIO modules not all loaded, skip VFIO support...
EAL: Setting up memory...
EAL: Ask a virtual area of 0x200000 bytes
EAL: Virtual area found at 0x7f2f72a00000 (size = 0x200000)
EAL: Ask a virtual area of 0x200000 bytes
EAL: Virtual area found at 0x7f2f72600000 (size = 0x200000)
EAL: Ask a virtual area of 0x200000 bytes
EAL: Virtual area found at 0x7f2f72200000 (size = 0x200000)
EAL: Ask a virtual area of 0x1a00000 bytes
EAL: Virtual area found at 0x7f2f70600000 (size = 0x1a00000)
EAL: Ask a virtual area of 0x200000 bytes
EAL: Virtual area found at 0x7f2f70200000 (size = 0x200000)
EAL: Ask a virtual area of 0x5c00000 bytes
EAL: Virtual area found at 0x7f2f6a400000 (size = 0x5c00000)
EAL: Ask a virtual area of 0x200000 bytes
EAL: Virtual area found at 0x7f2f6a000000 (size = 0x200000)
EAL: Requesting 64 pages of size 2MB from socket 0
EAL: TSC frequency is ~3292375 KHz
EAL: Master lcore 0 is ready (tid=74e2bb40;cpuset=[0])
PMD: ENICPMD trace: rte_enic_pmd_init
EAL: PCI device 0000:05:00.0 on NUMA socket -1
EAL: probe driver: 8086:10c9 rte_igb_pmd
EAL: PCI memory mapped at 0x7f2f72c00000
EAL: PCI memory mapped at 0x7f2f72c20000
EAL: PCI memory mapped at 0x7f2f72c60000
PMD: eth_igb_dev_init(): port_id 0 vendorID=0x8086 deviceID=0x10c9
EAL: PCI device 0000:05:00.1 on NUMA socket -1
EAL: probe driver: 8086:10c9 rte_igb_pmd
EAL: Not managed by a supported kernel driver, skipped
EAL: PCI device 0000:06:10.1 on NUMA socket -1
EAL: probe driver: 8086:10ca rte_igbvf_pmd
EAL: Not managed by a supported kernel driver, skipped
EAL: PCI device 0000:06:10.3 on NUMA socket -1
EAL: probe driver: 8086:10ca rte_igbvf_pmd
EAL: Not managed by a supported kernel driver, skipped
Zone 0: name:<MALLOC_S0_HEAP_0>, phys:0xd6c00000, len:0xb00000, virt:0x7f2f70600000, socket_id:0, flags:0
Zone 1: name:<RG_MP_log_history>, phys:0x2200000, len:0x2080, virt:0x7f2f72a00000, socket_id:0, flags:0
Zone 2: name:<MP_log_history>, phys:0xd7700000, len:0x28a0c0, virt:0x7f2f71100000, socket_id:0, flags:0
Zone 3: name:<rte_eth_dev_data>, phys:0x2202080, len:0x1f400, virt:0x7f2f72a02080, socket_id:0, flags:0
2016-04-07T13:57:09Z|00002|ovs_numa|INFO|Discovered 4 CPU cores on NUMA node 0
2016-04-07T13:57:09Z|00003|ovs_numa|INFO|Discovered 1 NUMA nodes and 4 CPU cores
2016-04-07T13:57:09Z|00004|reconnect|INFO|unix:/var/run/openvswitch/db.sock: connecting...
VHOST_CONFIG: socket created, fd:17
VHOST_CONFIG: bind to vhost-net
2016-04-07T13:57:09Z|00005|reconnect|INFO|unix:/var/run/openvswitch/db.sock: connected
2016-04-07T13:57:09Z|00006|ofproto_dpif|INFO|system@ovs-system: Datapath supports recirculation
2016-04-07T13:57:09Z|00007|ofproto_dpif|INFO|system@ovs-system: MPLS label stack length probed as 1
2016-04-07T13:57:09Z|00008|ofproto_dpif|INFO|system@ovs-system: Datapath supports unique flow ids
2016-04-07T13:57:09Z|00009|bridge|INFO|bridge br-ex: added interface br-ex on port 65534
2016-04-07T13:57:09Z|00010|bridge|INFO|bridge br-ex: added interface qg-5786befb-c3 on port 1
2016-04-07T13:57:09Z|00011|bridge|INFO|bridge br-tun: added interface patch-int on port 1
2016-04-07T13:57:09Z|00012|bridge|INFO|bridge br-tun: added interface br-tun on port 65534
2016-04-07T13:57:09Z|00013|bridge|INFO|bridge br-int: added interface tap140d04f3-58 on port 22
2016-04-07T13:57:09Z|00014|bridge|INFO|bridge br-int: added interface tap6a12dfe3-40 on port 20
2016-04-07T13:57:09Z|00015|bridge|INFO|bridge br-int: added interface tap1ea7e391-73 on port 21
2016-04-07T13:57:09Z|00016|bridge|INFO|bridge br-int: added interface tapdc1b7683-4e on port 14
2016-04-07T13:57:09Z|00017|bridge|INFO|bridge br-int: added interface patch-tun on port 182
2016-04-07T13:57:09Z|00018|bridge|INFO|bridge br-int: added interface tap23e3a388-68 on port 11
2016-04-07T13:57:09Z|00019|bridge|INFO|bridge br-int: added interface int-br-phy on port 1
2016-04-07T13:57:09Z|00020|bridge|INFO|bridge br-int: added interface tap935ec68a-1a on port 12
2016-04-07T13:57:09Z|00021|bridge|INFO|bridge br-int: added interface tap2ca9e4a0-67 on port 7
2016-04-07T13:57:09Z|00022|bridge|INFO|bridge br-int: added interface tapcc6c6a9e-f2 on port 13
2016-04-07T13:57:09Z|00023|bridge|INFO|bridge br-int: added interface tap4751f42a-65 on port 10
2016-04-07T13:57:09Z|00024|bridge|INFO|bridge br-int: added interface br-int on port 65534
2016-04-07T13:57:09Z|00025|bridge|INFO|bridge br-int: added interface tapdde9820f-58 on port 9
2016-04-07T13:57:09Z|00026|bridge|WARN|could not open network device br100 (No such device)
2016-04-07T13:57:09Z|00027|bridge|INFO|bridge br-phy: added interface phy-br-phy on port 3
2016-04-07T13:57:09Z|00028|bridge|INFO|bridge br-phy: added interface br-phy on port 65534
2016-04-07T13:57:09Z|00029|bridge|INFO|bridge br-ex: using datapath ID 0000de7e48588f4c
2016-04-07T13:57:09Z|00030|connmgr|INFO|br-ex: added service controller "punix:/var/run/openvswitch/br-ex.mgmt"
2016-04-07T13:57:09Z|00031|bridge|INFO|bridge br-tun: using datapath ID 00007a84c20ae149
2016-04-07T13:57:09Z|00032|connmgr|INFO|br-tun: added service controller "punix:/var/run/openvswitch/br-tun.mgmt"
2016-04-07T13:57:09Z|00033|bridge|INFO|bridge br-int: using datapath ID 00008e56b225c748
2016-04-07T13:57:09Z|00034|connmgr|INFO|br-int: added service controller "punix:/var/run/openvswitch/br-int.mgmt"
2016-04-07T13:57:09Z|00035|bridge|INFO|bridge br-phy: using datapath ID 00000255fc61864b
2016-04-07T13:57:09Z|00036|connmgr|INFO|br-phy: added service controller "punix:/var/run/openvswitch/br-phy.mgmt"
2016-04-07T13:57:09Z|00001|ofproto_dpif_upcall(handler15)|INFO|received packet on unassociated datapath port 0
测试
sudo ovs-vsctl ovsbr0 br-intsudo ovs-vsctl set bridge ovsbr0 datapath_type=netdev
sudo ovs-vsctl add-port ovsbr0 dpdk0 -- set Interface dpdk0 type=dpdk #Port name shoud begin with dpdk
给虚机创建普通ovs port:
sudo ovs-vsctl add-port ovsbr0 intP1 -- set Interface intP1 type=internal
sudo ip addr add 192.168.10.129/24 dev intP1
sudo ip link set dev intP1 up
sudo tcpdump -i intP1
或给虚机创建vhost-user port:
sudo ovs-vsctl add-port ovsbr0 vhost-user2 -- set Interface vhost-user2 type=dpdkvhostuser
虚机使用vhost-user port
sudo qemu-system-x86_64 -enable-kvm -m 128 -smp 2 \
-chardev socket,id=char0,path=/var/run/openvswitch/vhost-user1 \
-netdev type=vhost-user,id=mynet1,chardev=char0,vhostforce \
-device virtio-net-pci,netdev=mynet1,mac=52:54:00:02:d9:01 \
-object memory-backend-file,id=mem,size=128M,mem-path=/mnt/huge,share=on \
-numa node,memdev=mem -mem-prealloc \
-net user,hostfwd=tcp::10021-:22 -net nic \
/bak/images/openstack_demo.img
Inside VM: sudo ifconfig eth0 192.168.9.108/24
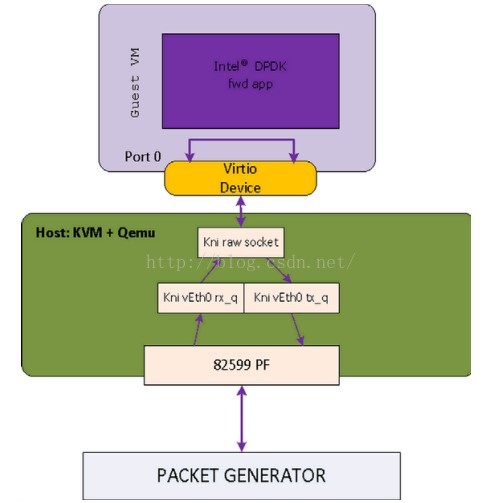
使用vhost-user方式可如下图所示:
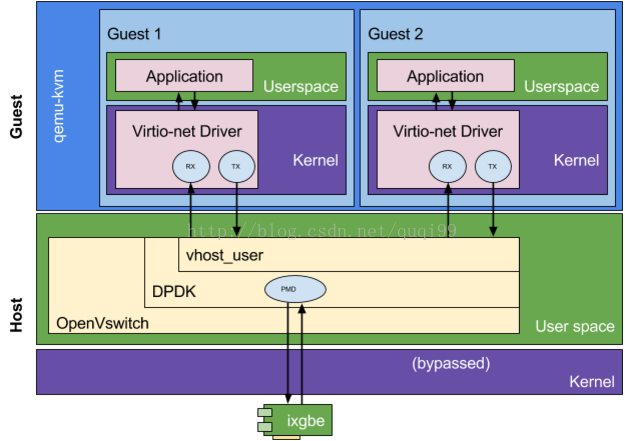
dpdk-virtio-net
与Neutron的集成
nova已经支持vhost-user与hugepages特性,显然在nova.conf应该打开。
[DEFAULT]
ovs_use_usvhost = True
[libvirt]
use_hugepages = True
另外,应该手工创建上述的ovsbr0,然后在/etc/neutron/plugins/ml2/ml2_conf.ini指定使用ovsbr0作为provider network.
[ovs]
bridge_mappings = default:ovsbr0
dpdk与neutron集成的工程叫networking-ovs-dpdk,在devstack加下列一行可使用devstack创建ovs dpdk环境。
enable_plugin networking-ovs-dpdk https://github.com/openstack/networking-ovs-dpdk master
整个运行命令
sudo add-apt-repository cloud-archive:mitaka
sudo apt-get install openvswitch-switch-dpdk
sudo modprobe vfio-pci
sudo chmod a+x /dev/vfio
sudo chmod 0666 /dev/vfio/*
sudo ifconfig eth1 down
sudo dpdk_nic_bind -b vfio-pci eth1 #注意:实验发现,对于sr-iov网卡,此处必须是PF,PF试验成功,VF试验不成功。
find /sys/kernel/iommu_groups/ -type l
sudo sysctl -w vm.nr_hugepages=256
cat /proc/meminfo |grep HugePages_
sudo restart openvswitch-switch
sudo update-alternatives --set ovs-vswitchd /usr/lib/openvswitch-switch-dpdk/ovs-vswitchd-dpdk
sudo killall ovs-vswitchd
sudo ovs-vswitchd --dpdk -c 0x1 -n 2 --socket-mem 128,0 -- unix:/var/run/openvswitch/db.sock -vconsole:emer -vsyslog:err -vfile:info --mlockall --no-chdir --log-file=/var/log/openvswitch/ovs-vswitchd.log --pidfile=/var/run/openvswitch/ovs-vswitchd.pid --detach --monitor
ps -ef|grep dpdk
sudo qemu-system-x86_64 -enable-kvm -m 128 -smp 2 \
-chardev socket,id=char0,path=/var/run/openvswitch/vhost-user1 \
-netdev type=vhost-user,id=mynet1,chardev=char0,vhostforce \
-device virtio-net-pci,netdev=mynet1,mac=52:54:00:02:d9:01 \
-object memory-backend-file,id=mem,size=128M,mem-path=/mnt/huge,share=on \
-numa node,memdev=mem -mem-prealloc \
-net user,hostfwd=tcp::10021-:22 -net nic \
/bak/images/openstack_demo.img
Inside VM: sudo ifconfig eth0 192.168.9.108/24
附录1,编译DPDK源码并运行单个应用
git clone git://dpdk.org/dpdk
export DPDK_DIR=/bak/linux/dpdk
export DPDK_BUILD=$DPDK_DIR/x86_64-ivshmem-linuxapp-gcc/
export RTE_TARGET=x86_64-ivshmem-linuxapp-gcc
export EXTRA_CFLAGS="-ggdb -ffunction-sections -O0" #设置调试选项
echo 'CONFIG_RTE_BUILD_COMBINE_LIBS=y' >> ./config/common_linuxapp #编译成单个文件
echo 'CONFIG_RTE_LIBRTE_VHOST=y' >> ./config/common_linuxapp
sudo make config T=x86_64-ivshmem-linuxapp-gcc
sudo make install T=x86_64-ivshmem-linuxapp-gcc #使用共享内存ivshmem模式
cd x86_64-ivshmem-linuxapp-gcc/
EXTRA_CFLAGS="-g -O0" make -j4
sudo modprobe uio
sudo insmod x86_64-ivshmem-linuxapp-gcc/kmod/igb_uio.ko #DPDK只能使用igb_uio和vfio-pci两种驱动
cd lib/librte_vhost/eventfd_link/
make
sudo insmod eventfd_link.ko
sudo python tools/dpdk_nic_bind.py --status
sudo python tools/dpdk_nic_bind.py -b igb_uio 0000:05:00.0
#sudo python tools/dpdk_nic_bind.py -b uio_pci_generic 0000:05:00.0
cd examples/helloworld/
make
sudo ./build/helloworld -c 0xf -n 4 --socket-mem=32
gdb ./build/helloworld
(gdb) run -c 0xf -n 4 --socket-mem=32
#integrate ovs with dpdk
git clone https://github.com/openvswitch/ovs.git
cd /bak/linux/ovs
export OVS_DIR=`pwd`
./boot.sh
./configure --with-dpdk="$DPDK_DIR/x86_64-ivshmem-linuxapp-gcc/" --enable-ssl CFLAGS="-g -O0"
make 'CFLAGS=-g -O0 -march=native' -j4
参考
[1] https://software.intel.com/en-us/blogs/2015/06/09/building-vhost-user-for-ovs-today-using-dpdk-200
[2] http://dpdk.readthedocs.org/en/v2.2.0/linux_gsg/index.html
[3] http://blog.csdn.net/xy010902100449/article/details/47282937
[4] http://openvswitch.org/support/dist-docs/INSTALL.DPDK.md.txt
[5] https://software.intel.com/en-us/articles/using-open-vswitch-with-dpdk-for-inter-vm-nfv-applications
[6] https://raw.githubusercontent.com/xsited/ssg/master/scripts/build_ovs_dpdk.sh
[7] http://www.ran-lifshitz.com/2015/06/17/open-vswitch-netdev-dpdk-with-vhost-user-support/
[8] DPDK编程指南


 1896
1896


 被折叠的 条评论
为什么被折叠?
被折叠的 条评论
为什么被折叠?
 到【灌水乐园】发言


