


1.如何加强?
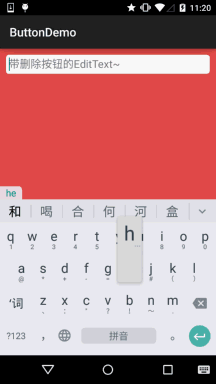
输入内容后,有面会显示一个图片,用户点击后 可以清空文本框。
2.案例构造步骤
1)在drawable文件中建一个bg_frame_search.xml文件。
<?xml version="1.0" encoding="utf-8"?>
<shape xmlns:android="http://schemas.android.com/apk/res/android" >
    <solid android:color="@color/background_white" />
    <corners android:radius="5dp" />
    <stroke android:width="1px" android:color="@color/frame_search"/>
</shape>
2)在drawable中放置你要显示的图片,图片名称为:delete_gray。
3)书写自定义view。
import android.content.Context;
import android.graphics.Rect;
import android.graphics.drawable.Drawable;
import android.text.Editable;
import android.text.TextWatcher;
import android.util.AttributeSet;
import android.view.MotionEvent;
import android.widget.EditText;
/**
 * Created by 刘鹏达 on 2017/12/9.
 */

public class DelEditText extends EditText {

    private Drawable imgClear;
    private Context mContext;

    public DelEditText(Context context, AttributeSet attrs) {
        super(context, attrs);
        this.mContext = context;
        init();
    }

    private void init() {
        imgClear = mContext.getResources().getDrawable(R.drawable.delete_gray);
        addTextChangedListener(new TextWatcher() {
            //内容变化前
            @Override
            public void beforeTextChanged(CharSequence s, int start, int count, int after) {

            }
           //内容正在改变
            @Override
            public void onTextChanged(CharSequence s, int start, int before, int count) {

            }
            //在内容改变完之后
            @Override
            public void afterTextChanged(Editable editable) {
                setDrawable();
            }
        });
    }


    //绘制删除图片
    private void setDrawable(){
        if (length() < 1)
            setCompoundDrawablesWithIntrinsicBounds(null, null, null, null);
        else
            setCompoundDrawablesWithIntrinsicBounds(null, null, imgClear, null);
    }


    //当触摸范围在右侧时,触发删除方法,隐藏叉叉
    @Override
    public boolean onTouchEvent(MotionEvent event) {
        if(imgClear != null && event.getAction() == MotionEvent.ACTION_UP)
        {
            int eventX = (int) event.getRawX();
            int eventY = (int) event.getRawY();
            Rect rect = new Rect();
            getGlobalVisibleRect(rect);
            rect.left = rect.right - 100;
            if (rect.contains(eventX, eventY))
                setText("");
        }
        return super.onTouchEvent(event);
    }


    @Override
    protected void finalize() throws Throwable {
        super.finalize();
    }

}
4)引用自定义view
布局:
<LinearLayout xmlns:android="http://schemas.android.com/apk/res/android"
    xmlns:tools="http://schemas.android.com/tools"
    android:layout_width="match_parent"
    android:layout_height="match_parent"
    android:background="@color/back_red"
    android:orientation="vertical"
    tools:context=".MainActivity">

    <com.example.edittextzdy.DelEditText
        android:id="@+id/edit_search"
        android:layout_width="match_parent"
        android:layout_height="32dp"
        android:layout_margin="10dp"
        android:background="@drawable/bg_frame_search"
        android:hint="带删除按钮的EditText~"
        android:maxLength="20"
        android:padding="5dp"
        android:singleLine="true" />


</LinearLayout>
activity:
import android.support.v7.app.AppCompatActivity;
import android.os.Bundle;

public class MainActivity extends AppCompatActivity {

    @Override
    protected void onCreate(Bundle savedInstanceState) {
        super.onCreate(savedInstanceState);
        setContentView(R.layout.activity_main);
    }
}
效果图:
总结:大家看了这几个案例之后,只是知道了,哦,我要实现自定义view大概应该怎么去操作,但对操作的底层,或者说本质却有点模糊,所以之后我们就来谈谈自定义view的深入了。


 被折叠的 条评论
为什么被折叠?
被折叠的 条评论
为什么被折叠?
 到【灌水乐园】发言


