


1,概述
前面我们说了volatile关键字,主要是为了处理并发读写场景,解决可见性的问题。然后又讲了synchronized锁,处理并发写的场景,解决原子性的问题。接着又说了Atomic原子系列,它是基于基本数据类型或者引用来解决原子问题,底层是基于CAS(compare and set),无锁化(乐观锁)。这篇文章主要来说说ReentractLock,先演示一个demo,对ReentractLock有个基本的了解。
public class ReentractLockDemo {
    #获取一个lock锁
    static ReentrantLock lock = new ReentrantLock();
    #可修改的共享变量
    static volatile int flag = 0;
    public static void main(String[] args) {
        new Thread() {
            @Override
            public void run() {
                while (true) {
                    //获取锁
                    lock.lock();
                    flag++;
                    System.out.println(Thread.currentThread().getName() + "线程修改变后的变量为" + flag);
                    //释放锁
                    lock.unlock();
                    try {
                        Thread.sleep(100);
                    } catch (InterruptedException e) {
                        e.printStackTrace();
                    }

                }
            }
        }.start();

        new Thread() {
            @Override
            public void run() {
                while (true) {
                    //获取锁
                    lock.lock();
                    flag++;
                    System.out.println(Thread.currentThread().getName() + "线程修改变后的变量为" + flag);
                    //释放锁
                    lock.unlock();

                    try {
                        Thread.sleep(100);
                    } catch (InterruptedException e) {
                        e.printStackTrace();
                    }

                }
            }
        }.start();


    }
}
2,AQS(Abstract Queued Synchronizer)
2.1 简述
抽象队列同步器。经常听到这个词,本文就要分析下这到底是啥含义。并发包的锁都是基于AQS来实现的,一般我们开发是不直接接触的,它是并发的基础,java并发包底层的API。我们先画个图,了解下AQS的含义:
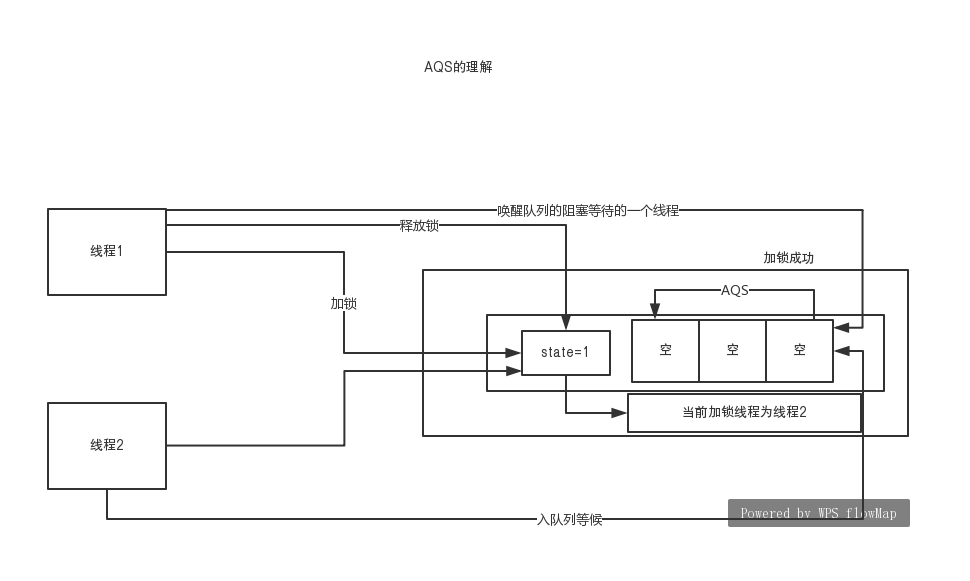
过程简述一下,当第一个线程获取锁时,将state状态+1,变成了1。此时当前加锁线程为线程1.然后线程2来获取锁,发现state不等于0,也就是有人占有了锁,此时线程2就到一个队列中排队。这时候线程3,线程N会依次来排队挂起。线程1处理任务完毕,将会唤醒队列中的线程,然后线程就去争取锁,获取到锁的线程就会出队列,重新改变state的值,将当前线程变为自己的。
大体过程如上所示,不过这样说起来还是太抽象了。我们从源码中去探索,看看是为啥叫AQS,队列是怎么实现的,怎么就实现了锁的功能了。。。
2.2 源码剖析
2.2.1首先看看ReentrantLock的构造函数。
    public ReentrantLock() {
        #当我们点进构造函数以后,发现里面构造了NonfairSync()对象。通过这里我们就能发现,ReentrantLock应该是一个外壳,真正执行功能的对象应该就是NonfairSync了。
        sync = new NonfairSync();
    }

    #我们顺势就点开NonfairSync的构造函数了。发现它也是ReentrantLock的内部类,继承自Sync对象,
    static final class NonfairSync extends Sync {
        private static final long serialVersionUID = 7316153563782823691L;

        /**
         * Performs lock.  Try immediate barge, backing up to normal
         * acquire on failure.
         */
        final void lock() {
            if (compareAndSetState(0, 1))
                setExclusiveOwnerThread(Thread.currentThread());
            else
                acquire(1);
        }

        protected final boolean tryAcquire(int acquires) {
            return nonfairTryAcquire(acquires);
        }
    }
通过上面的源代码,就知道了ReentrantLock里面有内部类:NonfairSync、FairSync、Sync。NonfairSync、FairSync是Sync的子类,其中NonfailSync是默认构造函数实现的(也就是非公平锁,后面会讲解它和FairSync的区别)。而且ReentrantLock就是一个外壳,真正功能的实现就是Sync这些对象。我们再看看Sync这个类,发现他是一个抽象类,继承了AbstractQueuedSynchronizer这个类。源码如下:
abstract static class Sync extends AbstractQueuedSynchronizer
这时候发现AbstractQueuedSynchronizer。也就是我们之前说的AQS,抽象队列同步器。很明显了,核心的方法都应该在AbstractQueuedSynchronizer类里面了。来看看AbstractQueuedSynchronizer的核心的字段:
private transient Thread exclusiveOwnerThread;
    #这是一个指针的头部
    private transient volatile Node head;
    #指针的尾部
    private transient volatile Node tail;
    #状态变量state
    private volatile int state;
    #这个应该似曾相识了,之前Atomic原子系列的CAS,就是基于unsafe来实现的。这里大概也能猜测到了,ReentractLock底层是基于CAS无锁化来实现的了
    private static final Unsafe unsafe = Unsafe.getUnsafe();
    #下面是一些变量的内存指针。
    private static final long stateOffset;
    private static final long headOffset;
    private static final long tailOffset;
    private static final long waitStatusOffset;
    private static final long nextOffset;
看了上面的核心成员变量,大概能知道:之前所谓的队列应该就是一个双向链表实现的,获取到锁之后就更新state的状态。Node是AQS实现的一种数据结构,我们可以看看:
    static final class Node {
        /** Marker to indicate a node is waiting in shared mode */
        static final Node SHARED = new Node();
        /** Marker to indicate a node is waiting in exclusive mode */
        static final Node EXCLUSIVE = null;

        /** waitStatus value to indicate thread has cancelled */
        static final int CANCELLED =  1;
        /** waitStatus value to indicate successor's thread needs unparking */
        static final int SIGNAL    = -1;
        /** waitStatus value to indicate thread is waiting on condition */
        static final int CONDITION = -2;
        /**
         * waitStatus value to indicate the next acquireShared should
         * unconditionally propagate
         */
        static final int PROPAGATE = -3;

        /**
         * Status field, taking on only the values:
         *   SIGNAL:     The successor of this node is (or will soon be)
         *               blocked (via park), so the current node must
         *               unpark its successor when it releases or
         *               cancels. To avoid races, acquire methods must
         *               first indicate they need a signal,
         *               then retry the atomic acquire, and then,
         *               on failure, block.
         *   CANCELLED:  This node is cancelled due to timeout or interrupt.
         *               Nodes never leave this state. In particular,
         *               a thread with cancelled node never again blocks.
         *   CONDITION:  This node is currently on a condition queue.
         *               It will not be used as a sync queue node
         *               until transferred, at which time the status
         *               will be set to 0. (Use of this value here has
         *               nothing to do with the other uses of the
         *               field, but simplifies mechanics.)
         *   PROPAGATE:  A releaseShared should be propagated to other
         *               nodes. This is set (for head node only) in
         *               doReleaseShared to ensure propagation
         *               continues, even if other operations have
         *               since intervened.
         *   0:          None of the above
         *
         * The values are arranged numerically to simplify use.
         * Non-negative values mean that a node doesn't need to
         * signal. So, most code doesn't need to check for particular
         * values, just for sign.
         *
         * The field is initialized to 0 for normal sync nodes, and
         * CONDITION for condition nodes.  It is modified using CAS
         * (or when possible, unconditional volatile writes).
         */
        volatile int waitStatus;

        /**
         * Link to predecessor node that current node/thread relies on
         * for checking waitStatus. Assigned during enqueuing, and nulled
         * out (for sake of GC) only upon dequeuing.  Also, upon
         * cancellation of a predecessor, we short-circuit while
         * finding a non-cancelled one, which will always exist
         * because the head node is never cancelled: A node becomes
         * head only as a result of successful acquire. A
         * cancelled thread never succeeds in acquiring, and a thread only
         * cancels itself, not any other node.
         */
        volatile Node prev;

        /**
         * Link to the successor node that the current node/thread
         * unparks upon release. Assigned during enqueuing, adjusted
         * when bypassing cancelled predecessors, and nulled out (for
         * sake of GC) when dequeued.  The enq operation does not
         * assign next field of a predecessor until after attachment,
         * so seeing a null next field does not necessarily mean that
         * node is at end of queue. However, if a next field appears
         * to be null, we can scan prev's from the tail to
         * double-check.  The next field of cancelled nodes is set to
         * point to the node itself instead of null, to make life
         * easier for isOnSyncQueue.
         */
        volatile Node next;

        /**
         * The thread that enqueued this node.  Initialized on
         * construction and nulled out after use.
         */
        volatile Thread thread;

        /**
         * Link to next node waiting on condition, or the special
         * value SHARED.  Because condition queues are accessed only
         * when holding in exclusive mode, we just need a simple
         * linked queue to hold nodes while they are waiting on
         * conditions. They are then transferred to the queue to
         * re-acquire. And because conditions can only be exclusive,
         * we save a field by using special value to indicate shared
         * mode.
         */
        Node nextWaiter;

        /**
         * Returns true if node is waiting in shared mode.
         */
        final boolean isShared() {
            return nextWaiter == SHARED;
        }

        /**
         * Returns previous node, or throws NullPointerException if null.
         * Use when predecessor cannot be null.  The null check could
         * be elided, but is present to help the VM.
         *
         * @return the predecessor of this node
         */
        final Node predecessor() throws NullPointerException {
            Node p = prev;
            if (p == null)
                throw new NullPointerException();
            else
                return p;
        }

        Node() {    // Used to establish initial head or SHARED marker
        }

        Node(Thread thread, Node mode) {     // Used by addWaiter
            this.nextWaiter = mode;
            this.thread = thread;
        }

        Node(Thread thread, int waitStatus) { // Used by Condition
            this.waitStatus = waitStatus;
            this.thread = thread;
        }
    }
2.2.2 lock()方法。
 //调用lock方法之后,底层调用的是Sync的lock方法
public void lock() {
        sync.lock();
    }
 //发现Sync只是声明了这个方法,具体实现是子类来实现的
 abstract void lock();


         #这是默认的子类NonfairSync的lock()方法的实现。
         final void lock() {
            if (compareAndSetState(0, 1))
                setExclusiveOwnerThread(Thread.currentThread());
            else
                acquire(1);
        }
compareAndSetState(0,1):
    protected final boolean compareAndSetState(int expect, int update) {
        // See below for intrinsics setup to support this
        return unsafe.compareAndSwapInt(this, stateOffset, expect, update);
    }
这是采用了CAS操作来判断state字段,如果state=0,就设置为1:表示某个线程第一次获取锁,将state状态从0到1,并将当前占用线程设置为自己:
setExclusiveOwnerThread(Thread.currentThread())
否则,acquire(1):
public final void acquire(int arg) {
        #在这里点进tryAcquire()方法,发现在AQS里面也是没有实现,所以查看了NonfairSync的tryAcquire()方法了。
if (!tryAcquire(arg) && acquireQueued(addWaiter(Node.EXCLUSIVE), arg)) selfInterrupt(); }
NonfairSync的tryAcquire()方法:
     final boolean nonfairTryAcquire(int acquires) {
            final Thread current = Thread.currentThread();
            #首先获取state的状态
            int c = getState();
            #如果等于0,说明没有线程获取到锁,
            if (c == 0) {
                #此时该线程获取到锁,并将自己设为当前线程
if (compareAndSetState(0, acquires)) {
                    setExclusiveOwnerThread(current);
                    return true;
                }
            }
            #否则说明有人占有锁,那么再判断下占有锁的线程是否是自己,是的话将state+1.这是什么意思呢??就是同一个线程可以获取到多次锁,也就是可重入锁。
            else if (current == getExclusiveOwnerThread()) {
                int nextc = c + acquires;
                if (nextc < 0) // overflow
                    throw new Error("Maximum lock count exceeded");
                setState(nextc);
                return true;
            }
            return false;
        }
以上条件表示的就是获取锁成功的情况。如果获取锁失败会怎样??回到方法:
if (!tryAcquire(arg) && acquireQueued(addWaiter(Node.EXCLUSIVE), arg)) selfInterrupt(); }

如果获取锁失败,那么第一个条件就是true了。进入第二个条件:acquireQueued(addWaiter(Node.EXCLUSIVE), arg))
先看看addWaiter方法源码是怎么走的:
#该方法是构建一个node节点,然后调用enq方法
private Node addWaiter(Node mode) {
        Node node = new Node(Thread.currentThread(), mode);
        // Try the fast path of enq; backup to full enq on failure
        Node pred = tail;
        if (pred != null) {
            node.prev = pred;
            if (compareAndSetTail(pred, node)) {
                pred.next = node;
                return node;
            }
        }
        enq(node);
        return node;
    }
enq源码:
    private Node enq(final Node node) {
        for (;;) {
            Node t = tail;
            if (t == null) { // Must initialize
                if (compareAndSetHead(new Node()))
                    tail = head;
            } else {
                node.prev = t;
                if (compareAndSetTail(t, node)) {
                    t.next = node;
                    return t;
                }
            }
        }
    }
最后执行acquireQueued:
    final boolean acquireQueued(final Node node, int arg) {
        boolean failed = true;
        try {
            boolean interrupted = false;
            for (;;) {
                final Node p = node.predecessor();
                if (p == head && tryAcquire(arg)) {
                    setHead(node);
                    p.next = null; // help GC
                    failed = false;
                    return interrupted;
                }
                if (shouldParkAfterFailedAcquire(p, node) &&
                    parkAndCheckInterrupt())
                    interrupted = true;
            }
        } finally {
            if (failed)
                cancelAcquire(node);
        }
    }
上面几个方法其实就是基于链表来操作的,我觉得还是画个图来比较直观。
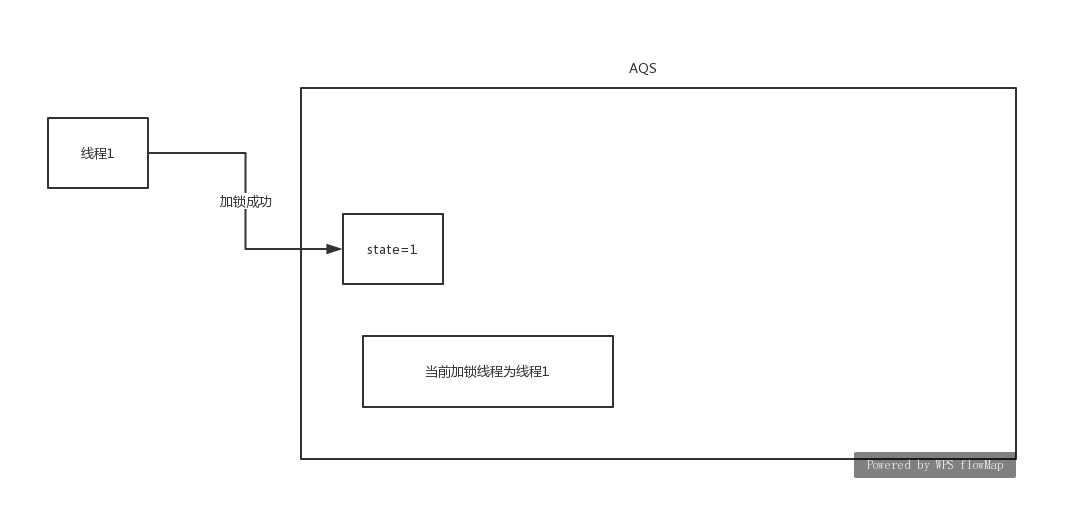
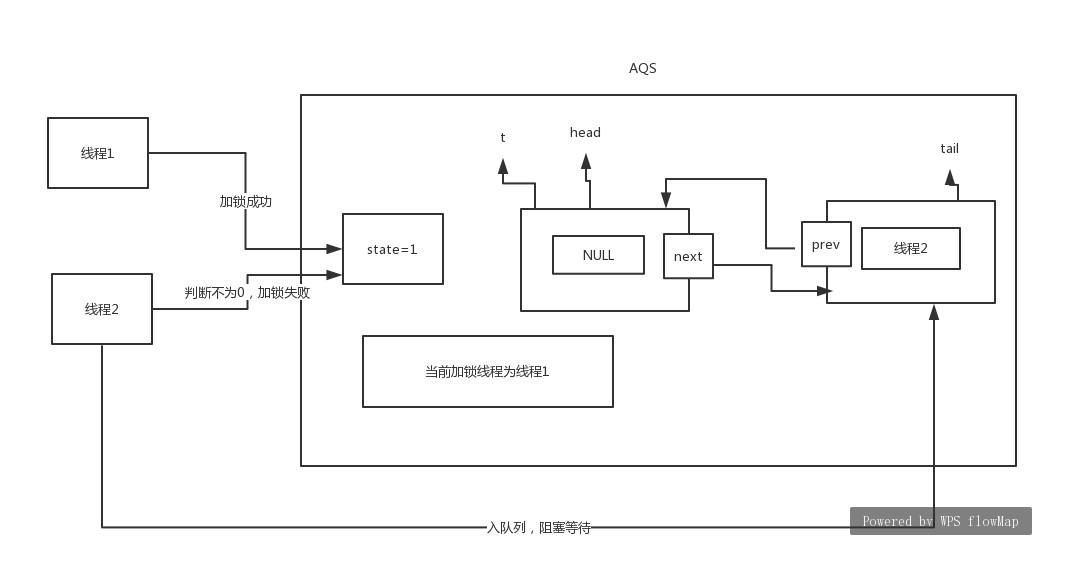
场景:首先是线程1来获取锁,获取成功,然后线程2,线程3来获取锁,获取失败,加入到队列的过程:
线程1获取锁成功:
线程2获取锁失败,加入队列的过程:
以上方法是加入到队列,至于线程挂起的源码如下:
    final boolean acquireQueued(final Node node, int arg) {
        boolean failed = true;
        try {
            boolean interrupted = false;
            for (;;) {
                final Node p = node.predecessor();
                if (p == head && tryAcquire(arg)) {
                    setHead(node);
                    p.next = null; // help GC
                    failed = false;
                    return interrupted;
                }
                //此时线程2会走到这里.
                if (shouldParkAfterFailedAcquire(p, node) &&
                    parkAndCheckInterrupt())
                    interrupted = true;
            }
        } finally {
            if (failed)
                cancelAcquire(node);
        }
    }
里面让线程2挂起的源码:
    private final boolean parkAndCheckInterrupt() {
        LockSupport.park(this);
        return Thread.interrupted();
    }
线程3获取锁失败,加入队列:
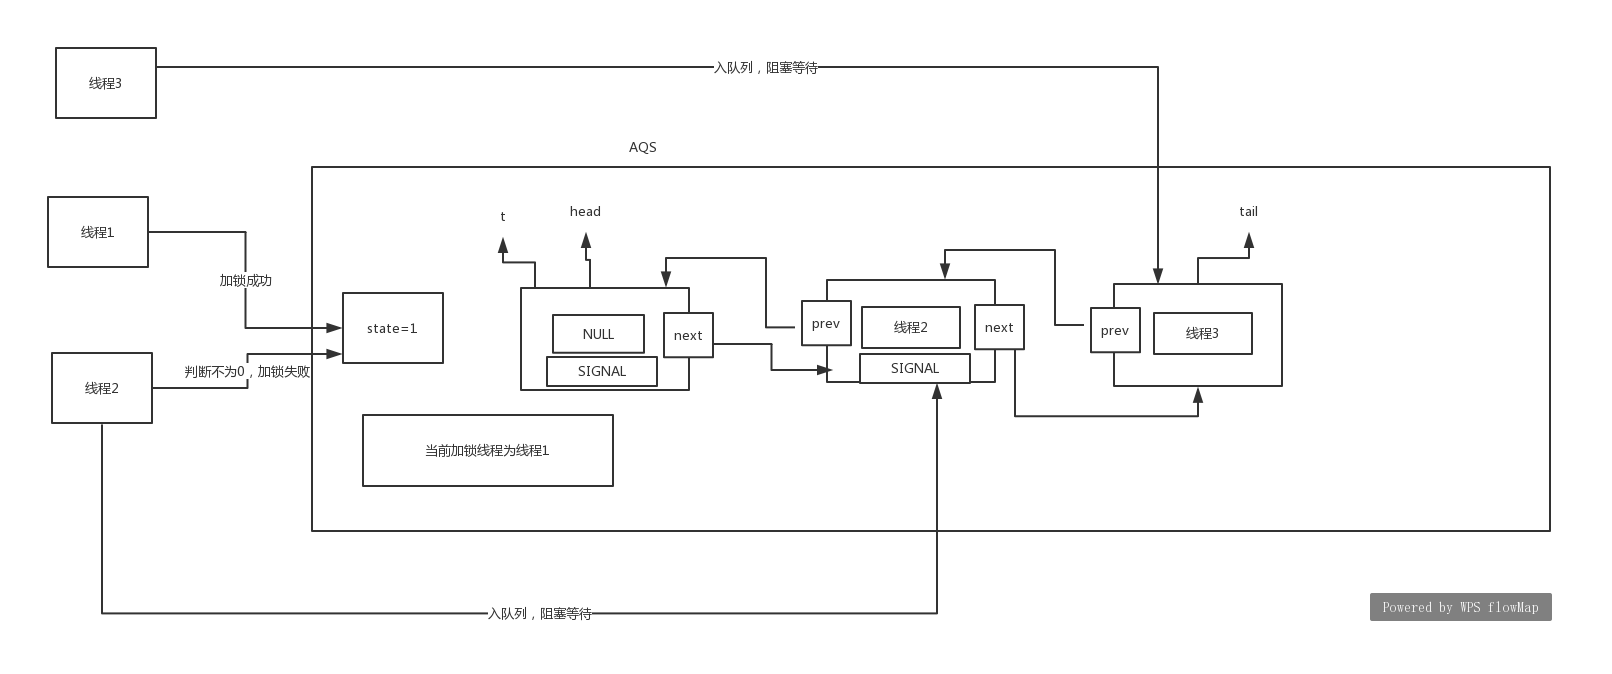
通过上面基于源码来画图,就可以知道了。首先线程1,获取到了锁,其他线程就会形成一个双向链表,也就是所谓的队列操作,并且同步阻塞了。同时这里还有一点,就是在挂起之前,会再次尝试获取锁,这也就是为啥叫非公平锁了。比如线程3在挂起的时候就获取到了锁,那么提前等待的线程2,就明显不公平了。至于怎么唤醒这些队列的线程,后面再分析。这里还有个值得学习的地方LockSupport.park(this):表示对当前线程的挂起。
2.2.3 unlock()方法。
    public void unlock() {
        sync.release(1);
    }

    public final boolean release(int arg) {
        //AQS也是没有实现的,在ReentrantLock里面有具体的实现。
        if (tryRelease(arg)) {
            Node h = head;
            if (h != null && h.waitStatus != 0)
                unparkSuccessor(h);
            return true;
        }
        return false;
    }
tryRelease的实现:
        protected final boolean tryRelease(int releases) {
            //首先将state的变量值-1
            int c = getState() - releases;
            //不是占有的线程去释放,就报异常
            if (Thread.currentThread() != getExclusiveOwnerThread())
                throw new IllegalMonitorStateException();
            boolean free = false;
            if (c == 0) {
                free = true;
                setExclusiveOwnerThread(null);
            }
            setState(c);
            return free;
        }
上面这段代码的意思是,当线程执行unlock()方法之后,state就一直减1,直到0为止,然后将当前加锁线程设为NULL。从队列中唤醒的源码就是这一段了:
            Node h = head;
            if (h != null && h.waitStatus != 0)
                unparkSuccessor(h);
            return true;
核心在unparkSuccessor()方法,我们去看一下:
    private void unparkSuccessor(Node node) {

        int ws = node.waitStatus;
        if (ws < 0)
            compareAndSetWaitStatus(node, ws, 0);
        //按照上文的分析,这个s其实就是线程2
        Node s = node.next;
        if (s == null || s.waitStatus > 0) {
            s = null;
            for (Node t = tail; t != null && t != node; t = t.prev)
                if (t.waitStatus <= 0)
                    s = t;
        }
        if (s != null)
            LockSupport.unpark(s.thread);
    }
从这里可以看出来当线程1执行unpark()方法的时候,就会唤醒队列的头结点的next节点,也就是线程2所在的节点了。当线程2唤醒以后,就从上文挂起的地方活过来,又开始争抢锁的操作。回到源码这一段中:
    final boolean acquireQueued(final Node node, int arg) {
        boolean failed = true;
        try {
            boolean interrupted = false;
            for (;;) {
                final Node p = node.predecessor();
                if (p == head && tryAcquire(arg)) {
                    setHead(node);
                    p.next = null; // help GC
                    failed = false;
                    return interrupted;
                }
                if (shouldParkAfterFailedAcquire(p, node) &&
                    parkAndCheckInterrupt())
                    interrupted = true;
            }
        } finally {
            if (failed)
                cancelAcquire(node);
        }
    }
此时应该从挂起的地方苏醒过来,重新执行上文中的for循环了。然后线程2就会获取到锁,当前加锁的线程=线程2.然后将链表的head下移一位,链表的线程2设置为NULL。这样就相当于线程2从队列中弹出了。最后再来回顾一下前面的操作:lock()方法,就是获取锁的操作,当线程1来的时候,没有人持有锁,所以线程1获取锁成功,修改state状态,设置当前线程为线程1;这时候线程2,线程3依次过来那么线程2,线程3会形成一个双向链表(队列),并且会同步挂起。当线程1执行了unlock()方法,其实就是修改state状态,将当前线程置为NULL,然后最重要的一步是唤醒了队列头的线程。这就是为啥能满足先进先出的原因了。此时线程2被唤醒以后,修改state状态,将当前线程=线程2,然后将链表head的线程与整个链表断开,然后把链表中的线程2设置为NULL的Node。整个锁的操作设计的很巧妙,通过一个state状态来控制,非常值得大家学习这个过程。
3,公平锁和非公平锁
前面我们知道默认情况下是使用非公平锁来实现的,而且非公平锁的性能高。但是这是为什么呢?我们通过源码来剖析原因。
ReentractLock有两种构造函数
    public ReentrantLock() {
        sync = new NonfairSync();
    }

    /**
     * Creates an instance of {@code ReentrantLock} with the
     * given fairness policy.
     *
     * @param fair {@code true} if this lock should use a fair ordering policy
     */
    public ReentrantLock(boolean fair) {
        sync = fair ? new FairSync() : new NonfairSync();
    }
前面我们用的都是默认的构造函数。当传入参数true,则使用的是公平锁的方式了。同理我们也要再次看lock()方法和unlock()方法了。因为前面详细分析过,这部分我们主要查看有哪些不同。
FairSync方法实现的lock()方法中,
        final void lock() {
            acquire(1);
        }
这和之前的非公平锁是不一样的,非公平锁的实现再贴一下:
        final void lock() {
            if (compareAndSetState(0, 1))
                setExclusiveOwnerThread(Thread.currentThread());
            else
                acquire(1);
        }
区别是什么??非公平锁上来就是直接判断state是否等于0,等于0就尝试获取锁。意味着什么呢?意味着就算没有进入队列的线程,也可以直接参与争抢锁。类比很多人在排队买东西,有个人直接过来就买了,不排队了,,不公平!!
继续看下去,下面就是方法acquire():
    public final void acquire(int arg) {
        if (!tryAcquire(arg) &&
            acquireQueued(addWaiter(Node.EXCLUSIVE), arg))
            selfInterrupt();
    }
这个方法前面都分析过。这里我们唯一需要看的就是tryAcquire()方法,因为它是具体子类的实现,我们之前看的都是NonfairSync,这里应该看FairSync了:
        protected final boolean tryAcquire(int acquires) {
            final Thread current = Thread.currentThread();
            int c = getState();
            if (c == 0) {
                #如果state=0,也就是没有人占有锁的情况下,会先去查看线程是否在队列中,这样就能彻底实现公平了。
                if (!hasQueuedPredecessors() &&
                    compareAndSetState(0, acquires)) {
                    setExclusiveOwnerThread(current);
                    return true;
                }
            }
            else if (current == getExclusiveOwnerThread()) {
                int nextc = c + acquires;
                if (nextc < 0)
                    throw new Error("Maximum lock count exceeded");
                setState(nextc);
                return true;
            }
            return false;
        }
这里也就发现了。公平锁和非公平锁的差别就是在争抢锁的时候是否会判断队列。公平锁会严格的去判断队列里是否含有该线程,所以会有遍历链表的操作,这也是为啥性能没有非公平锁高了。。但是公平锁严格遵循公平的原则了,所以使用哪一个就要根据场景了。一般情况下是使用非公平锁,提高性能。
4,读写锁
分析完了ReentrantLock以后,再来谈谈读写锁。它是将读写进行了分离,读线程可以同时多个并行,写请求只有一个线程,读写是互斥的。先写个demo,然后方便分析读写锁的源码:
public class ReentractReadWriteLockDemo {


    static ReentrantReadWriteLock lock = new ReentrantReadWriteLock();
    //获取写锁
    static ReentrantReadWriteLock.WriteLock writeLock = lock.writeLock();
    //获取读锁
    static ReentrantReadWriteLock.ReadLock readLock = lock.readLock();

    public static void main(String[] args) {
        writeLock.lock();

        writeLock.unlock();

        readLock.lock();

        readLock.unlock();

    }
}
首先看看ReentrantReadWriteLock的构造函数的内容:
public ReentrantReadWriteLock() {
        this(false);
    }

    public ReentrantReadWriteLock(boolean fair) {
        //默认的是非公平锁
        sync = fair ? new FairSync() : new NonfairSync();
        readerLock = new ReadLock(this);
        writerLock = new WriteLock(this);
    }

   //通过这里可以看出来,所谓的readLock或者是WriteLock底层的实现其实就是sync,ReentrantReadWriteLock就是一个包装的外壳。ReadLock和WriteLock都是ReentrantReadWriteLock都是其内部类。
   protected ReadLock(ReentrantReadWriteLock lock) {
    sync = lock.sync;
   }
写锁的lock()方法剖析:
        public void lock() {
            sync.acquire(1);
        }
       #这个方法是不是很熟悉。就是AQS类的方法,tryAcquire()方法在AQS没有实现,所以我们应该看看你它的具体实现。
       public final void acquire(int arg) {
        if (!tryAcquire(arg) &&
            acquireQueued(addWaiter(Node.EXCLUSIVE), arg))
            selfInterrupt();
    }
那么重点就是看砍tryAcquire()方法了,通过之前的分析已经很清楚了,这个方法其实就是加锁的操作,具体看看它的实现:
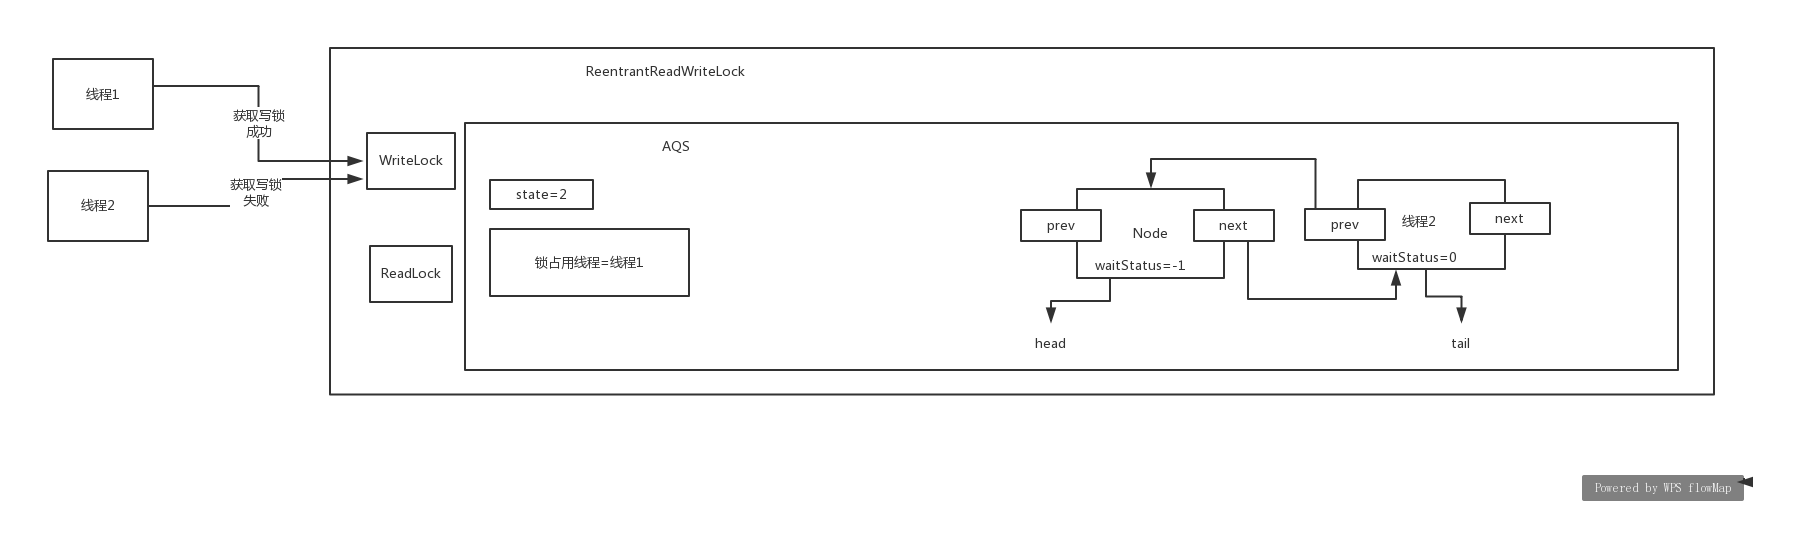
        protected final boolean tryAcquire(int acquires) {
            Thread current = Thread.currentThread();
            //获取state的值
            int c = getState();
            //这是重点:读写锁是巧妙的运用了state是int类型,32位,将前面的16位(高位)作为读锁,后面的16位(低位)作为写锁的标志。这就是获取低16位,写锁。
            int w = exclusiveCount(c);
            //说明是加锁了
            if (c != 0) {
                // (Note: if c != 0 and w == 0 then shared count != 0)
                //说明是加了读锁或者是加了写锁,但是 不是该线程。
                if (w == 0 || current != getExclusiveOwnerThread())
                    return false;
                if (w + exclusiveCount(acquires) > MAX_COUNT)
                    throw new Error("Maximum lock count exceeded");
                // Reentrant acquire
                setState(c + acquires);
                return true;
            }
            //前一个方法表示是公平锁实现还是非公平锁实现的,公平锁还要再判断是否在队列里,非公平锁则不需要。
            if (writerShouldBlock() ||
                !compareAndSetState(c, c + acquires))
                return false;
            setExclusiveOwnerThread(current);
            return true;
        }
写锁的整个流程还是很清晰的,我们可以根据源码画图,场景:线程1第一次来获取锁,线程1重入加锁,线程2来获取锁,但是没有成功,入队列:
加读锁,源码如下:
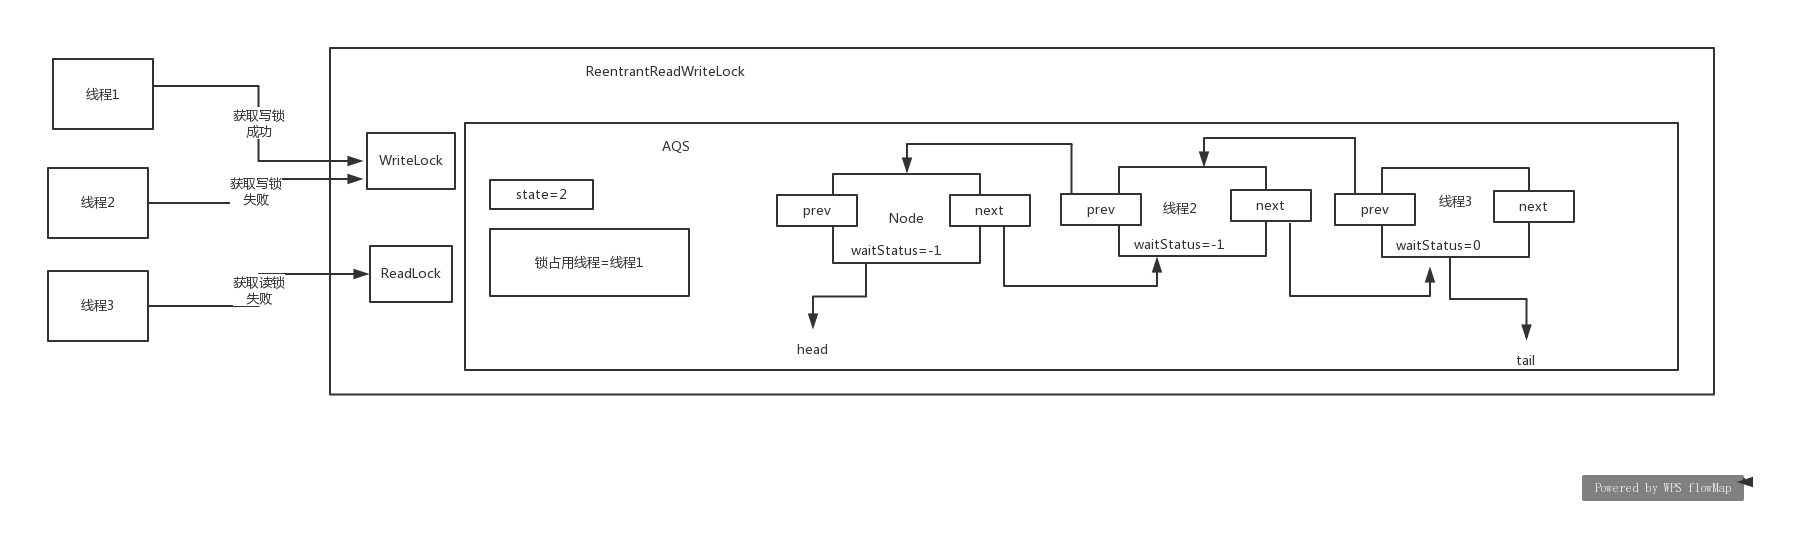
        public void lock() {
            sync.acquireShared(1);
        }


     public final void acquireShared(int arg) {
        //可以发现AQS也没有实现tryAcquireShared()方法,那么看子类是如何实现的,也是重点剖析的
        if (tryAcquireShared(arg) < 0)
            doAcquireShared(arg);
    }
tryAcquireShared()方法的具体实现:
        protected final int tryAcquireShared(int unused) {
            Thread current = Thread.currentThread();
            int c = getState();
            //判断别的线程是否占有了写锁
            if (exclusiveCount(c) != 0 &&
                getExclusiveOwnerThread() != current)
                return -1;
            //获取高16位,判断是否加了读锁
            int r = sharedCount(c);
            if (!readerShouldBlock() &&
                r < MAX_COUNT &&
                compareAndSetState(c, c + SHARED_UNIT)) {
                if (r == 0) {
                    firstReader = current;
                    firstReaderHoldCount = 1;
                } else if (firstReader == current) {
                    firstReaderHoldCount++;
                } else {
                    HoldCounter rh = cachedHoldCounter;
                    if (rh == null || rh.tid != getThreadId(current))
                        cachedHoldCounter = rh = readHolds.get();
                    else if (rh.count == 0)
                        readHolds.set(rh);
                    rh.count++;
                }
                return 1;
            }
            return fullTryAcquireShared(current);
        }
假设这时候线程3来加读锁,如果获取失败,进入方法:
doAcquireShared:
    private void doAcquireShared(int arg) {
        final Node node = addWaiter(Node.SHARED);
        boolean failed = true;
        try {
            boolean interrupted = false;
            for (;;) {
                final Node p = node.predecessor();
                if (p == head) {
                    int r = tryAcquireShared(arg);
                    if (r >= 0) {
                        setHeadAndPropagate(node, r);
                        p.next = null; // help GC
                        if (interrupted)
                            selfInterrupt();
                        failed = false;
                        return;
                    }
                }
                if (shouldParkAfterFailedAcquire(p, node) &&
                    parkAndCheckInterrupt())
                    interrupted = true;
            }
        } finally {
            if (failed)
                cancelAcquire(node);
        }
    }
这时候的图形是:
释放锁的过程也是雷同的。只要一步一步去分析,就ok了。主要是学会根据源码画图,会分析这个流程,我觉得这个技能是必备的。
5,condition
condition的await()和signal(),和wait(),notify()其实是实现相同的功能的。我们看看这里看看await()和signal()是如何基于AQS来实现这种效果的呢??先给个演示的demo。
public class ConditionDemo {

    static ReentrantLock lock = new ReentrantLock();

    static Condition condition = lock.newCondition();

    public static void main(String[] args) {


        new Thread() {
            @Override
            public void run() {

                lock.lock();
                System.out.println("第一个线程await之前的操作............");

                try {
                    condition.await();
                } catch (InterruptedException e) {
                    e.printStackTrace();
                }

                System.out.println("第一个线程await之后的操作............");
                lock.unlock();
            }
        }.start();

        try {
            Thread.sleep(1000);
        } catch (InterruptedException e) {
            e.printStackTrace();
        }

        new Thread() {
            @Override
            public void run() {
                lock.lock();
                System.out.println("第二个线程唤醒线程1之前............");
                condition.signal();
                System.out.println("第二个线程唤醒线程1之后............");
                lock.unlock();
            }
        }.start();
    }
}
我们基于这个demo来画出演示图,源码就不粘贴了。当线程1执行完await()方法,线程2获取到锁的时候:
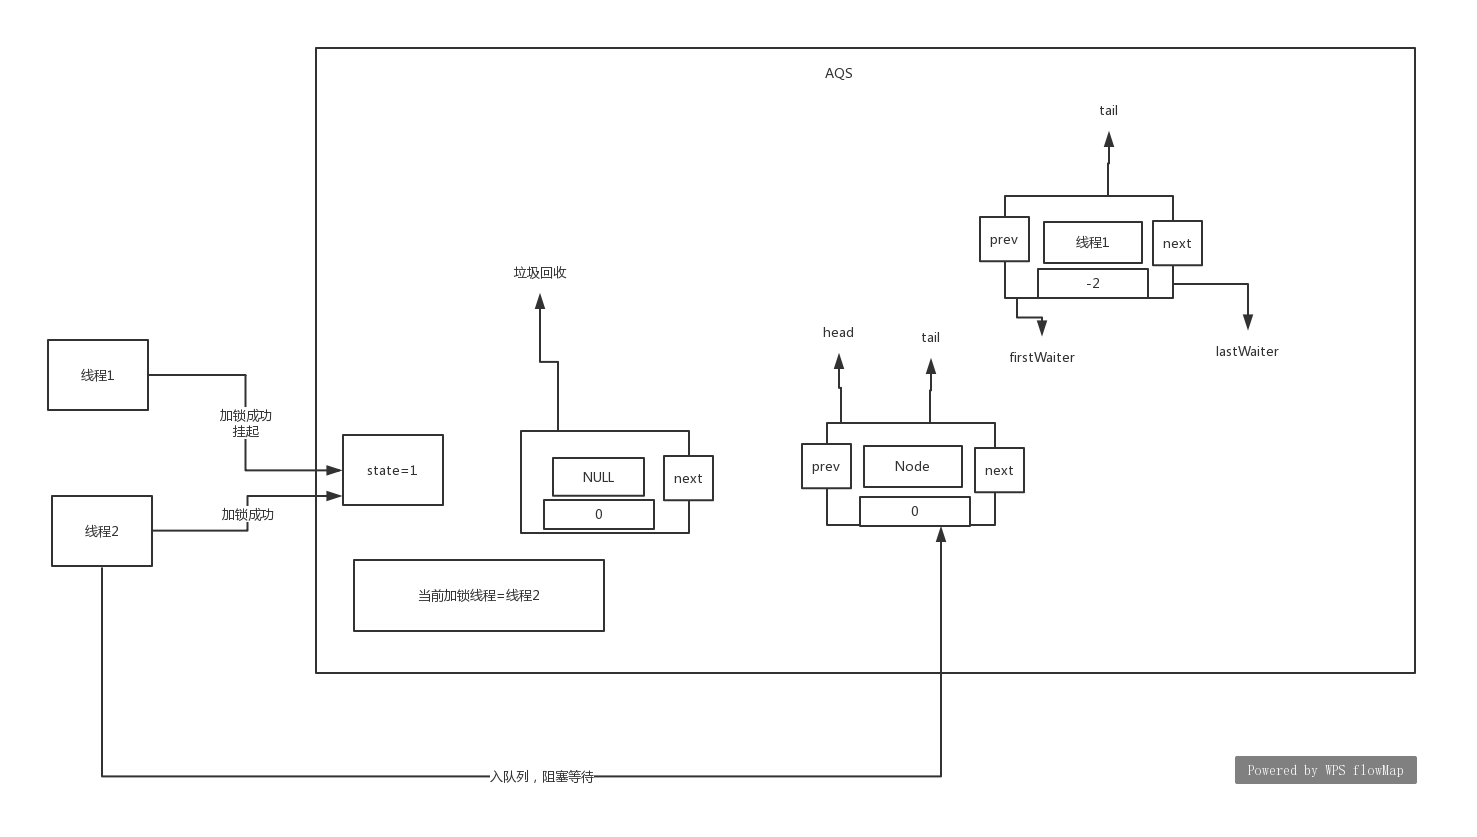
当线程2执行完signal()操作会怎样呢?
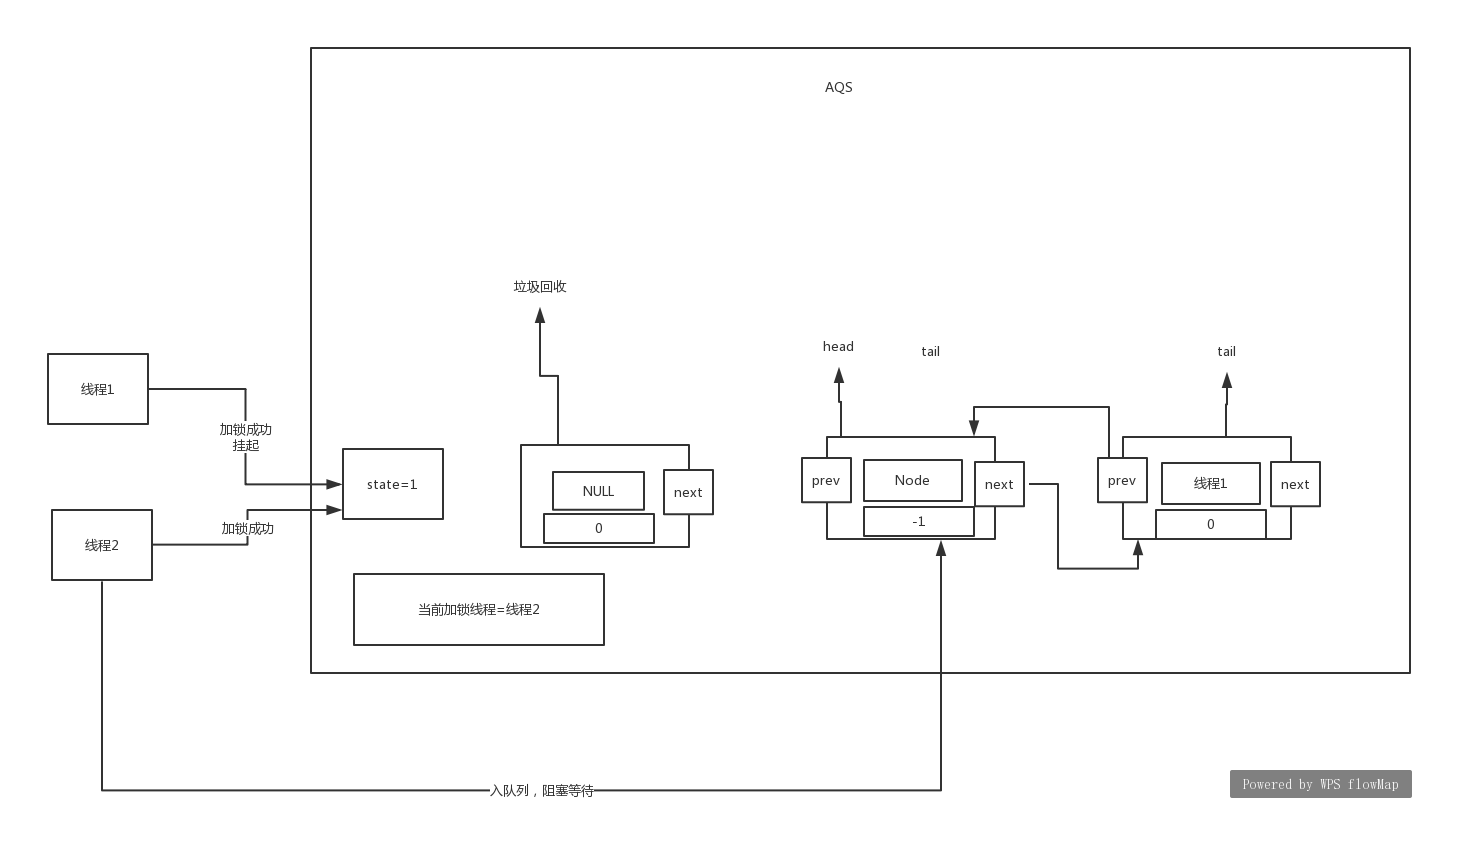
其实可以发现,当线程2执行完signal()方法,其实是将线程1从condition队列放到了阻塞等待队列。这样线程1又可以等待唤醒,来继续获取锁了。这两个图就能完全说明await()和signal()方法的功能了。总结下:线程1执行await()方法其实是将自己放入到一个condition队列,并将自己挂起。然后线程2执行signal()方法,会从condition队列转到阻塞等待队列。然后线程2释放锁,就会唤醒线程1来执行了。


 1077
1077


 被折叠的 条评论
为什么被折叠?
被折叠的 条评论
为什么被折叠?
 到【灌水乐园】发言


