


 本文介绍了如何利用Android Drawable Shape的layer-list组合多个Shape,来创建复杂的田字格图形。通过设置不同属性,如旋转角度、dashGap和dashWidth,成功实现了田字格的绘制,并给出了具体的XML代码示例。
Android Drawable Shape 组合画田字格
我们常用Android Drawable Shape来创建Android的背景、圆角边框、分隔线等图形。这样的教程网上有许多。象下面的
Android中的Shape使用总结Android设置虚线、圆角、渐变
我也常在项目中使用。但最近想做一个田字格背景,用上面的方法就不行了。
以前我对Android Drawable shape的了解并不深入,经过在网上不断寻找,最后找到了个较全面的文档
Android Drawable XML Documentation
看过这个文档后,对Android Drawable shape的理解较透了。原来Android Drawable shape不仅可以画简单图形,还可以做动画,还可以加入图片,当然还有我需要的功能,多个Shape组合,构建较复杂的图形。
使用layer-list组合多个Shap
话不多说,把我弄的代码贴出来
android:width="96dp"
android:height="96dp">
android:width="1dp"
android:color="#FF0000" />
android:fromDegrees="90"
android:pivotX="50%"
android:pivotY="50%"
android:toDegrees="90">
android:width="1dp"
android:color="#FF0000"
android:dashGap="3dp"
android:dashWidth="1dp" />
android:width="1dp"
android:color="#FF0000"
android:dashGap="3dp"
android:dashWidth="1dp" />
画出的田字格图形如下
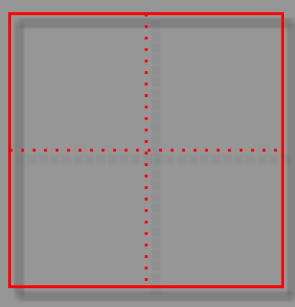
上面的代码也很简单,使用了一个标签layer-list,中间套着多个item,每个item中加一个shape。
上面的代码还有两点需要说一下:
1、必须设置宽高,不然竖线只能画和宽度一样长。
2、画竖线的方法就是横线加旋转。那个旋转的设置还是比较麻烦的。旋转的代码如下
android:fromDegrees="90"
android:pivotX="50%"
android:pivotY="50%"
android:toDegrees="90">
android:width="1dp"
android:color="#FF0000"
android:dashGap="3dp"
android:dashWidth="1dp" />
下面介绍一下那四个属性
android:fromDegrees="90" 开始的角度
android:toDegrees="90" 结束的角度
开始和结束都是90度,就竖起来了
android:pivotX="50%" 旋转中心点X座标,可以使用百分比设置
android:pivotY="50%" 旋转中心点Y座标,可以使用百分比设置
都设成50%就是在中心旋转。
关于 Android Drawable shape 的更从介绍可以看文档:Android Drawable XML Documentation


 被折叠的 条评论
为什么被折叠?
被折叠的 条评论
为什么被折叠?
 到【灌水乐园】发言


