从网上看了一些,好像说是要先调用uni.getUserProfile 或者uni.getUserInfo获取用户信息后,然后再调用uni.login才行,但是我看着uni.getUserProfile和uni.getUserInfo 返回的都是一些匿名信息(nickName: "微信用户", 头像也是统一的灰色头像),不知道有啥用哦,应该是之前是可以正常返回的,后来不知哪个版本后应该是为了用户的隐私、安全啥的,就都返回匿名信息了。

上面都是uniapp官网提供的一些API,地址如下:

 https://uniapp.dcloud.net.cn/api/plugins/login.html#login

这些是一些获取授权信息的一些API,除此外,uniapp还提供button组件设置open-type 更方便我们获取授权信息,具体如下:

<template>
  <view>
    <button class="WX-login-btn" open-type="getUserInfo" @getuserinfo="getuserinfo">微信登录</button>
  </view>
</template>
<script>
export default {
  data() {
    return {}
  },
  methods: {
    getuserinfo(e) {
      console.log(e.detail.userInfo)
    }
  }
}
</script>
  • 1.
  • 2.
  • 3.
  • 4.
  • 5.
  • 6.
  • 7.
  • 8.
  • 9.
  • 10.
  • 11.
  • 12.
  • 13.
  • 14.
  • 15.
  • 16.
  • 17.

open-type可选值以及对应的方法等具体信息见官网: https://uniapp.dcloud.net.cn/component/button.html

这些都是获取一些授权信息的API,除了这些还有:

uni.authorize(提前向用户发起授权请求。调用后会立刻弹窗询问用户是否同意授权小程序使用某项功能或获取用户的某些数据,但不会实际调用对应接口。如果用户之前已经同意授权,则不会出现弹窗,直接返回成功。如果用户之前拒绝了授权,此接口会直接进入失败回调,一般搭配uni.getSettinguni.openSetting使用。)地址如下:

 https://uniapp.dcloud.net.cn/api/other/authorize.html

 https://uniapp.dcloud.net.cn/api/other/setting.html

下面是一个简单使用示例: 

// 授权信息
getAuthorizeInfo() {
  return new Promise((resolve, reject) => {
    uni.getSetting({
      success: res => {
        if (res.authSetting['scope.userInfo']) {
          uni.getUserInfo({
            provider: 'weixin',
            success: ({ userInfo }) => {
              resolve(userInfo)
            },
            fail(e) {
              reject(e)
            }
          })
        } else {
          uni.authorize({
            scope: 'scope.userInfo',
            success: e => {
              console.log(e)
            },
            fail: e => {
              uni.openSetting({
                success(res) {
                  console.log(res)
                }
              })
            }
          })
        }
      },
      fail(e) {
        reject(e)
      }
    })
  })
}
  • 1.
  • 2.
  • 3.
  • 4.
  • 5.
  • 6.
  • 7.
  • 8.
  • 9.
  • 10.
  • 11.
  • 12.
  • 13.
  • 14.
  • 15.
  • 16.
  • 17.
  • 18.
  • 19.
  • 20.
  • 21.
  • 22.
  • 23.
  • 24.
  • 25.
  • 26.
  • 27.
  • 28.
  • 29.
  • 30.
  • 31.
  • 32.
  • 33.
  • 34.
  • 35.
  • 36.
  • 37.

大家看下上面如果有用到的就用,用不到的话就先不管。

登录

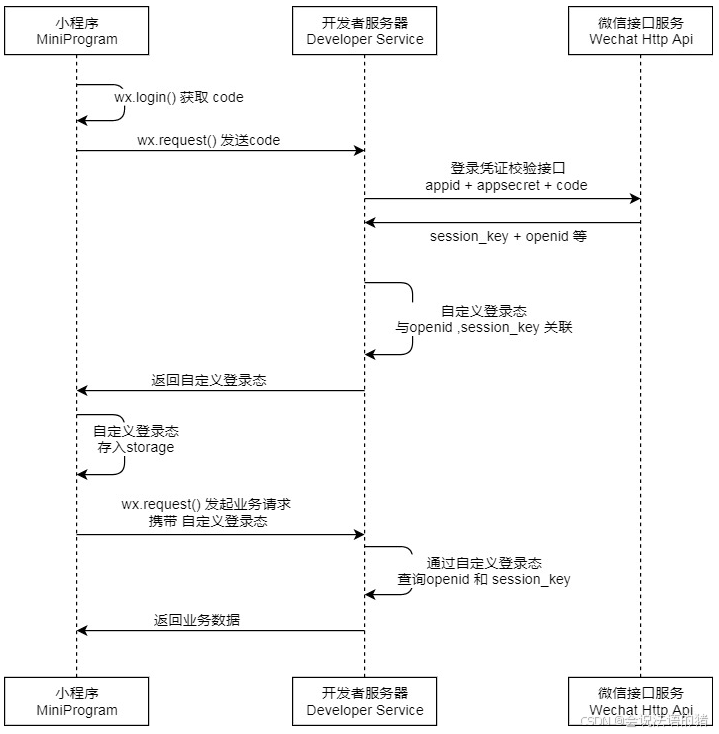
那正常核心的是先调用uni.login获取到临时的code,然后通过code、appid(小程序ID)、AppSecret(小程序密钥) 、grant_type(值为"authorization_code")去调用微信的接口

https://api.weixin.qq.com/sns/jscode2session
  • 1.

但是因为涉及的敏感数据、为了安全起见,该接口要在服务端调用。

code是uniapp中通过uni.login获取的( https://uniapp.dcloud.net.cn/api/plugins/login.html#login) ,获取到后,调用后端的接口,将code传递给后端,然后后端去调用如上接口换取到openid(openid就是微信登录后的用户的唯一凭证),然后后端获取到openid后,返回给前端,前端存一下,然后后面再调用接口时,应该时将openid携带上。小程序登录官网: https://developers.weixin.qq.com/miniprogram/dev/OpenApiDoc/user-login/code2Session.html

整体的流程图如下:

uniapp微信小程序端实现微信登录_html

大体的代码如下:简单写了一下,供参考

// 微信登录
wxLogin(e) {
  if (!this.isCheck) {
    uni.showToast({
      title: '请勾选并阅读协议',
      icon: 'none'
    })
    return
  }
  uni.login({
    provider: 'weixin', //使用微信登录
    success: loginRes => {
      const code = loginRes.code
      // 将code传递给后端
      request({
        url: 'xxxxxxx',
        method: 'post',
        data: { code }
      }).then(({ openid }) => {
        console.log(openid, '获取到openid')
        uni.setStorageSync('openid', openid)
      })
    }
  })
}
  • 1.
  • 2.
  • 3.
  • 4.
  • 5.
  • 6.
  • 7.
  • 8.
  • 9.
  • 10.
  • 11.
  • 12.
  • 13.
  • 14.
  • 15.
  • 16.
  • 17.
  • 18.
  • 19.
  • 20.
  • 21.
  • 22.
  • 23.
  • 24.
  • 25.

如果说在调用uni.login之前还需要先获取用户的其他的需要授权的一些信息,就看上面我说的api就可以了。