


Nagios是企业普遍使用的最具影响力的网络信息监视系统之一,它可以动态监视指定的网络状态,并在状态异常时发出警告音或邮件报警通知运维人员。监控的类型和警报定时器是完全可定制的。
Nagios的另一强大功能是它能同时监测主机和服务。例如,它可以同时监测到IP地址和TCP/UDP端口号。为进一步阐述此功能,我们假定有台需要监测的web服务器,Nagios可运用在服务器上基于IP/服务器名运行ping命令的方法检测服务器是否在线,同时当服务器的RTT(往返时延)增加时,Nagios会随时告警。另外,Nagios还能检测TCP的80端口(web服务器)是否可达,比如可能出现服务器在线但Apache/IIS没有响应的情况。
而基于Nagios的第三方监测工具如Centreon, FAN , op5 Monitor 在界面设计,自动化运行和技术支持方面在独立的Nagios引擎基础上提供了相应的补充。
本段教程将展示Linux下Nagios的安装与配置.
Debian或Ubuntu下Nagios的安装
Debian系统用户使用apt-get命令就可安装Nagios:
root@mrtg:~# apt-get install nagios3
Nagios安装过程中可以设置邮件服务器,安装后也可以进行自定义设置。
提示:为使Nagios可正常发送邮件通知,需正确配置SMTP。
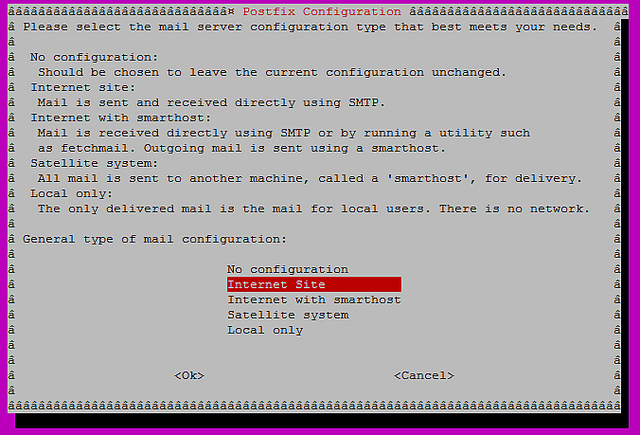
可以看到Nagios支持多种邮件传送方式。最常见的莫过于服务器(Internet Site)直接向接收者发送邮件,另一种常见的形式是用智能主机或中继服务器,将邮件传送至中继邮件服务器,然后它负责将邮件传送给接收者。
进行下一步操作时服务器的域名需要包含进去。

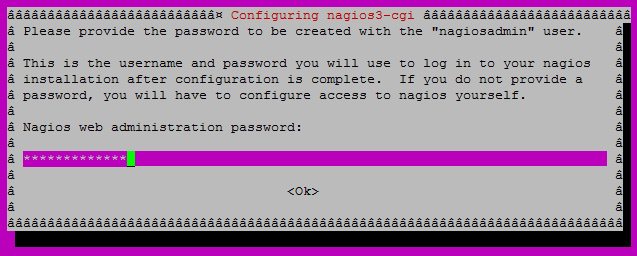
最后,设置一下Nagios管理员‘nagiosadmin’的密码,用户可以之后自行修改密码。
CentOS或RHEL下Nagios的安装
使用yum命令来安装,建立repoforge库之后运行如下yum命令:
[root@mrtg ~]# yum install nagios nagios-plugins
监测需求
本段教程中,我们希望完成以下监测内容:
每三分钟监测一次所有Linux服务器。
每三分钟监测一次所有思科路由器。
发出告警前Nagios都将进行3次验证以确保问题确有发生。
当设备的往返时延超过100ms并且/或包丢失量超过20%将发出邮件告警。
余下的教程将指导您如何在Linux系统中配置Nagios。
Ubuntu下Nagios的配置
明确Nagios配置文件的地址至关重要,以下路径指明了Debian系统下Nagios的配置文件地址。
/etc/nagios-plugins 实现监测功能的专有脚本存放地址
/etc/nagios3 添加主机、服务,定义检测和定时器的配置文件
/usr/lib/nagios/plugins 用于监测的可执行文件
接下来的步骤相互关联,由此开始定义主机,主机组及向主机组添加服务操作。
添加主机模板
我们对同一类型的主机定义了对应的模板,这里使用安装文件作举例说明。
首先,为Linux设备定义主机模板。
root@mrtg:~# cd /etc/nagios3/conf.d
root@mrtg:/etc/nagios3/conf.d/# cp generic-host_nagios2.cfg linux-server.cfg
如下编辑linux-server.cfg。需要修改部分已经标出。
root@mrtg:/etc/nagios3/conf.d/# vim linux-server.cfg
-
define host{
name linux-server ; 名称,需修改
notifications_enabled 1
event_handler_enabled 1
flap_detection_enabled 1
failure_prediction_enabled 1
process_perf_data 1
retain_status_information 1
retain_nonstatus_information 1
check_command example-host-check ; 检查所用脚本,需修改
check_interval 3 ; 连续检查的间隔,需修改
max_check_attempts 3 ; 产生邮件告警前的自检次数,需修改
notification_interval 0
notification_period 24x7
notification_options d,u,r
contact_groups admins ; 邮件将要发送至的组,需修改
register0
}
接下来,为Cisco设备定义主机模板。
root@mrtg:/etc/nagios3/conf.d/# cp linux-server.cfg cisco-device.cfg
如下修改cisco-device.cfg。需要修改部分已经标出。
root@mrtg:/etc/nagios3/conf.d/# vim cisco-device.cfg
-
define host{
name cisco-device ;名称,需修改
notifications_enabled 1
event_handler_enabled 1
flap_detection_enabled 1
failure_prediction_enabled 1
process_perf_data 1
retain_status_information 1
retain_nonstatus_information 1
check_command example-host-check ; 检查时使用的脚本,需修改
check_interval 3 ; 连续检查间隔,需修改
max_check_attempts 3 ; 产生邮件告警前的自检次数,需修改
notification_interval 0
notification_period 24x7
notification_options d,u,r
contact_groups admins ; 邮件将要发至的组,需修改
register 0
}
添加主机
现在已定义主机模板,就可以添加需要监测的主机。以默认的文件作例子展示如下内容。
root@mrtg:/etc/nagios3/conf.d/# cp localhost_nagios2.cfg example.cfg
root@mrtg:/etc/nagios3/conf.d/# vim example.cfg
-
# Host 1
define host{
use linux-server ; 使用的主机模板名
host_name our-server ; nagios使用的主机名
alias our-server
address 172.17.1.23 ; 主机的IP地址
}
# Host 2
define host{
use cisco-device ; 使用的主机模板名
host_name our-router ; nagios使用的主机名
alias our-router
address 172.17.1.1 ; 主机的IP地址
}
主机组定义
当有多个主机时,为方便管理,建议将相似的主机组成一组。
root@mrtg:/etc/nagios3/conf.d/# vim hostgroups_nagios2.cfg
-
define hostgroup {
hostgroup_name linux-server ; 主机组名
alias Linux Servers
members our-server ; 组员列表
}
define hostgroup {
hostgroup_name cisco-device ; 主机组名
alias Cisco Devices
members our-server ; comma separated list of members
}
定义服务
首先,定义一个服务example-host-check:当往返时延达到100ms预警值并且有20%包丢失时发出警告,而紧急告警设置为5000ms且包丢失比率为100%,只执行一个IPv4的ping请求检测。
root@mrtg:~# vim /etc/nagios-plugins/config/ping.cfg
-
define command{
command_name example-host-check
command_line /usr/lib/nagios/plugins/check_ping -H '$HOSTADDRESS$' -w 100,20% -c 5000,100% -p 1 -4
}
然后,将命令关联至主机组。
root@mrtg:/etc/nagios3/conf.d/# vim services_nagios2.cfg
-
define service {
hostgroup_name linux-server
service_description Linux Servers
check_command example-host-check
use generic-service
notification_interval 0 ; 初始化设置为0
}
define service {
hostgroup_name cisco-device
service_description Cisco Devices
check_command example-host-check
use generic-service
notification_interval 0 ; 初始化设置为0
}
联系人定义
进行如下定义将发送邮件需要的地址添加至Nagios。
root@mrtg:/etc/nagios3/conf.d/# vim contacts.cfg
-
define contact{
contact_name root
alias Root
service_notification_period 24x7
host_notification_period 24x7
service_notification_options w,u,c,r
host_notification_options d,r
service_notification_commands notify-service-by-email
host_notification_commands notify-host-by-email
email root@localhost, sentinel@example.tst
}
最后,试运行初始化检测是否有配置错误。如果没有错误,Nagios开始安全运行。
root@mrtg:~# nagios -v /etc/nagios3/nagios.cfg
root@mrtg:~# service nagios3 restart
CentOS/RHEL上的Nagios配置
Redhat系统中Nagios的配置文件地址如下所示。
/etc/nagios/objects 添加主机、服务,定义监测和定时器的配置文件
/usr/lib/nagios/plugins 实现监测的可执行文件
添加主机模板
为特定类型的主机创建所需的模板,相应修改安装所需的文件。
[root@mrtg objects]# cd /etc/nagios/objects/
[root@mrtg objects]# vim templates.cfg
-
define host{
name linux-server
use generic-host
check_period 24x7
check_interval 3
retry_interval 1
max_check_attempts 3
check_command example-host-check
notification_period 24x7
notification_interval 0
notification_options d,u,r
contact_groups admins
register 0
}
define host{
name cisco-router
use generic-host
check_period 24x7
check_interval 3
retry_interval 1
max_check_attempts 3
check_command example-host-check
notification_period 24x7
notification_interval 0
notification_options d,u,r
contact_groups admins
register 0
}
添加主机和主机组
这里以默认的配置文件为例,主机和主机组添加至配置文件中。
[root@mrtg objects]# cp localhost.cfg example.cfg
[root@mrtg objects]# vim example.cfg
-
#Adding Linux server
define host{
use linux-server
host_name our-server
alias our-server
address 172.17.1.23
}
#Adding Cisco Router
define host{
use cisco-router
host_name our-router
alias our-router
address 172.17.1.1
}
# HOST GROUP DEFINITION
define hostgroup{
hostgroup_name linux-servers
alias Linux Servers
members our-server
}
define hostgroup{
hostgroup_name cisco-router
alias cisco-router
members our-router
}
服务定义
定义一个服务example-host-check:当往返时延达到100ms预警值并且有20%包丢失时发出警告,而紧急告警设置为5000ms且包丢失比率为100%,只执行一个IPv4的ping请求检测。
[root@mrtg objects]# vim commands.cfg
-
define command{
command_name example-host-check
command_line $USER1$/check_ping -H $HOSTADDRESS$ -w 100.0,20% -c 5000.0,100% -p 1 -4
}
联系人定义
告警要发送的邮件地址添加至Nagios中。
[root@objects objects]# vim contacts.cfg
-
define contact{
contact_name nagiosadmin
use generic-contact
alias Nagios Admin
email nagios@localhost, sentinel@example.tst
}
最后,准备启动Nagios服务,可先试运行检测配置是否出错。
[root@mrtg ~]# nagios –v /etc/nagios/nagios.cfg
[root@mrtg ~]# service nagios restart
[root@mrtg ~]# chkconfig nagios on
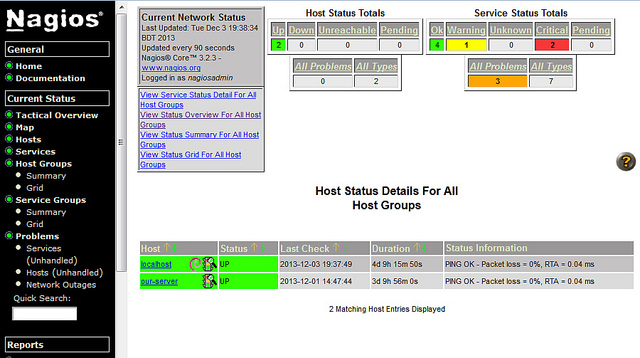
配置后访问Nagios
现在一切就绪,可以开始Nagios之旅了。Ubuntu/Debian用户可以通过打开 http://IP地址/nagios3 网页访问Nagios,CentOS/RHEL用户可以打开 http://IP地址/nagios ,如 http://172.17.1.23/nagios3 来访问Nagios。“nagiosadmin”用户则需要认证来访问页面。
若Nagios没有依原设定运行,首先要做的是建立一个测试运行(dry run)。
Debian或Ubuntu系统:
# nagios3 -v /etc/nagios3/nagios.cfg
CentOS或RHEL系统:
# nagios -v /etc/nagios/nagios.cfg
日志文件也会提供重要线索,若需查看可以转至路径/var/log/nagios/nagios.log。
希望本文有所帮助。
本文由 LCTT 原创翻译,Linux中国 荣誉推出 


 1360
1360


 被折叠的 条评论
为什么被折叠?
被折叠的 条评论
为什么被折叠?
 到【灌水乐园】发言


