


背景
现在Android 模块化开发越来越讲究了,比如你开发一个模块,先是在一个独立仓库开发,然后打包成jar或者aar包发布到私有maven仓库,然后APP 的project依赖你的SDK包,基本常规操作就是再在Application onCreate中添加一下初始化方法。
一个好的模块单元测试和自动化测试是少不了的,但是如果是一个复杂的SDK,需要多个参数配置进行初始化的时候怎么办?比如下面:
@Override
public void onCreate(){
super.onCreate();
Log.e("xxx", "DemoApplication onCreate: ");
MySdk.start(new Configuration("xx", "yy"));
}
复制代码
如果我想在不同的测试Case中切换不同的Configuration参数怎么办?
分析
我们先看下 @BeforeClass @Before @Test和 Application onCreate的执行顺序吧
@RunWith(AndroidJUnit4.class)
public class ExampleInstrumentedTest{
@BeforeClass
public static void beforeClass() throws Exception{
Log.e("xxx", "beforeClass: ");
}
@Before
public void setUp() throws Exception{
Log.e("xxx", "setUp: ");
}
@Test
public void beforeApplicationOnCreateTest(){
Log.e("xxx", "beforeApplicationOnCreateTest: ");
}
}
复制代码
Run下然后观察log发现顺序如下
E/xxx: DemoApplication onCreate:
E/xxx: beforeClass:
E/xxx: setUp:
E/xxx: beforeApplicationOnCreateTest:
复制代码
怎么办?Application onCreate是最先执行的,看上去并没有什么切入的时机。
自定义 testInstrumentationRunner
还好google也给这种情况留了一个后手,我们可以自定义testInstrumentationRunner,我们先自定义一个TestApplication 用于自动化测试的
public class TestApplication extends Application{
@Override
public void onCreate(){
super.onCreate();
Log.e("xxx", "TestApplication onCreate: ");
MySdk.start(new Configuration("other", null));
}
}
复制代码
再自定义一个AndroidJUnitRunner
public class TestAndroidJUnitRunner extends AndroidJUnitRunner{
@Override
public Application newApplication(ClassLoader cl, String className, Context context) throws IllegalAccessException, InstantiationException, ClassNotFoundException{
return super.newApplication(cl, TestApplication.class.getName(), context);
}
}
复制代码
最后将 app的build.gradle 中的testInstrumentationRunner切换为我们自定义的TestAndroidJUnitRunner
defaultConfig {
applicationId "com.littersun.beforeapponcreate"
minSdkVersion 17
targetSdkVersion 29
versionCode 1
versionName "1.0"
testInstrumentationRunner "com.littersun.beforeapponcreate.TestAndroidJUnitRunner"
}
复制代码
Run下然后观察log
E/xxx: TestApplication onCreate:
E/xxx: beforeClass:
E/xxx: setUp:
E/xxx: beforeApplicationOnCreateTest:
复制代码
发现Application 确实已经被替换成 TestApplication,貌似一切都没有什么问题了。但是我的开发SDK的配置千变万化,你这不还是只有一种配置吗?客官别急……
进阶
如果确实是上面说的场景,SDK的配置千变万化,怎么让一个case对应一个配置呢?最不济一个Test Class对应一种配置呢?
我们先打一个断点看看,在UI Test中Application onCreate的执行时机
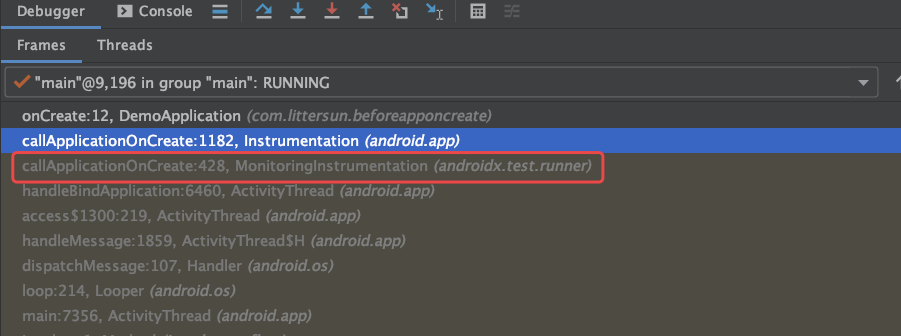
我们很容易发现 MonitoringInstrumentation 中调用了Application onCreate方法,而且AndroidJUnitRunner继承自MonitoringInstrumentation,看上去是一切都明朗了。
我们仔细研究AndroidJUnitRunner中的方法,发现还有一个 onCreate方法,通过阅读源码我们得知,是一个解析运行参数。具体源码解析的过程这里就不展开了。
既然有的切入点了,那我们是不是需要一种优雅的实现方式呢?我们来模仿 @BeforeClass 的实现,新增一个注解@BeforeAppOnCreate
@Retention(RetentionPolicy.RUNTIME)
@Target(ElementType.METHOD)
public @interface BeforeAppOnCreate {
}
复制代码
只要被@BeforeAppOnCreate注解的方法就是在Application onCreate前执行的,看,多优雅。
我们重写下AndroidJUnitRunner
public class TestAndroidJUnitRunner extends AndroidJUnitRunner{
private static final String TAG = "TestAndroidJUnitRunner";
private ClassLoader mClassLoader;
private String mTestClass;
@Override
public void onCreate(Bundle arguments){
Log.e(TAG, "arguments is " + arguments.toString());
RunnerArgs runnerArgs = new RunnerArgs.Builder().fromManifest(this).fromBundle(this, arguments).build();
if (runnerArgs.tests != null && !runnerArgs.tests.isEmpty()) {
mTestClass = runnerArgs.tests.get(0).testClassName;
Log.e(TAG, "TestClass is " + mTestClass);
}
super.onCreate(arguments);
}
@Override
public void callApplicationOnCreate(Application app){
if (!TextUtils.isEmpty(mTestClass)) {
try {
Class> clazz = mClassLoader.loadClass(mTestClass);
Method[] methods = clazz.getMethods();
for (Method method : methods) {
if (method.getAnnotation(BeforeAppOnCreate.class) != null) {
if (!Modifier.isStatic(method.getModifiers())) {
IllegalArgumentException exception = new IllegalArgumentException(method.getName() + "() should be static");
Log.e(TAG, "callApplicationOnCreate: " + exception);
throw exception;
}
method.invoke(null);
break;
}
}
} catch (ClassNotFoundException | IllegalAccessException | InvocationTargetException e) {
Log.e(TAG, e.getMessage(), e);
}
}
super.callApplicationOnCreate(app);
}
@Override
public Application newApplication(ClassLoader cl, String className, Context context) throws IllegalAccessException, InstantiationException, ClassNotFoundException{
mClassLoader = cl;
return super.newApplication(cl, className, context);
}
}
复制代码
最后再 Test class中添加注解方法
@RunWith(AndroidJUnit4.class)
public class ExampleInstrumentedTest{
@BeforeAppOnCreate
public static void beforeAppOnCreate(){
Log.e("xxx", "beforeAppOnCreate: ");
}
@BeforeClass
public static void beforeClass() throws Exception{
Log.e("xxx", "beforeClass: ");
}
@Before
public void setUp() throws Exception{
Log.e("xxx", "setUp: ");
}
@Test
public void beforeApplicationOnCreateTest(){
Log.e("xxx", "beforeApplicationOnCreateTest: ");
}
}
复制代码
Run下然后观察log
E/xxx: beforeAppOnCreate:
E/xxx: DemoApplication onCreate:
E/xxx: beforeClass:
E/xxx: setUp:
E/xxx: beforeApplicationOnCreateTest:
复制代码
我们发现第一行log就是 beforeAppOnCreate,emmmm……这次应该没有问题了吧。客观别急……
再进阶
由于Android Instrumented Test的特性,所有tese case 只会在一次APP的生命周期中运行,也就是说刚刚花了那么大力气,还是只能初始化一次SDK,怎么办?!没办法,google爸爸就是强,也想到了这个问题。为了避免每个case之间的相互干扰,google推出了 Orchestrator
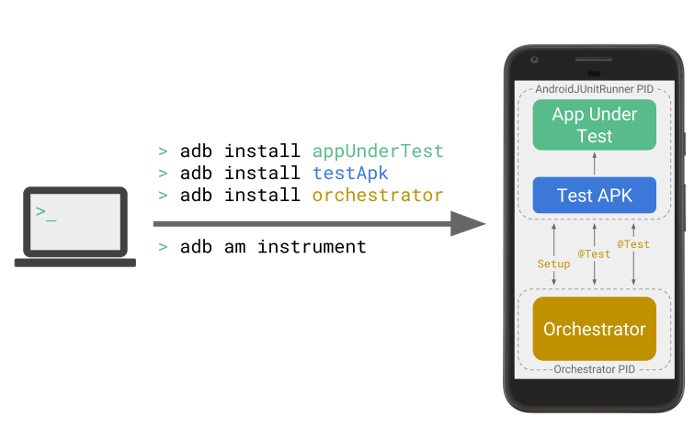
Android Test Orchestrator 可为您的测试环境提供以下优势:
最小共享状态。每个测试都在其自己的 Instrumentation 实例中运行。因此,如果您的测试共享应用状态,则每次测试后都会从设备的 CPU 或内存中移除该共享状态的一大部分。
崩溃被隔离。即使有一个测试崩溃,也只会关闭它自己的 Instrumentation 实例,因此套件中的其他测试仍会运行。
我们集成Orchestrator后再新增一个case
@RunWith(AndroidJUnit4.class)
public class OtherInstrumentedTest{
@BeforeAppOnCreate
public static void beforeAppOnCreate(){
Log.e("xxx", "Other beforeAppOnCreate: ");
}
@BeforeClass
public static void beforeClass() throws Exception{
Log.e("xxx", "Other beforeClass: ");
}
@Before
public void setUp() throws Exception{
Log.e("xxx", "Other setUp: ");
}
@Test
public void beforeApplicationOnCreateTest(){
Log.e("xxx", "Other beforeApplicationOnCreateTest: ");
}
}
复制代码
然后执行./gradlew connectedCheck后观察log
E/xxx: beforeAppOnCreate:
E/xxx: DemoApplication onCreate:
E/xxx: beforeClass:
E/xxx: setUp:
E/xxx: beforeApplicationOnCreateTest:
E/xxx: Other beforeAppOnCreate:
E/xxx: DemoApplication onCreate:
E/xxx: Other beforeClass:
E/xxx: Other setUp:
E/xxx: Other beforeApplicationOnCreateTest:
复制代码
好,大功告成,代码跑的飞起!
这里我把代码仓库地址也贴上,方便大家run demo体验下。
github.com/LitterSun/B…


 3516
3516


 被折叠的 条评论
为什么被折叠?
被折叠的 条评论
为什么被折叠?
 到【灌水乐园】发言


