


skywalking的架构图如下:
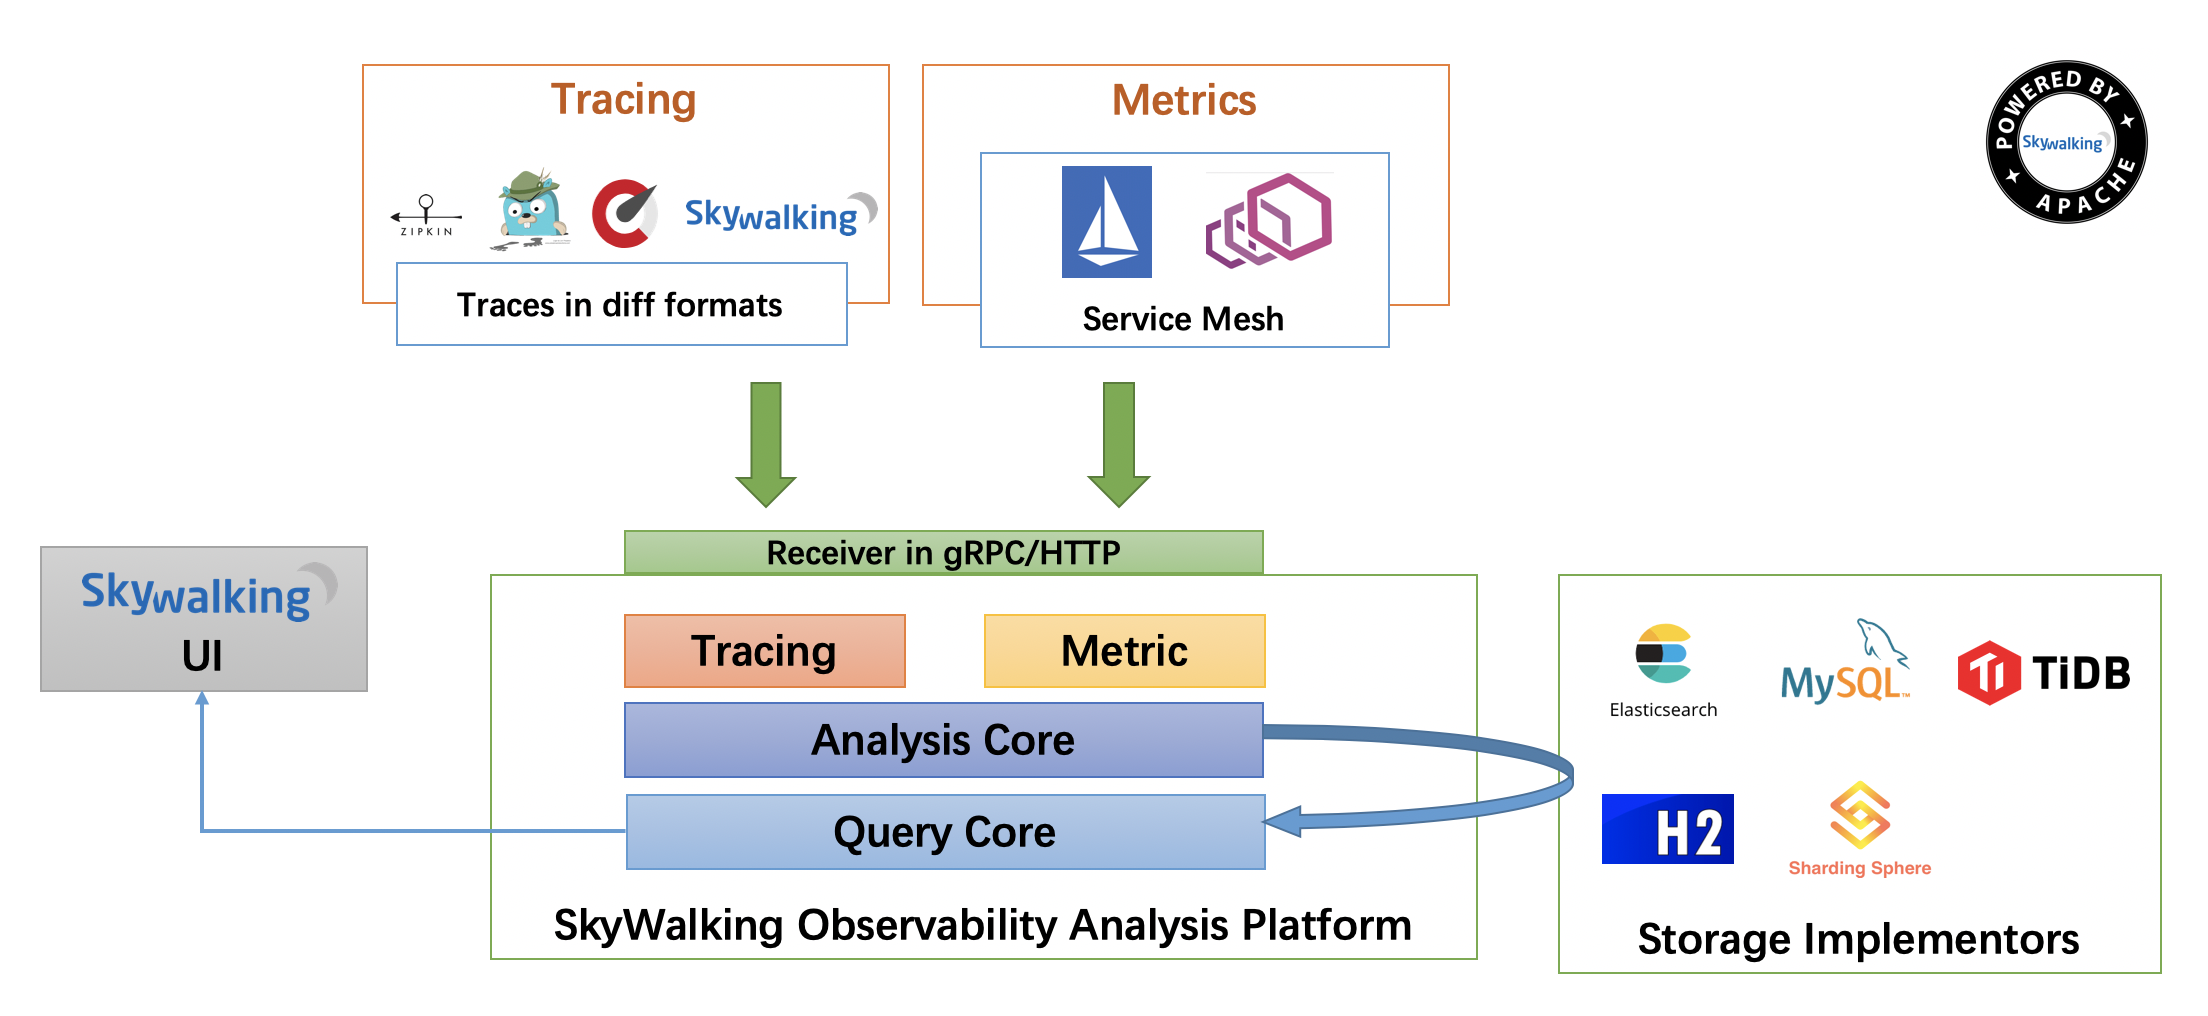
Skywalking的agent负责采集数据,发送到collector,collector聚合,并且存储这些数据,且提供了一个简洁使用的UI端,可共我们查看监控的指标。
下面我们来开始分析skywalking的源码。
下载源码并构建
因为skywalking为了实现高性能通信,采用的是grpc的方式来实现服务器与客户端的数据传输的,所以导入之后我们需要稍微做一些事情,我们可以参考docs/en/guides/How-to-build.md这篇文档来构建。
打包构建
我们可以在github上面将skywalking源码fork一份,然后下载到自己的本地。
// 直接
git clone --recurse-submodules https://github.com/apache/skywalking.git
// 或者
git clone https://github.com/apache/skywalking.git
cd skywalking/
git submodule init
git submodule update
执行命令:
./mvnw clean package -DskipTests
最终打好的包在dist目录下面
在IDEA里面构建源码
用IDEA打开skywalking项目(作为maven项目导入)
然后在skywalking所在目录命令行运行脚本去编译构建(因为skywalking用到了grpc):
./mvnw compile -Dmaven.test.skip=false
然后查看设置生成的源代码(主要是看potobuf文件编译生成的源代码)
apm-protocol/apm-network/target/generated-sources/protobuf选中这个目录下面的grpc-java和java,然后右键选择Mark Directory As-->Generated Sources Root如下图所示
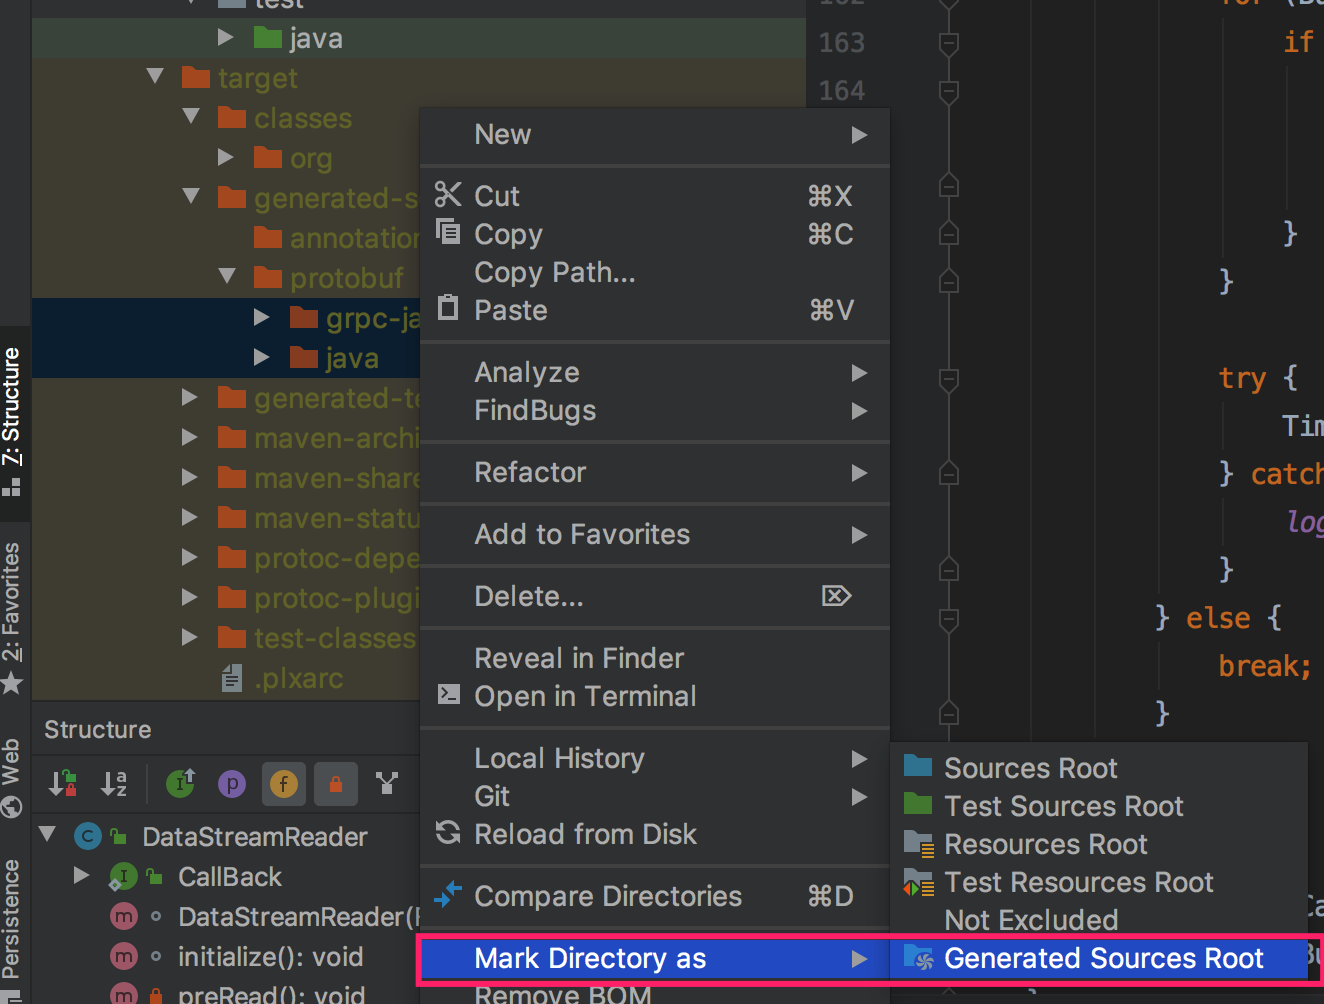
oap-server/server-core/target/generated-sources/protobuf目录的grpc-java和java文件夹Mark Directory As-->Generated Sources Root`
oap-server/server-receiver-plugin/receiver-proto/target/generated-sources/protobuf目录的grpc-java和java文件夹Mark Directory As-->Generated Sources Root`
oap-server/exporter/target/generated-sources/protobuf目录的grpc-java和java文件夹Mark Directory As-->Generated Sources Root`
oap-server/server-configuration/grpc-configuration-sync/target/generated-sources/protobuf目录的grpc-java和java文件夹Mark Directory As-->Generated Sources Root`
oap-server/oal-grammar/target/generated-sources目录的grpc-java和java文件夹Mark Directory As-->Generated Sources Root`
在Eclipse里面构建源码
1、按照maven项目导入到eclipse中
2、添加一下内容到skywalking/pom.xml中
org.codehaus.mojo
build-helper-maven-plugin
1.8
add-source
generate-sources
add-source
src/java/main
apm-protocol/apm-network/target/generated-sources/protobuf
apm-collector/apm-collector-remote/collector-remote-grpc-provider/target/generated-sources/protobuf
3、添加如下内容,使得eclipse的M2e插件能够支持扩展配置
org.eclipse.m2e
lifecycle-mapping
1.0.0
org.codehaus.mojo
build-helper-maven-plugin
[1.8,)
add-source
4、apm-collector-remote/collector-remote-grpc-provider/pom.xml文件中添加如下依赖
com.google.guava
guava
24.0-jre
5、执行命令
./mvnw compile -Dmaven.test.skip=true
6、执行命令
先执行maven clean,然后maven update
7、执行命令:
./mvnw compile
8、刷新项目
源码分析
skywalking的分布式链路追踪流程大致如下:
Agent采集数据
Agent发送数据到Collector
Collector接收数据
Collector将接收的数据存储到持久层
我们这里主要探探Agent采集Java类系统的数据比如spring等,以spring cloud的一个简易的分布式系统来讲:
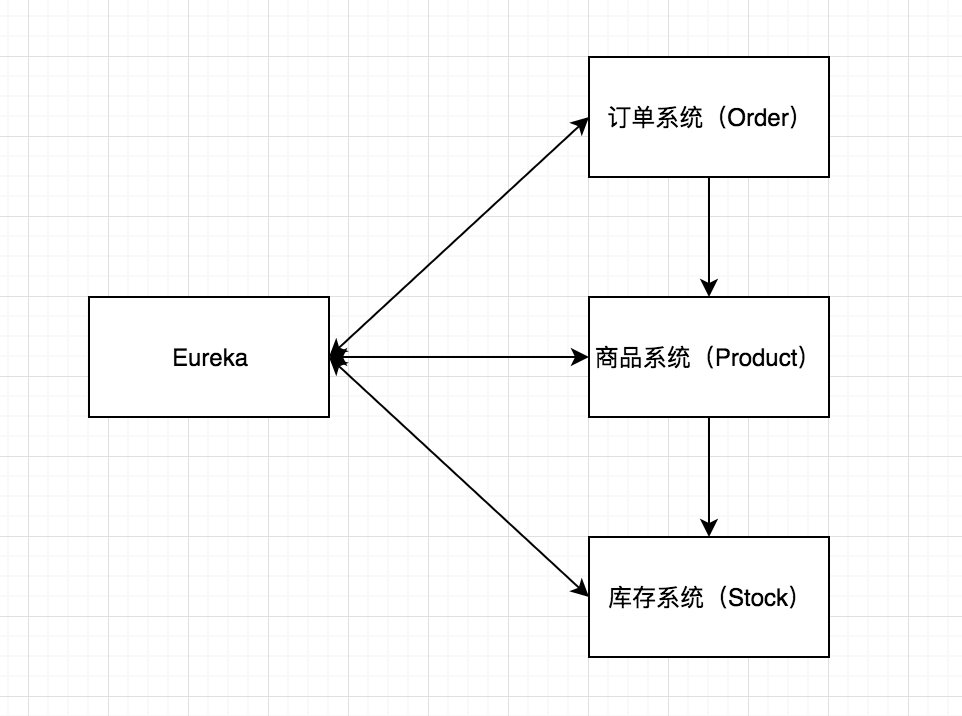
这是一个建议的订单系统,有Eureka,Order,Product,Stock,当下订单的时候,order会调用product,product又会调用stock。
我们从apm-sniffer工程开始出发(sniffer即嗅探器、探针的意思)
apm-agent工程
我们看到这个工程只有一个类
org.apache.skywalking.apm.agent.SkyWalkingAgent
这个类有一个方法:
/**
* 主入口,使用byte-buddy来实现来增强插件里面定义的所有的类。
*/
public static void premain(String agentArgs, Instrumentation instrumentation) throws PluginException, IOException {
}
Agent采集数据
我们这里主要介绍JVM的数据和spring相关的数据
JVM的数据
我们看到在apm-agent-core里面有类:org.apache.skywalking.apm.agent.core.jvm.JVMService
这个类实现了BootService和java.lang.Runnable接口,而这个类是怎么执行里面的一些方法的呢?在apm-agent-core这个工程的/src/main/resources/META-INF/services/org.apache.skywalking.apm.agent.core.boot.BootService文件里面有很多类的全限定名信息:
org.apache.skywalking.apm.agent.core.remote.TraceSegmentServiceClient
org.apache.skywalking.apm.agent.core.context.ContextManager
org.apache.skywalking.apm.agent.core.sampling.SamplingService
org.apache.skywalking.apm.agent.core.remote.GRPCChannelManager
org.apache.skywalking.apm.agent.core.jvm.JVMService
org.apache.skywalking.apm.agent.core.remote.ServiceAndEndpointRegisterClient
org.apache.skywalking.apm.agent.core.context.ContextManagerExtendService
org.apache.skywalking.apm.agent.core.commands.CommandService
org.apache.skywalking.apm.agent.core.commands.CommandExecutorService
org.apache.skywalking.apm.agent.core.context.OperationNameFormatService
而这每个类都实现了BootService这个借口,BootService是所有当插件机制开始起作用时需要启动的远程交换需要实现的接口。BootService启动的时候将调用boot方法。
org.apache.skywalking.apm.agent.core.boot.ServiceManager这个类里面会将所有实现BootService的类的实例都执行一遍。
JVMService类实例化后执行的boot方法内容如下
@Override
public void boot() throws Throwable {
// 创建一个持续收集(生产)指标的单一线程的线程池,这个线程池会定期(每秒)执行,而且执行的是JVMService的run方法
collectMetricFuture = Executors
.newSingleThreadScheduledExecutor(new DefaultNamedThreadFactory("JVMService-produce"))
.scheduleAtFixedRate(new RunnableWithExceptionProtection(this, new RunnableWithExceptionProtection.CallbackWhenException() {
@Override public void handle(Throwable t) {
logger.error("JVMService produces metrics failure.", t);
}
}), 0, 1, TimeUnit.SECONDS);
// 创建一个持续发送(消费)数据的单一线程的线程池,这个线程池会定期(每秒)执行,而且执行的是JVMService的内部类Sender的run方法
sendMetricFuture = Executors
.newSingleThreadScheduledExecutor(new DefaultNamedThreadFactory("JVMService-consume"))
.scheduleAtFixedRate(new RunnableWithExceptionProtection(sender, new RunnableWithExceptionProtection.CallbackWhenException() {
@Override public void handle(Throwable t) {
logger.error("JVMService consumes and upload failure.", t);
}
}
), 0, 1, TimeUnit.SECONDS);
}
JVMService类的run方法:
public void run() {
if (RemoteDownstreamConfig.Agent.SERVICE_ID != DictionaryUtil.nullValue()
&& RemoteDownstreamConfig.
 最低0.47元/天 解锁文章


 1678
1678


 被折叠的 条评论
为什么被折叠?
被折叠的 条评论
为什么被折叠?
 到【灌水乐园】发言


