目标
实现通过security实现 登录、注销、权限认证等功能
搭建
准备数据库
创建用户表,主要用用户的账号密码
当然也需要权限表,但是为了简单,我给省略了,在代码里写死了
DROP TABLE IF EXISTS `acl_user`;
CREATE TABLE `acl_user`  (
  `id` varchar(255) CHARACTER SET utf8mb4 COLLATE utf8mb4_0900_ai_ci NOT NULL,
  `username` varchar(255) CHARACTER SET utf8mb4 COLLATE utf8mb4_0900_ai_ci NULL DEFAULT NULL,
  `password` varchar(255) CHARACTER SET utf8mb4 COLLATE utf8mb4_0900_ai_ci NULL DEFAULT NULL,
  `nick_Name` varchar(255) CHARACTER SET utf8mb4 COLLATE utf8mb4_0900_ai_ci NULL DEFAULT NULL,
  `salt` varchar(255) CHARACTER SET utf8mb4 COLLATE utf8mb4_0900_ai_ci NULL DEFAULT NULL,
  `token` varchar(255) CHARACTER SET utf8mb4 COLLATE utf8mb4_0900_ai_ci NULL DEFAULT NULL,
  `is_Deleted` varchar(255) CHARACTER SET utf8mb4 COLLATE utf8mb4_0900_ai_ci NULL DEFAULT NULL,
  `gmt_Create` date NULL DEFAULT NULL,
  `gmt_Modified` date NULL DEFAULT NULL,
  PRIMARY KEY (`id`) USING BTREE
) ENGINE = InnoDB CHARACTER SET = utf8mb4 COLLATE = utf8mb4_0900_ai_ci ROW_FORMAT = Dynamic;
INSERT INTO `acl_user` VALUES ('1', 'user', 'e10adc3949ba59abbe56e057f20f883e', '1', '1', '1', '1', NULL, NULL);- 1.
- 2.
- 3.
- 4.
- 5.
- 6.
- 7.
- 8.
- 9.
- 10.
- 11.
- 12.
- 13.
- 14.
首先引入 pom 文件
<dependency>
    <groupId>mysql</groupId>
    <artifactId>mysql-connector-java</artifactId>
</dependency>
<dependency>
    <groupId>com.baomidou</groupId>
    <artifactId>mybatis-plus-boot-starter</artifactId>
    <version>3.5.3.1</version>
</dependency>

<dependency>
    <groupId>org.springframework.boot</groupId>
    <artifactId>spring-boot-starter-security</artifactId>
</dependency>
<dependency>
    <groupId>org.springframework.security</groupId>
    <artifactId>spring-security-test</artifactId>
</dependency>
<dependency>
    <groupId>io.jsonwebtoken</groupId>
    <artifactId>jjwt</artifactId>
    <version>0.9.1</version>
</dependency>

<dependency>
    <groupId>org.springframework.boot</groupId>
    <artifactId>spring-boot-starter-data-redis</artifactId>
    <version>2.6.2</version>
</dependency>- 1.
- 2.
- 3.
- 4.
- 5.
- 6.
- 7.
- 8.
- 9.
- 10.
- 11.
- 12.
- 13.
- 14.
- 15.
- 16.
- 17.
- 18.
- 19.
- 20.
- 21.
- 22.
- 23.
- 24.
- 25.
- 26.
- 27.
- 28.
- 29.
配置文件
server.port=8111

# 数据源
spring.datasource.driver-class-name=com.mysql.cj.jdbc.Driver
spring.datasource.url=jdbc:mysql://xxxx:3306/java0417?serverTimezone=UTC&useUnicode=true&characterEncoding=utf-8&AllowPublicKeyRetrieval=True
spring.datasource.username=xxxx
spring.datasource.password=xxxx

# 数据库连接池
spring.datasource.hikari.maximum-pool-size=5
spring.datasource.hikari.minimum-idle=0

# redis服务
spring.redis.host=xxx.xxx.xxx
spring.redis.port=9574
spring.redis.password=xxxx
spring.redis.database= 0
spring.redis.timeout=1800000
spring.redis.lettuce.pool.max-active=20
spring.redis.lettuce.pool.max-wait=-1
spring.redis.lettuce.pool.max-idle=5
spring.redis.lettuce.pool.min-idle=0- 1.
- 2.
- 3.
- 4.
- 5.
- 6.
- 7.
- 8.
- 9.
- 10.
- 11.
- 12.
- 13.
- 14.
- 15.
- 16.
- 17.
- 18.
- 19.
- 20.
- 21.
- 22.
创建两个工具类
两个返回值的工具类,用来封装返回值信息
import lombok.Data;
import java.util.HashMap;
import java.util.Map;

//统一返回结果的类
@Data
public class R {

    private Boolean success;

    private Integer code;

    private String message;

    private Map<String, Object> data = new HashMap<String, Object>();

    //把构造方法私有
    private R() {}

    //成功静态方法
    public static R ok() {
        R r = new R();
        r.setSuccess(true);
        r.setCode(20000);
        r.setMessage("成功");
        return r;
    }

    //失败静态方法
    public static R error() {
        R r = new R();
        r.setSuccess(false);
        r.setCode(20001);
        r.setMessage("失败");
        return r;
    }

    public R success(Boolean success){
        this.setSuccess(success);
        return this;
    }

    public R message(String message){
        this.setMessage(message);
        return this;
    }

    public R code(Integer code){
        this.setCode(code);
        return this;
    }

    public R data(String key, Object value){
        this.data.put(key, value);
        return this;
    }

    public R data(Map<String, Object> map){
        this.setData(map);
        return this;
    }
}- 1.
- 2.
- 3.
- 4.
- 5.
- 6.
- 7.
- 8.
- 9.
- 10.
- 11.
- 12.
- 13.
- 14.
- 15.
- 16.
- 17.
- 18.
- 19.
- 20.
- 21.
- 22.
- 23.
- 24.
- 25.
- 26.
- 27.
- 28.
- 29.
- 30.
- 31.
- 32.
- 33.
- 34.
- 35.
- 36.
- 37.
- 38.
- 39.
- 40.
- 41.
- 42.
- 43.
- 44.
- 45.
- 46.
- 47.
- 48.
- 49.
- 50.
- 51.
- 52.
- 53.
- 54.
- 55.
- 56.
- 57.
- 58.
- 59.
- 60.
- 61.
- 62.
import com.fasterxml.jackson.databind.ObjectMapper;
import org.springframework.http.HttpStatus;
import org.springframework.http.MediaType;

import javax.servlet.http.HttpServletResponse;
import java.io.IOException;

public class ResponseUtil {

    public static void out(HttpServletResponse response, R r) {
        ObjectMapper mapper = new ObjectMapper();
        response.setStatus(HttpStatus.OK.value());
        response.setContentType(MediaType.APPLICATION_JSON_UTF8_VALUE);
        try {
            mapper.writeValue(response.getWriter(), r);
        } catch (IOException e) {
            e.printStackTrace();
        }
    }
}- 1.
- 2.
- 3.
- 4.
- 5.
- 6.
- 7.
- 8.
- 9.
- 10.
- 11.
- 12.
- 13.
- 14.
- 15.
- 16.
- 17.
- 18.
- 19.
- 20.
创建 security使用的工具类
密码处理工具
主要用来密码加密,和密码对比使用,此处用的cmd5,需要写进配置类中
import cn.hutool.crypto.digest.MD5;
import org.springframework.security.crypto.password.PasswordEncoder;
import org.springframework.stereotype.Component;

@Component
public class DefaultPasswordEncoder implements PasswordEncoder {

    //@Autowired
    //PasswordEncoder passwordEncoder;


    public DefaultPasswordEncoder() {
        this(-1);
    }

    public DefaultPasswordEncoder(int strength) {
    }

    //进行MD5加密
    @Override
    public String encode(CharSequence charSequence) {
        //return  this.encode(charSequence);
        return MD5.create().digestHex(charSequence.toString());
    }

    //进行密码比对
    @Override
    public boolean matches(CharSequence charSequence, String encodedPassword) {
        System.out.println(MD5.create().digestHex(charSequence.toString()));
        return encodedPassword.equals(MD5.create().digestHex(charSequence.toString()));
    }

    public static void main(String[] args) {

        System.out.println(MD5.create().digestHex("123456"));
    }
}- 1.
- 2.
- 3.
- 4.
- 5.
- 6.
- 7.
- 8.
- 9.
- 10.
- 11.
- 12.
- 13.
- 14.
- 15.
- 16.
- 17.
- 18.
- 19.
- 20.
- 21.
- 22.
- 23.
- 24.
- 25.
- 26.
- 27.
- 28.
- 29.
- 30.
- 31.
- 32.
- 33.
- 34.
- 35.
- 36.
- 37.
创建一个退出登录的工具类
主要是用来,在用户退出时,清理token,此工具类后面需要写进配置类中,当退出登录时,自动调用此类的方法
package com.xiong.mydemo.security;

import com.xiong.mydemo.utils.R;
import com.xiong.mydemo.utils.ResponseUtil;
import org.springframework.data.redis.core.RedisTemplate;
import org.springframework.security.core.Authentication;
import org.springframework.security.web.authentication.logout.LogoutHandler;

import javax.servlet.http.HttpServletRequest;
import javax.servlet.http.HttpServletResponse;

//退出处理器
public class TokenLogoutHandler implements LogoutHandler {
    private TokenManager tokenManager;
    private RedisTemplate redisTemplate;

    public TokenLogoutHandler(TokenManager tokenManager,RedisTemplate redisTemplate) {
        this.tokenManager = tokenManager;
        this.redisTemplate = redisTemplate;
    }
    @Override
    public void logout(HttpServletRequest request, HttpServletResponse response, Authentication authentication) {
        //1 从header里面获取token
        //2 token不为空,移除token,从redis删除token
        String token = request.getHeader("token");
        if(token != null) {
            //移除
            String userName = tokenManager.getUserInfoFromToken(token);
            tokenManager.removeToken(token);
            redisTemplate.delete(userName);
            /*//从token获取用户名
            String username = tokenManager.getUserInfoFromToken(token);
            redisTemplate.delete(username);*/
        }
        ResponseUtil.out(response, R.ok());
    }
}- 1.
- 2.
- 3.
- 4.
- 5.
- 6.
- 7.
- 8.
- 9.
- 10.
- 11.
- 12.
- 13.
- 14.
- 15.
- 16.
- 17.
- 18.
- 19.
- 20.
- 21.
- 22.
- 23.
- 24.
- 25.
- 26.
- 27.
- 28.
- 29.
- 30.
- 31.
- 32.
- 33.
- 34.
- 35.
- 36.
- 37.
token生成工具类
主要用的jwt生产token,创建token,和根据token查询用户信息、和删除token的方法,分别在登录 和 普通请求 和 退出登录请求 拦截器中使用
package com.xiong.mydemo.security;

import io.jsonwebtoken.CompressionCodecs;
import io.jsonwebtoken.Jwts;
import io.jsonwebtoken.SignatureAlgorithm;
import org.springframework.stereotype.Component;

import java.util.Date;

/**
 * create by: ZhangYiXiong
 * description: 功能说明→ token生成
 * create time: 2022/1/13 10:40
 * @params
 * @return
 */
@Component
public class TokenManager {
    //token有效时长
    private long tokenEcpiration = 24*60*60*1000;
    //编码秘钥
    private String tokenSignKey = "123456";
    //1 使用jwt根据用户名生成token
    public String createToken(String username) {
        String token = Jwts.builder().setSubject(username)
                // 过期时间
                .setExpiration(new Date(System.currentTimeMillis()+tokenEcpiration))
                // 生成token加密规则
                .signWith(SignatureAlgorithm.HS512, tokenSignKey).compressWith(CompressionCodecs.GZIP).compact();
        return token;
    }

    //2 根据token字符串得到用户信息
    public String getUserInfoFromToken(String token) {
        String userinfo = Jwts.parser().setSigningKey(tokenSignKey).parseClaimsJws(token).getBody().getSubject();
        return userinfo;
    }
    //3 删除token
    public void removeToken(String token) {

    }

}- 1.
- 2.
- 3.
- 4.
- 5.
- 6.
- 7.
- 8.
- 9.
- 10.
- 11.
- 12.
- 13.
- 14.
- 15.
- 16.
- 17.
- 18.
- 19.
- 20.
- 21.
- 22.
- 23.
- 24.
- 25.
- 26.
- 27.
- 28.
- 29.
- 30.
- 31.
- 32.
- 33.
- 34.
- 35.
- 36.
- 37.
- 38.
- 39.
- 40.
- 41.
- 42.
- 43.
认证失败工具类
认证失败时跳转的方法,需要写在配置类中
import com.xiong.mydemo.utils.R;
import com.xiong.mydemo.utils.ResponseUtil;
import org.springframework.security.core.AuthenticationException;
import org.springframework.security.web.AuthenticationEntryPoint;

import javax.servlet.ServletException;
import javax.servlet.http.HttpServletRequest;
import javax.servlet.http.HttpServletResponse;
import java.io.IOException;

/**
 * 认证失败方法
 */
public class UnauthEntryPoint implements AuthenticationEntryPoint {
    @Override
    public void commence(HttpServletRequest httpServletRequest, HttpServletResponse httpServletResponse, AuthenticationException e) throws IOException, ServletException {
        ResponseUtil.out(httpServletResponse, R.error());
    }
}- 1.
- 2.
- 3.
- 4.
- 5.
- 6.
- 7.
- 8.
- 9.
- 10.
- 11.
- 12.
- 13.
- 14.
- 15.
- 16.
- 17.
- 18.
- 19.
创建两个实体类
acl_user 表的映射表
import com.baomidou.mybatisplus.annotation.*;

import lombok.Data;
import lombok.EqualsAndHashCode;
import lombok.experimental.Accessors;

import java.io.Serializable;
import java.util.Date;


@Data
@EqualsAndHashCode(callSuper = false)
@Accessors(chain = true)
@TableName("acl_user")
public class User implements Serializable {

    private static final long serialVersionUID = 1L;

    @TableId(value = "id", type = IdType.ASSIGN_ID)
    private String id;

    private String username;

    private String password;

    private String nickName;

    private String salt;

    private String token;

    private Boolean isDeleted;

    @TableField(fill = FieldFill.INSERT)
    private Date gmtCreate;

    @TableField(fill = FieldFill.INSERT_UPDATE)
    private Date gmtModified;


}- 1.
- 2.
- 3.
- 4.
- 5.
- 6.
- 7.
- 8.
- 9.
- 10.
- 11.
- 12.
- 13.
- 14.
- 15.
- 16.
- 17.
- 18.
- 19.
- 20.
- 21.
- 22.
- 23.
- 24.
- 25.
- 26.
- 27.
- 28.
- 29.
- 30.
- 31.
- 32.
- 33.
- 34.
- 35.
- 36.
- 37.
- 38.
- 39.
- 40.
- 41.
这是 security使用的用户类,属于user类的包装类
package com.xiong.mydemo.entity;

import lombok.Data;
import org.springframework.security.core.GrantedAuthority;
import org.springframework.security.core.authority.SimpleGrantedAuthority;
import org.springframework.security.core.userdetails.UserDetails;
import org.springframework.util.StringUtils;

import java.util.ArrayList;
import java.util.Collection;
import java.util.List;

@Data
public class SecurityUser implements UserDetails {

    //当前登录用户
    private transient User currentUserInfo;

    //当前权限
    private List<String> permissionValueList;

    public SecurityUser() {
    }

    public SecurityUser(User user) {
        if (user != null) {
            this.currentUserInfo = user;
        }
    }

    @Override
    public Collection<? extends GrantedAuthority> getAuthorities() {
        Collection<GrantedAuthority> authorities = new ArrayList<>();
        for(String permissionValue : permissionValueList) {
            if(StringUtils.isEmpty(permissionValue)) continue;
            SimpleGrantedAuthority authority = new SimpleGrantedAuthority(permissionValue);
            authorities.add(authority);
        }

        return authorities;
    }

    @Override
    public String getPassword() {
        return currentUserInfo.getPassword();
    }

    @Override
    public String getUsername() {
        return currentUserInfo.getUsername();
    }

    @Override
    public boolean isAccountNonExpired() {
        return true;
    }

    @Override
    public boolean isAccountNonLocked() {
        return true;
    }

    @Override
    public boolean isCredentialsNonExpired() {
        return true;
    }

    @Override
    public boolean isEnabled() {
        return true;
    }
}- 1.
- 2.
- 3.
- 4.
- 5.
- 6.
- 7.
- 8.
- 9.
- 10.
- 11.
- 12.
- 13.
- 14.
- 15.
- 16.
- 17.
- 18.
- 19.
- 20.
- 21.
- 22.
- 23.
- 24.
- 25.
- 26.
- 27.
- 28.
- 29.
- 30.
- 31.
- 32.
- 33.
- 34.
- 35.
- 36.
- 37.
- 38.
- 39.
- 40.
- 41.
- 42.
- 43.
- 44.
- 45.
- 46.
- 47.
- 48.
- 49.
- 50.
- 51.
- 52.
- 53.
- 54.
- 55.
- 56.
- 57.
- 58.
- 59.
- 60.
- 61.
- 62.
- 63.
- 64.
- 65.
- 66.
- 67.
- 68.
- 69.
- 70.
- 71.
- 72.
创建mapper
用来查询数据库中的user信息
创建service
用来查询数据库中的user信息,bean名称为“userDetailsService“,security会自动寻找这个bean,集成UserDetailsService接口并实现该接口的方法,此类的bean需要注入进配置类中
package com.xiong.mydemo.service;


import com.baomidou.mybatisplus.core.conditions.query.QueryWrapper;
import com.xiong.mydemo.entity.SecurityUser;
import com.xiong.mydemo.entity.User;
import com.xiong.mydemo.mapper.UserMapper;
import org.springframework.beans.factory.annotation.Autowired;
import org.springframework.security.core.userdetails.UserDetails;
import org.springframework.security.core.userdetails.UserDetailsService;
import org.springframework.security.core.userdetails.UsernameNotFoundException;
import org.springframework.stereotype.Service;

import java.util.ArrayList;
import java.util.List;

@Service("userDetailsService")
public class UserDetailsServiceImpl implements UserDetailsService {

    @Autowired
    UserMapper userMapper;

    @Override
    public UserDetails loadUserByUsername(String username) throws UsernameNotFoundException {
        //根据用户名查询数据
        User user = userMapper.selectOne(new QueryWrapper<User>().eq("username",username));
        //判断
        if(user == null) {
            throw new UsernameNotFoundException("用户不存在");
        }
        //根据用户查询用户权限列表
        List<String> permissionValueList = new ArrayList<>();
        permissionValueList.add("admin123");
        SecurityUser securityUser = new SecurityUser();
        securityUser.setCurrentUserInfo(user);
        securityUser.setPermissionValueList(permissionValueList);
        return securityUser;
    }
}- 1.
- 2.
- 3.
- 4.
- 5.
- 6.
- 7.
- 8.
- 9.
- 10.
- 11.
- 12.
- 13.
- 14.
- 15.
- 16.
- 17.
- 18.
- 19.
- 20.
- 21.
- 22.
- 23.
- 24.
- 25.
- 26.
- 27.
- 28.
- 29.
- 30.
- 31.
- 32.
- 33.
- 34.
- 35.
- 36.
- 37.
- 38.
- 39.
两个关键拦截器
登录拦截器
此拦截器需要写进 配置类
import com.fasterxml.jackson.databind.ObjectMapper;
import com.xiong.mydemo.entity.SecurityUser;
import com.xiong.mydemo.entity.User;
import com.xiong.mydemo.security.TokenManager;
import com.xiong.mydemo.utils.*;
import org.springframework.data.redis.core.RedisTemplate;
import org.springframework.security.authentication.AuthenticationManager;
import org.springframework.security.authentication.UsernamePasswordAuthenticationToken;
import org.springframework.security.core.Authentication;
import org.springframework.security.core.AuthenticationException;
import org.springframework.security.web.authentication.UsernamePasswordAuthenticationFilter;
import org.springframework.security.web.util.matcher.AntPathRequestMatcher;

import javax.servlet.FilterChain;
import javax.servlet.ServletException;
import javax.servlet.http.HttpServletRequest;
import javax.servlet.http.HttpServletResponse;
import java.io.IOException;
import java.util.ArrayList;

public class TokenLoginFilter extends UsernamePasswordAuthenticationFilter {

    // 生成token工具
    private TokenManager tokenManager;

    // redis 工具
    private RedisTemplate redisTemplate;

    private AuthenticationManager authenticationManager;

    public TokenLoginFilter(AuthenticationManager authenticationManager, TokenManager tokenManager, RedisTemplate redisTemplate) {
        // 初始化这些工具
        this.authenticationManager = authenticationManager;
        this.tokenManager = tokenManager;
        this.redisTemplate = redisTemplate;
        this.setPostOnly(false);
        // 设置登录路径
        this.setRequiresAuthenticationRequestMatcher(new AntPathRequestMatcher("/admin/acl/login","POST"));
    }

    //1 获取表单提交用户名和密码
    @Override
    public Authentication attemptAuthentication(HttpServletRequest request, HttpServletResponse response)
            throws AuthenticationException {
        //获取表单提交数据
        try {
            // 获取账号密码,并且转成user
            User user = new ObjectMapper().readValue(request.getInputStream(), User.class);
            // 获取 该用户 对应的权限
            Authentication authenticate = authenticationManager.authenticate(
                    new UsernamePasswordAuthenticationToken(user.getUsername(), user.getPassword(), new ArrayList<>()));
            return authenticate;
        } catch (IOException e) {
            System.out.println(e.getMessage());
            e.printStackTrace();
            throw new RuntimeException();
        }
    }

    //2 认证成功调用的方法
    @Override
    protected void successfulAuthentication(HttpServletRequest request,
                                            HttpServletResponse response, FilterChain chain, Authentication authResult)
            throws IOException, ServletException {
        //认证成功,得到认证成功之后用户信息
        SecurityUser user = (SecurityUser)authResult.getPrincipal();
        //根据用户名生成token
        String token = tokenManager.createToken(user.getCurrentUserInfo().getUsername());
        //把用户名称和用户权限列表放到redis
        redisTemplate.opsForValue().set(user.getCurrentUserInfo().getUsername(),user.getPermissionValueList());
        //返回token
        ResponseUtil.out(response, R.ok().data("token",token));
    }

    //3 认证失败调用的方法
    protected void unsuccessfulAuthentication(HttpServletRequest request, HttpServletResponse response, AuthenticationException failed)
            throws IOException, ServletException {
        // 方式一:报错
        ResponseUtil.out(response, R.error());
        // 方拾贰:
        // 跳转到登录页面
    }
}- 1.
- 2.
- 3.
- 4.
- 5.
- 6.
- 7.
- 8.
- 9.
- 10.
- 11.
- 12.
- 13.
- 14.
- 15.
- 16.
- 17.
- 18.
- 19.
- 20.
- 21.
- 22.
- 23.
- 24.
- 25.
- 26.
- 27.
- 28.
- 29.
- 30.
- 31.
- 32.
- 33.
- 34.
- 35.
- 36.
- 37.
- 38.
- 39.
- 40.
- 41.
- 42.
- 43.
- 44.
- 45.
- 46.
- 47.
- 48.
- 49.
- 50.
- 51.
- 52.
- 53.
- 54.
- 55.
- 56.
- 57.
- 58.
- 59.
- 60.
- 61.
- 62.
- 63.
- 64.
- 65.
- 66.
- 67.
- 68.
- 69.
- 70.
- 71.
- 72.
- 73.
- 74.
- 75.
- 76.
- 77.
- 78.
- 79.
- 80.
- 81.
- 82.
- 83.
访问拦截器
平时访问时的拦截器,用来判断该用户是否有此权限,此类也须写进配置类
import com.xiong.mydemo.security.TokenManager;
import org.springframework.data.redis.core.RedisTemplate;
import org.springframework.security.authentication.AuthenticationManager;
import org.springframework.security.authentication.UsernamePasswordAuthenticationToken;
import org.springframework.security.core.GrantedAuthority;
import org.springframework.security.core.authority.SimpleGrantedAuthority;
import org.springframework.security.core.context.SecurityContextHolder;
import org.springframework.security.web.authentication.www.BasicAuthenticationFilter;

import javax.servlet.FilterChain;
import javax.servlet.ServletException;
import javax.servlet.http.HttpServletRequest;
import javax.servlet.http.HttpServletResponse;
import java.io.IOException;
import java.util.ArrayList;
import java.util.Collection;
import java.util.List;

public class TokenAuthFilter extends BasicAuthenticationFilter {

    // token生成工具类
    private TokenManager tokenManager;
    private RedisTemplate redisTemplate;

    // 构造方法,初始化,这些参数在配置类(TokenWebSecurityConfig)中实例化
    public TokenAuthFilter(AuthenticationManager authenticationManager, TokenManager tokenManager, RedisTemplate redisTemplate) {
        super(authenticationManager);
        this.tokenManager = tokenManager;
        this.redisTemplate = redisTemplate;
    }

    // 过滤器方法
    @Override
    protected void doFilterInternal(HttpServletRequest request, HttpServletResponse response, FilterChain chain) throws IOException, ServletException {
        //获取当前认证成功用户权限信息(根据token)
        UsernamePasswordAuthenticationToken authRequest = getAuthentication(request);
        //判断如果有权限信息,放到权限上下文中
        if(authRequest != null) {
            SecurityContextHolder.getContext().setAuthentication(authRequest);
        }
        chain.doFilter(request,response);
    }

    // 根据token
    private UsernamePasswordAuthenticationToken getAuthentication(HttpServletRequest request) {
        //从header获取token 获取用户的权限信息,如果没有token,则返回空
        String token = request.getHeader("token");
        if(token != null) {
            //从token获取用户名
            String username = tokenManager.getUserInfoFromToken(token);
            //从redis获取对应权限列表
            List<String> permissionValueList = (List<String>)redisTemplate.opsForValue().get(username);
            Collection<GrantedAuthority> authority = new ArrayList<>();
            for(String permissionValue : permissionValueList) {
                SimpleGrantedAuthority auth = new SimpleGrantedAuthority(permissionValue);
                authority.add(auth);
            }
            return new UsernamePasswordAuthenticationToken(username,token,authority);
        }
        return null;
    }
}- 1.
- 2.
- 3.
- 4.
- 5.
- 6.
- 7.
- 8.
- 9.
- 10.
- 11.
- 12.
- 13.
- 14.
- 15.
- 16.
- 17.
- 18.
- 19.
- 20.
- 21.
- 22.
- 23.
- 24.
- 25.
- 26.
- 27.
- 28.
- 29.
- 30.
- 31.
- 32.
- 33.
- 34.
- 35.
- 36.
- 37.
- 38.
- 39.
- 40.
- 41.
- 42.
- 43.
- 44.
- 45.
- 46.
- 47.
- 48.
- 49.
- 50.
- 51.
- 52.
- 53.
- 54.
- 55.
- 56.
- 57.
- 58.
- 59.
- 60.
- 61.
- 62.
配置类 ☆☆☆☆☆
以上所有的代码,都是为这个配置类服务
package com.xiong.mydemo.config;


import com.xiong.mydemo.filter.TokenAuthFilter;
import com.xiong.mydemo.filter.TokenLoginFilter;
import com.xiong.mydemo.security.DefaultPasswordEncoder;
import com.xiong.mydemo.security.TokenLogoutHandler;
import com.xiong.mydemo.security.TokenManager;
import com.xiong.mydemo.security.UnauthEntryPoint;
import org.springframework.beans.factory.annotation.Autowired;
import org.springframework.context.annotation.Configuration;
import org.springframework.data.redis.core.RedisTemplate;
import org.springframework.security.config.annotation.authentication.builders.AuthenticationManagerBuilder;
import org.springframework.security.config.annotation.method.configuration.EnableGlobalMethodSecurity;
import org.springframework.security.config.annotation.web.builders.HttpSecurity;
import org.springframework.security.config.annotation.web.builders.WebSecurity;
import org.springframework.security.config.annotation.web.configuration.EnableWebSecurity;
import org.springframework.security.config.annotation.web.configuration.WebSecurityConfigurerAdapter;
import org.springframework.security.core.userdetails.UserDetailsService;

@Configuration
@EnableWebSecurity // 启动security
@EnableGlobalMethodSecurity(prePostEnabled = true) // 启动controller的安全管控
public class TokenWebSecurityConfig extends WebSecurityConfigurerAdapter {


    // token生成工具
    private TokenManager tokenManager;

    // redis 工具
    private RedisTemplate redisTemplate;

    // 自定义的密码工具
    private DefaultPasswordEncoder defaultPasswordEncoder;

    // 注入的实际是 自定义的service
    private UserDetailsService userDetailsService;

    // 构造方法,实例化工具类
    @Autowired
    public TokenWebSecurityConfig(UserDetailsService userDetailsService, DefaultPasswordEncoder defaultPasswordEncoder,
                                  TokenManager tokenManager, RedisTemplate redisTemplate) {
        this.userDetailsService = userDetailsService;
        this.defaultPasswordEncoder = defaultPasswordEncoder;
        this.tokenManager = tokenManager;
        this.redisTemplate = redisTemplate;
    }

    /**
     * 重要配置设置
     * @param http
     * @throws Exception
     */
    //设置退出的地址和token,redis操作地址
    @Override
    protected void configure(HttpSecurity http) throws Exception {
        http.exceptionHandling()
                //没有权限访问,认证失败时的方法"UnauthEntryPoint"是自定义的处理类
                .authenticationEntryPoint(new UnauthEntryPoint())

                // admin 权限才能访问的url
                .and()
                .authorizeRequests().antMatchers("/getAbc").hasAnyAuthority("admin")
                .and().csrf().disable()

                // 放行的url
                .authorizeRequests()
                .antMatchers("/test/*").permitAll()//放行
                .anyRequest().authenticated()

                //.and().formLogin().loginProcessingUrl("/login")
                // 注销路径
                .and().logout().logoutUrl("/admin/acl/index/logout")//退出路径

                // 设置注销时的方法,TokenLogoutHandler是自定义的方法
                .addLogoutHandler(new TokenLogoutHandler(tokenManager,redisTemplate))

                // 配置登录时的方法,TokenLoginFilter 是自定义的拦截器
                .and()
                .addFilter(new TokenLoginFilter(authenticationManager(), tokenManager, redisTemplate))

                // 配置普通请求时的验证方法,TokenAuthFilter是自定义的拦截器
                .addFilter(new TokenAuthFilter(authenticationManager(), tokenManager, redisTemplate)).httpBasic()

                .and().cors();
    }

    //调用userDetailsService和密码处理
    @Override
    public void configure(AuthenticationManagerBuilder auth) throws Exception {
        auth.userDetailsService(userDetailsService).passwordEncoder(defaultPasswordEncoder);
    }


    //不进行认证的路径,可以直接访问
    @Override
    public void configure(WebSecurity web) throws Exception {
        web.ignoring().antMatchers("/api/**")

        ;
    }
}- 1.
- 2.
- 3.
- 4.
- 5.
- 6.
- 7.
- 8.
- 9.
- 10.
- 11.
- 12.
- 13.
- 14.
- 15.
- 16.
- 17.
- 18.
- 19.
- 20.
- 21.
- 22.
- 23.
- 24.
- 25.
- 26.
- 27.
- 28.
- 29.
- 30.
- 31.
- 32.
- 33.
- 34.
- 35.
- 36.
- 37.
- 38.
- 39.
- 40.
- 41.
- 42.
- 43.
- 44.
- 45.
- 46.
- 47.
- 48.
- 49.
- 50.
- 51.
- 52.
- 53.
- 54.
- 55.
- 56.
- 57.
- 58.
- 59.
- 60.
- 61.
- 62.
- 63.
- 64.
- 65.
- 66.
- 67.
- 68.
- 69.
- 70.
- 71.
- 72.
- 73.
- 74.
- 75.
- 76.
- 77.
- 78.
- 79.
- 80.
- 81.
- 82.
- 83.
- 84.
- 85.
- 86.
- 87.
- 88.
- 89.
- 90.
- 91.
- 92.
- 93.
- 94.
- 95.
- 96.
- 97.
- 98.
- 99.
- 100.
- 101.
- 102.
mvc配置类
import org.springframework.context.annotation.Bean;
import org.springframework.context.annotation.Configuration;
import org.springframework.web.cors.CorsConfiguration;
import org.springframework.web.cors.UrlBasedCorsConfigurationSource;
import org.springframework.web.filter.CorsFilter;
import org.springframework.web.servlet.config.annotation.WebMvcConfigurer;

@Configuration
public class MvcConfig implements WebMvcConfigurer {

    @Bean
    public CorsFilter corsFilter() {
        final UrlBasedCorsConfigurationSource urlBasedCorsConfigurationSource = new UrlBasedCorsConfigurationSource();
        final CorsConfiguration corsConfiguration = new CorsConfiguration();
        corsConfiguration.setAllowCredentials(true); /*是否允许请求带有验证信息*/
        corsConfiguration.addAllowedOrigin("*");/*允许访问的客户端域名*/
        corsConfiguration.addAllowedHeader("*");/*允许服务端访问的客户端请求头*/
        corsConfiguration.addAllowedMethod("*"); /*允许访问的方法名,GET POST等*/
        corsConfiguration.addExposedHeader("token");/*暴露哪些头部信息 不能用*因为跨域访问默认不能获取全部头部信息*/
        corsConfiguration.addExposedHeader("TOKEN");
        corsConfiguration.addExposedHeader("Authorization");
        urlBasedCorsConfigurationSource.registerCorsConfiguration("/**", corsConfiguration);
        return new CorsFilter(urlBasedCorsConfigurationSource);
    }
}- 1.
- 2.
- 3.
- 4.
- 5.
- 6.
- 7.
- 8.
- 9.
- 10.
- 11.
- 12.
- 13.
- 14.
- 15.
- 16.
- 17.
- 18.
- 19.
- 20.
- 21.
- 22.
- 23.
- 24.
- 25.
测试类
测试类一
import com.baomidou.mybatisplus.core.conditions.query.QueryWrapper;
import com.xiong.mydemo.entity.User;
import com.xiong.mydemo.mapper.UserMapper;
import com.xiong.mydemo.utils.R;
import com.xiong.mydemo.utils.ResponseUtil;
import org.springframework.beans.factory.annotation.Autowired;
import org.springframework.web.bind.annotation.GetMapping;
import org.springframework.web.bind.annotation.RequestMapping;
import org.springframework.web.bind.annotation.RestController;

@RestController
@RequestMapping("/test")
public class TestController {

    @Autowired
    UserMapper userMapper;


    @GetMapping("/count")
    public R getAbc(String string){
        int size = userMapper.selectList(new QueryWrapper<User>()).size();
        return R.ok().message("总数为:"+size);
    }


}- 1.
- 2.
- 3.
- 4.
- 5.
- 6.
- 7.
- 8.
- 9.
- 10.
- 11.
- 12.
- 13.
- 14.
- 15.
- 16.
- 17.
- 18.
- 19.
- 20.
- 21.
- 22.
- 23.
- 24.
- 25.
- 26.
- 27.
测试类二
package com.xiong.mydemo.controller;

import com.xiong.mydemo.entity.User;
import com.xiong.mydemo.utils.R;
import org.springframework.web.bind.annotation.*;

/**
 * @Auther: 张一雄
 * @Date: 2023/5/8 22:50
 * @Description: UserController
 * @Version 1.0.0
 */
@RestController
@RequestMapping("/user")
public class UserController {

   /**
    * 简述:
    * @author 张一雄
    * @param user
    * @return { com.xiong.mydemo.utils.R }
    * @exception/throws
    * @create: 2023/5/8 22:55
    */
    @PostMapping("/test")
    public R test(@RequestBody User user){
        return R.ok();
    }
}- 1.
- 2.
- 3.
- 4.
- 5.
- 6.
- 7.
- 8.
- 9.
- 10.
- 11.
- 12.
- 13.
- 14.
- 15.
- 16.
- 17.
- 18.
- 19.
- 20.
- 21.
- 22.
- 23.
- 24.
- 25.
- 26.
- 27.
- 28.
- 29.
测试
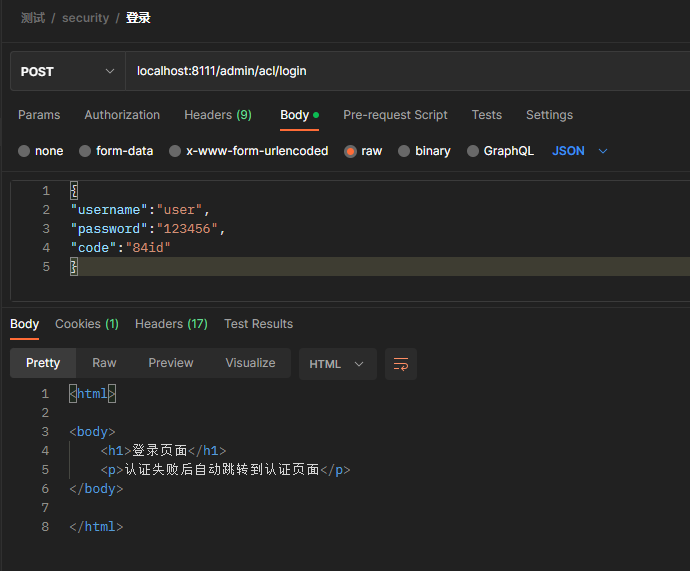
登录
退出
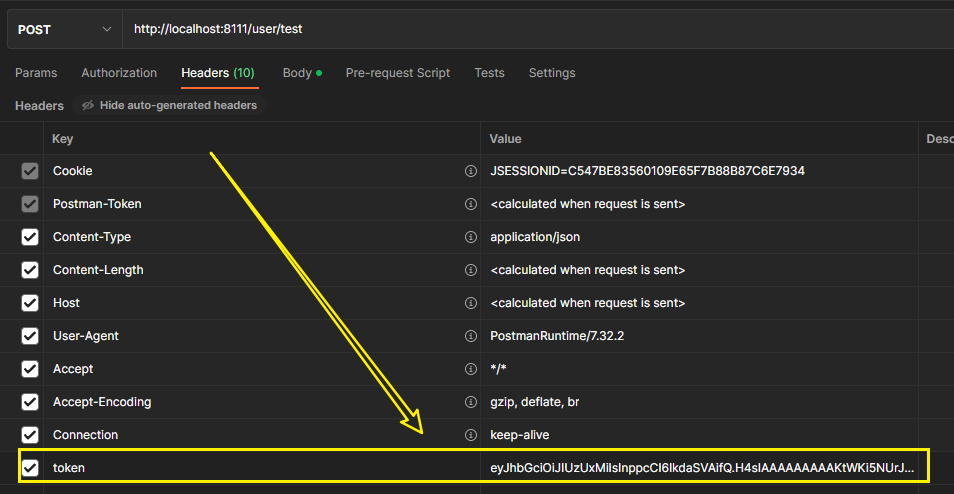
要带token
测试
get-测试放行
post 测试 正常请求

扩展
其他的密码加密算法
public static void main(String[] args) {
    System.out.println("BCryptPasswordEncoder------------------------------------");
    BCryptPasswordEncoder encoder = new BCryptPasswordEncoder();
    String encodedPasswidd = encoder.encode("123456");
    System.out.println("加密后:"+ encodedPasswidd);
    boolean matches = encoder.matches("123456", encodedPasswidd);
    System.out.println("比对结果:"+matches);
}- 1.
- 2.
- 3.
- 4.
- 5.
- 6.
- 7.
- 8.
配置登录验证码
使用hutool生成验证码,在登录过滤器之前,使用验证码的过滤器
pom
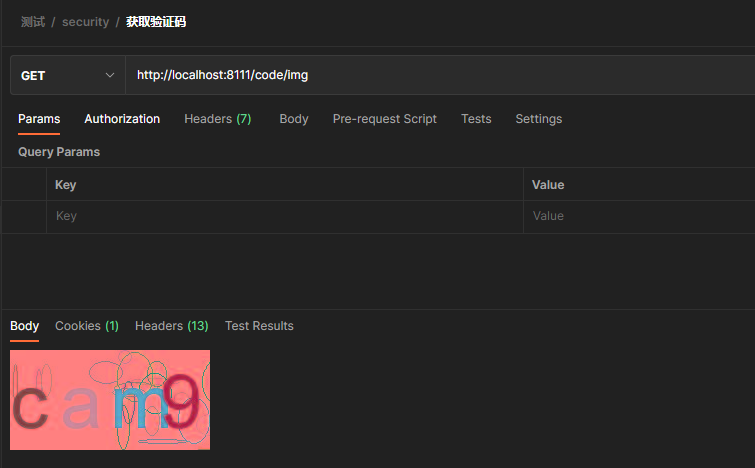
创建一个获取验证码的接口
import cn.hutool.captcha.CaptchaUtil;
import cn.hutool.captcha.CircleCaptcha;
import org.springframework.stereotype.Controller;
import org.springframework.web.bind.annotation.RequestMapping;

import javax.imageio.ImageIO;
import javax.servlet.http.HttpServletRequest;
import javax.servlet.http.HttpServletResponse;
import java.io.IOException;

/**
 * @Auther: 张一雄
 * @Date: 2023/5/10 09:58
 * @Description: CodeController
 * @Version 1.0.0
 */

@Controller
@RequestMapping("/code")
public class CodeController {
    @RequestMapping("/img")
    public void code(HttpServletRequest request, HttpServletResponse response) {
        //创建验证码长,宽,字符数,干扰元素个数
        CircleCaptcha circleCaptcha = CaptchaUtil.createCircleCaptcha(200, 100, 4, 20);

        // 放在session里面
        System.out.println("生成的验证码" + circleCaptcha.getCode());
        request.getSession().setAttribute("circleCaptcha", circleCaptcha.getCode());

        // 用流写出去
        try {
            ImageIO.write(circleCaptcha.getImage(), "JPEG", response.getOutputStream());
        } catch (IOException e) {
            e.printStackTrace();
        }

    }
}- 1.
- 2.
- 3.
- 4.
- 5.
- 6.
- 7.
- 8.
- 9.
- 10.
- 11.
- 12.
- 13.
- 14.
- 15.
- 16.
- 17.
- 18.
- 19.
- 20.
- 21.
- 22.
- 23.
- 24.
- 25.
- 26.
- 27.
- 28.
- 29.
- 30.
- 31.
- 32.
- 33.
- 34.
- 35.
- 36.
- 37.
- 38.
创建验证码的过滤器
import org.springframework.stereotype.Component;
import org.springframework.util.StringUtils;
import org.springframework.web.filter.OncePerRequestFilter;

import javax.servlet.FilterChain;
import javax.servlet.ServletException;
import javax.servlet.http.HttpServletRequest;
import javax.servlet.http.HttpServletResponse;
import java.io.IOException;

/**
 * @Auther: 张一雄
 * @Date: 2023/5/10 09:59
 * @Description: ValidateCodeFilter
 * @Version 1.0.0
 */
@Component
public class ValidateCodeFilter extends OncePerRequestFilter {

    @Override
    protected void doFilterInternal(HttpServletRequest request, HttpServletResponse response, FilterChain filterChain) throws ServletException, IOException {
        //得到请求地址
        String requestURI = request.getRequestURI();
        System.out.println("requestURL" + requestURI);

        //判断是否是登录请求
        if (requestURI.equals("/admin/acl/login")) {
            //说明当前请求为登陆
            //1,得到登陆时用户输入的验证码
            String code1 = request.getSession().getAttribute("circleCaptcha").toString();
            String code = request.getParameter("code");
            System.out.println("用户输入的验证码:" + code);
            if (StringUtils.hasText(code)) {
                if (code.equalsIgnoreCase(code1)) {
                    //说明验证码正确  直接放行
                    request.getSession().removeAttribute("errorMSg");
                    filterChain.doFilter(request, response);
                    return;
                } else {
                    //说明验证码不正确,返回登陆页面
                    request.getSession().setAttribute("errorMsg", "验证码错误");
                    response.sendRedirect("/index/toLogin");
                    return;
                }
            } else {
                //用户没有输出验证码重定向到登陆页面
                request.getSession().setAttribute("errorMsg", "验证码不能为空");
                response.sendRedirect("/index/toLogin");
                return;
            }
        } else {
            //说明不是登陆 直接放行到下一个过滤器
            filterChain.doFilter(request, response);
            return;
        }

    }
}- 1.
- 2.
- 3.
- 4.
- 5.
- 6.
- 7.
- 8.
- 9.
- 10.
- 11.
- 12.
- 13.
- 14.
- 15.
- 16.
- 17.
- 18.
- 19.
- 20.
- 21.
- 22.
- 23.
- 24.
- 25.
- 26.
- 27.
- 28.
- 29.
- 30.
- 31.
- 32.
- 33.
- 34.
- 35.
- 36.
- 37.
- 38.
- 39.
- 40.
- 41.
- 42.
- 43.
- 44.
- 45.
- 46.
- 47.
- 48.
- 49.
- 50.
- 51.
- 52.
- 53.
- 54.
- 55.
- 56.
- 57.
- 58.
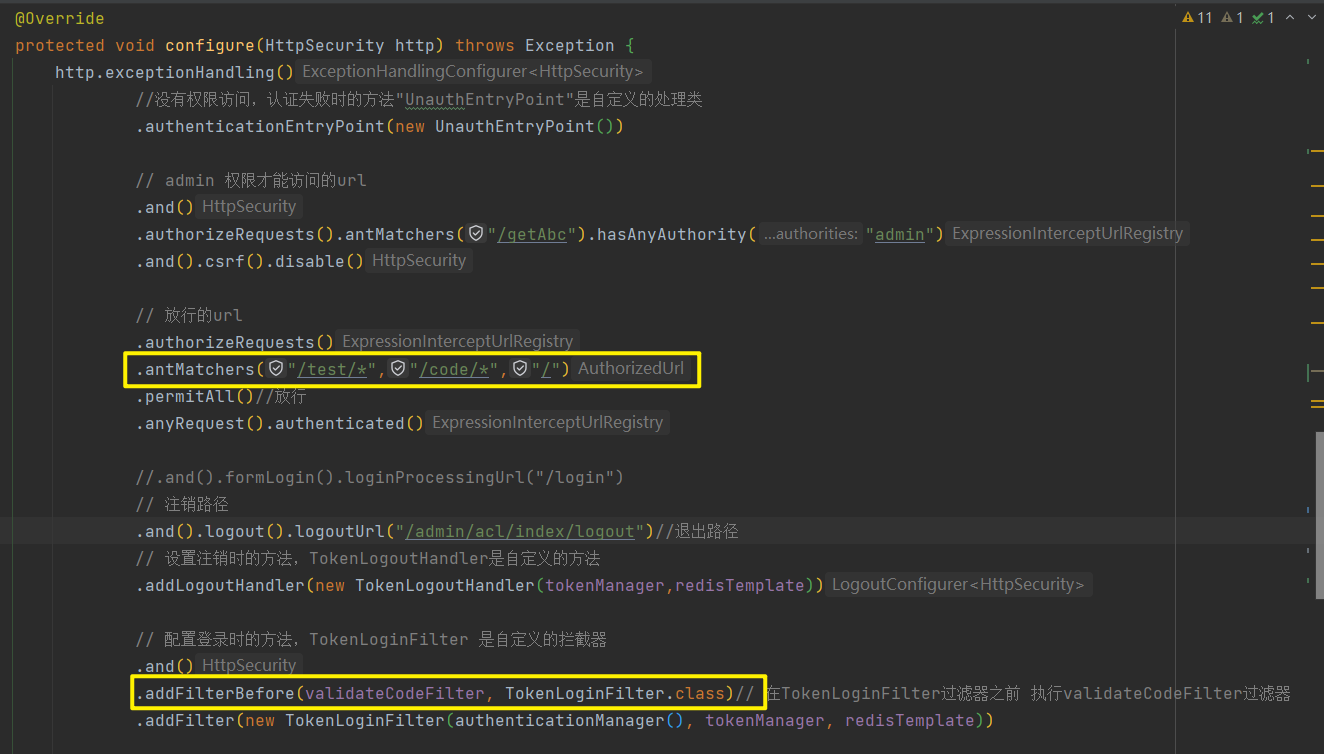
放行取验证码的接口,并且在登录过滤器前添加验证码过滤器

测试


JWT的使用
import cn.hutool.jwt.JWT;
import io.jsonwebtoken.CompressionCodecs;
import io.jsonwebtoken.Jwts;
import io.jsonwebtoken.SignatureAlgorithm;

import java.util.Date;

/**
 * hutool中jwt的使用
 * @Auther: 张一雄
 * @Date: 2023/5/10 15:28
 * @Description: Test
 * @Version 1.0.0
 */
public class Test {
    public static void main(String[] args) {

        long tokenEcpiration = 60*1000; // 过期时间
        String tokenSignKey = "123456"; // 秘钥

        String token = Jwts.builder().setSubject("zhang") //存body
                .setHeaderParam("name","zhangyixiong") // 存头
                .setHeaderParam("age","18")
                // 过期时间
                .setExpiration(new Date(System.currentTimeMillis()+tokenEcpiration)) //存过期时间
                // 生成token加密规则
                .signWith(SignatureAlgorithm.HS512, tokenSignKey).compressWith(CompressionCodecs.GZIP).compact();
        // 打印token
        System.out.println(token);

        // 解析出body
        String userinfo = Jwts.parser().setSigningKey(tokenSignKey).parseClaimsJws(token).getBody().getSubject();
        // 解析出hander
        Object name = Jwts.parser().setSigningKey(tokenSignKey).parseClaimsJws(token).getHeader().get("name");
        // 打印
        System.out.println(userinfo);
        System.out.println(name);

    }
}- 1.
- 2.
- 3.
- 4.
- 5.
- 6.
- 7.
- 8.
- 9.
- 10.
- 11.
- 12.
- 13.
- 14.
- 15.
- 16.
- 17.
- 18.
- 19.
- 20.
- 21.
- 22.
- 23.
- 24.
- 25.
- 26.
- 27.
- 28.
- 29.
- 30.
- 31.
- 32.
- 33.
- 34.
- 35.
- 36.
- 37.
- 38.
- 39.
- 40.


 9251
9251

 被折叠的 条评论
为什么被折叠?


