


必须说明的是,本教程里所有的YII框架开发网站项目是整合Smarty来开发的,Smarty作为最成熟使用最多的模板之一,相信大家都比较熟悉。如果还有的同学不是很熟悉,可以参考Smarty教程。不过就算不会也不要紧,我这里尽量详细说明让大家明白。
可以先了解smarty中的assign(),include,display()这几个函数的用法。另外,还需要知道if-else,foreach这两个标签。足矣!
我们先来看一下整个开发目录文件:
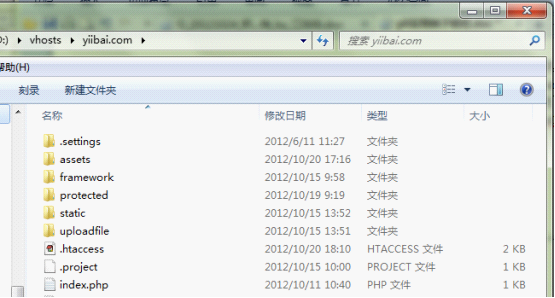
简单说明一下几个目录的作用(存放文件的内容):
1、framework: YII框架文件目录
2、static: 静态文件
3、protected: 开发程序文件目录
4、uploadfile: 上传的文件
配置Smarty支持
1、创建一个类,文件名为:CSmarty.php 内容如下:
<?php
/**
 * 扩展增加smarty模板
 *
 * @author Hema
 * @link http://www.ttall.net/
 * @copyright Copyright © 2012-2015  ttall.net
 * @license http://www.ttall.net/license/
 */
require_once (Yii::getPathOfAlias('application.extensions.smarty') . DIRECTORY_SEPARATOR . 'Smarty.class.php');
define('SMARTY_VIEW_DIR', Yii::getPathOfAlias('application.views'));
class CSmarty extends Smarty {
	const DIR_SEP = DIRECTORY_SEPARATOR;
	function __construct() {
		parent::__construct();
		$this -> template_dir = SMARTY_VIEW_DIR;
		$this -> compile_dir = SMARTY_VIEW_DIR . self::DIR_SEP . 'template_c';
		$this -> caching = true;
		$this -> cache_dir = SMARTY_VIEW_DIR . self::DIR_SEP . 'cache';
		$this -> left_delimiter = '<!--{';
		$this -> right_delimiter = '}-->';
		$this -> cache_lifetime = 0;
		// -- 初始全局数据
		$this -> assign('base_url', 'http://www.ttall.net');
		$this -> assign('index_url', 'http://www.ttall.net/index.php');
	}
	function init() {
	}
}把上述类放到文件目录: protected/extensions/
2、配置protected/config/main.php
在该文件中加入如下代码:
<?php
/**
 * 配置文件
 *
 * @author Hema
 * @link http://www.ttall.net/
 * @copyright Copyright © 2012-2015 ttall.net
 * @license http://www.ttall.net/license/
 */
// uncomment the following to define a path alias
// Yii::setPathOfAlias('local','path/to/local-folder');
return array(
	'basePath'=>dirname(__FILE__).DIRECTORY_SEPARATOR.'..',
	'name'=>'易百IT教程网-www.yiibai.com',

	// preloading 'log' component
	'preload'=>array('log'),

	// autoloading model and component classes
	'import'=>array(
		'application.models.*',
		'application.components.*',
		'application.extensions.*',
		'application.extensions.smarty.sysplugins.*',
	),
	// application components
	'components'=>array(
		'user'=>array(
			// enable cookie-based authentication
			'allowAutoLogin'=>true,
		),

		'smarty'=>array(
			'class'=>'application.extensions.CSmarty',
),3、找到文件protected/components/Controller.php,加入两个方法:
/**
 * Smarty assign()方法
 *
 */
public function assign($key, $value) {
	Yii::app() -> smarty -> assign($key, $value);
}

/**
 * Smarty display()方法
 *
 */
public function display($view) {
	Yii::app() -> smarty -> display($view);
}这样,我们就可以在每一个控制器里直接调用这两个Smarty方法了。


 1万+
1万+

 被折叠的 条评论
为什么被折叠?
被折叠的 条评论
为什么被折叠?
 到【灌水乐园】发言


