一、 理论介绍
1、电子邮件服务的概述:
Internet最基本的服务,也是最重要的服务之一,就是电子邮件服务。据统计Internet上百分之三十以上的业务量是电子邮件,仅次于WWW服务。与传统的邮政信件服务类似,电子邮件可以用来在Internet或Intranet上进行信息的传递和交流,但电子邮件服务还具有快速、经济的特点。发一份电子邮件给远在他方的一位用户,通常来说,对方几分钟之内就能收到。如果选用传统邮件,发一封特快专递也需要至少一天的时间。而且电子邮件的费用最多只需几毛钱。与实时信息交流,如电话相比,因为电子邮件是采用存储转发的方式,发送邮件时,并不需要收件人处于在线状态,收件人可以根据实际需要随时上网从邮件服务器上收取邮件,方便了信息的交流。
关于电子邮件服务器的协议有:SMTP协议,使用的是tcp的25号端口,明文传输来发送邮件;pop3 协议,使用的是tcp的110端口,采用的是明文传输来接收邮件;与SMTP对应的是SMTPS,使用的是tcp的993端口,采用的是密文传输协议;与POP3对应的是POP3S,使用的是tcp的995端口,采用的也是密文传输。关于邮件服务的相关术语有:MUA 邮件用户代理、MTA 邮件传输代理、MAA 邮件访问代理、MDA 邮件的转发代理。
2
、主流电子邮件服务器软件:
在Linux平台中,有许多邮件服务器可供选择,但目前使用较多的是Sendmail服务器、 Postfix服务器和Qmail服务器。Sendmail是一个很优秀的邮件服务软件。几乎所有Linux的缺省配置中都内置了这个软件,只需要设置好操作系统,它就能立
即运转起来。 Postfix是一个由IBM资助下由Wietse Venema 负责开发的一个
自由软件工程产物,它的目的就是为用户提供除Sendmail之外的邮件服务器选择。 Qmail是有Dan Bernstein开发的可以自由下载邮件服务器软件,其第一个beta版本0.70.7发布于1996年1月24日,当前版本是2.3.3-2。
二、
相关实验:
在做实验之前首先先搭建好实验环境,先搭建DNS服务器(方便后面的测试),本DNS服务器的域为abc.com。
sendmail
(发送服务器)在系统中是默认安装的,因为系统将自身发生的一些问题通过邮件的方式发给管理员,sendmail需要四个安装包:sendmail的主程序:sendmail、sendmail-cf是允许编辑一些简易的语法文件、sendmail-doc、m4是转换工具,在系统启动的时候将sendmail-mc转换为sendmail-cf
查看sendmail的状态:chkconfig --list |grep sendmail

使用指令:rpm -qa |grep -E(使用扩展的) “sendmail|m4”可知

m4和sendmail已经默认安装了。因此只需要安装sendmail-cf,步骤:
[root@localhost ~]# mkdir /mnt/cdrom
[root@localhost ~]# mount /dev/cdrom /mnt/cdrom/
mount: block device /dev/cdrom is write-protected, mounting read-only
[root@localhost ~]# cd /mnt/cdrom/Server/
[root@localhost Server]# rpm -ivh sendmail-cf-8.13.8-2.el5.i386.rpm
安装完之后我们需要编辑的文件在/etc/mail中,有sendmail的主配置文档sendmail.mc
[root@localhost Server]# cd /etc/mail
[root@localhost mail]# vim sendmail.mc
修改116行:

[root@localhost mail]# vim access
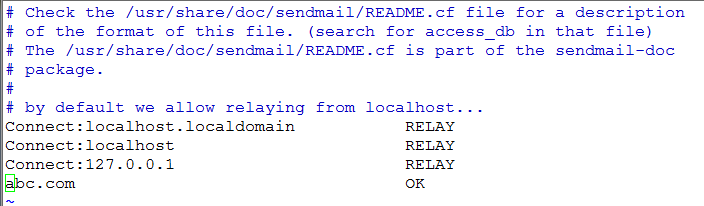
[root@localhost mail]# vim local-host-names

重启sendmail :service sendmail restart
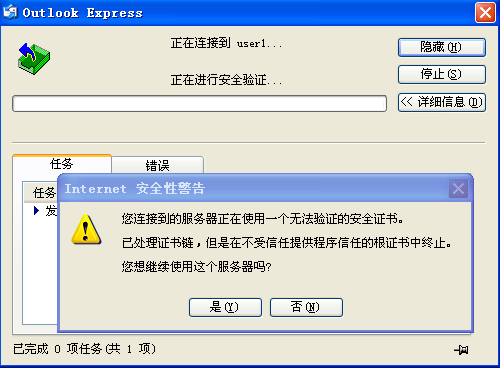
(补充:在本人重启过程中出现如下问题:

其解决方法有两种:1、修改系统时间为当前时间。2、在目录/etc/mail下执行“touch *”。其实这两种方式最终目的都是一样,都是重置时间。)
然后添加两个用户:user1 和user2,密码都为“123”(为了以后测试):
[root@localhost mail]# cd
[root@localhost ~]# useradd user1
[root@localhost ~]# echo "123" |passwd --stdin user1
Changing password for user user1.
passwd: all authentication tokens updated successfully.
[root@localhost ~]# useradd user2
[root@localhost ~]# echo "123" |passwd --stdin user2
Changing password for user user2.
passwd: all authentication tokens updated successfully.
架设DNS服务器
[root@localhost mail]# cd /mnt/cdrom/Server/
[root@localhost Server]# rpm -ivh bind-9.3.6-4.P1.el5.i386.rpm
[root@localhost Server]# rpm -ivh bind-chroot-9.3.6-4.P1.el5.i386.rpm
[root@localhost Server]# rpm -ivh caching-nameserver-9.3.6-4.P1.el5.i386.rpm
[root@localhost Server]# cd /var/named/chroot/etc/
[root@localhost etc]# cp -p named.caching-nameserver.conf name.conf
[root@localhost etc]# vim named.conf
(红色为修改的内容)

修改区域声明文件
[root@localhost etc]# vim named.rfc1912.zones

生成数据库
[root@localhost etc]# cd ../var/named/
[root@localhost named]# ll
[root@localhost named]# cp -p localhost.zone abc.com.db
[root@localhost named]# vim abc.com.db
修改为如下内容:

修改/etc/resolv.conf

修改主机名:
vim /etc/sysconfig/network

vim /etc/hosts如下:
重启系统:init 6
重启之后确认DNS与sendmail服务都是开启的。
想要用邮件客户端接受邮件还需要打开其110端口,安装接受服务器,具体做法如下:
编辑yum(操作方法前面文章中已提到,这里不做解释),
[root@mail ~]# yum install -y dovecot
[root@mail ~]# chkconfig dovecot on
[root@mail ~]# service dovecot start
sendmail的安全
sendmail的安全支持starttls发送加密:

要想启用starttls必须有颁发机构颁发的证书,下面就来做证书:
[root@mail ~]# cd /etc/pki/
[root@mail pki]# vim tls/openssl.cnf


[root@mail pki]# cd CA/
[root@mail CA]# mkdir crl certs newcerts
[root@mail CA]# touch serial index.txt
[root@mail CA]# vim serial

[root@mail CA]# openssl genrsa 1024 >private/cakey.pem
Generating RSA private key, 1024 bit long modulus
.................................................++++++
......................................++++++
e is 65537 (0x10001)
[root@mail CA]# chmod 600 private/*
产生证书:
[root@mail CA]# openssl req -x509 -new -key private/cakey.pem -out cacert.pem -days 3650
You are about to be asked to enter information that will be incorporated
into your certificate request.
What you are about to enter is what is called a Distinguished Name or a DN.
There are quite a few fields but you can leave some blank
For some fields there will be a default value,
If you enter '.', the field will be left blank.
-----
Country Name (2 letter code) [GB]:CN
State or Province Name (full name) [Berkshire]:HENAN
Locality Name (eg, city) [Newbury]:ZHENGZHOU
Organization Name (eg, company) [My Company Ltd]:ZZU
Organizational Unit Name (eg, section) []:TEC
Common Name (eg, your name or your server's hostname) []:Eleven
Email Address []:
[root@mail CA]# mkdir /etc/mail
mail/ mail.rc mailcap
[root@mail CA]# mkdir /etc/mail/certs
[root@mail CA]# cd /etc/mail/certs/
[root@mail certs]# openssl genrsa 1024 >sendmail.key
Generating RSA private key, 1024 bit long modulus
...........................++++++
..........++++++
e is 65537 (0x10001)
[root@mail certs]# openssl req -new -key sendmail.key -out sendmail.csr
You are about to be asked to enter information that will be incorporated
into your certificate request.
What you are about to enter is what is called a Distinguished Name or a DN.
There are quite a few fields but you can leave some blank
For some fields there will be a default value,
If you enter '.', the field will be left blank.
-----
Country Name (2 letter code) [GB]:CN
State or Province Name (full name) [Berkshire]:HENAN
Locality Name (eg, city) [Newbury]:ZHENGZHOU
Organization Name (eg, company) [My Company Ltd]:ZZU
Organizational Unit Name (eg, section) []:TEC
Common Name (eg, your name or your server's hostname) []:Eleven
Email Address []:
Please enter the following 'extra' attributes
to be sent with your certificate request
A challenge password []:
An optional company name []:
[root@mail certs]# openssl ca -in sendmail.csr -out sendmail.cert
(下面输入两次“Y”)
[root@mail certs]# cp /etc/pki/CA/cacert.pem .
[root@mail certs]# cd ..
[root@mail mail]# vim sendmail.mc


[root@mail mail]# cd certs/
[root@mail certs]# chmod 600 *
[root@mail certs]# service sendmail restart
下面查看STARTTLS

测试(首先打开linux中邮件的日志:tail -f /var/log/maillog):
首先设置outlook express :
选中账户中的user1 打开属性找到“高级“,

给自己(user1 发送邮件)

点击“是“邮件即发送出去,
再来查看日志:

下面来做关于接收加密(即pop3)
先来做加密之前的测试
,用抓包工具wireshark来抓取相关信息:
[root@localhost ~]# yum install -y wireshark
[root@localhost ~]# tshark -ni eth0 -R "tcp.dstport eq 110"
还是用user1给user1发送邮件,捕捉到的信息如下图:

下面做接收加密:
[root@mail ~]# cd /etc/mail/certs/
[root@mail certs]# mkdir -pv /etc/dovecot/certs
mkdir: created directory `/etc/dovecot'
mkdir: created directory `/etc/dovecot/certs'
[root@mail certs]#cd /etc/dovecot/certs
[root@mail certs]# openssl genrsa 1024 >dovecot.key
Generating RSA private key, 1024 bit long modulus
.............++++++
..............................++++++
e is 65537 (0x10001)
[root@mail certs]# openssl req -new -key dovecot.key -out dovecot.csr
You are about to be asked to enter information that will be incorporated
into your certificate request.
What you are about to enter is what is called a Distinguished Name or a DN.
There are quite a few fields but you can leave some blank
For some fields there will be a default value,
If you enter '.', the field will be left blank.
-----
Country Name (2 letter code) [GB]:CN
State or Province Name (full name) [Berkshire]:HENAN
Locality Name (eg, city) [Newbury]:ZHENGZHOU
Organization Name (eg, company) [My Company Ltd]:ZZDX
Organizational Unit Name (eg, section) []:TEC
Common Name (eg, your name or your server's hostname) []:Eleven
Email Address []:
Please enter the following 'extra' attributes
to be sent with your certificate request
A challenge password []:
An optional company name []:
[root@mail certs]# openssl ca -in dovecot.csr -out dovecot.cert
[root@mail certs]# chmod 600 *
[root@mail certs]# vim /etc/dovecot.conf


[root@mail certs]# service dovecot restart
这时候可以查看端口:
[root@mail certs]# netstat -tupln |grep dovecot
下面再次进行抓包:
首先设置账号的属性,找到“高级”:

用user1向user1发送邮件,打开抓包工具,截获信息如下:
[root@mail certs]# tshark -ni eth0 -R "tcp.dstport eq 995"(
注意是用的加密端口)

因此才有加密的方式发送和接收邮件将变得很安全。
sendmail
的认证
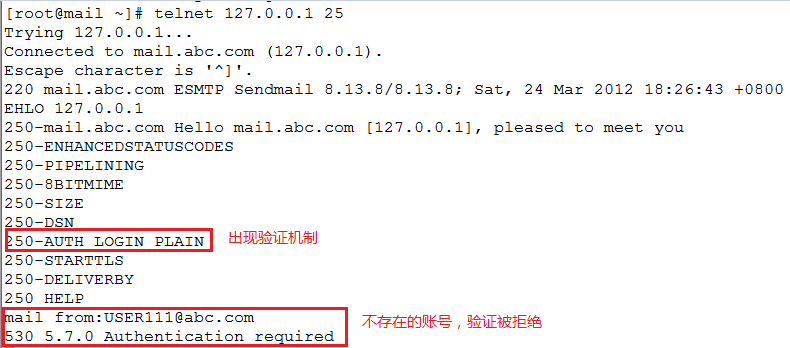
在默认情况下,任何一个用户都可以向外发送邮件,不管这个账号是否存在,
例如:

账号USER111不存在,但却能发送出去。
为了避免这种情况,就需要做邮件服务的认证。在邮件中认证采用的是sasl(简单认证安全层),sasl是一个协议,在客户端和服务器端中sasl协议所对应的服务是saslauthd
[root@mail ~]# rpm -qa |grep sasl

[root@mail ~]# chkconfig --list |grep sasl

[root@mail ~]# service saslauthd start
[root@mail ~]# vim /etc/mail/sendmail.mc


[root@mail ~]# service sendmail restart
再次验证:
然后用管理员的用户名和密码(本实验中管理员是“root”,密码是“123456”)的64位编码输入:
先得到管理员的64位编码:
[user1@mail ~]$ echo -n "root" |openssl base64
cm9vdA==
[user1@mail ~]$ echo -n "123456" |openssl base64
MTIzNDU2


切换至user1中查看邮件:

再用outlook express 测试:
注意:打开日志进行观察。
找到user1账号的“属性”中的“服务器”:

用user1向user1发送邮件:查看日志:

因此在设置验证的情况下,只有合法用户才能向外发送邮件。


 225
225


 被折叠的 条评论
为什么被折叠?
被折叠的 条评论
为什么被折叠?
 到【灌水乐园】发言


