1.安装Nginx前期准备:
1)Nginx的配置及运行需要pcre、zlib等软件包的支持,因此应预先安装这些软件的开发包(devel),以便提供相应的库和头文件,确保Ngnix的安装顺利完成。
Yum –y install pcre-devel zlib-devel
2)
创建运行用户、组,建议为其创建专门的用户账号,以便更准确地控制其访问权限,增加灵活性、降低安全风险。
useradd –M –s /sbin/nologin nginx
3)编译安装Nginx
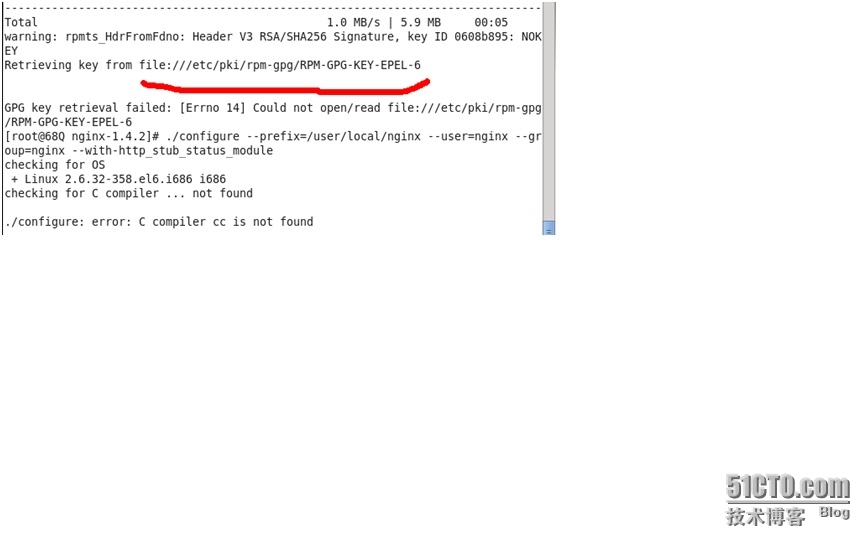
如果在编译的时候出现下面的状况,是因为gcc没有安装,不信的话,可以
Rpm –ql | grep gcc* 看看
在安装gcc的时候如果出现下面情况是因为gpgcheck=1,而你的key又导入失败,这时key不能用,要么就找个新的key地址,要不就把gpgcheck=0,就ok了
做完这步就可以编译安装Nginx了
3)
编译安装Nginx
[root@68Q /]# tar zxvf nginx-1.4.2.tar.gz
[root@68Q /]# cd nginx-1.4.2
[root@68Q nginx-1.4.2]#
[root@68Q nginx-1.4.2]# ./configure --prefix=/usr/local/nginx--user=nginx --group=nginx
[root@68Q nginx-1.4.2]# make && make install
为了使Nginx服务器的运行更加方便,可以为nginx创建链接文件,以便管理员直接执行”nginx”命令就可以调用nginx的主程序。
[root@68Q nginx-1.4.2]# ln -s /usr/local/nginx/sbin/nginx/usr/local/sbin/
1.Nginx 的运行控制
1)检查配置文件
与Apache的主程序httpd类似,nginx的主程序也提供了“-t”选项用来对配置文件进行检查,以便找出不当或错误的配置。配置文件nginx.conf默认位于安装目录下的conf/子目录中,若要检查其他位置的配置文件,可使用“-c”选项来指定路径。
[root@68Qnginx-1.4.2]# nginx -t
nginx:the configuration file /usr/local/nginx/conf/nginx.conf syntax is ok
nginx:configuration file /usr/local/nginx/conf/nginx.conf test is successful
[root@68Q nginx-1.4.2]#
2)
启动nginx
[root@68Q nginx-1.4.2]# nginx
通过检查nginx程序的监听状态,或者在浏览器中访问此web服务(默认页面将显示“Welcom to nginx!”),可以确认nginx服务是否正常运行。
[root@68Qnginx-1.4.2]# netstat -anpt | grep nginx
tcp00 0.0.0.0:800.0.0.0:*LISTEN5443/nginx
[root@68Q nginx-1.4.2]#
[root@68Qnginx-1.4.2]# elinks http://localhost
Welcome to nginx!
Welcome tonginx!
If you see this page, the nginx web serveris successfully installed and
working. Further configuration isrequired.
For online documentation and support pleaserefer to nginx.org.
Commercial support is available atnginx.com.
Thank you forusing nginx.
访问成功
主程序nginx支持标准的进程信号,通过kill或killall命令发送HUP信号表示重载配置,QUIT信号表示退出进程。KILL信号表示杀死进程。(例如,若使用killall命令,重载配置、停止服务的操作分别如下(通过-s指定信号种类)
[root@68Qnginx-1.4.2]# killall -s HUP nginx选项-s HUP 等同于 -1
[root@68Qnginx-1.4.2]# killall -s QUIT nginx选项-s QUIT 等同于 -3
[root@68Q nginx-1.4.2]#
当nginx进程运行时,PID号默认存放在logs/目录下的nginx.pid文件中,因此若要改用kill命令,也可以根据nginx.pid文件中的PID号来进行控制。
3)使用nginx服务脚本
[root@68Q nginx-1.4.2]# vi /etc/init.d/nginx
[root@68Qnginx-1.4.2]# vi /etc/init.d/nginx
#!/bin/sh
#
# nginx - this script starts and stops the nginx daemin
#
# chkconfig: - 85 15
# description: Nginx is an HTTP(S) server,HTTP(S) reverse \
# proxy and IMAP/POP3 proxy server
# processname: nginx
# config: /usr/local/nginx/conf/nginx.conf
# pidfile: /usr/local/nginx/logs/nginx.pid
# Source function library.
. /etc/rc.d/init.d/functions
# Source networking configuration.
. /etc/sysconfig/network
# Check that networking is up.
[ "$NETWORKING" = "no" ] &&exit 0
nginx="/usr/local/nginx/sbin/nginx"
prog=$(basename $nginx)
NGINX_CONF_FILE="/usr/local/nginx/conf/nginx.conf"
lockfile=/var/lock/subsys/nginx
start() {
[ -x $nginx ] || exit 5
[ -f $NGINX_CONF_FILE ] || exit 6
echo -n $"Starting $prog:"
daemon $nginx -c $NGINX_CONF_FILE
retval=$?
echo
[ $retval -eq 0 ] && touch$lockfile
return $retval
}
stop() {
echo -n $"Stopping $prog:"
killproc $prog -QUIT
retval=$?
echo
[ $retval -eq 0 ] && rm -f$lockfile
return $retval
}
restart() {
configtest || return $?
stop
start
}
reload() {
configtest || return $?
echo -n $"Reloading $prog:"
killproc $nginx -HUP
RETVAL=$?
echo
}
force_reload() {
restart
}
configtest() {
$nginx -t -c $NGINX_CONF_FILE
}
rh_status() {
status $prog
}
rh_status_q() {
rh_status >/dev/null 2>&1
}
case "$1" in
start)
rh_status_q &&exit 0
$1
;;
stop)
rh_status_q || exit 0
$1
;;
restart|configtest)
$1
;;
reload)
rh_status_q || exit 7
$1
;;
force-reload)
force_reload
;;
status)
rh_status
;;
condrestart|try-restart)
rh_status_q || exit 0
;;
*)
echo $"Usage: $0{start|stop|status|restart|condrestart|try-restart|reload|force-reload|configtest}"
exit 2
esac
[root@68Qnginx-1.4.2]# chmod +x /etc/init.d/nginx
[root@68Qnginx-1.4.2]# chkconfig --add nginx
[root@68Q nginx-1.4.2]#
通过脚本,nginx就可以正常的使用了。
转载于:https://blog.51cto.com/zyxjohn/1290394


 623
623


 被折叠的 条评论
为什么被折叠?


