


一:Openfire Connection Manager 简介
Openfire Connection Manager 是 Openfire 服务器的扩展,它可以透明的处理大规模并发 XMPP 客户端对Openfire 服务器的联接。根据 Connection Manager 主页介绍,每个 Connection Manager 可以处理至少5000个并发用户<官方文档>。
Openfire 服务器可以连接一个或多个 Connection Manager 。每个 Connection Manager 可以处理一个或多个支持 XMPP 的客户端。为 Openfire 配置 Connection Manager 后,支持 XMPP 的客户端仅需要连接 Connection Manager ,由 Connection Manager 负责管理对来自 XMPP 客户端对 Openfire 服务器的连接。下图是Openfire 服务器配置 Connection Manager 后的系统架构。
openfire使用该模块是双许可下的开源GPL许可证或COMERCIAL Jive软件提供的软件许可协议。
二:Openfire 配置
- 首先需要在 Openfire 上开启 Connection Manager 监听服务,具体流程如下所示
- 打开 Openfire Admin Console
- 点击 Server 选项卡下面的 Server Settings 页面
- 点击右侧的 Connection Managers 页面
- 选择 Enable 单选按钮以打开 Connection Manager 监听服务
- 设置 password 。例如, 123456 。
看图: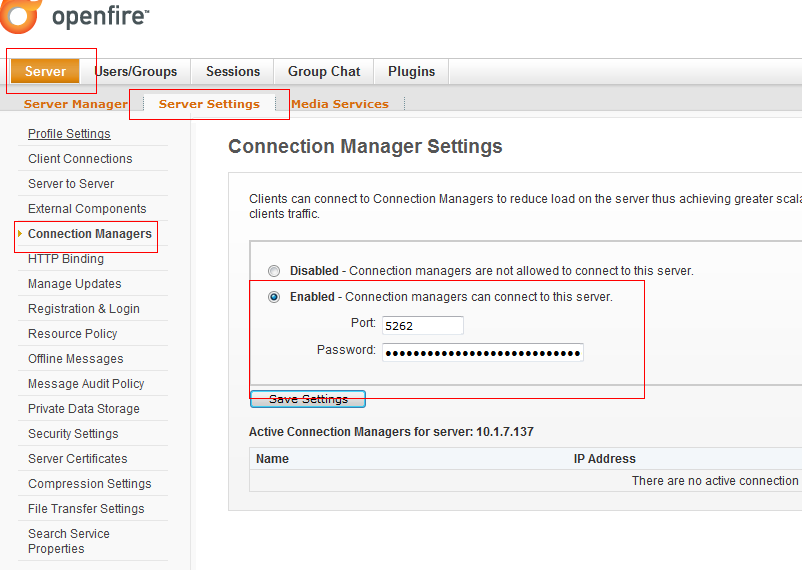
现在配置Connection Manager。解压从官网下载下来的打包. tar -zxvf connection_manager_3_6_3.tar.gz 包
- 修改 domain,conf下面的manager.xml文件 18行。修改如下:
<domain>xx.xx.xx.xx</domain>
        <!-- IP address or hostname of the XMPP server. If not defined then a DNS SRV lookup
        of the domain will be performed. -->
        <!-- <hostname></hostname> -->
        <!-- TCP port to connect to the XMPP server on. -->
        <port>5262</port>
        <!-- Password to use to log into the server. This property is required. -->
        <password>123456</password>
修改<certificate>标签下面的 <verify>true</verify> 改成 <verify>false</verify> 原因是:配置默认是需要 CA 颁发的证书。固我们现在先不用ca证书。而且这个证书也比较麻烦。意思上线了就有必要了。
配置到这里。Connection Manager的配置基本上已经完成。现在我们启动bin/cmanager.sh文件试试。刷新openfire 控制台。看下图结果: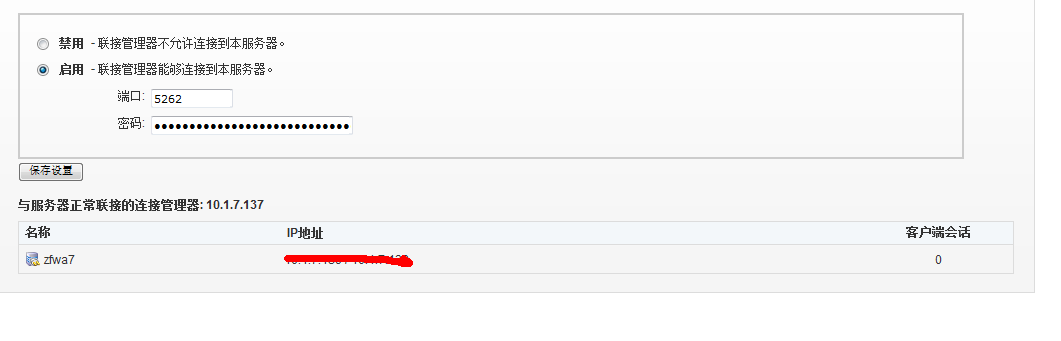
已经出现了我们刚刚配置的Connection Manager。说明已经配置成功。oy.
下面我们来配置客户端,客户端我是用的smack模拟。ip用Connection Manager port还是原来的5222。下面是我smack模拟代码
package com.amack;

import java.util.UUID;

import org.jivesoftware.smack.AccountManager;
import org.jivesoftware.smack.ConnectionConfiguration;
import org.jivesoftware.smack.PacketListener;
import org.jivesoftware.smack.XMPPConnection;
import org.jivesoftware.smack.XMPPException;
import org.jivesoftware.smack.filter.PacketTypeFilter;
import org.jivesoftware.smack.packet.Message;
import org.jivesoftware.smack.packet.Packet;

public class Client {

	private String host = "xx.xx.xx.xx";
	private int port = 5222;

	public void run() {
		connection();

	}

	public static void main(String[] args) {
		new Client().run();
	}

	public void connection() {
		// XMPPConnection.DEBUG_ENABLED = true;
		final ConnectionConfiguration config = new ConnectionConfiguration(
				host, port);
		config.setReconnectionAllowed(true);
		config.setSendPresence(true);
		config.setSASLAuthenticationEnabled(false);
		XMPPConnection connection = new XMPPConnection(config);

		try {
			connection.connect();
			Thread.sleep(9000);
			String userName = newRandomUUID();
			String passWord = newRandomUUID();
			if (regist(connection, userName, passWord)) {
				connection.login(userName, passWord);
				print("login  " + connection.isConnected() + "");
				connection.addPacketListener(new PacketListener() {
					@Override
					public void processPacket(Packet paramPacket) {
						Message message = (Message) paramPacket;
						print("receive message:  " + message.toXML());
					}
				}, new PacketTypeFilter(Message.class));
			}

		} catch (XMPPException e) {
			e.printStackTrace();
		} catch (InterruptedException e) {
			e.printStackTrace();
		}
	}

	/**
	 * 注册
	 *
	 * @param account
	 *            注册帐号
	 * @param password
	 *            注册密码
	 * @return 1、注册成功 0、服务器没有返回结果2、这个账号已经存在3、注册失败
	 */
	public boolean regist(XMPPConnection connection, String account,
			String password) {
		if (connection == null)
			return false;
		AccountManager accountManager = new AccountManager(connection);
		try {
			accountManager.createAccount(account, password);
		} catch (XMPPException e1) {
		}
		return true;

	}

	public String newRandomUUID() {
		return UUID.randomUUID().toString();
	}

	public void print(String str) {
		System.out.println(str);
	}
}- 查看openfire的客户端会话:

2. 查看Connection Manager的有效客户端会话数。

哈哈哈。说明已经通过Connection Manager连接到openfire服务器了。
一边学习一边写。不急不急


 174
174


 被折叠的 条评论
为什么被折叠?
被折叠的 条评论
为什么被折叠?
 到【灌水乐园】发言


