STEP 1: Create new webapp project, I will use maven for this. (Note: I am on my macbook with Maven 3 and Java 6 installed.)
mvn archetype:generate
-DgroupId=com.manishchhabra.blog
-DartifactId=HelloSpringWithMongoDB
-DarchetypeArtifactId=maven-archetype-webapp
-DinteractiveMode=false
You could create the maven project directly in your IDE as well. But I usually create it on the terminal and import it in eclipse by using the following command (Note: The following command is run within your newly created project directory, i.e. run -> cd HelloSpringWithMongoDB)
mvn eclipse:eclipse -Dwtpversion=2.0
STEP 2: Add Spring Framework 3.2 and Spring Data 1.2 dependencies to your pom.xml
1
2
3
4
5
6
7
8
9
10
11
12
13
14
15
16
17
<dependency>
<groupId>org.springframework</groupId>
<artifactId>spring-orm</artifactId>
<version>3.2.0.RELEASE</version>
</dependency>
<dependency>
<groupId>org.springframework</groupId>
<artifactId>spring-webmvc</artifactId>
<version>3.2.0.RELEASE</version>
</dependency>
<dependency>
<groupId>org.springframework.data</groupId>
<artifactId>spring-data-mongodb</artifactId>
<version>1.2.0.RELEASE</version>
</dependency>
STEP 3: Update your web.xml (src/main/webapp/WEB-INF/web.xml) to use Spring’s DispatcherServlet
1
2
3
4
5
6
7
8
9
10
11
12
13
14
15
16
17
18
19
20
21
22
23
24
25
26
27
28
<web-appxmlns="http://java.sun.com/xml/ns/javaee"
xmlns:xsi="http://www.w3.org/2001/XMLSchema-instance"
xsi:schemaLocation="http://java.sun.com/xml/ns/javaee http://java.sun.com/xml/ns/javaee/web-app_2_5.xsd"
version="2.5">
<display-name>Spring With MongoDB Web Application</display-name>
<servlet>
<servlet-name>dispatcher</servlet-name>
<servlet-class>org.springframework.web.servlet.DispatcherServlet</servlet-class>
<load-on-startup>1</load-on-startup>
</servlet>
<servlet-mapping>
<servlet-name>dispatcher</servlet-name>
<url-pattern>/</url-pattern>
</servlet-mapping>
<context-param>
<param-name>contextConfigLocation</param-name>
<param-value>/WEB-INF/dispatcher-servlet.xml</param-value>
</context-param>
<listener>
<listener-class>org.springframework.web.context.ContextLoaderListener</listener-class>
</listener>
</web-app>
STEP 4: Add your spring configuration to the dispatcher-servlet.xml
Use MongoFactoryBean to connect to the MongoDB instance. Use MongoTemplate to connect and make queries to the database.
1
2
3
4
5
6
7
8
9
10
11
12
13
14
15
16
17
18
19
20
21
22
23
24
25
26
27
28
29
30
<?xmlversion="1.0"encoding="UTF-8"?>
<beansxmlns="http://www.springframework.org/schema/beans"
xmlns:xsi="http://www.w3.org/2001/XMLSchema-instance"
xmlns:context="http://www.springframework.org/schema/context"
xmlns:p="http://www.springframework.org/schema/p"
xsi:schemaLocation="http://www.springframework.org/schema/beans http://www.springframework.org/schema/beans/spring-beans-3.2.xsd http://www.springframework.org/schema/context http://www.springframework.org/schema/context/spring-context-3.2.xsd">
<context:component-scanbase-package="com.manishchhabra.blog"/>
<!-- Factory bean that creates the Mongo instance -->
<beanid="mongo"class="org.springframework.data.mongodb.core.MongoFactoryBean">
<propertyname="host"value="localhost"/>
</bean>
<!-- MongoTemplate for connecting and quering the documents in the database -->
<beanid="mongoTemplate"class="org.springframework.data.mongodb.core.MongoTemplate">
<constructor-argname="mongo"ref="mongo"/>
<constructor-argname="databaseName"value="test"/>
</bean>
<!-- Use this post processor to translate any MongoExceptions thrown in @Repository annotated classes -->
<beanclass="org.springframework.dao.annotation.PersistenceExceptionTranslationPostProcessor"/>
<beanid="jspViewResolver"
class="org.springframework.web.servlet.view.InternalResourceViewResolver"
p:prefix="/WEB-INF/jsp/"
p:suffix=".jsp"/>
</beans>
STEP 5: Create a model (using Person as an example), service and controller in the new source directory src/main/java
Model
1
2
3
4
5
6
7
8
9
10
11
12
13
14
15
16
17
18
19
20
21
22
23
24
25
packagecom.manishchhabra.blog.model;
importorg.springframework.data.annotation.Id;
importorg.springframework.data.mongodb.core.mapping.Document;
publicclassPerson {
@Id
privateString id;
privateString name;
publicString getId() {
returnid;
}
publicvoidsetId(String id) {
this.id = id;
}
publicString getName() {
returnname;
}
publicvoidsetName(String name) {
this.name = name;
}
}
Service
1
2
3
4
5
6
7
8
9
10
11
12
13
14
15
16
17
18
19
20
21
22
23
24
25
26
27
28
29
30
31
32
33
34
35
36
37
38
39
packagecom.manishchhabra.blog.service;
importjava.util.List;
importjava.util.UUID;
importorg.springframework.beans.factory.annotation.Autowired;
importorg.springframework.data.mongodb.core.MongoTemplate;
importorg.springframework.stereotype.Repository;
importcom.manishchhabra.blog.model.Person;
@Repository
publicclassPersonService {
@Autowired
privateMongoTemplate mongoTemplate;
publicstaticfinalString COLLECTION_NAME ="person";
publicvoidaddPerson(Person person) {
if(!mongoTemplate.collectionExists(Person.class)) {
mongoTemplate.createCollection(Person.class);
}
person.setId(UUID.randomUUID().toString());
mongoTemplate.insert(person, COLLECTION_NAME);
}
publicList<Person> listPerson() {
returnmongoTemplate.findAll(Person.class, COLLECTION_NAME);
}
publicvoiddeletePerson(Person person) {
mongoTemplate.remove(person, COLLECTION_NAME);
}
publicvoidupdatePerson(Person person) {
mongoTemplate.insert(person, COLLECTION_NAME);
}
}
Controller for the CRUD operations
1
2
3
4
5
6
7
8
9
10
11
12
13
14
15
16
17
18
19
20
21
22
23
24
25
26
27
28
29
30
31
32
33
34
35
36
37
38
39
40
41
42
43
packagecom.manishchhabra.blog.controller;
importorg.springframework.beans.factory.annotation.Autowired;
importorg.springframework.stereotype.Controller;
importorg.springframework.ui.ModelMap;
importorg.springframework.util.StringUtils;
importorg.springframework.web.bind.annotation.ModelAttribute;
importorg.springframework.web.bind.annotation.RequestMapping;
importorg.springframework.web.bind.annotation.RequestMethod;
importorg.springframework.web.servlet.View;
importorg.springframework.web.servlet.view.RedirectView;
importcom.manishchhabra.blog.model.Person;
importcom.manishchhabra.blog.service.PersonService;
@Controller
publicclassPersonController {
@Autowired
privatePersonService personService;
@RequestMapping(value ="/person", method = RequestMethod.GET)
publicString getPersonList(ModelMap model) {
model.addAttribute("personList", personService.listPerson());
return"output";
}
@RequestMapping(value ="/person/save", method = RequestMethod.POST)
publicView createPerson(@ModelAttributePerson person, ModelMap model) {
if(StringUtils.hasText(person.getId())) {
personService.updatePerson(person);
}else{
personService.addPerson(person);
}
returnnewRedirectView("/HelloSpringWithMongoDB/person");
}
@RequestMapping(value ="/person/delete", method = RequestMethod.GET)
publicView deletePerson(@ModelAttributePerson person, ModelMap model) {
personService.deletePerson(person);
returnnewRedirectView("/HelloSpringWithMongoDB/person");
}
}
STEP 5: Create a JSP Page in the folder WEB-INF/jsp called output.jsp (This will currently invoke create and delete).
1
2
3
4
5
6
7
8
9
10
11
12
13
14
15
16
17
18
19
20
21
<%@ taglib prefix="c" uri="http://java.sun.com/jsp/jstl/core" %>
<html>
<body>
<h2>Here is a simple CRUD using Spring MVC and MongoDB.</h2>
<formaction="person/save"method="post">
<inputtype="hidden"name="id">
<labelfor="name">Person Name</label>
<inputtype="text"id="name"name="name"/>
<inputtype="submit"value="Submit"/>
</form>
<tableborder="1">
<c:forEachvar="person"items="${personList}">
<tr>
<td>${person.name}</td><td><inputtype="button"value="delete"οnclick="window.location='person/delete?id=${person.id}'"/></td>
</tr>
</c:forEach>
</table>
</body>
</html>
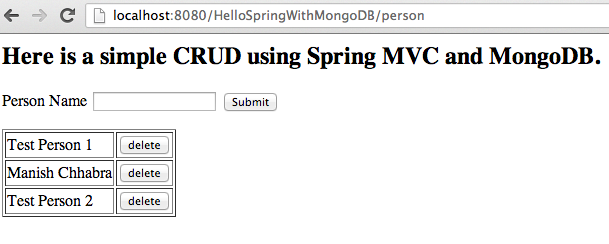
STEP 6: That’s it! Its time to run your project. You could either run directly from eclipse or you could run “mvn package” to build a war file and deploy it to your application server. I tested this on tomcat running on port 8080 (http://localhost:8080/HelloSpringWithMongoDB/person) and I could store and delete person with provided names. Working! yeah.. Here is a picture of me playing with the app 

Spring Data MongoDB Spring MVC 3.2 Example App
You can view or download the full project code athttps://github.com/manishchhabra/HelloSpringWithMongoDB


 876
876


 被折叠的 条评论
为什么被折叠?
被折叠的 条评论
为什么被折叠?
 到【灌水乐园】发言


