数据库外模式/模式映像简介
我们知道,应用程序是依据数据的外模式编写的,通过外模式/模式映像与数据库的模式(schema)相交互。因此,数据库模式的改变时仅需要对外模式/模式映像进行改变,从而不一定要改变应用程序,因此保证了应用程序的独立性。在MySQL数据库的实现中,此概念中外模式/模式映象的具体体现即为链接程序,程序通过链接程序对数据库模式进行访问。
不同的编程语言编写的程序通过各自的链接程序连接数据库的模式,例如Java通过JDBC(Java DataBase Connector)访问MySQL,C++比较有意思,由于其众所周知的特殊性(本身是个语言、面向对象以及与C语言一定程度兼容),它既可以通过Connector C++,又可以通过ODBC连接MySQL数据库,还能使用MySQL C API。对于Python来说链接程序就是Connector python。
本文数据库结构
本文所用测试数据库schema名称为department_store,所用表为sale表,其表结构如下图所示: 

测试程序需要执行query语句:
INSERT INTO sale VALUES (1027, 3, 8, 4);
测试方案是以各种编程语言编写程序调用以上Query,若没有报错,则可以观察数据库的情况。若观察到此记录已经插入,如下图所示,则表明插入成功。(观察到词条记录插入成功后执行人工删除,以便于下一次测试观察)

解释型编程语言(脚本语言)连接数据库示例
解释型编译语言往往自带数据库连接支持,因此解释型编程语言连接数据库往往较为方便简洁,仅需调用若干内置模块即可。本文以php和python语言为例,展示解释型编程语言连接数据库的例子。
PHP程序连接数据库
PHP连接数据库的方式比较简单方便,其基本步骤如下:
- 安装xampp软件(默认安装路径为:"C:\xampp")。
- 打开("C:\xampp\htdocs"),此位置也是浏览器默认执行网页脚本程序的位置。
- 在此路径下新建文件夹"Web_App Demo",内放置即将执行的演示数据库插入网页脚本。
- 新建文件demo.php(新建完毕后可以用记事本打开,也可以用专业网页程序编写软件如Dreamweaver打开),输入如下代码:
<?php
print '<p> connecting to database... </p>';

$link = mysql_connect('localhost', 'root', '123456')
	or die('Could not connect: '.mysql_error());
/* Can be replaced by:
if (!$link = mysql_connect('localhost', 'root', '123456'))
    exit('wrong');
If one thinks the word 'die' is unfortunate or if the sentence used an extra if. Thanks @Lee*/

print '<p> connected successfully </p>';
mysql_select_db('department_store') or die('could not select database');
//Perform SQL query
$query = "INSERT INTO sale VALUES(1027, 3, 8, 4)";
if(!mysql_query($query, $link))
	die('Error: '.mysql_error());

print "<p> 1 record added: </p>";
print "<ul>";

mysql_close($link);
?>

//Or use those codes, thanks to Lee
<?php
print '<p> connecting to database... </p>';

$mysqli = new mysqli("localhost", "root", "123456", "department_store");
if ($mysqli->connect_errno) {
    echo "Failed to connect to MySQL: (" . $mysqli->connect_errno . ") " . $mysqli->connect_error;
}

if (!$mysqli->query("INSERT INTO sale VALUES(1027, 3, 8, 4)")) {
    echo "Insert into table fails!";
}

print "<p> 1 record added: </p>";
print "<ul>";

mysql_close($link);
?>
-
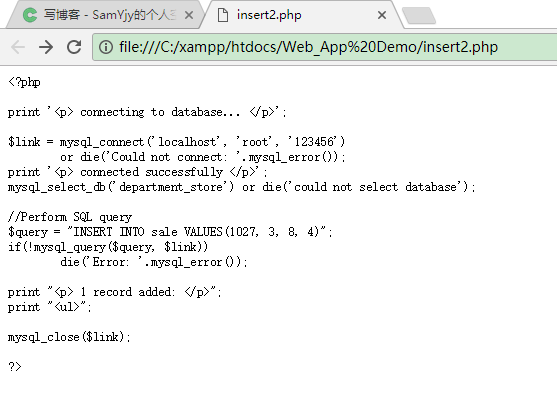
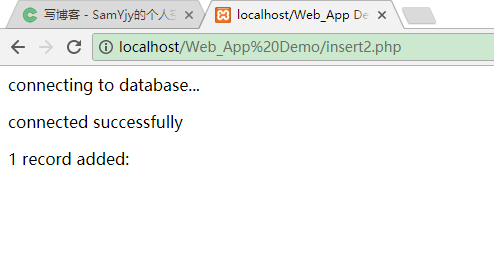
以任意浏览器打开上述脚本,并将地址截止htdocs的部分改为localhost,如图所示
-
单击回车,即可观察脚本执行情况。
Python程序连接数据库
安装python以及Connector/Python之后(注意顺序一定是先python后connector),以任意Python IDE(如Python IDLE, Spyder, Pycharm等)运行以下测试程序:
#import mysql.connector model:
#In python 3 you don't need next line, exceptions is the default model:
import exceptions
import mysql.connector as connector

"""
An easier version of trying connection
try:
  cnn = connector.connect(host = 'localhost', user = 'root', password = '123456', database =                'department_store')
except Exception as e:
  print "Error connecting to database!{}".format(e)
"""

#A dictionary structure:
config={'host':'127.0.0.1',#By default local host
        'user':'root',
        'password':'123456',
        'port':3306 ,#By default port 3306
        'database':'department_store',
        'charset':'utf8' #By default UTF-8
}

query = "INSERT INTO sale VALUES (1027, 3, 8, 4)"

try:
  cnn = connector.connect(**config)
  cursor = cnn.cursor()
  cursor.execute(query)
  # 注意不要忘记commit
  cnn.commit()
except Exception as e:
  print "Error connecting to database!{}".format(e)
finally:
    cursor.close()
    cnn.close()
观察运行情况即可。更多关于Python连接数据库的资料,请参考参考资料部分以及《MySQL Connector/Python Developer Guide》第五、六两章。
编译型语言连接数据库示例
编译型语言由于自身不带数据库支持,连接数据库往往需要通过链接程序(connector),将链接程序作为用户程序调用的子程序来完成与数据库的交互。因此,编译型语言连接数据库时,往往需要导入外部类库作为支持。
Java程序连接数据库
- JDBC可从此下载:https://dev.mysql.com/downloads/connector/j/ ,解压至任意路径。(或可用gradle管理依赖)
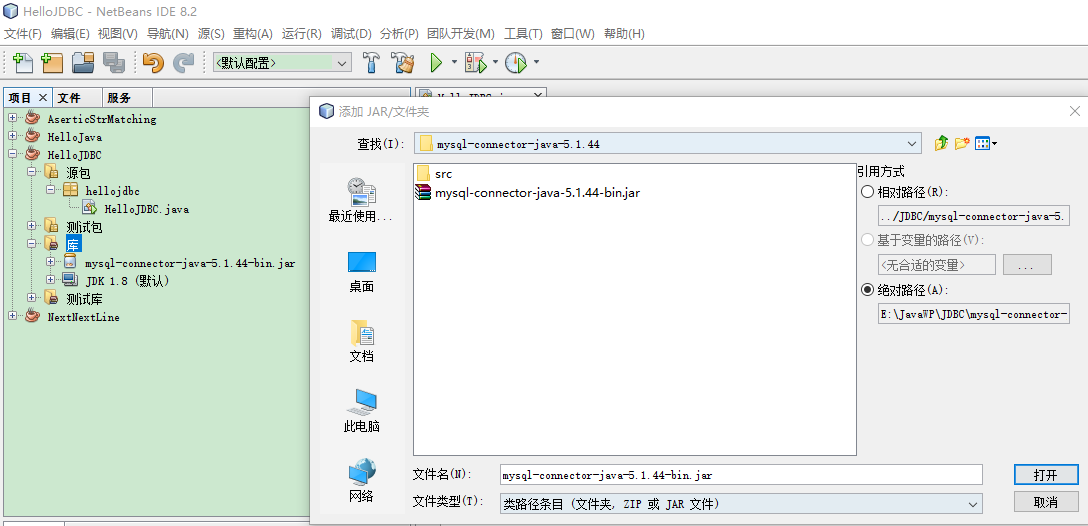
- 在Java IDE(如Netbeans, eclipse等)中新建一个项目,打开将刚才下载解压的文件,将其中的.jar文件夹添加至与JDK包同一个级别的路径下(笔者此处使用的是Netbeans,添加过程如下所示)
新建主类HelloJDBC,输入如下代码:
//视IDE情况不同选用
package hellojdbc;

import java.sql.Connection;
import java.sql.DriverManager;
import java.sql.SQLException;
import java.sql.Statement;

public class HelloJDBC {

    private Connection connect = null;
    private Statement statement = null;

    public static void main(String[] args) {
        HelloJDBC jdbcInst = new HelloJDBC();
        jdbcInst.insertToDB();
    }//end main method

    public void insertToDB(){
        try {
          // this will load the MySQL driver, each DB has its own driver
          Class.forName("com.mysql.jdbc.Driver");
          // setup the connection with the DB.
          connect = DriverManager.getConnection(
                  "jdbc:mysql://localhost/department_store",
                  "root", "123456");

          // statements allow to issue SQL queries to the database
          statement = connect.createStatement();
          // resultSet gets the result of the SQL query
          statement.execute("INSERT INTO sale VALUES(1027, 3, 8, 4)");
          statement.close();
          connect.close();

        } catch (SQLException ex) {
            ex.printStackTrace();
        } catch (ClassNotFoundException ex) {
            ex.printStackTrace();
        }//end try-catch
    }//end method insert

}//end class
并测试运行即可。
C++程序连接数据库(以Visual Studio C++并使用Connector C++为例)
C++程序推荐使用connector C++连接数据库(虽然C语言的MySQL API以及ODBC也能实现类似功能),connector C++的下载地址:https://dev.mysql.com/downloads/connector/cpp/ 下载MSI版本的解压后即可安装(笔者选择默认安装)
此外,C++程序连接数据库还需要使用Boost库,其下载地址为:http://www.boost.org/users/download/, 下载后即可解压使用(笔者直接解压到系统盘C盘)。本文所用测试代码如下:
#include<iostream>
#include<stdlib.h>

#include "mysql_connection.h"
#include "mysql_driver.h"
#include "mysql_error.h"
#include <cppconn/driver.h>
#include <cppconn/exception.h>
#include <cppconn/resultset.h>
#include <cppconn/statement.h>

using namespace std;

int main(int argc, char *argv[])
{
	try {
		sql::mysql::MySQL_Driver *driver;
		driver = sql::mysql::get_mysql_driver_instance();
		sql::Connection *con;
		con = driver->connect("tcp://127.0.0.1:3306", "root", "123456");
		sql::Statement *stmt;
		stmt = con->createStatement();
		stmt->execute("USE department_store");
		stmt->execute("INSERT INTO sale VALUES (1027, 3, 8, 4)");
		delete stmt;
		delete con;
	}catch(sql::SQLException &e){
		/*
		MySQL Connector/C++ throws three different exceptions:
		- sql::MethodNotImplementedException (derived from sql::SQLException)
		- sql::InvalidArgumentException (derived from sql::SQLException)
		- sql::SQLException (derived from std::runtime_error)
		*/
		cout << "# ERR: SQLException in " << __FILE__;
		cout << "(" << __FUNCTION__ << ") on line " << __LINE__ << endl;
		/* what() (derived from std::runtime_error) fetches error message */
		cout << "# ERR: " << e.what();
		cout << " (MySQL error code: " << e.getErrorCode();
		cout << ", SQLState: " << e.getSQLState() << " )" << endl;
		system("pause");
		return EXIT_FAILURE;
	}
	system("pause");
}
本文后面部分假设读者已经安装Visual Studio
- 新建一个Visual studio C++项目,新建一个cpp文件,并且将调试选项由Debug改为Release。
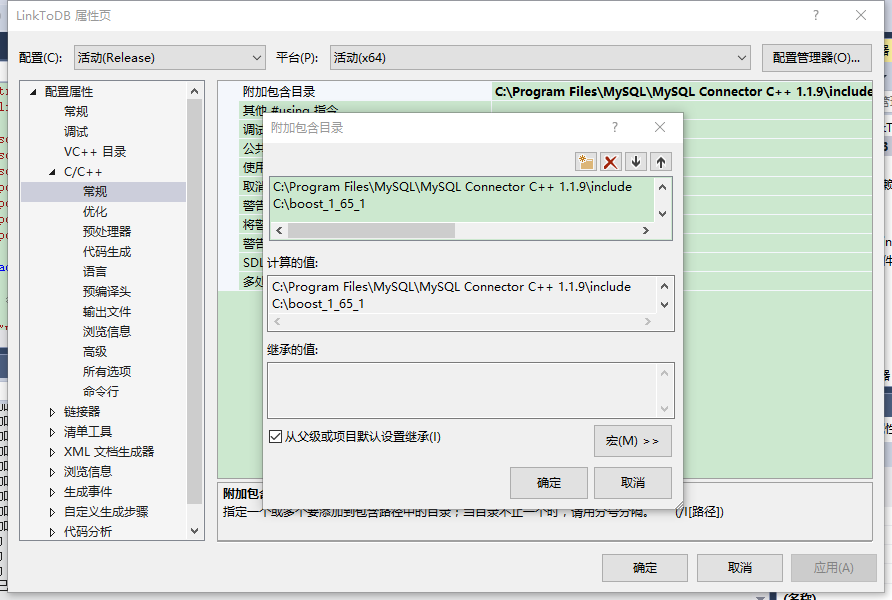
- 点击“项目->属性->C++->常规”,如图所示。
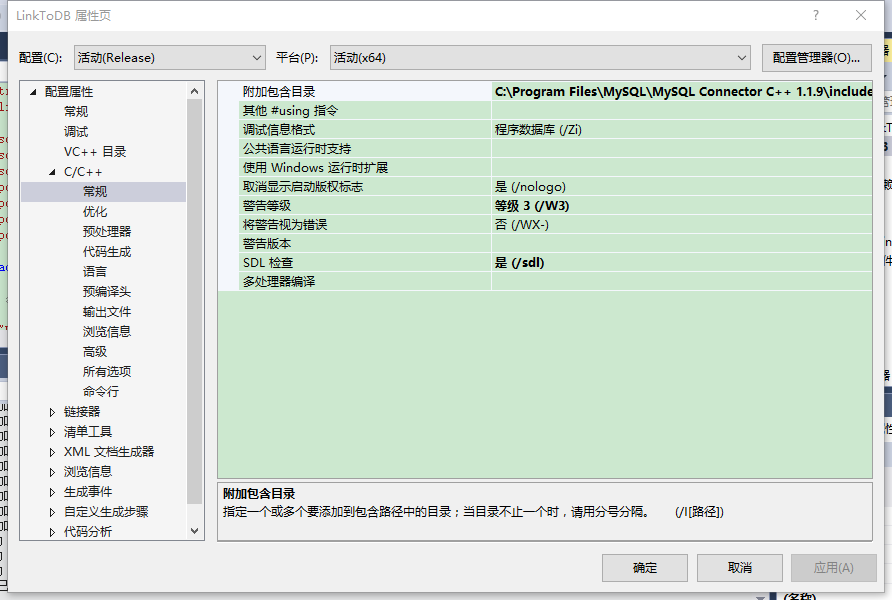
- 在“附加包含目录”项,添加connector C++ include文件所在路径以及Boost库根目录(若是默认安装如图所示即可)
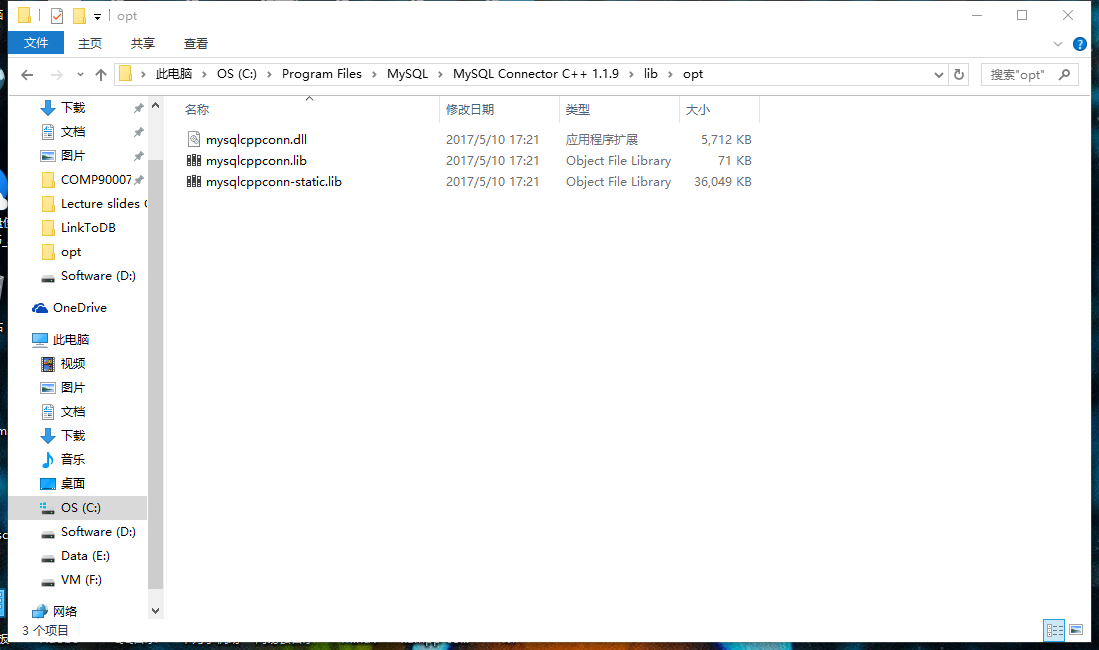
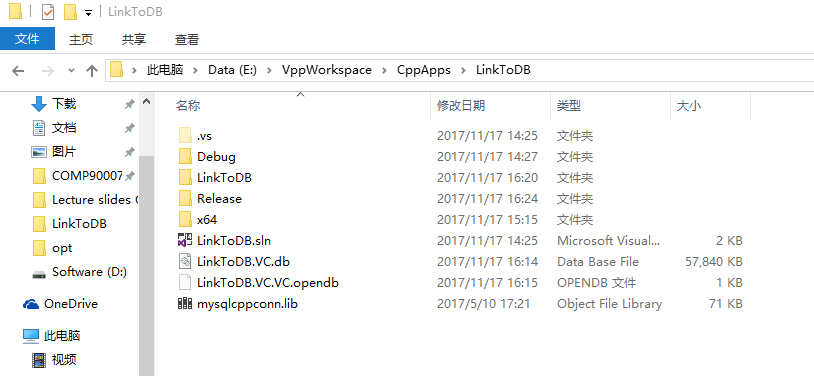
- 进入connector C++所在目录,将 "mysqlcppconn.lib"文件复制到此C++项目所在根目录。如果是第一次开发C++连接数据库的应用,还需要将"mysqlcppconn.dll"复制到 "C:\Windows"目录下。

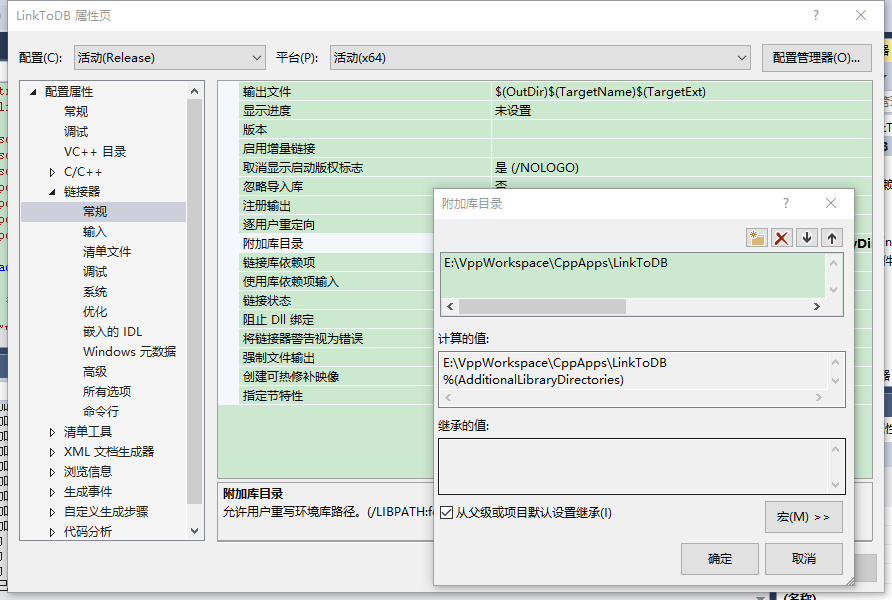
- 下一步,点击“项目->属性->链接器->常规”,在“附加库目录”中添加本项目根目录的路径,并且在“输入”一栏的“附加依赖项”中添加"mysqlcppconn.lib",如图所示。
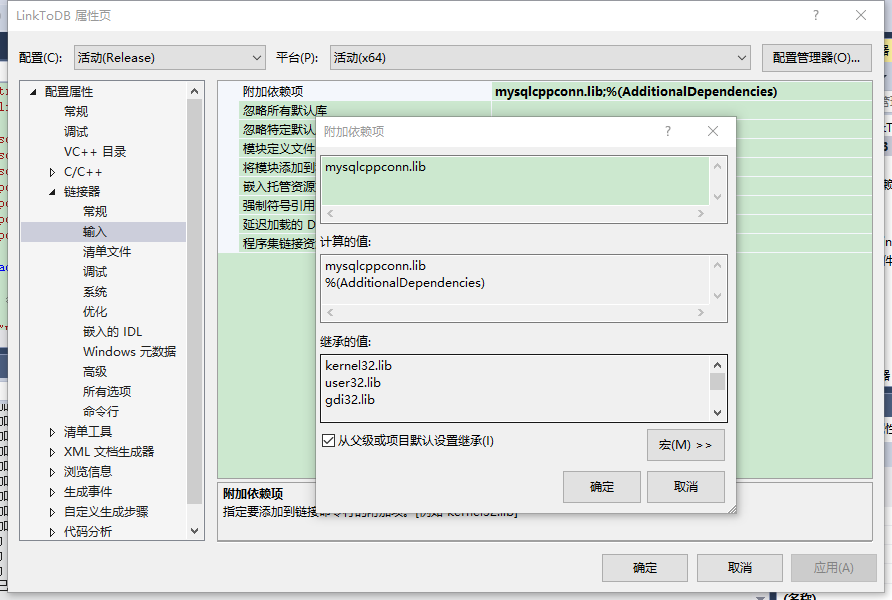
- 然后即可进行C++连接数据库程序的开发,比如可在刚才新建的.cpp文件中输入上面的测试代码并运行进行测试。
更多示例,可以参考MySQL的官方文档《MySQL Connector/C++ Developer Guide》第33-34页。.
参考资料:
- Python中MySQLConnector模块使用方法详解,URL:http://www.111cn.net/phper/python/67319.htm
- “connector-cpp-en.a4.pdf.” .
- “connector-odbc-en.a4.pdf.” .
- tutorialspoint.com, “JDBC - Create Database Example,” www.tutorialspoint.com. [Online]. Available: https://www.tutorialspoint.com/jdbc/jdbc-create-database.htm. [Accessed: 16-Nov-2017].
- “MySQL :: MySQL 5.7 Reference Manual :: 27.8.6 C API Function Overview.” [Online]. Available: https://dev.mysql.com/doc/refman/5.7/en/c-api-function-overview.html. [Accessed: 17-Nov-2017].
- 王珊和萨师煊,《数据库系统概论》第5版,高等教育出版社,2016年2月,北京


 1万+
1万+

 被折叠的 条评论
为什么被折叠?


