


环境说明:
- 操作系统:CentOS 7.4 64位
- JDK:jdk-8u152-linux-x64.tar.gz
- Maven:apache-maven-3.5.2-bin.tar.gz
- Nexus:nexus-2.14.5-02-bundle.tar.gz
一、JDK安装和配置
1.先从官网下载安装包http://www.oracle.com/technetwork/java/javase/downloads/index.html,然后通过Xshell或FTP将安装包传输到Linux服务器;
2.拷贝到/usr/program目录下进行解压:
[root@centos7.4 program]# tar zvxf jdk-8u152-linux-x64.tar.gz3.解压后会生成一个jdk1.8.0_152/目录,切换到解压后的jdk1.8.0_152/目录下:
[root@centos7.4 program]# cd jdk1.8.0_152/
[root@centos7.4 jdk1.8.0_152]#
4. 配置环境变量
[root@centos7.4 jdk1.8.0_152]# vi /etc/profile

在该配置文件的最下方添加如下配置:
#set JAVA_HOME
export JAVA_HOME=/usr/program/jdk1.8.0_152
export CLASSPATH=.:$JAVA_HOME/lib/dt.jar:$JAVA_HOME/lib/tools.jar
export PATH=$JAVA_HOME/bin:$PATH
5.执行配置文件修改
[root@centos7.4 jdk1.8.0_152]# source /etc/profile6.查看java版本,看是否安装成功(看到如下说明安装配置成功):
[root@centos7.4 jdk1.8.0_152]# java -version
java version "1.8.0_152"
Java(TM) SE Runtime Environment (build 1.8.0_152-b16)
Java HotSpot(TM) 64-Bit Server VM (build 25.152-b16, mixed mode)
二、Maven安装和配置
1.先从官网下载安装包http://maven.apache.org/download.cgi,然后通过Xshell或FTP将安装包传输到Linux服务器;
2.拷贝到/usr/program目录下进行解压:
[root@centos7.4 program]# tar zvxf apache-maven-3.5.2-bin.tar.gz3.解压后会生成一个apache-maven-3.5.2/目录,切换到解压后的apache-maven-3.5.2/目录下:
[root@centos7.4 program]# cd apache-maven-3.5.2/
[root@centos7.4 apache-maven-3.5.2]#
4.配置环境变量
[root@centos7.4 apache-maven-3.5.2]# vi /etc/profile

在该配置文件的最下方添加如下配置:
#set MAVEN_HOME
export MAVEN_HOME=/usr/program/apache-maven-3.5.2
export PATH=$MAVEN_HOME/bin:$PATH
5.执行配置文件修改
[root@centos7.4 apache-maven-3.5.2]# source /etc/profile6.查看maven版本,看是否安装成功(看到如下说明安装配置成功):
[root@centos7.4 apache-maven-3.5.2]# mvn -version
Apache Maven 3.5.2 (138edd61fd100ec658bfa2d307c43b76940a5d7d; 2017-10-18T15:58:13+08:00)
Maven home: /usr/program/apache-maven-3.5.2
Java version: 1.8.0_152, vendor: Oracle Corporation
Java home: /usr/program/jdk1.8.0_152/jre
Default locale: en_US, platform encoding: UTF-8
OS name: "linux", version: "3.10.0-693.5.2.el7.x86_64", arch: "amd64", family: "unix"
三、Nexus的安装和配置
1.Nexus的几个相关网站:
- 官网:http://www.sonatype.org/nexus/
- 历史版本下载:http://www.sonatype.org/nexus/archived/
- 最新版本下载:https://www.sonatype.com/download-oss-sonatype
- 官网帮助说明 1:http://books.sonatype.com/nexus-book/2.11/reference/install.html
- 官网帮助说明 2:http://books.sonatype.com/sonatype-clm-book/html/clm-book/installation-configuration.html
2.Nexus安装条件:JDK要求7u6以后,并且兼容JDK1.8,Nexus官方建议使用较新的
开始安装:
3.先从官网下载安装包http://maven.apache.org/download.cgi,然后通过Xshell或FTP将安装包传输到Linux服务器;
4.拷贝到/usr/program目录下进行解压:
[root@centos7.4 program]# tar zxvf nexus-2.14.5-02-bundle.tar.gz5.解压后会生成一个nexus-2.14.5-02/和sonatype-work/两个目录,我们先修改目录名称为nexus-2.14.5/,然后切换到解压后的nexus-2.14.5/目录下:
[root@centos7.4 program]# mv nexus-2.14.5-02/ nexus-2.14.5/
[root@centos7.4 program]# cd nexus-2.14.5/
[root@centos7.4 nexus-2.14.5]#
6.配置环境变量
[root@centos7.4 nexus-2.14.5]# vi /etc/profile

在该配置文件的最下方添加如下配置:
#set NEXUS_HOME
export NEXUS_HOME=/usr/program/nexus-2.14.5
export RUN_AS_USER=root #以root用户运行,不配置这个,启动nexus时会出现警告
7.执行配置文件修改
[root@centos7.4 nexus-2.14.5]# source /etc/profile8.注意解压产生的sonatype-work/目录,以后是做仓库用的,会存储很多 jar,所以这个目录一定要放在磁盘空间大的区内,目前我们还没第一次启动 Nexus,所以这里还是空文件;我们把这个目录移动到opt/目录下:
[root@centos7.4 nexus-2.14.5]# mv /usr/program/sonatype-work/ /opt/9. 设置配置文件nexus.properties
[root@centos7.4 nexus-2.14.5]# vi /usr/program/nexus2.14.5/conf/nexus.properties


把文件中该值:nexus-work=${bundleBasedir}/../sonatype-work/nexus
       改为:nexus-work=/opt/sonatype-work/nexus
10. 默认情况下如果你的 JDK 等系统变量设置好的是无需编辑 Nexus 的配置文件,但还是告诉给大家一下配置文件路径:
[root@centos7.4 nexus-2.14.5]# vi /usr/program/nexus2.14.5/bin/jsw/conf/wrapper.conf11.开放防火墙端口(nexus默认是8081端口)
[root@centos7.4 nexus-2.14.5]# firewall-cmd --permanent --add-port=8081/tcp


[root@centos7.4 nexus-2.14.5]# firewall-cmd --reload   #重新加载


[root@centos7.4 nexus-2.14.5]# firewall-cmd --list-all #查看当前防火墙所有信息
public
  target: default
  icmp-block-inversion: no
  interfaces:
  sources:
  services: ssh dhcpv6-client
  ports: 8081/tcp
  protocols:
  masquerade: no
  forward-ports:
  source-ports:
  icmp-blocks:
  rich rules:
12.到此Nexus的安装与配置就结束了,我们可以可以启动Nexus,并且在网页上访问了:
[root@centos7.4 nexus-2.14.5]# /usr/program/nexus-2.14.5/bin/nexus start #启动
****************************************
WARNING - NOT RECOMMENDED TO RUN AS ROOT
****************************************
Starting Nexus OSS...
Started Nexus OSS.
[root@centos7.4 nexus-2.14.5]# /usr/program/nexus-2.14.5/bin/nexus stop  #停止
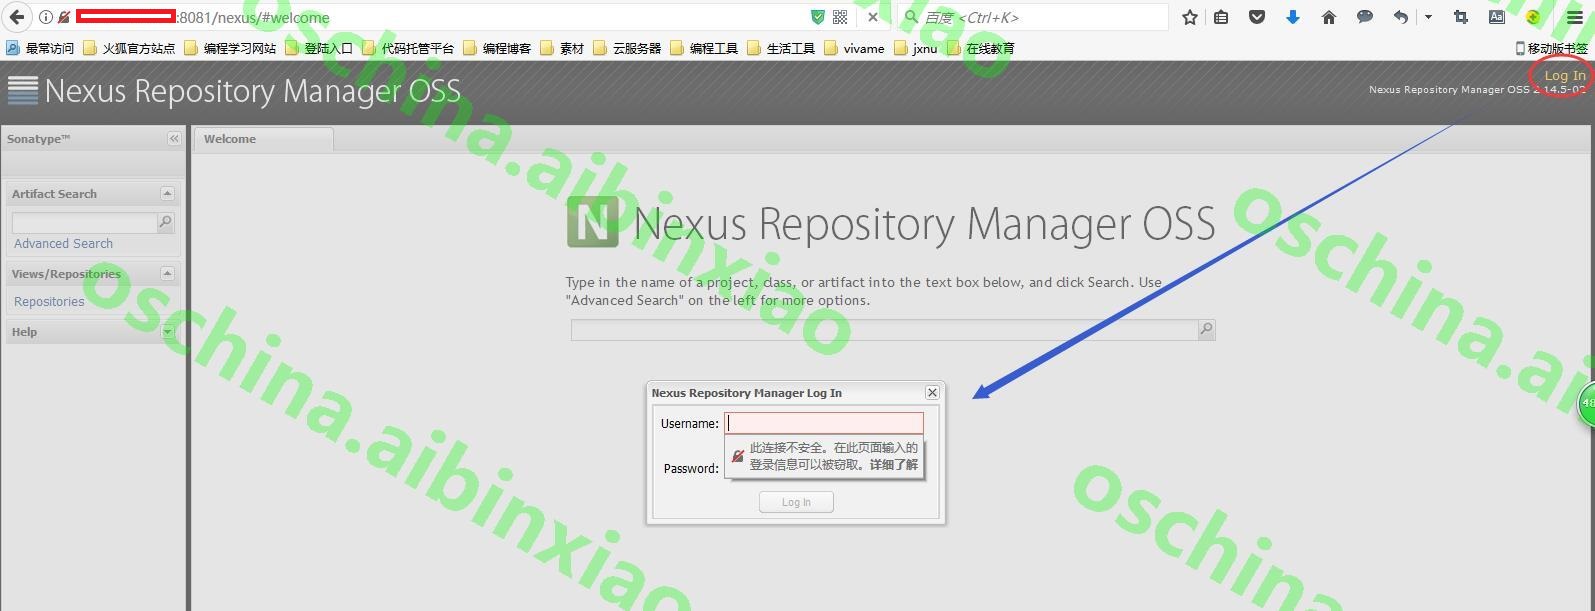
[root@centos7.4 nexus-2.14.5]# tail -200f /usr/program/nexus-2.14.5/logs/wrapper.log #查看启动日志启动成功之后,我们就可以在浏览器上访问了:http://主机IP:8081/nexus
默认用户名admin,密码admin123
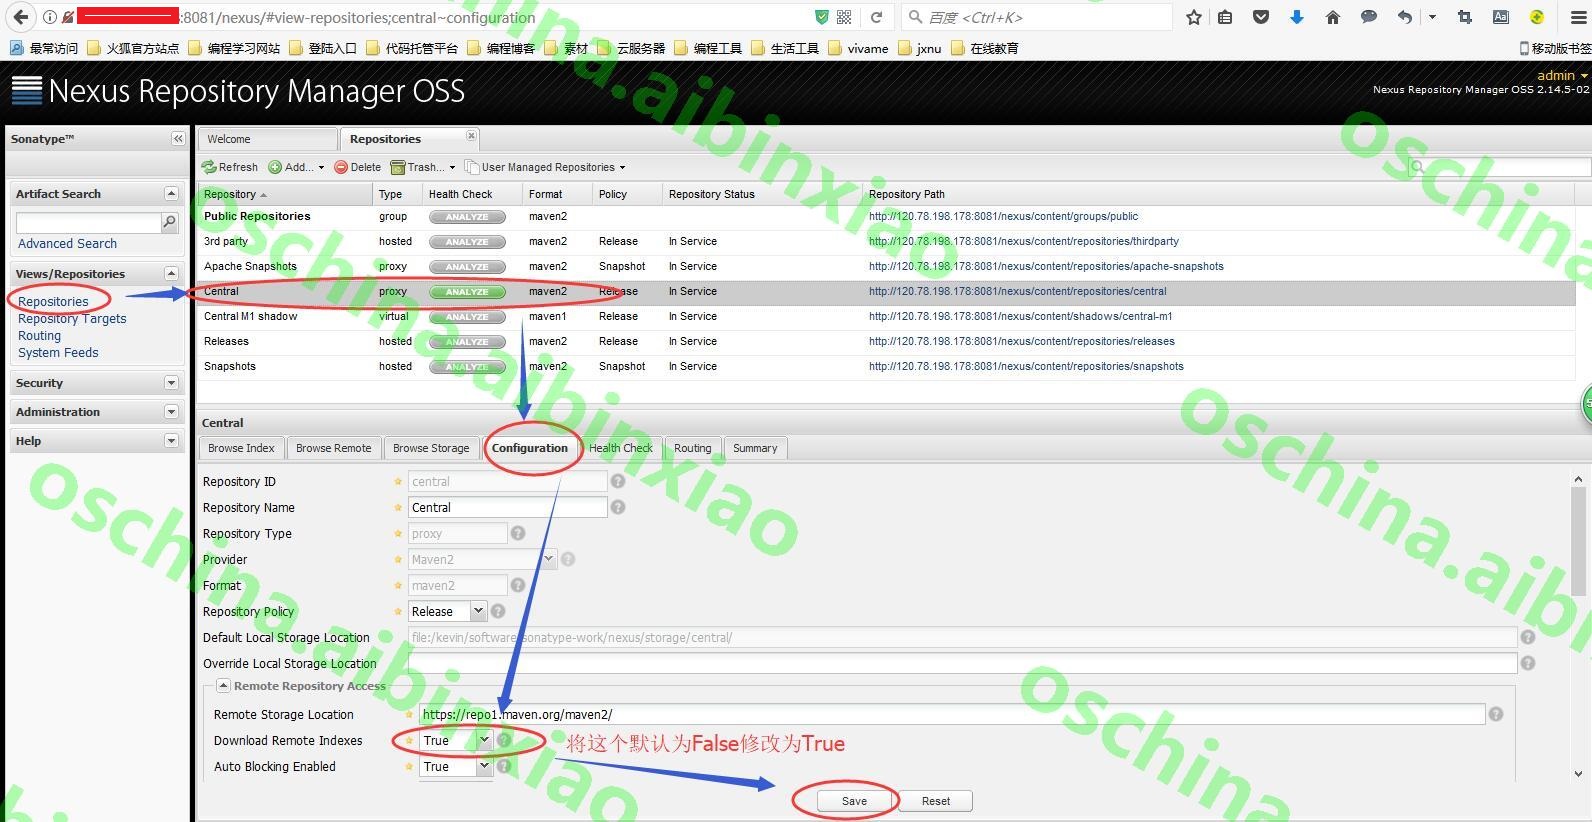
14. 下载远程中央库的索引到服务器,将 Download Remote Indexes 修改为True:
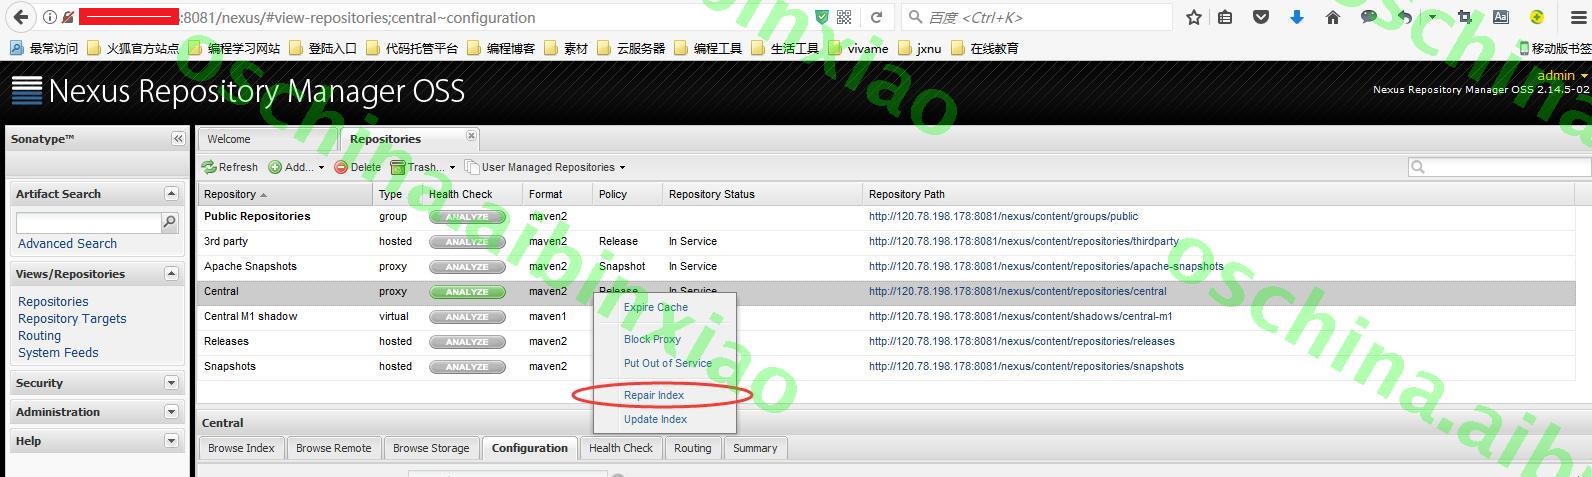
13.创建任务开始进行索引下载。需要特别提醒的是,如果你的私服是虚拟机,那得保证你分配的硬盘足够大,否则结果报:设备上没有空间;
四、项目上配置连接私服
1.对项目独立设置:打开项目pom.xml文件,添加如下内容:
<repositories>
  <repository>
      <id>Nexus</id>
      <name>主机IP-Nexus</name>
      <url>http://主机IP:8081/nexus/content/groups/public/</url>
  </repository>
</repositories>
2.全局配置,打开Maven的setting.xml文件,添加如下内容:
<mirrors>
  <mirror>
      <id>YouMeekNexus</id>
      <name>YouMeek Nexus</name>
      <mirrorOf>*</mirrorOf>
      <url>http://主机IP:8081/nexus/content/groups/public/</url>
  </mirror>
</mirrors>
持续集成自动构建后发布到Nexus上:
(1) 在 Maven 的 settings.xml 加上连接服务器信息:
<!--设置私库认证信息,用户名和密码我就用默认的,如果你们有权限控制的需求可以创建对应的一些账号-->
<servers>
    <server>
        <id>nexus-releases</id>
        <username>admin</username>
        <password>admin123</password>
    </server>
    <server>
        <id>nexus-snapshots</id>
        <username>admin</username>
        <password>admin123</password>
    </server>
</servers>
(2) 在项目的 pom.xml 文件加上:
<!-- nexus-releases nexus-snapshots 与 Maven 的配置文件 settings.xml 中 server 下的 id 对应 -->
<distributionManagement>
    <repository>
        <id>nexus-releases</id>
        <name>Nexus Releases Repository</name>
        <url>http://主机IP:8081/nexus/content/repositories/releases/</url>
    </repository>
    <snapshotRepository>
        <id>nexus-snapshots</id>
        <name>Nexus Snapshots Repository</name>
        <url>http://主机IP:8081/nexus/content/repositories/snapshots/</url>
    </snapshotRepository>
</distributionManagement>
Nexus手动更新索引文件:
(1) 关闭 Nexus:
[root@centos7.4 ~]# /usr/program/nexus2.14.5/bin/nexus stop(2)删除之前的索引文件:
[root@centos7.4 ~]# cd  /opt/sonatype-work/nexus/indexer/central-ctx
[root@centos7.4 central-ctx]# rm -rf *
(3) 下载更新索引,访问官网索引http://repo.maven.apache.org/maven2/.index/
(4) 下载文件:nexus-maven-repository-index.gz
[root@centos7.4 ~]# wget http://repo.maven.apache.org/maven2/.index/nexus-maven-repository-index.gz(5) 下载文件:nexus-maven-repository-index.properties
[root@centos7.4 ~]# wget http://repo.maven.apache.org/maven2/.index/nexus-maven-repository-index.properties(6) 下载索引解压工具:
[root@centos7.4 ~]# wget https://repo1.maven.org/maven2/org/apache/maven/indexer/indexer-cli/5.1.1/indexer-cli-5.1.1.jar(7) 执行解压命令(该命令执行需要4分钟左右):
[root@centos7.4 ~]# java -jar indexer-cli-5.1.0.jar -u nexus-maven-repository-index.gz -d ./(8) 删除解压前文件:
[root@centos7.4 ~]# rm -rf indexer-cli-5.1.0.jar nexus-maven-repository-index.gz nexus-maven-repository-index.properties(9) 重启服务:
[root@centos7.4 ~]# /usr/program/nexus2.14.5/bin/nexus start
本文为原创文章,如果对你有一点点的帮助,别忘了点赞哦!比心!如需转载,请注明出处,谢谢!


 475
475

 被折叠的 条评论
为什么被折叠?
被折叠的 条评论
为什么被折叠?
 到【灌水乐园】发言


