


一、UIView动画的实现
UIView使用Context来实现动画
关键代码:
//
//参数1 动画名称 参数2 要实现动画的对象上下文
[UIView beginAnimations:@"attribute" context:_showImageView];

//设置动画的时间
[UIView setAnimationDuration:1.0f];

//设置动画延迟时间
// [UIView setAnimationDelay:2];

//设置视图center 实现试图移动动画
_showImageView.center = CGPointMake(100, 100);

//设置alpha值:视图透明度
_showImageView.alpha = 0.2f;

//设置背景颜色
_showImageView.backgroundColor = [UIColor greenColor];

//UIView动画 设置代理
[UIView setAnimationDelegate:self];

//动画将要开始代理方法
[UIView setAnimationWillStartSelector:@selector(animationWillStart:context:)];

//动画已经结束代理方法
[UIView setAnimationDidStopSelector:@selector(animationDidStop:finished:context:)];

//提交动画设置,执行动画
[UIView commitAnimations];
使用Block实现的动画:
//
//UIView动画,使用Block实现
[UIView animateWithDuration:1.0f animations:^{
   //通过设置translation 实现视图的偏移
   if ([self.mySwitch isOn]) {
       //基于上一次的translation
       _showImageView.transform = CGAffineTransformTranslate(_showImageView.transform, 50, 0);
   } else {
       //基于原始的translation
       _showImageView.transform = CGAffineTransformMakeTranslation(-50, 0);
   }
}];
二、一个例子使用animation(包括上下左右移动,旋转,放大缩小)
a、首先用storybroad布局好一个页面,并给各个按钮设置tag
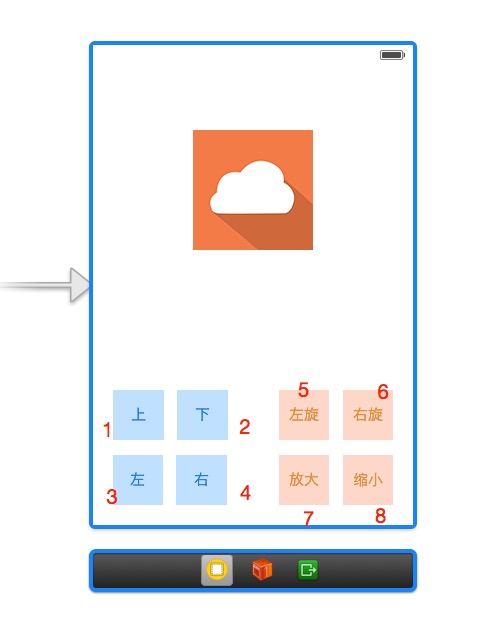
(1)图中的图片是一个按钮,点击后可重置位置
(2)蓝色按钮可改变图片的frame
(3)橘色按钮可改变图片的transform
绑定对象和事件后是这样:
(1)蓝色的四个按钮都绑定了move方法
(2)橘色的四个按钮都绑定了transform方法
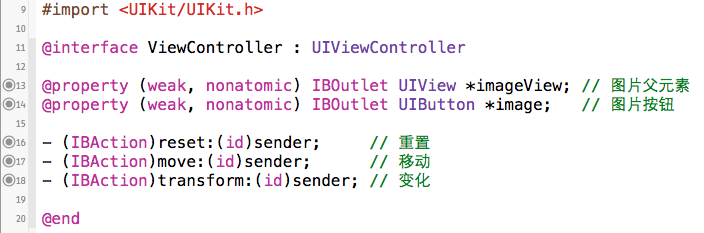
(3)暂时不用管上面的imageView变量,后面会有用处的
先来解决move方法吧:
#pragma mark 移动
- (IBAction)move:(id)sender {
    [UIView animateWithDuration:1.0f animations:^{
        CGRect frame = _image.frame;
        frame.origin.y -= 50;
        _image.frame = frame;
    }];
}
好了,成功移动图片了,这时我们可以用switch来实现上下左右移动
注意,id类型的sender是不能用点语法,即sender.tag是会报错的,应该使用[sender tag]
#pragma mark 移动
- (IBAction)move:(id)sender {
    [UIView animateWithDuration:1.0f animations:^{
        CGRect frame = _image.frame;
        switch ([sender tag]) {
            case 1:    // 上
                frame.origin.y -= 50;
                break;
            case 2:    // 下
                frame.origin.y += 50;
                break;
            case 3:    // 左
                frame.origin.x -= 50;
                break;
            case 4:    // 右
                frame.origin.x += 50;
                break;
            default:
                break;
        }
        _image.frame = frame;
    }];
}
接下来是transform方法,类似move方法:
#pragma mark 变化
- (IBAction)transform:(id)sender {
//    // 不会在原有基础上继续变化,M_PI_4表示math中的π/4,M_4_PI则表示math的4π
//    _image.transform = CGAffineTransformMakeRotation(-M_PI_4);

    [UIView animateWithDuration:1.0f animations:^{
        switch ([sender tag]) {
            case 5:    // 左转
                _image.transform = CGAffineTransformRotate(_image.transform, -M_PI_4);
                break;
            case 6:    // 右转
                _image.transform = CGAffineTransformRotate(_image.transform, M_PI_4);
                break;
            case 7:    // 放大
                _image.transform = CGAffineTransformScale(_image.transform, 2.0, 2.0);
                break;
            case 8:    // 缩小
                _image.transform = CGAffineTransformScale(_image.transform, 0.5, 0.5);
            default:
                break;
        }
    } completion:^(BOOL finished) {
        NSLog(@"动画完成");
    }];
}
然后问题就来了,你会发现旋转时图片不是按照center中心来旋转,它按照左上角旋转了!
三种办法解决:
(1)去掉autolayout
(2)如果一定要autolayout,则取消image的autolayout
_image.translatesAutoresizingMaskIntoConstraints = YES;
(3)给image设置一个父view,并使用autolayout居中于它,这就是之前的.h文件中imageView的作用了,我把它设置成蓝色,旋转后便可看到

move方法则最好把之前的_image移动改成_imageView移动
#pragma mark 移动
- (IBAction)move:(id)sender {
    [UIView animateWithDuration:1.0f animations:^{
        CGRect frame = _imageView.frame;
        switch ([sender tag]) {
            case 1:    // 上
                frame.origin.y -= 50;
                break;
            case 2:    // 下
                frame.origin.y += 50;
                break;
            case 3:    // 左
                frame.origin.x -= 50;
                break;
            case 4:    // 右
                frame.origin.x += 50;
                break;
            default:
                break;
        }
        _imageView.frame = frame;
    }];
}
最后是reset方法:
#import "ViewController.h"

@interface ViewController ()
@property (nonatomic) CGRect frame;
@end

@implementation ViewController

#pragma mark view load
- (void)viewDidLoad {
    _frame = _imageView.frame;
}

#pragma mark 重置
- (IBAction)reset:(id)sender {
    [UIView animateWithDuration:1.0f animations:^{
        _image.transform = CGAffineTransformIdentity;
        _imageView.frame = _frame;
    }];
}


 581
581


 被折叠的 条评论
为什么被折叠?
被折叠的 条评论
为什么被折叠?
 到【灌水乐园】发言


