


NFS服务搭建与配置
一、NFS介绍
1.1 NFS简介
- NFS,Network File System。网络文件系统,即通过网络,对在不同主机上的文件进行共享。
- NFS最早由Sun公司开发,分2,3,4三个版本,2和3由Sun起草开发,4.0开始Netapp公司参与并主导开发,最新为4.1版本,更新比较慢其实4.1是从2010年就开始使用了。
- NFS数据传输基于RPC协议,RPC为Remote Procedure Call的简写。
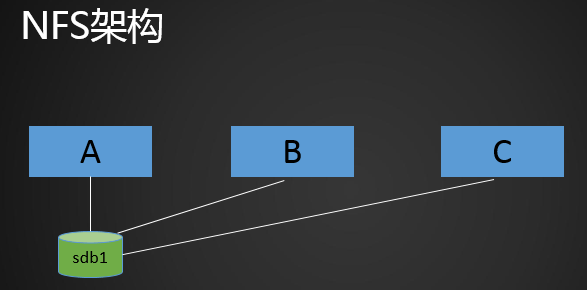
NFS应用场景是:A,B,C三台机器上需要保证被访问到的文件是一样的,A共享数据出来,B和C分别去挂载A共享的数据目录,从而B和C访问到的数据和A上的一致;
1.2 NFS应用场合
在生产环境,我们很少使用单机部署应用,因为单机存在单点故障,一旦宕机,将无法为前端业务提供服务,这是客户无法容忍的。 现在提倡的高可用及7*24服务,是我们追求的目标。 对于一些小的应用,双机成为了主流。
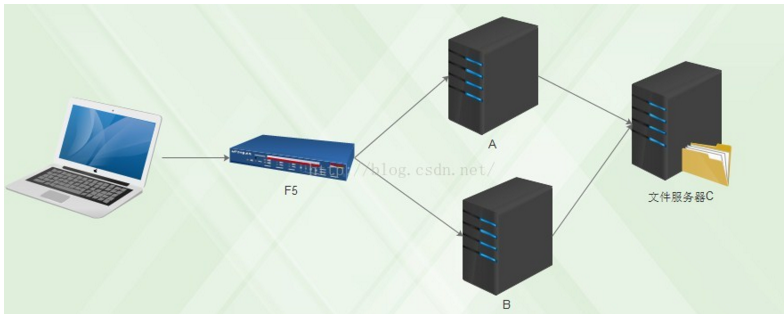
我们来看一种简单集群场景, 应用分别部署在A及B上, 前端通过F5或着web服务器访问应用。NFS提供了一种机制,可以让A、B访问C中的一个共享目录,就像是操作本地文件一样。 如下图:
1.3 NFS原理:
-
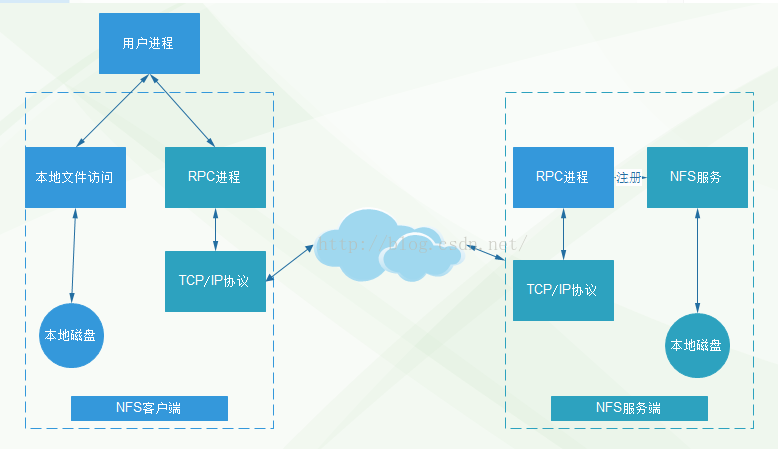
首先:NFS包括两部分,服务端及客户端
-
由于NFS服务功能很多,会有很多端口,这些端口还有可能不固定,那么客户端就无法与服务器进行通信,因为程序间通信必须通过端口(tcp/udp都是端到端通信),那么就需要一个中间的桥接机制,RPC进程即充当这样一个角色,RPC的端口是一定的(111),当NFS启动时,会向RPC进行注册, 那么客户端PRC就能与服务器RPC进行通信, 从而进行文件的传输。
-
当客户端用户打开一个文件或目录时,内核会判断,该文件是本地文件还是远程共享目录文件,如果是远程文件则通过RPC进程访问远程NFS服务端的共享目录,如果是本地文件,则直接打开。
-
为了更好的并发,RPC进程及NFS进程都有多个。
二、安装配置NFS
用两台机器做实验,一台作为服务端(ying01 192.168.112.136),一台作为客户端(ying02 192.168.112.138);
在ying01上安装:nfs-utils包
[root@ying01 ~]# yum install -y nfs-utils
已加载插件:fastestmirror
同时也在ying02上安装:nfs-utils包;
[root@ying02 ~]# yum install -y nfs-utils
已加载插件:fastestmirror
在ying01上,新建配置文件;写入以下语句
[root@ying01 ~]# vim /etc/exports

/home/nfstestdir 192.168.112.0/24(rw,sync,all_squash,anonuid=1000,anongid=1000)
语句释义:
- /home/nfstestdir :共享的目录
- rw: 读写
- ro: 只读
- sync: 同步模式,内存数据实时写入磁盘
- async :非同步模式
- no_root_squash: 客户端挂载NFS共享目录后,root用户不受约束,权限很大
- root_squash: 与上面选项相对,客户端上的root用户收到约束,被限定成某个普通用户
- all_squash:客户端上所有用户在使用NFS共享目录时都被限定为一个普通用户
- anonuid/anongid: 和上面几个选项搭配使用,定义被限定用户的uid和gid
- 192.168.112.0/24:为客户端的网段;
创建nfstestdir目录,并给予777权限;
[root@ying01 ~]# mkdir /home/nfstestdir
[root@ying01 ~]# ls /home/
mysql  nfstestdir  user1   user11  user13  user15  user18  user4  user8
nba    php-fpm     user10  user12  user14  user17  user3   user7  ying111
[root@ying01 ~]# chmod 777 /home/nfstestdir/
开启nfs服务,并监听端口,端口111为其默认端口;
[root@ying01 ~]# systemctl start nfs

[root@ying01 ~]# netstat -lnpt
Active Internet connections (only servers)
Proto Recv-Q Send-Q Local Address           Foreign Address         State       PID/Program name
tcp        0      0 0.0.0.0:60556           0.0.0.0:*               LISTEN      3152/rpc.statd
tcp        0      0 0.0.0.0:111             0.0.0.0:*               LISTEN      3160/rpcbind
tcp        0      0 0.0.0.0:20048           0.0.0.0:*               LISTEN      3172/rpc.mountd
tcp        0      0 0.0.0.0:80              0.0.0.0:*               LISTEN      975/nginx: master p
tcp        0      0 0.0.0.0:22              0.0.0.0:*               LISTEN      671/sshd
tcp        0      0 127.0.0.1:25            0.0.0.0:*               LISTEN      798/master
tcp        0      0 0.0.0.0:443             0.0.0.0:*               LISTEN      975/nginx: master p
tcp        0      0 0.0.0.0:33280           0.0.0.0:*               LISTEN      -
tcp        0      0 0.0.0.0:2049            0.0.0.0:*               LISTEN      -
tcp6       0      0 :::59663                :::*                    LISTEN      3152/rpc.statd
tcp6       0      0 :::111                  :::*                    LISTEN      3160/rpcbind
tcp6       0      0 :::20048                :::*                    LISTEN      3172/rpc.mountd
tcp6       0      0 :::22                   :::*                    LISTEN      671/sshd
tcp6       0      0 ::1:25                  :::*                    LISTEN      798/master
tcp6       0      0 :::2049                 :::*                    LISTEN      -
tcp6       0      0 :::43138                :::*                    LISTEN      -
tcp6       0      0 :::3306                 :::*                    LISTEN      1179/mysqld
设置开机启动:systemctl enable nfs
[root@ying01 ~]# systemctl enable nfs
Created symlink from /etc/systemd/system/multi-user.target.wants/nfs-server.service to /usr/lib/systemd/system/nfs-server.service.
在客户端ying02上设置:
查看服务端共享目录:showmount -e 192.168.112.136
[root@ying02 ~]# showmount -e 192.168.112.136
Export list for 192.168.112.136:
/home/nfstestdir 192.168.112.0/24    //192.168.241.0/24网段
注意:假如没有出现共享目录,有下面可能,注意排查:
- 1、两者通信问题;
- 2、把两者的防火墙关闭
挂载NFS
[root@ying02 ~]# mount -t nfs 192.168.112.136:/home/nfstestdir /mnt/
[root@ying02 ~]# df -h
文件系统                          容量  已用  可用 已用% 挂载点
/dev/sda3                          27G 1004M   26G    4% /
devtmpfs                          907M     0  907M    0% /dev
tmpfs                             916M     0  916M    0% /dev/shm
tmpfs                             916M  8.7M  908M    1% /run
tmpfs                             916M     0  916M    0% /sys/fs/cgroup
/dev/sda1                         197M  113M   84M   58% /boot
tmpfs                             184M     0  184M    0% /run/user/0
192.168.112.136:/home/nfstestdir   27G  7.0G   20G   27% /mnt
在增加的/mnt分区,就是NFS共享的目录,在该目录下创建测试文件:
[root@ying02 ~]# cd /mnt/
[root@ying02 mnt]# ls
[root@ying02 mnt]# touch ying.111
[root@ying02 mnt]# ls
ying.111
[root@ying02 mnt]# ls -l
总用量 0
-rw-r--r--. 1 1000 1000 0 7月  13 15:14 ying.111         //注意gud为1000
在服务端ying01机器上,查看其详细信息
[root@ying01 ~]# ls -l /home/nfstestdir/
总用量 0
-rw-r--r-- 1 user1 user1 0 7月  13 15:14 ying.111
[root@ying01 ~]# id user1
uid=1000(user1) gid=1020(grp3) 组=1020(grp3),1007(user6)    //uid也为1000
**测试结果:**可以看到创建的新文件ying.111,uid为1000.
三、exportfs命令
看下图:假如A的NFS服务停掉了,但是B和C还在挂载着A分享的分区,这就无法正常工作了,由于B和C上面的进程是d状态(不可中断进程,在ps一节中学习到的),一旦A停止了,B和C一定会出问题,无法服务,既不可以重启,也不可以关闭,就会把系统整挂掉。所以NFS一定不可以随便重启。 如果必须重启怎么办?先把B和C上面的目录卸载下来。
那么就开始卸载 B和C的目录,一个一个卸载下来;
出现这种情况,不利于生产以及智能化。因此需要利用exportps命令。
exportps命令常用选项:
| 选项 | 释义 |
|---|---|
| -a | 全部挂载或者全部卸载 |
| -r | 重新挂载 |
| -u | 卸载某一个目录 |
| -v | 显示共享目录 |
在服务端ying01上:
[root@ying01 ~]# exportfs -arv
exporting 192.168.112.0/24:/home/nfstestdir
这样就可以让服务器直接生效,不需要再次重启nfs服务,也不会对客户端造成之前所说的错误!
编辑配置文件,增加一个共享的目录
[root@ying01 ~]# vim /etc/exports

/home/nfstestdir  192.168.112.0/24(rw,sync,all_squash,anonuid=1000,anongid=1000)
/tmp/ 192.168.112.138(rw,sync,no_root_squash)          //新增一个共享目录,及其权限
用命令:exportfs -arv 直接生效,不用重启NFS服务
[root@ying01 ~]# exportfs -arv
exporting 192.168.112.138:/tmp             //新增加的共享目录
exporting 192.168.112.0/24:/home/nfstestdir
使用客户端测试;
查看服务端共享目录:showmount -e 192.168.112.136
[root@ying02 ~]# showmount -e 192.168.112.136
Export list for 192.168.112.136:
/home/nfstestdir 192.168.112.0/24
/tmp             192.168.112.138
[root@ying02 ~]# mount -t nfs 192.168.112.136:/tmp  /mnt/
[root@ying02 ~]# df -h
文件系统              容量  已用  可用 已用% 挂载点
/dev/sda3              27G 1004M   26G    4% /
devtmpfs              907M     0  907M    0% /dev
tmpfs                 916M     0  916M    0% /dev/shm
tmpfs                 916M  8.6M  908M    1% /run
tmpfs                 916M     0  916M    0% /sys/fs/cgroup
/dev/sda1             197M  113M   84M   58% /boot
tmpfs                 184M     0  184M    0% /run/user/0
192.168.112.136:/tmp   27G  7.0G   20G   27% /mnt
在mnt下创建一个测试文本;
新检测试文本1212.txt,查看其gid和uid都为root;
[root@ying02 ~]# vi /mnt/1212.txt
[root@ying02 ~]# ls -l /mnt/
总用量 1988
-rw-r--r--. 1 root   root        33 7月  13 15:44 1212.txt
-rw-r--r--. 1 root   root     29744 7月  11 23:36 mysql2.sql
-rw-r--r--. 1 root   root   1311133 7月  11 23:32 mysql_all.sql
-rw-r--r--. 1 root   root    655770 7月  11 22:49 mysqlbak.sql
srwxrwxrwx. 1   1060   1060       0 7月  13 10:59 mysql.sock
drwxr-xr-x. 3 root   root        18 6月  25 13:57 pear
-rw-r--r--. 1 daemon daemon    1842 7月   2 11:35 php_errors.log-20180704
srw-rw-rw-. 1 root   root         0 7月  13 10:59 php-fcgi.sock
drwx------. 3 root   root        17 7月  13 10:58 systemd-private-88c2142b67f24ac1bcaeaf0f2fa0d228-chronyd.service-FDdtJL
drwx------. 3 root   root        17 7月  13 10:58 systemd-private-88c2142b67f24ac1bcaeaf0f2fa0d228-vgauthd.service-HwW5sv
drwx------. 3 root   root        17 7月  13 10:58 systemd-private-88c2142b67f24ac1bcaeaf0f2fa0d228-vmtoolsd.service-jYj9pf
-rw-r--r--. 1 root   root      4229 7月   9 13:09 test.com.log
-rw-r--r--. 1 root   root       174 7月   5 21:02 test.com.log-20180704
-rw-r--r--. 1 root   root      7223 7月  11 23:24 user.sql
srw-rw-rw-. 1 root   root         0 7月  13 10:59 ying.sock
在服务端ying01下
查看/tmp目录下的1212.txt测试文本,其uid和gid都为root
[root@ying01 ~]# ls -l /tmp/
总用量 1988
-rw-r--r-- 1 root   root        33 7月  13 15:44 1212.txt
-rw-r--r-- 1 root   root     29744 7月  11 23:36 mysql2.sql
-rw-r--r-- 1 root   root   1311133 7月  11 23:32 mysql_all.sql
-rw-r--r-- 1 root   root    655770 7月  11 22:49 mysqlbak.sql
srwxrwxrwx 1 mysql  mysql        0 7月  13 10:59 mysql.sock
drwxr-xr-x 3 root   root        18 6月  25 13:57 pear
-rw-r--r-- 1 daemon daemon    1842 7月   2 11:35 php_errors.log-20180704
srw-rw-rw- 1 root   root         0 7月  13 10:59 php-fcgi.sock
drwx------ 3 root   root        17 7月  13 10:58 systemd-private-88c2142b67f24ac1bcaeaf0f2fa0d228-chronyd.service-FDdtJL
drwx------ 3 root   root        17 7月  13 10:58 systemd-private-88c2142b67f24ac1bcaeaf0f2fa0d228-vgauthd.service-HwW5sv
drwx------ 3 root   root        17 7月  13 10:58 systemd-private-88c2142b67f24ac1bcaeaf0f2fa0d228-vmtoolsd.service-jYj9pf
-rw-r--r-- 1 root   root      4229 7月   9 13:09 test.com.log
-rw-r--r-- 1 root   root       174 7月   5 21:02 test.com.log-20180704
-rw-r--r-- 1 root   root      7223 7月  11 23:24 user.sql
srw-rw-rw- 1 root   root         0 7月  13 10:59 ying.sock
四、NFS客户端问题
注意:NFS 4版本会有该问题
我们在分享一个目录且权限设置为no_root_squash,客户端看到的文件属主、组不是root,却是nobody。 这个不是设置错误,是软件本身自带的BUG。
解决方案:
- 方案1: 在客户端挂载的时候加上 -o nfsvers=3,其目的是制定nfs使用3版本。
[root@ying02 ~]# mount -t nfs -o,nfsvers=3 192.168.112.136:/tmp /mnt/
[root@ying02 ~]# df -h
文件系统              容量  已用  可用 已用% 挂载点
/dev/sda3              27G 1004M   26G    4% /
devtmpfs              907M     0  907M    0% /dev
tmpfs                 916M     0  916M    0% /dev/shm
tmpfs                 916M  8.6M  908M    1% /run
tmpfs                 916M     0  916M    0% /sys/fs/cgroup
/dev/sda1             197M  113M   84M   58% /boot
tmpfs                 184M     0  184M    0% /run/user/0
192.168.112.136:/tmp   27G  7.0G   20G   27% /mnt
- 方案2:在服务端和客户端配置:vim /etc/idmapd.conf
[root@ying02 ~]# vi /etc/idmapd.conf


#Domain = local.domain.edu                // 改为 Domain = xxx.com
然后再重启rpcidmapd服务;
FTP服务搭建与配置
一、FTP介绍
我们之前传输文件所用的是rzsz命令,可以简单明了的就把我们所需的文件下载或者上传。但是有个缺陷,不可以上传或者下载大体积的文件。FTP就可以解决这个问题! 超过4G, 跳板机,
FTP是File Transfer Protocol(文件传输协议,简称文传协议)的英文简称,用于在Internet上控制文件的双向传输。
FTP的主要作用就是让用户连接一个远程计算机(这些计算机上运行着FTP服务器程序),并查看远程计算机中的文件,然后把文件从远程计算机复制到本地计算机,或把本地计算机的文件传送到远程计算机。 小公司用的多,大企业不用FTP,因为不安全。大多数的企业使用git。
二、使用vsftpd搭建ftp服务
2.1 配件相关信息
centos上自带的FTP软件vsftpd,默认没有安装;需要用yum安装;
[root@ying01 ~]# yum install -y vsftpd
安装后,不用配置,可以直接使用,默认支持使用系统账号登录,但是因为安全原因,需要建立账号体系;
[root@ying01 ~]# useradd -s /sbin/nologin virftp        //创建虚拟用户
[root@ying01 ~]# vim /etc/vsftpd/vsftpd_login           //编写账号、密码文件

ying001               //账号
1223                  //密码
ying002               //账号
1225                  //密码
vsfptd 使用的密码不是明文,所以需要生产相对应的库文件;
[root@ying01 ~]# ls /etc/vsftpd/vsftpd_login
/etc/vsftpd/vsftpd_login
[root@ying01 ~]# ls /etc/vsftpd/
ftpusers  user_list  vsftpd.conf  vsftpd_conf_migrate.sh  vsftpd_login
[root@ying01 ~]# db_load -T -t hash -f /etc/vsftpd/vsftpd_login /etc/vsftpd/vsftpd_login.db  //成成库文件
[root@ying01 ~]# ls -l /etc/vsftpd/
总用量 36
-rw------- 1 root root   125 8月   3 2017 ftpusers
-rw------- 1 root root   361 8月   3 2017 user_list
-rw------- 1 root root  5030 8月   3 2017 vsftpd.conf
-rwxr--r-- 1 root root   338 8月   3 2017 vsftpd_conf_migrate.sh
-rw------- 1 root root    26 7月  15 08:09 vsftpd_login
-rw-r--r-- 1 root root 12288 7月  15 08:12 vsftpd_login.db        //此为生成的库文件密码
创建与虚拟账号相关的虚拟账号,以及配置文件
[root@ying01 ~]# mkdir /etc/vsftpd/vsftpd_user_conf
[root@ying01 ~]# cd /etc/vsftpd/vsftpd_user_conf
[root@ying01 vsftpd_user_conf]# vim ying001         //新建ying001账号的配置文件


local_root=/home/virftp/ying001   //虚拟用户的家目录
anonymous_enable=NO               //是否允许匿名用户
write_enable=YES                  //是否允许可写
local_umask=022                   //创建新目录和文件的权限
anon_upload_enable=NO             //是否允许匿名用户上传
anon_mkdir_write_enable=NO        //是否允许匿名用户可创建
idle_session_timeout=600          //连接后没有任何操作的超时时间,空闲时间段
data_connection_timeout=120       //数据传输超时时间
max_clients=10                    //最大允许连接的clients客户端
创建账号ying001的家目录,并在其下面创建新文件
[root@ying01 vsftpd_user_conf]# mkdir /home/virftp/ying001
[root@ying01 vsftpd_user_conf]# touch /home/virftp/ying001/test.txt
[root@ying01 vsftpd_user_conf]# chown -R virftp:virftp /home/virftp   //更改整个目录权限
配置认证文件及路径。按下面增加2行语句;注意每行语句后面不能有空格;
[root@ying01 vsftpd_user_conf]# vim /etc/pam.d/vsftpd


#%PAM-1.0
auth sufficient /lib64/security/pam_userdb.so db=/etc/vsftpd/vsftpd_login     //新增语句
account sufficient /lib64/security/pam_userdb.so db=/etc/vsftpd/vsftpd_login  //新增语句

session    optional     pam_keyinit.so    force revoke
auth       required     pam_listfile.so item=user sense=deny file=/etc/vsftpd/ftpusers onerr=succeed
auth       required     pam_shells.so
auth       include      password-auth
account    include      password-auth
session    required     pam_loginuid.so
session    include      password-auth
~
修改全局配置文件/etc/vsftpd/vsftpd.conf。注意每行语句后面不能有空格;
[root@ying01 vsftpd_user_conf]# vim /etc/vsftpd/vsftpd.conf


将anonymous_enable=YES 改为 anonymous_enable=NO
将#anon_upload_enable=YES 改为 anon_upload_enable=NO
将#anon_mkdir_write_enable=YES 改为 anon_mkdir_write_enable=NO


chroot_local_user=YES
guest_enable=YES
guest_username=virftp
virtual_use_local_privs=YES
user_config_dir=/etc/vsftpd/vsftpd_user_conf
allow_writeable_chroot=YES
启动服务并查看启动状态:
[root@ying01 vsftpd_user_conf]# systemctl start vsftpd
[root@ying01 vsftpd_user_conf]# ps aux |grep vsftp
root      6275  0.0  0.0  53256   572 ?        Ss   08:31   0:00 /usr/sbin/vsftpd /etc/vsftpd/vsftpd.conf  //启动成功
root      6279  0.0  0.0 112720   984 pts/1    S+   08:32   0:00 grep --color=auto vsftp
[root@ying01 vsftpd_user_conf]# netstat -lntp
Active Internet connections (only servers)
Proto Recv-Q Send-Q Local Address           Foreign Address         State       PID/Program name
tcp        0      0 0.0.0.0:60556           0.0.0.0:*               LISTEN      3152/rpc.statd
tcp        0      0 0.0.0.0:111             0.0.0.0:*               LISTEN      3160/rpcbind
tcp        0      0 0.0.0.0:20048           0.0.0.0:*               LISTEN      3172/rpc.mountd
tcp        0      0 0.0.0.0:80              0.0.0.0:*               LISTEN      975/nginx: master p
tcp        0      0 0.0.0.0:22              0.0.0.0:*               LISTEN      671/sshd
tcp        0      0 127.0.0.1:25            0.0.0.0:*               LISTEN      798/master
tcp        0      0 0.0.0.0:443             0.0.0.0:*               LISTEN      975/nginx: master p
tcp        0      0 0.0.0.0:33280           0.0.0.0:*               LISTEN      -
tcp        0      0 0.0.0.0:2049            0.0.0.0:*               LISTEN      -
tcp6       0      0 :::59663                :::*                    LISTEN      3152/rpc.statd
tcp6       0      0 :::111                  :::*                    LISTEN      3160/rpcbind
tcp6       0      0 :::20048                :::*                    LISTEN      3172/rpc.mountd
tcp6       0      0 :::21                   :::*                    LISTEN      6275/vsftpd
tcp6       0      0 :::22                   :::*                    LISTEN      671/sshd
tcp6       0      0 ::1:25                  :::*                    LISTEN      798/master
tcp6       0      0 :::2049                 :::*                    LISTEN      -
tcp6       0      0 :::43138                :::*                    LISTEN      -
tcp6       0      0 :::3306                 :::*                    LISTEN      1179/mysqld
[root@ying01 vsftpd_user_conf]#
注意: 21端口FTP; 22端口SSHD; 23端口TELNET
2.2 在客户端的FTP测试
服务器端安装lftp
[root@ying01 ~]# yum install -y lftp
查看服务端的文件:lftp ying001@127.0.0.1
[root@ying01 ~]# lftp ying001@127.0.0.1     //连接ying001用户
口令:                                       //刚才设置的密码,1223
lftp ying001@127.0.0.1:~> ls                //查看ying001目录下的文件
-rw-r--r--    1 1062     1062            0 Jul 15 00:23 test.txt
lftp ying001@127.0.0.1:/> ?                 //是用来查看操作的命令
    !<shell-command>                     (commands)                           alias [<name> [<value>]]             attach [PID]
    bookmark [SUBCMD]                    cache [SUBCMD]                       cat [-b] <files>                     cd <rdir>
    chmod [OPTS] mode file...            close [-a]                           [re]cls [opts] [path/][pattern]      debug [<level>|off] [-o <file>]
    du [options] <dirs>                  exit [<code>|bg]                     get [OPTS] <rfile> [-o <lfile>]      glob [OPTS] <cmd> <args>
    help [<cmd>]                         history -w file|-r file|-c|-l [cnt]  jobs [-v] [<job_no...>]              kill all|<job_no>
    lcd <ldir>                           lftp [OPTS] <site>                   ln [-s] <file1> <file2>              ls [<args>]
    mget [OPTS] <files>                  mirror [OPTS] [remote [local]]       mkdir [-p] <dirs>                    module name [args]
    more <files>                         mput [OPTS] <files>                  mrm <files>                          mv <file1> <file2>
    [re]nlist [<args>]                   open [OPTS] <site>                   pget [OPTS] <rfile> [-o <lfile>]     put [OPTS] <lfile> [-o <rfile>]
    pwd [-p]                             queue [OPTS] [<cmd>]                 quote <cmd>                          repeat [OPTS] [delay] [command]
    rm [-r] [-f] <files>                 rmdir [-f] <dirs>                    scache [<session_no>]                set [OPT] [<var> [<val>]]
    site <site-cmd>                      source <file>                        torrent [-O <dir>] <file|URL>...     user <user|URL> [<pass>]
    wait [<jobno>]                       zcat <files>                         zmore <files>
lftp ying001@127.0.0.1:/>
使用 get+文件名 来下载一个文件到根目录:/root/
lftp ying001@127.0.0.1:/> get test.txt   //获取test.txt文件,存放在root下
lftp ying001@127.0.0.1:/> quit
[root@ying01 ~]# ls
10   11       221.txt  3  555  8  anaconda-ks.cfg  ccc  grep         ib_logfile1  sed   shiyan  test.txt  xargs
100  12zhang  222      5  6    9  awk              ch   ib_logfile0  NBA          sed1  test    wenben    ysb
[root@ying01 ~]# ls -l test.txt
-rw-r--r-- 1 root root 0 7月  15 08:23 test.txt
三、xshell使用xftp传输文件
3.1 使用xshell直接传输
原理就是:使用sftp模式登录服务器
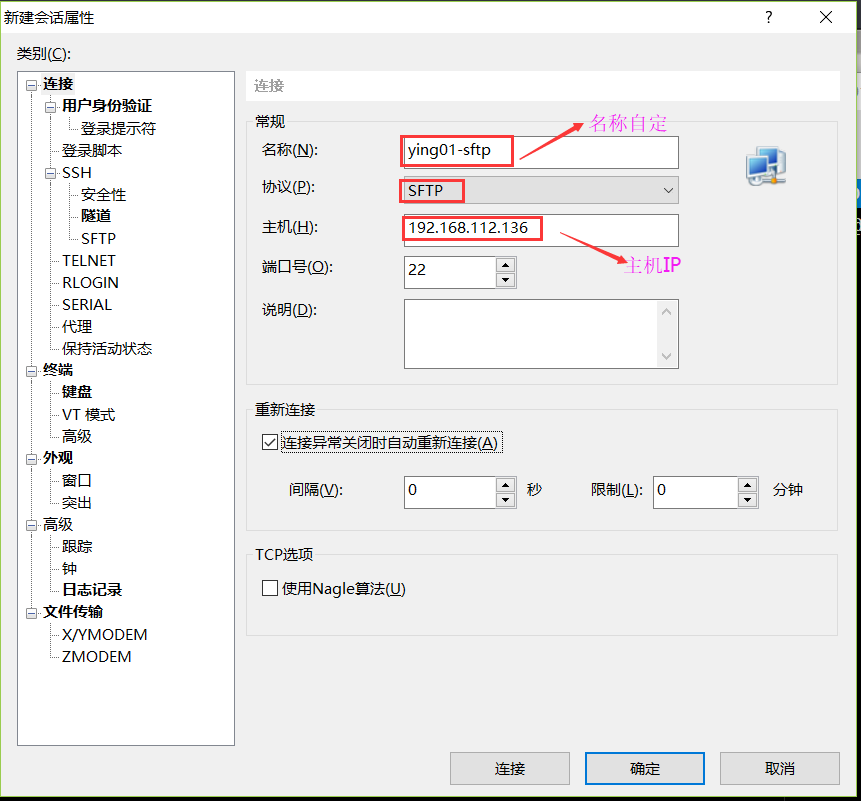
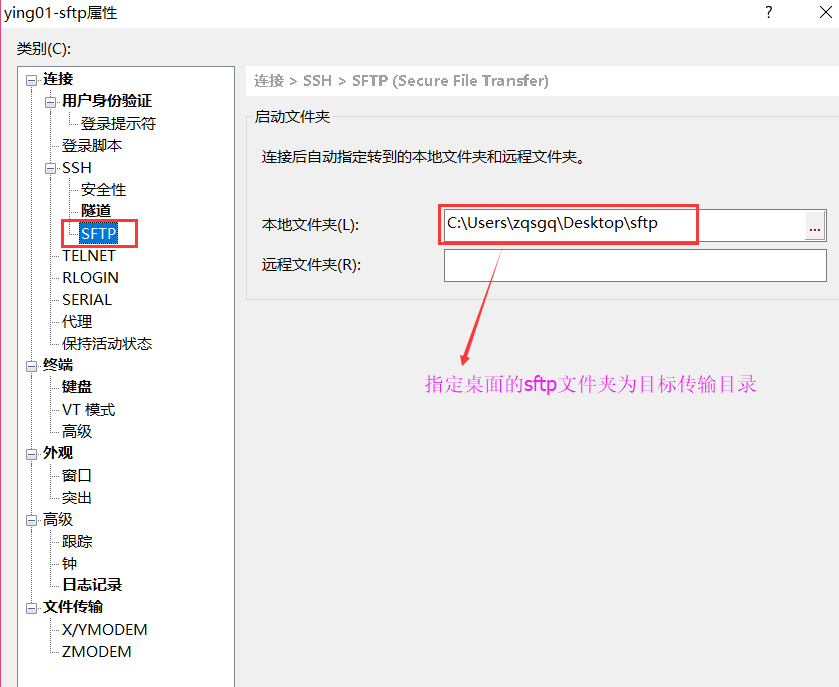
第一步:在xshell下,新建会话,按下图设置其属性;
第二步:按下图,设置其目标目录;
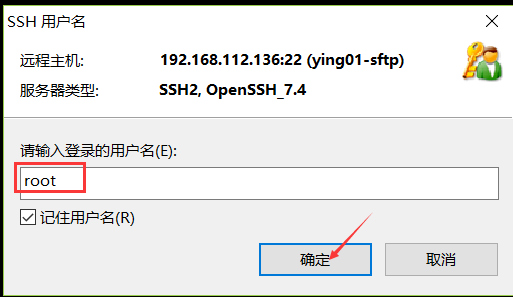
第三步:此时弹出页面,填写主机名,root
第四步:此时进入到/root下,可以到有大文件的目录xia;
sftp:/root> cd /usr/local/src/         //进入一个目录下
sftp:/usr/local/src> ls
drwxr-xr-x    9 root     root         4096 Jul  3 16:52 .
drwxr-xr-x   21 root     root          254 Jul  3 16:55 ..
-rw-r--r--    1 root     root      9076901 Mar 22 00:20 httpd-2.4.33.tar.gz
drwxr-sr-x   12 root     40           4096 Jun 25 12:38 httpd-2.4.33
-rw-r--r--    1 root     root     316320366 Mar 18  2017 mysql-5.6.36-linux-glibc2.5-x86_64.tar.gz
-rw-r--r--    1 root     root     541295045 May 16  2017 mariadb-10.2.6-linux-glibc_214-x86_64.tar.gz
-rw-r--r--    1 root     root      9076901 Mar 22 00:20 httpd-2.4.33.tar.gz.1
-rw-r--r--    1 root     root      1072661 Oct 23  2017 apr-1.6.3.tar.gz
-rw-r--r--    1 root     root       428595 Oct 23  2017 apr-util-1.6.1.tar.bz2
drwxr-xr-x   28 nba      user2        4096 Jun 24 22:33 apr-1.6.3
drwxr-xr-x   21 nba      user2        4096 Jun 25 11:33 apr-util-1.6.1
-rw-r--r--    1 root     root     15055569 Oct 25  2017 php-5.6.32.tar.bz2
drwxr-xr-x   17 user1    user1        4096 Jul  3 15:25 php-5.6.32
-rw-r--r--    1 root     root     15732452 Jun  7  2017 php-7.1.6.tar.bz2
drwxrwxr-x   19 user1    user1        4096 Jun 25 15:57 php-7.1.6
-rw-r--r--    1 root     root       239183 Jul  2 12:16 phpredis-develop.zip
drwxr-xr-x   11 root     root         4096 Jul  2 12:23 phpredis-develop
-rw-r--r--    1 root     root       769153 Mar 19  2014 nginx-1.4.7.tar.gz
drwxr-xr-x    9 nba      user2         186 Jul  3 16:54 nginx-1.4.7

sftp:/usr/local/src> get httpd-2.4.33.tar.gz   //获取此文件
Fetching /usr/local/src/httpd-2.4.33.tar.gz to httpd-2.4.33.tar.gz
sftp: received 8.65 MB in 0.50 seconds
sftp:/usr/local/src> get mariadb-10.2.6-linux-glibc_214-x86_64.tar.gz   //再获取一个文件
Fetching /usr/local/src/mariadb-10.2.6-linux-glibc_214-x86_64.tar.gz to mariadb-10.2.6-linux-glibc_214-x86_64.tar.gz
sftp: received 516 MB in 24.38 seconds
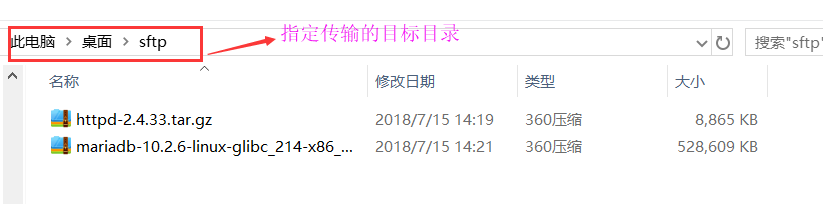
此时windows在桌面上,找到对应的目录,即可看到相应的文件;
3.2 xshell使用xftp软件传输文件
在xshell界面上按下“ctrl+alt+F”弹出以下对话框
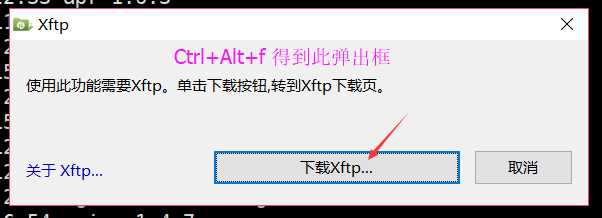
此时会弹出一个xftp 6 下载网页,许可证选择 学校和家庭,其余自己填写
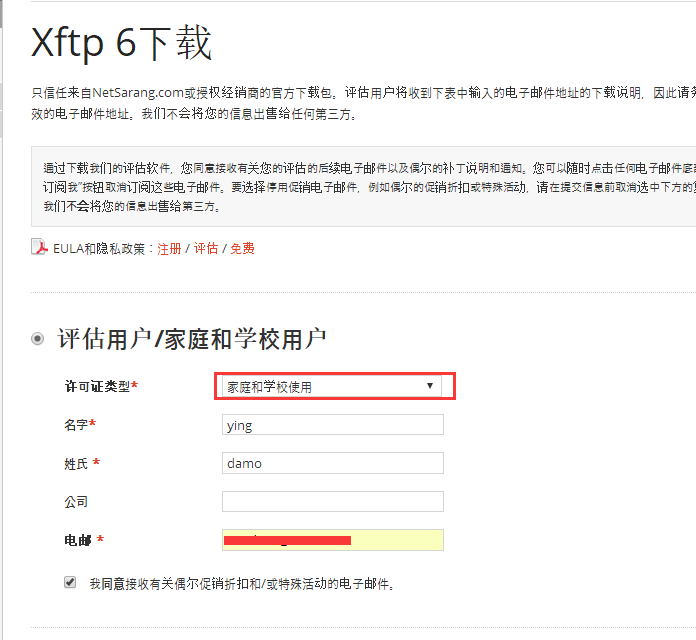
然后会弹出,此信息,下载链接已经发到你的邮箱;下载安装就可以了。

安装完成后,回到虚拟机上,按下“ctrl+alt+F”弹出软件界面
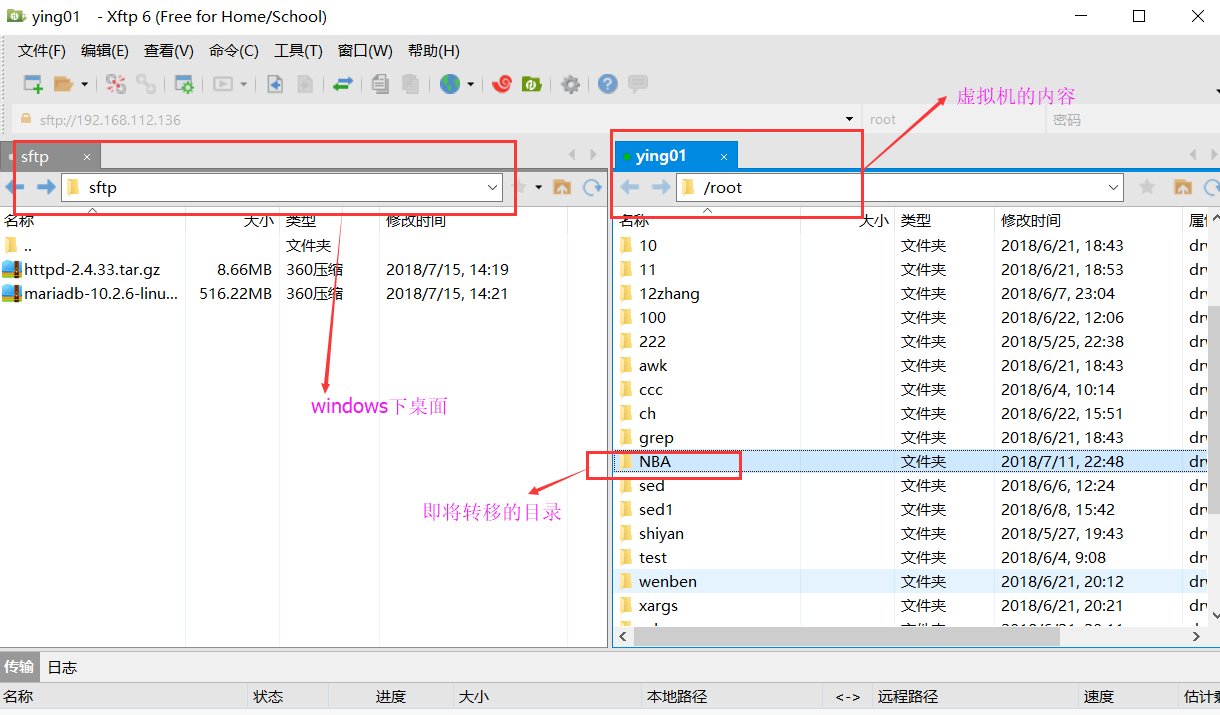
我们选择好要传输的目录;比如按下图,我传输NBA目录到,windows下
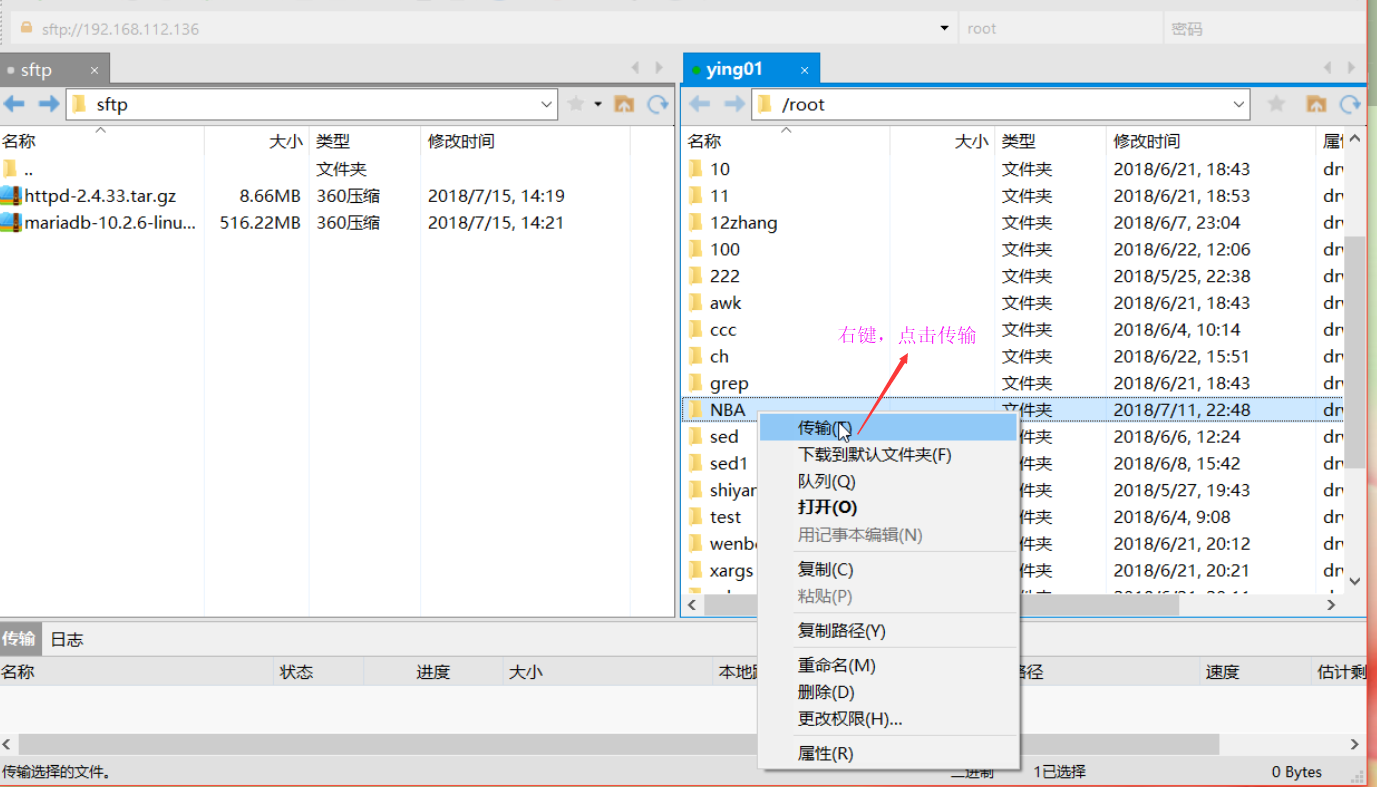
此时能够清晰的看到,windows目录下有刚才传的文件;

四、使用pure-ftpd搭建ftp服务
安装并配置pure-ftpd
[root@ying01 ~]# yum install -y pure-ftpd
配置文件 /etc/pure-ftpd/pure-ftpd.conf,
[root@ying01 ~]# vim /etc/pure-ftpd/pure-ftpd.conf
按下图,让其语句加载(即去掉前面的#)

因为vsftpd和pure-ftpd 共用21端口,因此需要把vsftpd服务关掉,再开启pure-ftpd
[root@ying01 ~]# systemctl stop vsftpd
[root@ying01 ~]# systemctl start pure-ftpd
[root@ying01 ~]# ps aux | grep pure-ftpd
root      2376  0.0  0.0 202520  1204 ?        Ss   14:44   0:00 pure-ftpd (SERVER)
root      2378  0.0  0.0 112720   984 pts/0    S+   14:44   0:00 grep --color=auto pure-ftpd
创建一个新的用户
[root@ying01 ~]# mkdir /data/ftp                                //创建数据目录
[root@ying01 ~]# touch /data/ftp/123.txt                        //创建一个文件
[root@ying01 ~]# useradd -u 1010 pure-ftp                       //设置UID
[root@ying01 ~]# chown -R pure-ftp:pure-ftp /data/ftp/
通过PW命令,配置相关信息;
[root@ying01 ~]# pure-pw useradd ftp_usera -u pure-ftp -d /data/ftp/    //建立相关信息
Password:
Enter it again:
[root@ying01 ~]# pure-pw mkdb                                 //建立虚拟用户数据
[root@ying01 ~]# lftp ftp_usera@127.0.0.1
口令:                                                         //输入之前新的虚拟用户的的密码
lftp ftp_usera@127.0.0.1:~> ls
drwxr-xr-x    2 1010       pure-ftp           21 Jul 15 14:51 .
drwxr-xr-x    2 1010       pure-ftp           21 Jul 15 14:51 ..
-rw-r--r--    1 1010       pure-ftp            0 Jul 15 14:51 123.txt
lftp ftp_usera@127.0.0.1:/>
lftp ftp_usera@127.0.0.1:/> quit


 346
346

 被折叠的 条评论
为什么被折叠?
被折叠的 条评论
为什么被折叠?
 到【灌水乐园】发言


