


Puppet测试环境搭建
一. Puppet介绍
Puppet是开源的自动化配置和部署工具,与cfengine相比,Puppet的语法更简单;对管理员屏蔽了底层的具体操作步骤,可以支持多种系统Linux,freebsd等等,并且Puppet的代码是可以分享和重用的,避免了重复劳动同时弥补了脚本无法重用的缺陷。
二. Puppet工作原理
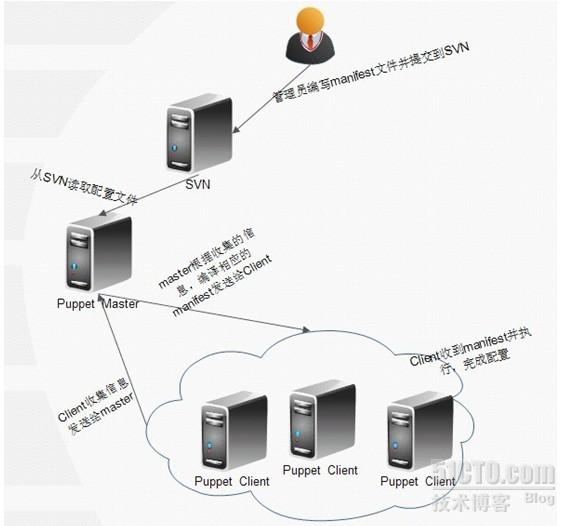
工作原理如下:
1. 客户端puppetd调用facter,facter探测出主机的变量信息并且将这些信息通过ssl连接发送到服务器端
2. 服务器端puppetmaster检测客户端的主机名,然后找到manifest中对应的node配置,进行解析生成伪代码,并将伪代码发送给客户端
3. 客户端接受到伪代码并执行,将执行结果返回给服务器
4. 服务器把客户端的执行结果写入日志
Puppet使用的端口:8140,443,61613 防火墙需要开放这几个端口
三. 测试环境搭建
测试环境列表:
| Client1.centos | 192.168.2.101 |
| Client2.centos | 192.168.2.102 |
| Client3.freebsd | 192.168.2.99 |
| Master.puppet | 192.168.2.98 |
Puppet需要和DNS结合,这里测试是写hosts文件
服务器端安装puppet-server,可以使用yum安装或者源码包编译安装
- [root@localhost ~]# yum install puppet-server
启动puppetmaster服务:
- [root@localhost puppet]# /usr/sbin/puppetmasterd start
- [root@localhost puppet]# netstat -antup
- Active Internet connections (servers and established)
- Proto Recv-Q Send-Q Local Address Foreign Address State PID/Program name
- tcp 0 0 0.0.0.0:57771 0.0.0.0:* LISTEN 1699/rpc.statd
- tcp 0 0 0.0.0.0:8140 0.0.0.0:* LISTEN 15415/ruby
重启puppetmaster服务和将puppetmaster设置为自动启动
- [root@localhost puppet]# service puppetmaster restart
- [root@master ~]# chkconfig --level 345 puppetmaster on
Centos客户端安装,使用EPEL源,直接yum安装puppet客户端
- [root@client1~]#rpm -ivh http://download.fedoraproject.org/pub/epel/6/i386/epel-release-6-5.noarch.rpm
- [root@localhost ~]# yum install puppet
FreeBSD客户端的安装
- [root@nagios ~]# whereis puppet
- puppet: /usr/ports/sysutils/puppet
- [root@nagios ~]# cd /usr/ports/sysutils/puppet
- [root@nagios /usr/ports/sysutils/puppet]# make install clean
- [root@nagios ~]# vim /etc/rc.conf
- puppet_enable="YES"
- [root@nagios ~]# cd /usr/local/etc/puppet/
- [root@nagios /usr/local/etc/puppet]# cp auth.conf-dist auth.conf
- [root@nagios /usr/local/etc/puppet]# cp puppet.conf-dist puppet.conf
- [root@nagios ~]# vi puppet.conf
- [root@nagios ~]# /usr/local/etc/rc.d/puppet start
客户端的设置
- [root@client1 ~]# vim /etc/sysconfig/puppet
- # The puppetmaster server
- PUPPET_SERVER=Master.puppet
- # If you wish to specify the port to connect to do so here
- PUPPET_PORT=8140
- # Where to log to. Specify syslog to send log messages to the system log.
- PUPPET_LOG=/var/log/puppet/puppet.log
- # You may specify other parameters to the puppet client here
- PUPPET_EXTRA_OPTS=--waitforcert=500
重启客户端服务并加入自动启动
- [root@master ~]# service puppet start
- [root@client1 ~]# chkconfig --level 345 puppet on
查看需要认证的客户端
- [root@master ~]# puppetca --list
- client1.centos (CD:3E:E5:F0:6A:0B:8B:52:B2:54:C7:AB:09:E7:E3:A1)
- client2.centos (F3:DF:25:77:7F:DF:37:5B:2B:18:EE:DC:7A:A6:F5:CA)
- client3.freebsd (C4:93:76:65:49:34:18:FC:C7:68:9B:FD:02:D3:5F:CF)
认证所有的客户端
- [root@master ~]# puppetca -s -a
认证某一台客户端
- [root@master ~]# puppetca --sign client1.centos
- notice: Signed certificate request for client1.centos
- notice: Removing file Puppet::SSL::CertificateRequest client1.centos at '/var/lib/puppet/ssl/ca/requests/client1.centos.pem'
客户端连接测试
- [root@client1 ~]# puppetd --test --server master.puppet
- info: Caching catalog for client1.centos
- info: Applying configuration version '1329891537'
- notice: Finished catalog run in 0.01 seconds
解决RDoc::usage问题
- [root@master ~]# puppetca --help
- No help available unless you have RDoc::usage installed
- [root@master ~]# yum install ruby-rdoc
- 安装ruby-rdoc后恢复
转载于:https://blog.51cto.com/waydee/847112


 105
105


 被折叠的 条评论
为什么被折叠?
被折叠的 条评论
为什么被折叠?
 到【灌水乐园】发言


